Page Twenty Two- All out war. - FlamesofRebirth
Completely Random Introductory Quote-
What though the field be lost?
All is not lost; the unconquerable will,
And study of revenge, immortal hate,
And Courage never to submit or yield.John Milton, Paradise Lost
Chapter 12[]
Start Your Engines[]
Eden[]
You may want to make some popcorn before starting this chapter, ‘cause you’re in for some serious cut-scene action (about 9 minutes worth). This racetrack scene is jam-packed with ridiculous over the top stunts that seem far-fetched even for a game with the word “fantasy” in the title. I guess this just bothers me because it reminds me of the way pretty much all movies insult your intelligence with insane stunts that couldn’t be pulled off without using as much CGI as this game does. At least Raines gives a decent speech, and you don’t want to skip the scene where he reunites with Rygdea. Anyway, the movies will end eventually, throwing you into a boss battle.

Battle- Anavatapta Warmech
This battle starts off with Lightning in Gestalt Mode. The Warmech is so weak, it doesn’t even deserve a boss box. Use Analog Stick Right + X repeatedly to stagger him until you run out of Gestalt charges, then use Zantesuken for an instant kill. 26,000 CP in 30 seconds- use it to finish getting those Full ATB Skills. After you have them, get all three primary roles up to level 4 (two of them should be there already).
"My dream is but a Fal'Cie's fancy. End it." - Cid Raines[]
Your battle team will be changed- make sure you at least check your paradigms if you don’t want to switch members. I’ll be sticking with the ladies as usual. Keep Ruthless as the default unless otherwise noted. If you got bored and skipped all those cut-scenes, you missed the portals bringing monsters from Pulse into Eden. I’m not talking about Flans and Alraunes, either- there’s some big game out there. You’ll also have to deal with Sanctum troops who have been ordered to terminate you on sight. If you haven’t upgraded weapons yet, you may want to do so at this save point. Use whatever organic components you have sitting around to build the multiplier on the Hauteclaire to 3x, then use 3 Particle Accelerators to max it out. Now give it a Uraninite, get the multiplier up again, and use two Ultracompact Reactors to make Lightning as strong as Fang. This will be very helpful in a few upcoming fights.

Battle- Varcolaci x 2
Battle- Varcoraci x 3
After this group, you should see a sphere to your left. Move ahead and make two left turns to get to it. The Lionheart gives Lightning the Quick Stagger ability, but it’s not that useful just yet. From here, turn around and go ahead to the circular platform.
Battle- Bulwarker
These things aren’t very tough at all. From this platform, take the first right and go to the edge, then turn right again to pick up 9,240 Gil. Go back to the site of the last battle and then forward to the destination marker to jump off a cliff. You’ll have to run a gauntlet of enemies to get through the next area.
Battle- Corps Defender x 5
No worries from these guys. I’m not putting up pics of the other three soldier types in this area, because they all pretty much look the same.
Battle- Corps Steward x 2, Sanctum Archangel
Neither type has any abilities worth mentioning.

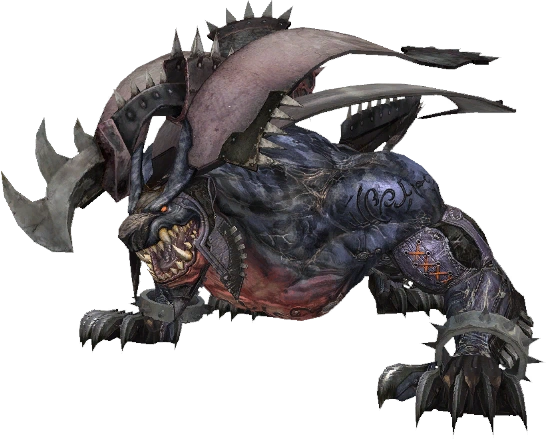
Battle- Adamantheron x 4
Just like their palette swap, they use War Cry to get Haste and Brave, but Vanille will Dispel them before they have a chance to take advantage of it.
Battle- Sanctum Seraph x 2, Bulwarker
After this group, set your default paradigm to Smart Bomb before riding the elevator down. You’ll be thrown straight into a tough battle.
Battle- Behemoth King
If you haven’t fought one of these straight up yet, you’re in for a treat. When he stands up he can do massive damage with Sunder, as well as using multi target spells like Thundaga. He also loses all debuffs and gains back all of his HP. Use Slow and Imperil manually at the beginning, you don’t want Deprotect or Deshell yet. This will hopefully let you stagger him without him changing. When you Stagger him, go to Ruthless to get Deprotect, then finish him with Aggression.
Eden Under Siege[]
Move down the highway, which has been completely overrun with Pulsian monsters.
Battle- Orobon x 2
You should remember these from Sulyya Springs. You’re a lot stronger now than you were then.
Battle- Orobon x 4
Battle- Orobon x 3, Behemoth King
This battle looks harder than it really is. Focus on the Orobons first, then use the same strategy as before on the King. Grab the Rebel Heart, a weapon for Snow, here.
Battle- Amphisbaena
You can’t jump over this rubble, you have to walk around.
Battle- Adamantheron x 2
Battle- Adamantheron x 3, Corps Defender x 2
Battle- Proto-behemoth
Use the standard Behemoth strategy of Smart Bomb followed by Aggression. You shouldn’t have to worry about this one standing before he staggers. On the right you will find an Otshirvani boomerang. You will now have a long stretch of road where you will face no resistance whatsoever. Is this one of those “a little too quiet” times? At the save point, burn your CP and get set up.
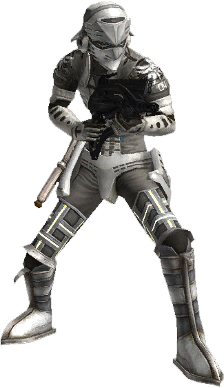
“I see your power has grown, Mr. Villiers” - Yaag Rosch[]
That seems more like a Bond villain line than a FF one, but whatever. Saboteurs are utterly worthless here, because this SoB is immune to everything. There are two ways to go about this battle, if you don’t use my way you’ll want to change out Vanille for Hope to get defensive buffs, Snow can swap in for Fang since she doesn’t have any Ravager abilities yet, but leave Lightning in so you don’t overload on the testosterone. Actually, it’s because she has access to Medic, and you’ll want two of them here. After the first stagger, the boss will get Auto-Haste and Brave (along with a HP recharge), and every time he comes out of stagger he will unleash a devastating barrage of attacks that you need Combat Clinic to survive. If you didn’t grind on Pulse, go with my strategy instead.
| Paradigm Deck- Sazh, Snow, Lightning | ||||||||
|---|---|---|---|---|---|---|---|---|
| Cerberus | Commando | Commando | Commando | |||||
| Tireless Charge | Commando | Commando | Medic | |||||
| Relentless Assault | Commando | Ravager | Ravager | |||||
| Hero's Charge | Synergist | Commando | Medic | |||||
| Strike Team | Synergist | Commando | Commando | |||||
| Decimation | Synergist | Commando | Ravager | |||||
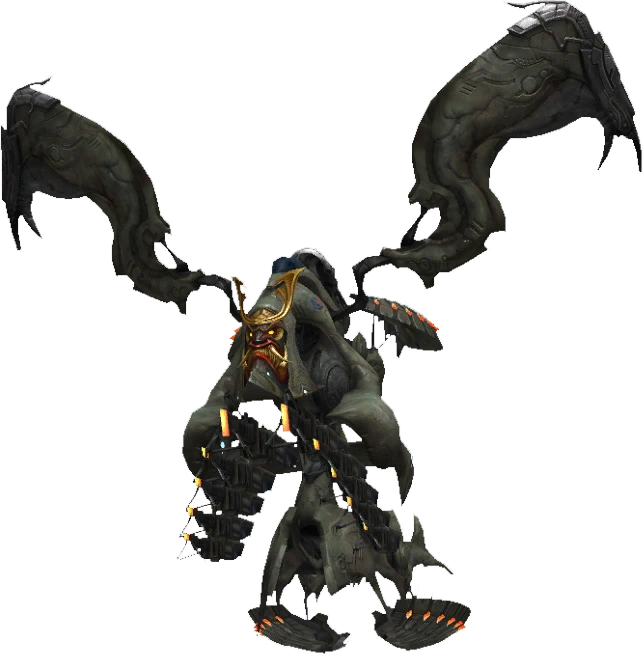
Boss Battle- The Proudclad, The[]
We’re on the same side here.
Snow
| The Proudclad,The | |||||||||||||||||||||||||||||||||||||||||||||||||||||||||||||||||||||
|---|---|---|---|---|---|---|---|---|---|---|---|---|---|---|---|---|---|---|---|---|---|---|---|---|---|---|---|---|---|---|---|---|---|---|---|---|---|---|---|---|---|---|---|---|---|---|---|---|---|---|---|---|---|---|---|---|---|---|---|---|---|---|---|---|---|---|---|---|---|
|
| ||||||||||||||||||||||||||||||||||||||||||||||||||||||||||||||||||||
|
| ||||||||||||||||||||||||||||||||||||||||||||||||||||||||||||||||||||
| |||||||||||||||||||||||||||||||||||||||||||||||||||||||||||||||||||||
“It’s time for some payback” - Fang[]
Go down the elevator and walk outside for a quick cut-scene. So much for “leave no man behind.” Of course we have to save him, we’re the good guys. Don’t forget to set your team up for random encounters again (Stagger-Lock sucks when you don‘t want it!)

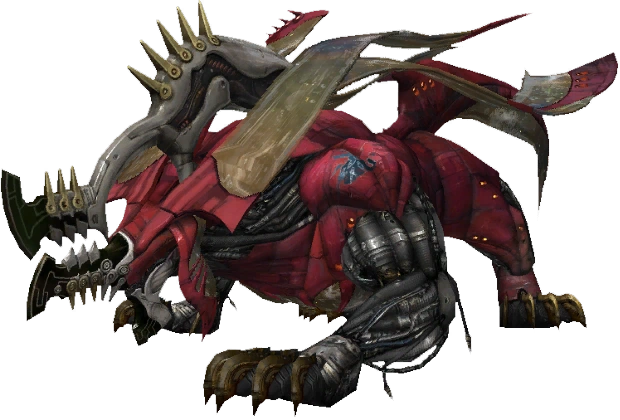
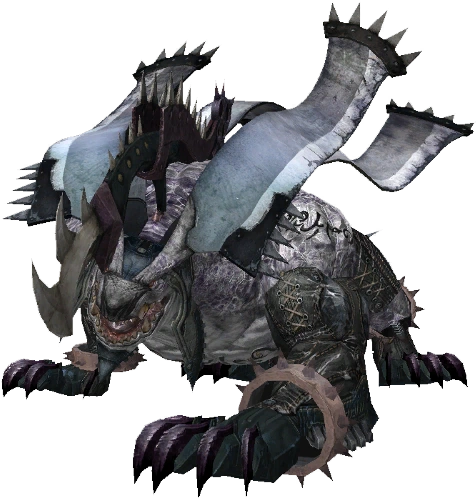
Battle- Adamanchelid
This one can be rough if you didn’t do any grinding back on Pulse. Start with Smart Bomb, you’ll need to go to Diversity very quickly. When you see Quake coming, summon to block it. Get as many debuffs on him as you can while Bahamut staggers him and does big damage. You should be able to finish him with Gestalt Mode, if not pray he only takes a few more hits. If you’re strong enough to fight him for real, also watch out for Bay. It does massive damage, causes Daze on everyone, and debuffs you. You want to stagger him before it gets to that point.
Along the path forward, pick up a Punisher spear. Looks like these Sanctum boys have their hands full, but don’t think they’ll be grateful when you jump in to help them out. Unless you get a preemptive strike, take down the humans first in the upcoming battles to reduce the amount of incoming fire. That will make it much easier to deal with the monsters.
Battle- Corps Defender x 4
Battle- Humbaba
Use the same strategy as Behemoth King to stagger him before or right after he stands. He loses his debuffs and gains back his HP as well, and when he’s standing he can use a very powerful Aeroga. After the fight you have to jump down the broken highway in a zig-zag pattern to reach the lower level.
Battle- Corps Steward x 3, Sanctum Archangel, Humbaba
If you can’t get a preemptive here, just retry or run past. Because he starts at half HP, the Humbaba will stand up immediately, and everyone will start attacking you right away. You don’t want that.
Battle- Corps Defender x 2, Sanctum Archangel, Humbaba
Same deal, finish the Humbaba with a preemptive or you’re screwed.
Battle- Varcolaci x 2, Corps Steward x 2, Sanctum Archangel
Take out the humans first, you know by now that the Varcolaci aren’t any threat.
Battle- Varcolaci x 3
Battle- Corps Defender x 2, Sanctum Archangel
Just beyond them is a sphere holding 5 Perfect Conductors. Now run in between the Adamanchelids (or fight them if you want) to get to the right side of the road. You will find 15,000 Gil tucked in a corner. Go down the stairs to move on.
Battle- Sanctum Archangel x 2, Proto-behemoth
Take out the Archangels first for an easier time with the Behemoth. Now walk past the Humbaba corpse and open the gate to the next area.
“Damn idealism- you feed it blood and it howls for more” - Rygdea[]
There will be plenty more to feed it, but you’ll have to wait until the next page.