(replacing images) |
(→The Sunken Cave: - The Magic Urn) |
||
| Line 13: | Line 13: | ||
The fiends you'll face in the Sunken Cave aren't overly difficult but if you thought you were free of Malboros be prepared to be sorely disappointed as they, along with the Couerls have taken a trip from the Calm Lands and settled here too. It's also worth noting that the Nidhoggs will be seen also on Mt Gagazet. The Defenders and Machina can not be captured so don't worry about them. |
The fiends you'll face in the Sunken Cave aren't overly difficult but if you thought you were free of Malboros be prepared to be sorely disappointed as they, along with the Couerls have taken a trip from the Calm Lands and settled here too. It's also worth noting that the Nidhoggs will be seen also on Mt Gagazet. The Defenders and Machina can not be captured so don't worry about them. |
||
| − | Otherwise the standard monsters here will be you Dark Elements which can easily be captured by using '''Armour Break'''. The Ghosts you will just have to have to hack away at until they perish, Kimarhi can also learn '''Doom''' from them. One thing to look out for would be getting ambushed by a group of Yowies, if you aren't protected against '''Petrify''' then you may suffer a swift game over which will be rather humiliating and irritating so ensure your team mates have armour with '''Stone Ward/Proof''' equipped. Thorns are similar to their cousins the Funguars and will counter with '''Pollen''' against any physical attacks which will blind and put to sleep all of your team, therefore it's only worth using Auron's powerful attack to kill them in one go or, failing that, a blast of '''Firaga''' will suffice. There is also your ever friendly, ever terrifying Tonberrys to face. You will hopefully be able to chip away their 13,500 HP before they manage to knife you but also watch out as they counter any attack with '''Karma''', the damage is calculated by how many fiends you have killed, basically, watch out Auron! |
+ | Otherwise the standard monsters here will be you Dark Elements which can easily be captured by using '''Armour Break'''. The Ghosts you will just have to have to hack away at until they perish, Kimarhi can also learn '''Doom''' from them. One thing to look out for would be getting ambushed by a group of Yowies, if you aren't protected against '''Petrify''' then you may suffer a swift game over which will be rather humiliating and irritating so ensure your team mates have armour with '''Stone Ward/Proof''' equipped. Thorns are similar to their cousins the Funguars and will counter with '''Pollen''' against any physical attacks which will blind and put to sleep all of your team, therefore it's only worth using Auron's powerful attack to kill them in one go or, failing that, a blast of '''Firaga''' will suffice. There is also your ever friendly, ever terrifying Tonberrys to face. You will hopefully be able to chip away their 13,500 HP before they manage to knife you but also watch out as they counter any attack with '''Karma''', the damage is calculated by how many fiends you have killed, basically, watch out Auron! There is one more fiend to look out for, the '''Magic Urn'''; this little guy has eyes on the pot it lives in, hit the right one and you get a prize (just various items like '''Soul Springs''' or handy '''Elixirs'''), however, hit the wrong one and it'll go ballistic and explode. You cannot beat or capture this fiend, it's quite simply a game of chance so you have options, you can flee like a maniac or play the game until he explodes and leaves your characters weakened or dead... Bit like Russian Roulette but with a pot. And eyes... |
So whilst you're capturing your fiends here is a shortlist of the types you will undoubtedly come across and need to catch at least one each of to appease the Monster Arena owner. At the end of the day you will need to capture 10 of each but that's not totally necessary now. It's just when you come back the next time, (after this) you won't be able to use the Save Sphere in the depths of the cave as this will be Dark Yojimbo's new lair. So take that as a due warning when monster catching: |
So whilst you're capturing your fiends here is a shortlist of the types you will undoubtedly come across and need to catch at least one each of to appease the Monster Arena owner. At the end of the day you will need to capture 10 of each but that's not totally necessary now. It's just when you come back the next time, (after this) you won't be able to use the Save Sphere in the depths of the cave as this will be Dark Yojimbo's new lair. So take that as a due warning when monster catching: |
||
Revision as of 12:08, 3 July 2012
Hamfruitcake here and thoroughly annoyed she has to write all this up again...
The Sunken Cave
So I told you to take the right path down into the gorge. You will find a Rusty Sword if you run along to the right in a crevice. Then to the left will be the entrance to the Cavern of the Stolen Fayth. It's worth noting that you will need to keep your Capture weaponry equipped from now to the dawn of time. It'll save you a lot of backtracking later and also I'm going to repeat it a lot. Actually:
From now on keep you Capture weaponry equipped at all times. Because I said so! And it will save you a lot of time later on.
Upon entering the Cave you will come to a small room to roam around in, there's nothing to pick up here but as you go along the corridor there will be a dead end to the right with a Megalixir waiting in a chest for you to pick up. There will be another big area and a short scene again, straight ahead there will be another fork, to the right is a chest with a Lv 2 Key Sphere to grab, then head straight along to the left to follow the passage around.
At the next fork there is a dead end straight ahead with a chest containing a Fortune Sphere backtrack and take the left path to find yet another fork. Straight ahead will be a chest with 2x Mega-Potions and to the left you will find the Al Bhed Primer vol. XXV todays lesson O = Y, my god that is truly astounding. Taking the right path will bring you to the Save Sphere.
The fiends you'll face in the Sunken Cave aren't overly difficult but if you thought you were free of Malboros be prepared to be sorely disappointed as they, along with the Couerls have taken a trip from the Calm Lands and settled here too. It's also worth noting that the Nidhoggs will be seen also on Mt Gagazet. The Defenders and Machina can not be captured so don't worry about them.
Otherwise the standard monsters here will be you Dark Elements which can easily be captured by using Armour Break. The Ghosts you will just have to have to hack away at until they perish, Kimarhi can also learn Doom from them. One thing to look out for would be getting ambushed by a group of Yowies, if you aren't protected against Petrify then you may suffer a swift game over which will be rather humiliating and irritating so ensure your team mates have armour with Stone Ward/Proof equipped. Thorns are similar to their cousins the Funguars and will counter with Pollen against any physical attacks which will blind and put to sleep all of your team, therefore it's only worth using Auron's powerful attack to kill them in one go or, failing that, a blast of Firaga will suffice. There is also your ever friendly, ever terrifying Tonberrys to face. You will hopefully be able to chip away their 13,500 HP before they manage to knife you but also watch out as they counter any attack with Karma, the damage is calculated by how many fiends you have killed, basically, watch out Auron! There is one more fiend to look out for, the Magic Urn; this little guy has eyes on the pot it lives in, hit the right one and you get a prize (just various items like Soul Springs or handy Elixirs), however, hit the wrong one and it'll go ballistic and explode. You cannot beat or capture this fiend, it's quite simply a game of chance so you have options, you can flee like a maniac or play the game until he explodes and leaves your characters weakened or dead... Bit like Russian Roulette but with a pot. And eyes...
So whilst you're capturing your fiends here is a shortlist of the types you will undoubtedly come across and need to catch at least one each of to appease the Monster Arena owner. At the end of the day you will need to capture 10 of each but that's not totally necessary now. It's just when you come back the next time, (after this) you won't be able to use the Save Sphere in the depths of the cave as this will be Dark Yojimbo's new lair. So take that as a due warning when monster catching:
|
|
When you're done capturing whatever you can or wish then head past the save sphere to find Lady Ginnem, Lulu's previous summoner. Yuna will try to send her but it looks like the fallen Summoner has other ideas.
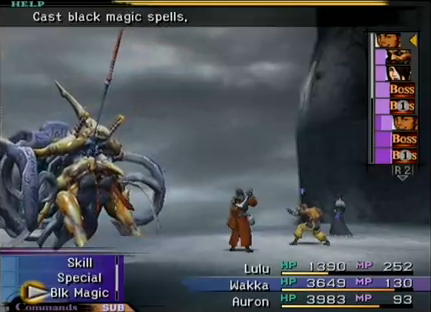
| Boss Battle : Yojimbo |
A simple battle if there ever were one. It's very easy for you to inflict Doom on him with either Kimarhi or using a Candle of Life with Rikku. After 5 turns he will perish. Otherwise you can just keep thwacking away at him with your powerful physical attacks until he falls. If you fancy you can summon up an aeon to defend against his Overdrive if the bar fills up but otherwise it's just a case of hitting him and healing when necessary. A very easy battle to win. |
After the battle you will get to jump on the teleporter, in the room to the left will be a chest with a Flexible Arm to the right will be a chest with an MP Sphere and 2x X Potions. When you're ready head to the Fayth and watch Yuna pray to reveal the aeon. To get the cheapest tariff answer with the third option. To defeat the most powerful enemies. Start with 125,001 gil for him to lower his initial offer, then offer 150,002 gil, then try 175,003 gil. At this point the offer should stand at 203,000 gil, that's about the lowest you canbeat him down to, I wouldn't try any more otherwise his affection levels or whatever they are might be tarnished somewhat. It's up to you though. If you pay Yojimbo three times his initial asking price you will recieve 2x Teleport Spheres in addition to his services. Worth it? Nah. If you are in posession of the airship at this point you can pop back into the Fayth to recieve a Strength Sphere.
Overall Yojimbo is not an Aeon you will be relying on very strongly in battle. Fair enough his Zamnato can destroy anything in it's path, including Dark Aeons, but my stance on those buggers is taking them head on, not the pansy method. Plus the only way he'll do his most powerful attack is if you offer him a significant amount of gil which can be better put to Bribing monsters for items you will actually need. He's just a bit of a waste of space really but is worth having in order to obtain his fellow secret aeons.
You can now feel free to name your new Aeon and leave the Cavern and head to Mt Gagazet, off you go then!
Mt Gagazet
When you cross the bridge back where you beat Defender X you will see a short scene in which Yuna solemnly gazes at the places she'll never see again. Up the mountain you'll be accosted by Ronso. Yuna with her strong will proves herself to Elder Kelk Ronso and he lets her pass to climb the sacred Mountain. At this point you can talk to your team and buy weapons from the male ronso on the lower right. Now is a good time to sell him any equipment you won't be needing as you'll soon be experiencing overflow issues I'm sure. It will also regain the gil lost in bartering with that dastardly Yojimbo.
Before climbing the mountain now is good time to equip Kimarhi well and teach him Steal with a Special Sphere if you can, use a Teleport Sphere or Return Sphere, whatever, you just really do need Steal for the next battle in order to obtain some Lv 3 Key Spheres, you won't be coming across these for a very long while and this is the only place you'll be able to get a real stock of them before Zanarkand. You'll find your characters reaching the end of their paths at this point and they'll need these key spheres to move into the next areas so it's definitely worth getting as many as you can in this next battle. It's also worth having Kimarhi know Haste and/or Cura to asist him in the next battle, not imperative but it does help you.
Upon walking up the mountain Biran and Yenke will then harrass Kimarhi on the mountain path and a battle will then ensue:
| Boss Battle : Biran and Yenke Ronso |
In this battle the troublesome duo will defend each other when they are standing together but when they are in a pincer movement on either side of Kimarhi this is when you can actually attack them. When they are together it's best to use this oppurtunity to Steal as often as possible to farm as many Lv 3 Key Spheres off the pair as you can. Cast Haste to speed this process up and use Cura or a Hi-Potion to heal up when necessary. Otherwise spend as much time as you can stealing their endless supply of Key Spheres. Kimarhi can learn a lot of Blue Magic from the pair by using Lancet on them. He can only learn White Wind and Mighty Guard after Yenke and and Biran use them respectively. To encourage them to use these moves you must lower their HP. When you've learnt Mighty Guard it's worth using it on Kimarhi to prolong the battle further to steal some more but otherwise when you're bored just hit them until they collapse and you will succeed. |
After the battle you will find 20,000 gil in a chest to the lower right and a chest with 2x Mega-Potions to the upper left. Heading further will result in another scene where the Ronso will quite tunefully serenade Yuna. How very adorable. Now we can finally start climbing this damn mountain!
Ok so the monsters here will involve some machina and some old different coloured friends. Grenades are essentially Bombs but purple and have all the same weaknesses to match, they must also be killed in 3 turns to avoid detonation. There are also Grats who take great pleasure in inflicting your team mates with confuse but aside from that nothing you should be too concerned about.
To reiterate a very important point. You need to keep your Capture Weaponry equipped whilst scaling the mountain in order to catch at least one of everything on your way up. This will be essential for obtaining an item needed for a secret aeon later and will also save you backtracking time too.
The fiends you will be hunting are:
|
|
|
The first column will be the fiends in this area, the columns to the right will be in the later areas, I'll reiterate them for you when we get there just in case.
As you travel up the mountain path you'll see a small passage to the right leading to a Braska's Sphere, a message to Yuna from her father. A very touching moment in which he tells his daughter he will always be with her and he mentions how entertaining his journey with Auron and Jecht has been, this will be your third sphere from the previous pilgrimage and will therefore teach Auron a new Overdrive technique, Banishing Blade.
On your way up there will be shrines for fallen summoners and warning that the fiends here are particularly strong, nothing your team can't handle though. Take the path straight ahead to find a chest containing a Defending Bracer back track to take the right path to continue onwards. You'll find Wantz, that guy in blue who keeps appearing then running off all over place. As it is he is actually O'aka's brother who has taken over his brother's business as O'aka is currently imprisoned due to fraternising with us. Take advantage of his excellent wares, and be sure to stock up on some Holy Waters from the item shop for some later battles. When you're done spending all of your money be on your way.
Keep following the path around until you start to travel upwards on a steep incline. You'll come to a Save Sphere and a scene between Tidus and Rikku in the next area will herald a boss battle with none of than Mr Can't Stay Dead for More than 20 Minutes - Seymour. Looks like he killed all of the Ronso, that's pretty dreadful (don't worry, the Blitzball team are still alive). And now he wishes to exhibit his power to us.
| Boss Battle : Seymour Flux |
This is going to be one of the toughest boss battles you'll face. Use the Trigger Command to Talk to Seymour with Yuna and Kimarhi this time to raise their Strength and Magic Defence respectively. Lance of Atrophy will inflict Zombie on a single party member, Mortiorchis will follow this up with Full-Life soon after, quickly remedy this status with Holy Water to avoid being killed swiftly. A character with high agility should always be on your team to out manouvere Seymour and remedy Zombie, preferably Rikku or Yuna. Total Annihilation will kill an under-levelled under-prepared team. Shell will protect you against this this so prepare with that, or you can use Kimarhi's Mighty Guard to soften the blow. The best way to handle this battle is to set up the team you intend to battle with quickly, it should be Yuna and two of your best attackers, then ensure Haste and Shell is cast upon all of them. Have Yuna healing and using Dispel to take off any of protection Seymour may cast on himself. Then keep hitting him repeatedly with your strongest attacks. Shell will defend against Total Annihiliation so just heal up swiftly with a Mega-Potion after and keep hammering away. Relax and things should go fine. |
After the battle the team will discover the truth about Jecht and Sin and become incredibly confused. Take the path along and pick up the Saturn Crest from the hidden chest on the left among the pillars as you approach the Save Sphere.
In the next area we will witness a quite mind boggling scene of a lot of people encased in stone, they are fayth. Someone is using them to summon something and everyone is getting quite het up about it. We will then suddenly be in Zanarkand, run into Tidus' home to continue the storyline. It looks like the purple cloaked kid is about to fill in some storyline blanks. I wish his voice wasn't so annoying... Follow the kid to learn about a different kind of summoning, we learn that all those fayth are summoning up a dream Zanarkand to keep their home alive after the war.
Tidus wakes up and team molly-coddle him, he lies to them that he had a nap but clearly he is a rubbish actor and no one is buying it. Not much we can do but move on i guess.