Part 20, we'll cover the optional Aeons Anima and Yojimbo.
Zanarkand Cloister[]
To get Anima we need to have all the Destruction Spheres from the previous temples. If you haven't followed this walkthrough all the way through, click the links for instructions on how to get the Destruction Spheres: Besaid Temple, Kilika Temple, Djose Temple, Macalania Temple, Bevelle Temple. We still need the Zanarkand sphere. If you don't know which of those five temples you missed or not, read ahead to Baaj Temple and I'll tell you how to find out.
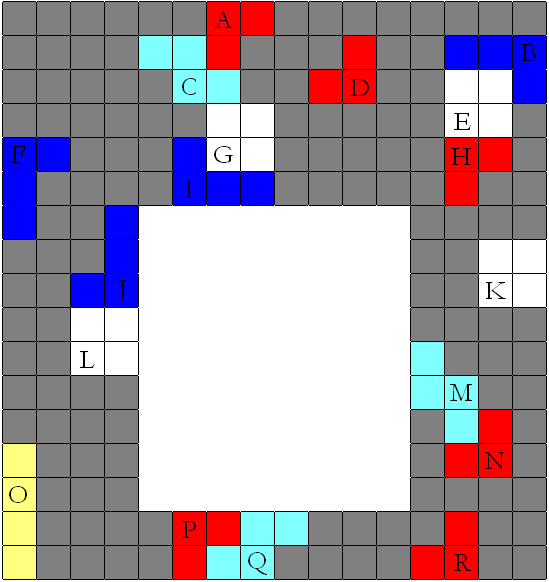
At Zanarkand, run through the ruins and go to the Cloister room. Step on all the white squares as shown in the diagrams, in both rooms. The Destruction Sphere will appear in the first room. Get it, take it to the second room and insert it into the right slot. Take the Magistral Rod from the chest.
Baaj Temple[]
Wakka, Tidus and Rikku all need armor with Stone Ward, or preferably Stone Proof. Talk to Cid aboard the airship and select Search. Move the cursor to X = 12, Y = 57, it doesn't need to be exact. Search to find Baaj Temple, and fly here. Recognize this place? You should, this is where we began the game. Jump into the water and swim towards the door on your minimap to meet an old friend.
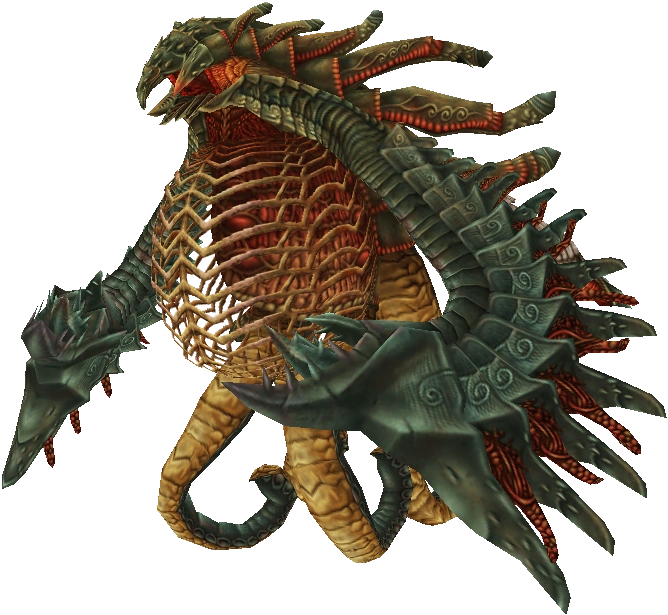
| Boss | |||||
| Geosgaeno | |||||
| |||||
| HP | MP | Dangerous Attack | |||
| 32,767 | 256 | Stone Punch | |||
| Steal | Morph | Drops | |||
| Water Gem | N/A | Power Sphere | |||
| Weakness | Resistance | Difficulty | |||
| All | None | 2/5 | |||
Remember him too? Time to take him out. Of course Hastega to begin. If you didn't bring Stone Ward, you're dead - Geosgaeno's Stone Punch will Petrify you, and with the fight underwater you'll instantly shatter with no chance to heal. Quick Hit with Tidus and Wakka to kill him quickly. When he's weak, he'll suck up a party member and absorb their Haste status. If Rikku has a Purifying Salt use it to Dispel the boss. If Rikku gets an Overdrive, Mix a Bomb Core with a Petrify Grenade. That's far too many other combinations that work too, but that's a fairly simple one and will heavily damage the boss. Forget nailing Overkill, you won't, the Overkill is the same as the boss' HP!
With the boss dead, swim into the door. Surface and enter the temple. Examine the six statues; if you got the Destruction Sphere from the temple each statue represents, there will be a scene. The lower right statue is Kilika, middle-right is Djose, upper right is Bevelle, upper left is Zanarkand, middle right is Macalania, lower-right is Besaid. At least I think that's how it goes, mostly I'm guessing from the elemental properties of the sphere. If a statue doesn't light up, you missed the Destruction Sphere in that temple. Enter the chamber of the Fayth and watch the scene. Anima's Fayth is Seymour's mother, who became Anima to be Seymour's final aeon at the end of their pilgrimage. Now she's ours.
Anima is without question the best Aeon in the game. She has much higher HP than other Aeons and joins knowing several status attacks and Black Magic. Her normal attacks can break the damage limit, as can her special attack Pain, which can sometimes inflict Instant Death. Her Overdrive is Oblivion, don't be surprised to see it do 99999 or close to it the first time you use it.
Yojimbo[]
Don't even attempt his subquest if you don't have at least 200,000 gil. If you do, fly to the Calm Lands and go north to the entrance to Mt. Gagazet. Cross the bridge and go down into the valley. Go left, use the sphere and enter the cave. This is the Cavern of the Stolen Fayth, where Lulu's first summoner died. The only enemies of note here are the Magic Urn and the Tonberry. Magic Urn you choose one of its five eyes to attack each turn, get it correct and you win some great items. Keep your HP high, if they self-destruct they do 3000 damage to the party or higher. You can Steal Chocobo Feathers from them, but I believe they explode if you do. The Tonberry uses Karma when attacked, doing more damage the more enemies the character has killed. It has a Farplane Shadow to Steal, and drops Deathtouch weapons and Death Ward armor. Ghosts, drop Death Ward armor too and also have Farplane Shadows. Thorns counter attacks with the status-inflicting Pollen, and Yowie has Petrify Grenades.
Follow the path until it forks, the small right path has a Megalixir. Further north is a small scene. At the next fork go right for a Lvl 2 Keysphere, then go left. At the next fork go north to find a Fortune Sphere, the go back and take the left path. At the final split, take the two Mega-Potion from the chest, go left to find the Al Bhed Primer #25, one more to go. To the right use the Save Sphere and go up. The spirit of Lulu's summoner is here and conjures an Aeon to attack. Yojimbo is a cakewalk, when his Overdrive fills he does 9999 damage to the party, don't give him the chance. He only has 35,000 HP and will die quickly. Even if he does hit Overdrive, you can call an Aeon to take the fall for you. When Yojimbo dies, board the platform and press X when the arrow points left to find a Flexible Arm. Go back and press X when it points right to find a X-Potion and MP Sphere. Finally, go north.
Yojimbo is here, and he'll become our Aeon. Tell him you wish to "Defeat the most powerful enemies," then offer him 200,000 gil. He'll lower his offer, offer him 200,000 gil again. Now offer 210,000, he should accept and join you. He's for show only, Yojimbo is useless. He charges you when he attacks! That's total bullshit. Furthermore, you want to save your gil for Bribes now, so fuck Yojimbo. Besides, Anima is strong enough as it is. I must wonder though, why does he want gil? What do Aeons need money for, to visit the variety store in the Farplane? And if he was once an official Aeon on the pilgrimage, what about summoners who were broke, did he just go "piss off, no Final Aeon for you," or what?
Remiem Temple[]
Getting the final optional Aeon ties directly into getting the Celestial Weapons. You also need Yojimbo and Anima before you can get the last Aeon. In the Calm Lands, talk to the Chocobo trainer and ride a Chocobo. Take it up the south hill and examine the Chocobo feather. Hop over to the cliff and enter the new area. Cross the long bridge and go left to find the 24th Al Bhed primer, then enter the temple. Belgemine is here, and surprise, she's an Unsent too. She's here to help train Yuna for the battles ahead. Now, one by one, you must take out Belgemine's Aeons - Valefor, Ifrit, Ixion, Shiva, Bahamut, Yojimbo, Anima. Anima is more than enough to kill all of Belgemine's Aeons on her own. Against Belgemine's own Anima, you'll have to use Bahamut since Aeon mirror-matches are a no-no.
If you haven't faced Belgemine before and won the Summoner's Soul and Aeon's Soul, you'll win them now. You also get some nice items every time you win the subsequent battles. Among the treasures I got (I think they may change, if not tell me please) was 10 Chocobo Feathers, which I used to teach Anima Haste, and 60 Mega-Potions to teach her Curaga. In fact, Belgemine pointedly gives you items to teach your Aeons new skills, but you don't need to. When you beat all her Aeons you get a Flower Scepter. Now you need the Blossom Crown. Go to the Monster Arena in the Calm Lands and buy some "Capture" weapons. Go to Mt. Gagazet and capture one of every monster. Here's a list. If you plan to go the Monster Arena quest, capture four of each monster, but if you just want the award you can make due with one of each:
- Bandersnatch
- Ahriman
- Dark Flan
- Grenade
- Grat
- Grendel
- Bashura
- Mandragora
- Behemoth
- Splasher
- Achelous
- Maelspike
Don't actually fight any of the "special creations" the guy mentions unless you want to experience a quick and painful death. With the Blossom Crown return to the temple. Go to the door in the back and use the Blossom Crown and Flower Scepter to break the seal. Claim the last optional Aeon, the Magus Sisters. The sisters are only good for post-game stuff, individually each of them is just as strong as Anima if not stronger, and they can easily hit 99,999 damage with their normal blows. Cindy also has a powerful multi-hit attack that can do far more than the damage cap thanks to its multiple hits. The downside is you can't directly command them, just give them vague directions like "support each other," "attack," etc. They may do that, or may just skip their turns. Their Overdrive is lame, you need all three of them to have their Overdrive gauges full to use it and it still only does 99,999 damage. So use Anima for fighting normal enemies, and save the Sisters for big enemies.
Challenge Belgemine and kill her Sisters, an Oblivion from Anima works just fine. Hell, even Bahamut is enough. After this you can choose to Send Belgemine. If you opt not to, she remains here and you can challenge her Aeons any time you like for some minor prizes. If you decide not to Send her, you can get the option to do so by killing the Magus Sisters again. Send her to receive the Moon Sigil.
| Drake Clawfang's FFX Walkthrough | ||
| Previous page | 1 - 2 - 3 - 4 - 5 - 6 - 7 - 8 - 9 - 10 | Next page |
| 11 - 12 - 13 - 14 - 15 - 16 - 17 - 18 - 19 - 20 - 21 - 22 - 23 - 24 - 25 | ||