It’s finally time to enter the lair of the God of Magic. Welcome to part 30.
Enter the Opposition[]
Welcome the final dungeon, Kefka's Tower. Here, as you might expect, are the most potent enemies in the game. The tower has 3 types of architecture, and some enemies only show up in certain rooms, so I’ll cover them when needed, but the rest I’ll cover now.
Great Behemoths use Haymaker, a strong physical, and use Meteor when alone. Great Malboros absorb every element except Fire, and use Bad Breath when alone. Fortunately, outside the tower they attack together with a Vector Lythos, which is weak. Save them for last to avoid Haymaker and Bad Breath. Inside the caves lurk the same enemies, and the Primeval Dragon, who uses a powerful physical called Swing and double-Lifeshaver, and when alone it uses Atomic Ray. Use Ice on the Dragon, Fire on the Malboro, and anything else you have on the Behemoth.
Inside the palace areas, Demon Knights are cool because they remind me of that Tales from the Crypt movie, and like the Collector they’ll raise the dead as Zombies with ChokeSmoke. This is bad, because they like to bring their buddies – Yojimbo uses Instant Death, so be careful around these two. The Dark Force is actually an enemy you don’t want to kill, because it uses all but 4 Lores in the game! Fight one with Strago in the party and sit there learning Lores. They’re weak to Holy.
Daedelus is a palette swap of Dullahan, and uses Death, Gravity, Bio and Blizzaga. It’s undead, so use Holy and Firaga. The Ahriman likes Roulette, Dread which Petrifies you, and Doom. Use Bio to kill it. Cherry is very dangerous, it knows Level 3 spells, Holy, Flare, Meteor, Protect, Shell, Curaga and ReRaise. Take her out first. She often comes paired with 2 Outsiders who throw things and use Instant Death attacks, and this trio is quite deadly to you if you're unprepared.
In the factories are palette swaps of your favorite Magitek machines. Duel Armor uses Metal Cutter, Level 4 Flare and Level 5 Death, so be careful around it. Death Machine loves Blaster, Death and Doom, all Instant Death attacks. Fortis uses Fireball and Snowball, odd since it’s a machine. InnoSent uses Plasma, can Confuse you, and uses Level ? Holy. Metal Hitman uses Dischord, but it is no threat. Junk likes to suicide itself with Transfusion and Exploder, so take it out fast. The Gamma uses Launcher, Wave Cannon, Gamma Rays (inflicts Doom), Gravity Bomb (same as Gravity), and uses Atomic Ray when it dies. All of these guys are weak to Thunder.
By now you know what each character does best. Your mages should cast their best spells, Edgar uses his Tools, Sabin Phantom Rushes, Shadow Throws things, etc. With your power and levels, you should be able to handle most of the enemies here with moderate difficulty. I say moderate because, well, it is the final dungeon, so of course there's risk. Defeat is more than an option, it’s very possible. Be on your guard and never underestimate any of the enemies here.
Time to Move Forward[]
As Party 1, go down over the conveyor belt and right. Open the chest to find the Hypno Crown a useless helmet for Relm that raises the success rate of Control. Enter the air duct to the let and go down and right. Follow the linear path in the palace area. Along the way, you find the Fixed Dice. This is Setzer’s ultimate weapon. He rolls three dice, the three die are multiplied together, then multiplied by his level, and that’s the damage they do. And they ignore defense! In tandem with the Master’s Scroll, Setzer is a one-man army. He attacks every turn from now on, no exception. Leave the palace area and go down. Enter the duct to find…a dead end. Time for Party 2!
| Boss | |||||
| Inferno | |||||

| |||||
| HP | MP | Dangerous Attack | |||
| 30800 | 9700 | Meteor | |||
| Steal | Morph | Drops | |||
| Ice Shield, Fire Shield (from its blades) | Can't Morph | None | |||
| Weakness | Resistance | Difficulty | |||
| Lightning | Fire | 2.5/5 | |||
Give Setzer those Fixed Dice and move forward. Go down and enter the duct. In the cave in the upper-left is the second Minerva Bustier! Finally! Go down from the chest and take the lower path. You're in the prison cell from Vector, and there’s a boss waiting in the far left cell. He’s strong, so first, swap to Party 3.
As Party 3, go down and take the first door on the left. Just outside of it is the second Red Cap. Go up and take the Nutkin Suit and the Gauntlet, although both are useless now. Go back outside and go down. Take the door and enter the duct to enter the factory. Open the chest for a Hero’s Ring. No, go down on the left side of the lower engine to find a hidden passage. At the end of it is another Aegis Shield. Go back up and hop on the conveyor belt. Ride it up to a save point, use it, then head left for the first of many bosses.
Inferno comes into the battle with Ketu and Rahu, and the whole thing is a palette swap of Number 128. Ketu uses Metal Cutter, and Rahu uses physicals. Inferno itself uses Delta Hit when both blades are alive, and it uses Atomic Ray, Thundaga, Meteor, Gigavolt, and Magitek Barrier which gives it Protect and Reflect. It also has a powerful physical called Sobat.
Use your best multi-hit attacks like Ultima to take out the blades, then focus on Inferno. He has an Ice Shield for Locke to Steal, if you’re interested – the blades each have a Flame Shield. Even at level 50, Inferno is strong, so keep your HP high to avoid Meteor and Sobat catching you off guard. When Inferno dies, go back and save, then swap to Party 2. Now fight the boss in safety...well, relative safety that is.
| Boss | |||||
| Ultima Buster | |||||
| |||||
| HP | MP | Dangerous Attack | |||
| 55000 | 19000 | Ultima | |||
| Steal | Morph | Drops | |||
| Blood Sword, Crystal Orb | Can't Morph | None | |||
| Weakness | Resistance | Difficulty | |||
| None | Earth, Holy, Poison, Water, Wind | 3.5/5 | |||
Ultima Buster is just as dangerous as the original Ultima Weapon. It uses Quake, Flare Star, Meteor, Firaga, Blizzaga, and Thundaga. And what’s worse, it will charge up, then unleash Ultima. It also has 55,000 HP, a lot. As for elements, it has no weaknesses, but absorbs all elemental but thunder, ice and fire. Use Ultima as much as you can, and spam Curaga and Arise. When Ultima Buster starts charging for Ultima, cast ReRaise to survive the blast, and then revive who you couldn’t save and keep fighting. You can see what Setzer’s Master’s Scroll-Fixed Dice combo can really do here. Gogo may use Celes’ Runic to absorb the spell, and you’ll also want to give him Steal – Ultima Buster has a rare Crystal Orb to swipe, which raises MP by one half.
With Ultima Buster dead, save and go down as Party 2. Here, the Muud Suuds have Thunder Shields to Steal, so do that, otherwise they’re weak. BTW, they’re palette swaps of our buddy Humbaba. Come to think of it, there’s a lot of boss palette swaps in this dungeon. The Movers have very high defenses and Evade, so use spells like Ultima and…well, just Ultima. Go up the stairs and through the door at the top. Take the left pipe.
The Fall of the Dragons[]
Outside, open the chest for a Force Shield, then go down. Take a left below the vent to find a chest with Force Armor, then enter the vent to find Party 1 stuck at their dead end. Hit the switch to open the path, and loot the chest for a Ribbon – you can never have too many. Go back out the vent and take the door on the right. Go up the palace area and talk to the monster.
The Gold Dragon is no threat at all. It uses Thunder, Thundara, Gigavolt, and Thundaga. That’s about it. Just use your normal spells to take it out. Hell, if he rolls high enough, Setzer can take him out alone. You win a Crystal Orb. One dragon left now. Take the linear path to the long walkway. Hit the switch at the end and swap to Party 3.
Head down and outside. On the right is a chest with a Megalixir. Go past the door and inspect the open treasure chest to remove the rocks from the path, and take the conveyor belt up. It’s a Rainbow Brush. Lame. Go back and take the door. Go up and confront the final Dragon.
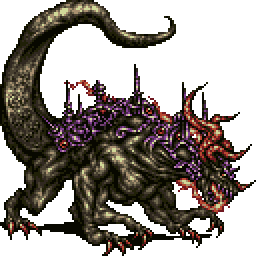
Skull Dragon is the Dragon of Poison and Death. It’s weak to Holy and Fire, but is not undead, despite it’s attacks and appearance. It can inflict many status ailments on you, so Ribbons are the way to go. Edgar’s Holy Lance Jumps were awesome for damage here. As an easy win, you can kill it by draining all of its MP. So just have your mages Rasp it to death, it should only take a few turns. When you beat it, you’ll have the Muscle Belt, which raises HP by one half. And, what’s more, with all 8 Dragons destroyed, the Eightfold Seal is broken, and the ultimate Magicite is yours!
And boy does it blow! Crusader teaches the useless Meteor, and Meltdown, which does fire/wind damage to all enemies and allies, cannot be blocked or Reflected, and ignores split damage. Basically, unless your party absorbs or nulls Fire, it sucks. And its summon is an instant game over, it’s spell power is so high and it hits your party, so there’s no way you can survive it. For all that work, you get a useless…hey…a tablet? “I’ll await you at the Dragon’s Horn”…hm…odd. Well, we’re in the tower, we’ll have to worry about this later. Take the path and hit the switch at the end to open the door.
As Party 1 once again, go down to a portion of the abandoned Magitek Research Facility, and go right. In this small area, the Fiend Dragon is a very real danger. See, it has an attack called Heartless Angel that cuts your HP down to 1. It cannot be blocked. They also have S. Cross, so unless someone absorbs or nulls fire, you're in trouble. They also like to attack in pairs. If you see them, dual-cast Ultima, or run.
Out here, go up and left for a Pinwheel, then go up through the door. Follow the path.
Up through the door are 4 bosses, the final guardians of the tower's summit. After them, it’s just you and the clown…
| Drake Clawfang's FFVI Advance Walkthrough | ||
| Previous page | World of Balance 1 - 2 - 3 - 4 - 5 - 6 - 7 - 8 - 9 - 10 - 11 - 12 - 13 - 14 - 15 - 16 - 17 |
Next page |
| World of Ruin 18 - 19 - 20 - 21 - 22 - 23 - 24 - 25 - 26 - 27 - 28 - 29 - 30 - 31 - 32 Dragon's Den/Soul Shrine | ||