Desert Palace[]
| Treasure: Desert Palace | |||||
| 1 | Promist Ring | 2 | Fairy Earrings | 3 | Anklet |
| 4 | Shield Armor | 5 | N-Kai Armlet | 6 | Black Hood |
| 7 | Venetia Shield | ||||
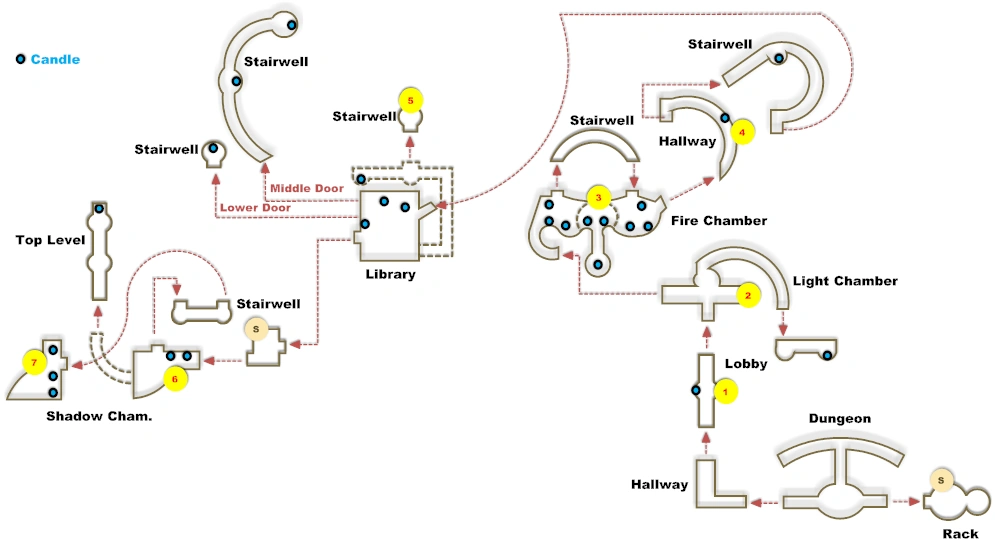
After the scene you will control Cid at the [Dungeon]. Take the east exit to arrive at the [Rack]. You need to get the Hourglass key without letting the Hedgehog Pie notice your approach. Press the circle button quickly when the foe is looking away. If you mess up you can always try again even after the countdown is over. Once you have the key choose to examine the weights first then put on the weights; Clay, Stone and Iron. Finally climb on the weights to free everyone. When you control Eiko return to the [Rack] and speak with Mojito to deliver his letter. Note that if you have Quina in your party then her LV5 Death will kill any enemy at the [Palace]. Go to the [Lobby] and light the candle on your left. Inspect the bloodstone on your right to receive a Promist Ring. Go to the [Light Chamber] and try to take the left path to reveal a hidden stairs. Ascend it to reach the upper part of the [Lobby]. Light the candle and return to the [Light Chamber]. Open the newly appeared chest by the stairs for a Fairy Earrings. Head to the [Fire Chambers] and light the three candles to access the [Stairwell]. Make your way around to reach the east side of the [Fire Chambers]. Light the south-west candle and return to the west side. Light the two middle candles to have all statues disappear.
Light the two remaining candles on the east side. Go to the middle and light the candle at the bottom. Inspect the middle bloodstone to receive Anklet. Take the east path to arrive at the [Hallway]. Light the candle here and examine the nearby bloodstone for a Shield Armor. Keep heading west to go upstairs. Light the candle near the stairs then go to the [Library]. Light the west candle to make the east stairs appear. Take the newly created stairs and light the candle on the west side to reveal a door. Go through it and check the bloodstone for N-Kai Armlet. Return to the [Library] and take the stairs to light the middle candle. Go through the door to reach the [Stairwell]. Light the two candles here then return to the [Library]. Descend the stairs and light the lower-east candle. Go through the door and light the candle. Back at the [Library] take the west transparent door. Speak with Mogsam and hand over his letter. Go to the [Shadow Cham.] and light the two candles. Take the Black Hood from the bloodstone. Unlit the west candle then go to the [Stairwell] to reach the other side. Light the two candles near the statue then check the bloodstone for a Venetia Shield. Unlit the left candle to have hidden stairs appear on the east side. Make your way around to ascend the stairs or you can save before doing so. Try to light the last candle at the [Top Level] for a boss fight.
|
Boss: Valia Pira |
|||||||||||||||||
|
 FFIX Boss Valia Pira |
||||||||||||||||
Esto Gaza[]
You can now encounter Garuda foes at the [Terrace]. Head inside for a conversation with the Bishop. If you came here before then the shop has upgraded its items. Speak with Mogrika at the [Terrace] to read and deliver a letter for her. Go to the [Path] and enter the big doors.
Mount Gulug[]

| Treasure: Mount Gulug | |||||
| 1 | 9, 693 Gil | 2 | Ether | 3 | Red Hat |
| 4 | Golden Hairpin | 5 | Wing Edge | 6 | Gaia Gear |
| 7 | Demon's Mail | 8 | Elixir | ||
You start at the [Interior]. West reside a few items and east is where you need to go. When you arrive at the [Well] use the rope to slide down. Go east and hand over Moolan his letter. He also has a letter to deliver. Go east and keep following the path until you reach a dead end where you can pick a Gaia Gear. Make your way back to the [Well]; you get to fight Red Dragons x2 (8, 000 HP) around the second stairs at the [Path].
| Optional [start] | ||||||||||
| Note that you get to fight a maximum number of 5 Red Dragons at [Mount Gulug]. If Quina is not your party then you can get these two blue magic from other foes. | ||||||||||
| ||||||||||
| Optional [end] | ||||||||||
|
Boss: Meltigemini |
|||||||||||||||||
|
 FFIX Boss Meltigemini |
||||||||||||||||
| Main Page | Pages: 1 | 2 | 3 | 4 | 5 | 6 | 7 | 8 | 9 | 10 | 11 | 12 | 13 | 14 | 15 | 16 | 17 | 18 | 19 | 20 | 21 | 22 | 23 | 24 | 25 | 26 | 27 | 28 |