m (just link-fixing) |
|||
| (18 intermediate revisions by 6 users not shown) | |||
| Line 11: | Line 11: | ||
==The SuperWEAPONs== |
==The SuperWEAPONs== |
||
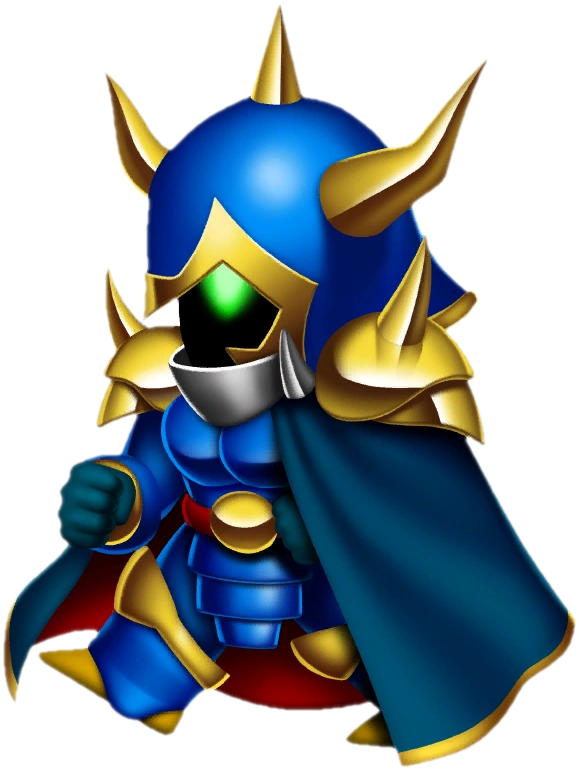
Time to track down our best weapons...well, second best, anyway, this is the Advance release. From the save, backtrack to the area with the two staircases, and take the left stairs on the left here is an invisible path over the air, walk right left, then up and right through the wall and down a flight of stairs. Down here open the chest for a Gold Apple, then go right to a warp tile. Along the next few paths you'll encounter Behemoths and Red and Blue Dragons as random encounters, be very careful. Take the stairs up to another warp tile, go up from there for a chest with a Behemoth, who yields a Protect Ring, then keep going up. This tile takes you to a save, use it, then leave and approach the sword. |
Time to track down our best weapons...well, second best, anyway, this is the Advance release. From the save, backtrack to the area with the two staircases, and take the left stairs on the left here is an invisible path over the air, walk right left, then up and right through the wall and down a flight of stairs. Down here open the chest for a Gold Apple, then go right to a warp tile. Along the next few paths you'll encounter Behemoths and Red and Blue Dragons as random encounters, be very careful. Take the stairs up to another warp tile, go up from there for a chest with a Behemoth, who yields a Protect Ring, then keep going up. This tile takes you to a save, use it, then leave and approach the sword. |
||
| − | {{Drake's Walkthrough Enemies |
+ | {{User:Drake Clawfang/Drake's Walkthrough Enemies |
| − | | name = [[Dark Bahamut (Final Fantasy IV)|Dark Bahamut]] |
+ | | name = [[Dark Bahamut (Final Fantasy IV 2D)|Dark Bahamut]] |
| image = [[File:DarkBahamut-ffiv-gba.png]] |
| image = [[File:DarkBahamut-ffiv-gba.png]] |
||
| HP = 60000 |
| HP = 60000 |
||
| Line 28: | Line 28: | ||
For your victory you win Cecil's Ragnarok, equip it now! It's his second-best weapon. Now take the long path back to the first save and use it. We've got more bosses to knock off here. Enter the middle door to the right of the save and approach the weapon. |
For your victory you win Cecil's Ragnarok, equip it now! It's his second-best weapon. Now take the long path back to the first save and use it. We've got more bosses to knock off here. Enter the middle door to the right of the save and approach the weapon. |
||
| − | The [[Plague Horror (Final Fantasy IV)|Plague]] will cast Doom on your party, then use Haste on them one by one. However, he's a joke, if you go all-out with Bahamut and physicals and maybe a few Shurikens, he'll die quickly, he's only got just over 30k HP. If you're having trouble, here's a tip - go into battle with Rosa killed off. Attack the boss, then when the Doom counter is like, 3 or 2, revive Rosa. He'll recast Doom, resetting everyone's counter to 10. Not too bright huh? Repeat if needed and he's toast. He leaves behind the Holy Lance for Kain. Go save and heal and enter the third room. |
+ | The [[Plague Horror (Final Fantasy IV 2D)|Plague]] will cast Doom on your party, then use Haste on them one by one. However, he's a joke, if you go all-out with Bahamut and physicals and maybe a few Shurikens, he'll die quickly, he's only got just over 30k HP. If you're having trouble, here's a tip - go into battle with Rosa killed off. Attack the boss, then when the Doom counter is like, 3 or 2, revive Rosa. He'll recast Doom, resetting everyone's counter to 10. Not too bright huh? Repeat if needed and he's toast. He leaves behind the Holy Lance for Kain. Go save and heal and enter the third room. |
| − | The [[Lunasaur]] is a tough motherfucker in the DS release, here, he's a joke. Each has 23000 HP, but Cecil can smack them with Ragnarok for 9999 easily. Two physicals from Cecil and a couple from Edge and Kain will take one out. The Lunasaurs cast Reflect on themselves and use Bio and Flame on your party, irritating but manageable. They should only last a few rounds. Go back and heal and save, and get ready for the final few floors. There's no save beyond here, just the final boss. Go right, up, left, down the stairs and enter the door. |
+ | The [[Lunasaur (Final Fantasy IV 2D)|Lunasaur]] is a tough motherfucker in the DS release, here, he's a joke. Each has 23000 HP, but Cecil can smack them with Ragnarok for 9999 easily. Two physicals from Cecil and a couple from Edge and Kain will take one out. The Lunasaurs cast Reflect on themselves and use Bio and Flame on your party, irritating but manageable. They should only last a few rounds. Go back and heal and save, and get ready for the final few floors. There's no save beyond here, just the final boss. Go right, up, left, down the stairs and enter the door. |
==The Core== |
==The Core== |
||
| − | Down here, there are three types of enemies. Behemoths and Red Dragons appear as random encounters, along with a new enemy, the [[Deathmask (Final Fantasy IV)|Deathmask]]. It will cast Reflect on itself and the party, and bounce Holy, Flare and Curaja spells around. Use physicals and Rydia's Bahamut, which |
+ | Down here, there are three types of enemies. Behemoths and Red Dragons appear as random encounters, along with a new enemy, the [[Deathmask (Final Fantasy IV 2D)|Deathmask]]. It will cast Reflect on itself and the party, and bounce Holy, Flare and Curaja spells around. Use physicals and Rydia's Bahamut, which pierces reflect. Most enemies down here are practically minibosses, so the going can be tough, but don't give up. Feel free to use your Ethers and Elixirs if needed, soon they won't be needed. You may also want to use Edge's Smoke to escape from battles, unless you want to get a few more levels before the end. |
| − | Go right, down the stairs and left to a Fuma Shuriken. Go down from here to spy the stairs down, but first, a final challenge before the end! Well, challenge may be a stretch, the [[Ogopogo]] isn't too tough. He opens with a double Tidal Wave for 1000 damage, then uses the singular form and physicals. He also counters magic with Blaze to do a few hundred damage to the party. Pummel him and claim Edge's Masamune as your prize. You may want to run back and save this if you want. Then take the stairs down. |
+ | Go right, down the stairs and left to a Fuma Shuriken. Go down from here to spy the stairs down, but first, a final challenge before the end! Well, challenge may be a stretch, the [[Ogopogo (Final Fantasy IV 2D)|Ogopogo]] isn't too tough. He opens with a double Tidal Wave for 1000 damage, then uses the singular form and physicals. He also counters magic with Blaze to do a few hundred damage to the party. Pummel him and claim Edge's Masamune as your prize. You may want to run back and save this if you want. Then take the stairs down. |
Go down the stairs here and head right to a chest with an Elixir. Go down the stairs here, go left, down the long stairs, and right to a chest with a Whistle, then further right to a warp tile. Go left and down the stairs, right to a Fuma Shuriken, then down the stairs and left to another. Go down and right to another warp tile. On this final floor, go left, down, right, down and left. This is it, heal up the party, equip yourself, and go up the long stairs above you. Here, watch Fusoya and Golbez attack Zemus. Technically the G-man is uncontrollable, but that's just because he's too badass to be controlled by us. Still, he has a player sprite, time for a final character box! |
Go down the stairs here and head right to a chest with an Elixir. Go down the stairs here, go left, down the long stairs, and right to a chest with a Whistle, then further right to a warp tile. Go left and down the stairs, right to a Fuma Shuriken, then down the stairs and left to another. Go down and right to another warp tile. On this final floor, go left, down, right, down and left. This is it, heal up the party, equip yourself, and go up the long stairs above you. Here, watch Fusoya and Golbez attack Zemus. Technically the G-man is uncontrollable, but that's just because he's too badass to be controlled by us. Still, he has a player sprite, time for a final character box! |
||
| Line 42: | Line 42: | ||
COMPUTER CONTROLLED PLAYABLE CHARACTER - [[Golbez]] |
COMPUTER CONTROLLED PLAYABLE CHARACTER - [[Golbez]] |
||
[[File:IV-golbez sd.png|left]] |
[[File:IV-golbez sd.png|left]] |
||
| − | The Badass in Black is only visible with his player-battle sprite for three battles, all uncontrollable. Fortunately ''The After'' lets us control Golbez, |
+ | The Badass in Black is only visible with his player-battle sprite for three battles, all uncontrollable. Fortunately ''The After Years'' lets us control Golbez at last, giving me hope that SE ''can'' learn from their mistakes...pardon? Type-0 is gonna get an HD remake for PS4? Well, I had hope for a second there, guess I was wrong. Ah, anyway, the G-man knows the strongest Black Magics in the game. He's got all your favorite hits: Bio, Drain, Osmose, Flare, the three "aga" spells, and Meteor. He can also Twincast with Fusoya to use powered-up Black Magic like Double Meteor. The only reason I'd ever play ''The After Years'' is to control Golbez and form my dream party of Kain, Rydia and him. AI controlled characters are a rip-off. |
| + | {{-}} |
||
---- |
---- |
||
| − | Fusoya and Golbez attack with powerful spells, and then, the unthinkable happens! Fusoya combines his Old Man Rage with Golbez's Badass power! The ultimate power is born - Old Badass Rage! The prophecy has been fulfilled! The two wallop Zemus with Double Meteor and kill him. |
+ | Fusoya and Golbez attack with powerful spells, and then, the unthinkable happens! Fusoya combines his Old Man Rage with Golbez's Badass power! The ultimate power is born - Old Badass Rage! The prophecy has been fulfilled! The two wallop Zemus with Double Meteor and kill him. The party approaches and Edge protests them killing Zemus without him. Edge, having the hots for a badass doesn't make ''you'' badass by association. Then Zemus rises again as Zeromus! Everyone is struck down, I guess we lose. |
| + | |||
| + | Then, in a really corny sequence of hope and friendship, the party is revived to finish Ze(ro)mus off once and for all. The prayers of our loved ones on Earth are giving us the strength to conquer evil, we can't let them down! For the safety of those we care about, we will triumph in the face of destruction! Heart of the Cards, guide us! |
||
==Final Boss== |
==Final Boss== |
||
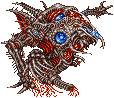
At the battle's start, spend a couple turns to cast a few buffs like Haste on the gang, then have Cecil use the "Crystal" item on the boss. |
At the battle's start, spend a couple turns to cast a few buffs like Haste on the gang, then have Cecil use the "Crystal" item on the boss. |
||
| − | {{Drake's Walkthrough Enemies |
+ | {{User:Drake Clawfang/Drake's Walkthrough Enemies |
| − | | name = [[Zeromus ( |
+ | | name = [[Zeromus (Final Fantasy IV 2D)|Zeromus]] |
| image = [[File:Zeromus2-ffiv-gba.png]] |
| image = [[File:Zeromus2-ffiv-gba.png]] |
||
| HP = 65498 |
| HP = 65498 |
||
| Line 63: | Line 66: | ||
| Difficulty = 4/5 |
| Difficulty = 4/5 |
||
}} |
}} |
||
| − | Zeromus is really, one of the hardest bosses I remember facing. |
+ | Zeromus is really, one of the hardest bosses I remember facing. He only has one really dangerous attack to worry about, but it's all he needs. He's kinda like [[Zodiark (summon)|Zodiark]] in that aspect. '''''Darkja is the cheapest fucking attack in the ENTIRE SERIES''''', I'm telling you now! Oh kiddies, the tales I could tell, but there's a place and a time for that, and it's my FFXII walkthrough, assuming I ever can be bothered to do one. In the meantime, back to our show. Zeromus' "Big Bang" is merciful in that it can't do Instant Death to the entire party, but it ''does'' do around 2000+ damage to the entire party. You can tell when Zeromus is about to use it, because he'll shake in warning. You'll need to heal every turn with Rosa up here to survive such an onslaught. |
| + | |||
| + | Zeromus also has Black Hole, which nullifies every positive status on the party, so if you didn't realize Shell, Haste and Protect were useless before, you will now. Rosa can't spare the time to re-buff you, she needs to heal. Zeromus also uses Bio, inflicting Sap. That 65000 HP seems low, but when he gets below 16000 HP Zeromus will heal himself to full and begin a new AI script that works in Flare. When his HP goes below 12000, he'll alternate between a random attack and Meteor, which has lower power here and is survivable. He only heals himself once, so whittle down that last 12000 HP and he's a goner. |
||
It's the final battle, go all out! This is your strategy regardless of who you took along with you. Throw everything you have with Edge, have Porom or Rosa cast Holy when they're not healing, Cecil, Yang and Cid attack, Kain jumps, Palom uses Flare and Rydia calls Bahamut. Once the true battle starts don't waste time with buffs, Black Hole will remove them and it's a waste of time. When Zeromus shakes, get ready to endure Big Bang. Afterwards, if anyone dies revive them right away and heal them. It's a tough fight with Big Bang blasting your party what seems every few turns. If you lose at this point grind a bit more and come back. |
It's the final battle, go all out! This is your strategy regardless of who you took along with you. Throw everything you have with Edge, have Porom or Rosa cast Holy when they're not healing, Cecil, Yang and Cid attack, Kain jumps, Palom uses Flare and Rydia calls Bahamut. Once the true battle starts don't waste time with buffs, Black Hole will remove them and it's a waste of time. When Zeromus shakes, get ready to endure Big Bang. Afterwards, if anyone dies revive them right away and heal them. It's a tough fight with Big Bang blasting your party what seems every few turns. If you lose at this point grind a bit more and come back. |
||
Revision as of 22:15, 30 August 2019
Ya know kiddies, I, Drake Clawfang, need a title. Or some sort of pompous meaningless position. Let's see....
- I'm Adam, Kaiser of the Wiki
- I'm Adam, War Czar of Final Fantasy
- I'm Adam, creative consultant to myself
- I'm Adam, aspiring author and self-delusional
- I'm Adam, aspiring Antichrist, wanna blow up the Vatican?
- I'm Adam, the father of your next child
Hmm...I'd say it's between the third and fifth one, what do you think kiddies?
The SuperWEAPONs
Time to track down our best weapons...well, second best, anyway, this is the Advance release. From the save, backtrack to the area with the two staircases, and take the left stairs on the left here is an invisible path over the air, walk right left, then up and right through the wall and down a flight of stairs. Down here open the chest for a Gold Apple, then go right to a warp tile. Along the next few paths you'll encounter Behemoths and Red and Blue Dragons as random encounters, be very careful. Take the stairs up to another warp tile, go up from there for a chest with a Behemoth, who yields a Protect Ring, then keep going up. This tile takes you to a save, use it, then leave and approach the sword.
| Boss | |||||
| Dark Bahamut | |||||

| |||||
| HP | MP | Dangerous Attack | |||
| 60000 | N/A | Mega Flare | |||
| Steal | Morph | Drops | |||
| Nothing | N/A | Ragnarok | |||
| Weakness | Resistance | Difficulty | |||
| Nothing | Nothing | 2/5 | |||
This bad boy doesn't need to charge up like his little brother, oh no. He opens the battle with an instant Mega Flare, wave goodbye to most of your party besides Cecil and maybe Rosa or Kain. Revive and heal everyone quickly. DB will now cast Reflect on himself and spam Flare to reflect onto you, though you can survive it. If you attack him with summons, he counters with Mega Flare, but it'll only do a few thousand damage, you can survive it. For lawls, cast Reflect on your party (on the mages and Edge first), and have Rydia summon Bahamut. DB will counter with Mega Flare, which will reflect. Those normal Flares of his aren't too strong, so if you can just stay one Curaja ahead of the (Mega)Flares, you'll be fine.
For your victory you win Cecil's Ragnarok, equip it now! It's his second-best weapon. Now take the long path back to the first save and use it. We've got more bosses to knock off here. Enter the middle door to the right of the save and approach the weapon.
The Plague will cast Doom on your party, then use Haste on them one by one. However, he's a joke, if you go all-out with Bahamut and physicals and maybe a few Shurikens, he'll die quickly, he's only got just over 30k HP. If you're having trouble, here's a tip - go into battle with Rosa killed off. Attack the boss, then when the Doom counter is like, 3 or 2, revive Rosa. He'll recast Doom, resetting everyone's counter to 10. Not too bright huh? Repeat if needed and he's toast. He leaves behind the Holy Lance for Kain. Go save and heal and enter the third room.
The Lunasaur is a tough motherfucker in the DS release, here, he's a joke. Each has 23000 HP, but Cecil can smack them with Ragnarok for 9999 easily. Two physicals from Cecil and a couple from Edge and Kain will take one out. The Lunasaurs cast Reflect on themselves and use Bio and Flame on your party, irritating but manageable. They should only last a few rounds. Go back and heal and save, and get ready for the final few floors. There's no save beyond here, just the final boss. Go right, up, left, down the stairs and enter the door.
The Core
Down here, there are three types of enemies. Behemoths and Red Dragons appear as random encounters, along with a new enemy, the Deathmask. It will cast Reflect on itself and the party, and bounce Holy, Flare and Curaja spells around. Use physicals and Rydia's Bahamut, which pierces reflect. Most enemies down here are practically minibosses, so the going can be tough, but don't give up. Feel free to use your Ethers and Elixirs if needed, soon they won't be needed. You may also want to use Edge's Smoke to escape from battles, unless you want to get a few more levels before the end.
Go right, down the stairs and left to a Fuma Shuriken. Go down from here to spy the stairs down, but first, a final challenge before the end! Well, challenge may be a stretch, the Ogopogo isn't too tough. He opens with a double Tidal Wave for 1000 damage, then uses the singular form and physicals. He also counters magic with Blaze to do a few hundred damage to the party. Pummel him and claim Edge's Masamune as your prize. You may want to run back and save this if you want. Then take the stairs down.
Go down the stairs here and head right to a chest with an Elixir. Go down the stairs here, go left, down the long stairs, and right to a chest with a Whistle, then further right to a warp tile. Go left and down the stairs, right to a Fuma Shuriken, then down the stairs and left to another. Go down and right to another warp tile. On this final floor, go left, down, right, down and left. This is it, heal up the party, equip yourself, and go up the long stairs above you. Here, watch Fusoya and Golbez attack Zemus. Technically the G-man is uncontrollable, but that's just because he's too badass to be controlled by us. Still, he has a player sprite, time for a final character box!
COMPUTER CONTROLLED PLAYABLE CHARACTER - Golbez
The Badass in Black is only visible with his player-battle sprite for three battles, all uncontrollable. Fortunately The After Years lets us control Golbez at last, giving me hope that SE can learn from their mistakes...pardon? Type-0 is gonna get an HD remake for PS4? Well, I had hope for a second there, guess I was wrong. Ah, anyway, the G-man knows the strongest Black Magics in the game. He's got all your favorite hits: Bio, Drain, Osmose, Flare, the three "aga" spells, and Meteor. He can also Twincast with Fusoya to use powered-up Black Magic like Double Meteor. The only reason I'd ever play The After Years is to control Golbez and form my dream party of Kain, Rydia and him. AI controlled characters are a rip-off.
Fusoya and Golbez attack with powerful spells, and then, the unthinkable happens! Fusoya combines his Old Man Rage with Golbez's Badass power! The ultimate power is born - Old Badass Rage! The prophecy has been fulfilled! The two wallop Zemus with Double Meteor and kill him. The party approaches and Edge protests them killing Zemus without him. Edge, having the hots for a badass doesn't make you badass by association. Then Zemus rises again as Zeromus! Everyone is struck down, I guess we lose.
Then, in a really corny sequence of hope and friendship, the party is revived to finish Ze(ro)mus off once and for all. The prayers of our loved ones on Earth are giving us the strength to conquer evil, we can't let them down! For the safety of those we care about, we will triumph in the face of destruction! Heart of the Cards, guide us!
Final Boss
At the battle's start, spend a couple turns to cast a few buffs like Haste on the gang, then have Cecil use the "Crystal" item on the boss.
| Boss | |||||
| Zeromus | |||||
| |||||
| HP | MP | Dangerous Attack | |||
| 65498 | 4093 | Big Bang | |||
| Steal | Morph | Drops | |||
| Dark Matter | N/A | Nothing | |||
| Weakness | Resistance | Difficulty | |||
| Nothing | Nothing | 4/5 | |||
Zeromus is really, one of the hardest bosses I remember facing. He only has one really dangerous attack to worry about, but it's all he needs. He's kinda like Zodiark in that aspect. Darkja is the cheapest fucking attack in the ENTIRE SERIES, I'm telling you now! Oh kiddies, the tales I could tell, but there's a place and a time for that, and it's my FFXII walkthrough, assuming I ever can be bothered to do one. In the meantime, back to our show. Zeromus' "Big Bang" is merciful in that it can't do Instant Death to the entire party, but it does do around 2000+ damage to the entire party. You can tell when Zeromus is about to use it, because he'll shake in warning. You'll need to heal every turn with Rosa up here to survive such an onslaught.
Zeromus also has Black Hole, which nullifies every positive status on the party, so if you didn't realize Shell, Haste and Protect were useless before, you will now. Rosa can't spare the time to re-buff you, she needs to heal. Zeromus also uses Bio, inflicting Sap. That 65000 HP seems low, but when he gets below 16000 HP Zeromus will heal himself to full and begin a new AI script that works in Flare. When his HP goes below 12000, he'll alternate between a random attack and Meteor, which has lower power here and is survivable. He only heals himself once, so whittle down that last 12000 HP and he's a goner.
It's the final battle, go all out! This is your strategy regardless of who you took along with you. Throw everything you have with Edge, have Porom or Rosa cast Holy when they're not healing, Cecil, Yang and Cid attack, Kain jumps, Palom uses Flare and Rydia calls Bahamut. Once the true battle starts don't waste time with buffs, Black Hole will remove them and it's a waste of time. When Zeromus shakes, get ready to endure Big Bang. Afterwards, if anyone dies revive them right away and heal them. It's a tough fight with Big Bang blasting your party what seems every few turns. If you lose at this point grind a bit more and come back.
When Zeromus falls, watch the ending and rejoice! Or not, it's not over - we have one final dungeon to go through! The Lunar Ruins await!
| Drake Clawfang's FFIV Walkthrough | ||
| Previous page | 1 - 2 - 3 - 4 - 5 - 6 - 7 - 8 - 9 - 10 | Next page |
| 11 - 12 - 13 - 14 - 15 - 16 - 17 - 18 | ||