Head east over the bridge and on your way. Head north from there and you will eventually find a cave. Save and Enter.
Northern Cave
First thing to say is that all the enemies here are a little stronger, but can’t stand before the added might of Aigis. First thing to do is climb the small set of stairs and head east to a Cotton cap. Return to the entrance and head north. Follow the path to a sacred candle and take the ladder down. As you head down the path, claim the Maiden’s Kiss from the chest. As you head up the next set of steps, head down for an ether, then go up to find B2. Go left to find a dagger, then continue back the other way. Before you ascend the next steps you see, grab the Leather Shoes in plain view. Do not climb the next steps yet, instead, go around them and look around for leather armour in the northeast corner. Return to the steps, go up them, and find yet more stairs leading down. In this room, you will find your first save point. You may save and use tents in this circle, which you would normally only be able to do on the world map. When you’re ready, head south into the next area. Our first boss fight is not moments away!
As we enter this new place, you can see a man in a feathered cap facing a faceless man in a red robe. Talk to the man, and the boss music begins to play. Reminds me of ‘Force your Way’ for the first few seconds, but it begins to fade into obscurity after about a minute. It’s not that good. To Battle!
| Boss Fight: Manatoise |
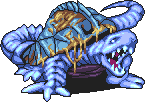
How’d a turtle this big hide under that red cloak? The first boss is damn easy, as first bosses are naturally inclined to be. Not only do you have Diana, who can cast white magic, but you also have Aigis, who can wield healing and offensive magic. The mysterious ???? also joins, to add his excellent repertoire of spells to the fray. Manatoise has high defense, so physical strikes aren’t going to cut it. Have Aigis use blizzard, have ???? use blizzara for massive damage, and heal every turn with Diana. Manatoise himself only attacks weakly, but may counter physical strikes with a strong blast of thunder. Leave the battle to the magical attackers, keep everyone’s HP up, and you’ll win in no time. |
So it turns out that our enigmatic question mark man is none other than:
| Guest Character: Elgo |
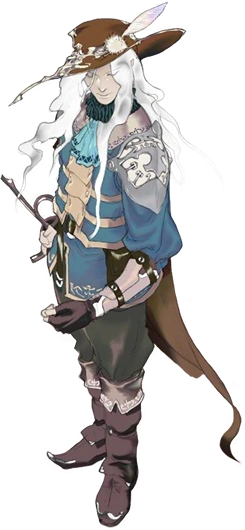
Elgo is a ‘wandering prophet’ - whatever the hell that means. I suppose he just ambles from place to place, predicting what may happen to the world next. Even after revealing his name to us, Elgo remains something of a mystery for most of FFD. Suffice to say that Elgo is a prime example of Chekhov’s Gun: a plot device that dictates that a character or object will become much more significant as the plot unfolds. Elgo's main colour palette is brown, and he sports a cape and feathered hat of this colour. His hair is bone white, but he doesn't appear to be old. You might also notice that he's present on the game's logo. Is he more important than he seems? I'll never tell! For now, though, Elgo is just a boring ol’ soothsayer, seeing visions of the future and purporting to try and save the crystal of Lux from the imminent disaster that is about to befall it. Elgo is a red mage, meaning that he can attack, heal and strike with black magic all in the same battle. It may not seem like much to most Final Fantasy veterans, but for the short period of time that Elgo stays with us, he’s incredibly helpful, considering that he has an occupation, while the rest of our party are all jobless bums. His best skill is the spell “Raise” which restores a KO’d character to life. A neat little character, this. Use him well. Also, I know 'equipable' is not a word. Henceforth I have made it a word, so spread the good news. |
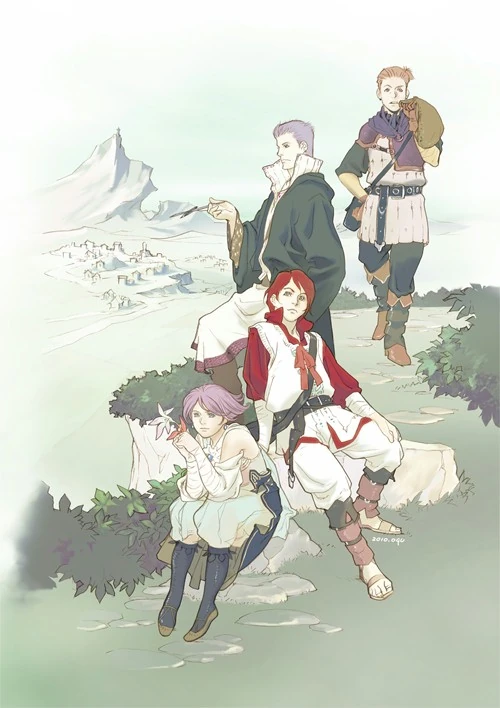
Elgo appears to be crazy, and talks to himself far too often. The party finds this endearing, and they decide to let him join for reals. The foolhardy four becomes the foolhardy five, and become much stronger in the process. Return to the save point if you desire, then push onward. Follow the linear path, and collect the tent from the chest you see. Head up the ladder, then continue north to the phoenix down. Head down and left to find the ‘Traveling Moogle Emporium”. How bloody cute is that? The Mog Mart has everything for sale that the Luxian shops did. If you have the funds, buy to your heart’s content. When you’re finished, head out of the cave and into the daylight.
The path from here to the temple is quite straightforward. Heal as need be, save outside the temple, then enter.
Temple of the Crystal
The Crystal Temple holds the only crystal in the world, which is really unusual for Final Fantasy. Where are the other three? Screw it, that just means three less nuisances to run after and protect. If You played FFIII, IV and V, you might suspect that something bad is about to happen to the crystal in this temple… The enemies in this place are much tougher, but still kinda suck. Vassago are tough, but still go down after three hits. The Red mousse can’t be hurt physically; cast fire to exterminate them.
As you enter, head north through the atrium and through the door. This room contains six doors, including the one you came in through. The northwest leads to an antidote. Southwest leads to a phoenix down, Northeast leads to a bronze hauberk, and southeast leads to a feathered cap. Now seems as good a time as any to advise you to constantly equip your party with the latest and strongest equipment you find. Head north up the stairs to 2F. Go right, down and right again to reach the eastern door. Inside is a bronze helm. The western door at the other end of the room holds nothing. What build the damn room if you aren’t going to stash treasure inside it? Take the centre door for some bronze armour, and then go down towards the block in the bottom of the screen. Take the top-most door for 600 gil, exit, walk around, and enter the other door. On 3F, walk around the large square room in the centre of the floor and enter through the back for a potion. The top of the room has a junction: West has a chest with a pointy hat, and a door with a chest with a tent. Sorry for the weird sounding script, I’m trying to find new ways to say, “Go left, pick up item, go north, pick up item, walk around, exit”. Walkthrough writing is exhausting. The northeast staircase takes you up to 4F. Go up and through the door for a Rod. Exit and go all the way left, then up, for a door that leads to a metal claw. Awesome weapon. Equip it on Sol or Glaive. Head out and into the centre of the floor, which leads up to the fifth floor and a save point. If you’re like me, you may need a tent to replenish your MP. Using one couldn’t hurt, right? I should also mention that this is the last save point of the prologue. If you haven’t actually bought anything, I suggest you get cracking, because you won’t be able to progress past this point without buying chapter 1. If you think you’re ready for the following boss battle, knock that green door open saloon-style to find yourself into the crystal chamber.
Saving the Crystal
No enemies or obstacles in here, just walk up to the eponymous crystal to get the scene playing. Seems that the crystal’s all right after all. Oh, but wait! The ground starts shaking and some monster appears in front of you. He promptly begins to destroy the crystal. Not if we can help it!
| Boss Fight: Watchbeast |
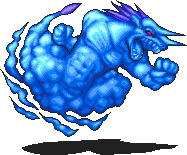
Watchbeast is much harder than Manatoise, and yet, it’s still quite the pushover. His physical attack hurts, but that’s nothing that a healthy dose of cure can’t fix. Exploit this guy’s weakness to fire by casting Fira and Fire, Healing as per normal, and having Glaive use Focus once before striking. His evasion rate is higher than normal, but it’s nothing to write home about. Continue as you would any battle. Watchbeast really isn’t much threat to you. He exists more as a way to stop you from automatically hitting AUTO and actually forcing you to pay attention to the battle itself. One attack he uses near battle’s end (After you whitle away about 2000HP) is Soul Despair, which he charges up for, a magical strike that leaves the party with critical level HP. A few seconds after this, and the battle will end. A bit like the Beatrix encounters from FFIX. Doesn’t that just piss you off? |
As the battle ends, we get to see more people from around the world. This time a Bard, a Dancer, a Mad scientist and his robot toy, a ninja on the run from other ninjas, and a drunken man stumbling from the pub after being kicked out by the bartender. Flashback to the crystal, which begins to crack under the pressure of the watchbeast’s assault. Some guardian He’s supposed to be.
But then, a group of four other misfits breaks through the wall to confront the creature, annnnnnd…… that’s all. The prologue has reached its end, and so has this adventure for every person that did not purchase the next chapter.
You want more than just a crummy prologue-epilogue? Buy the game. Money doesn’t buy happiness, true, but it sure does help. If you don’t buy the game, I suppose you can still read my walkthrough if you want, I am never one to turn away poor vagrants from my door.
For now though, the walkthrough has ended. You won't be seeing any more information from me! The game has all but finished. Til the next page.