Intangir Bot (talk | contribs) |
Intangir Bot (talk | contribs) m (Bot: Changing template: Q) |
||
| (43 intermediate revisions by 12 users not shown) | |||
| Line 1: | Line 1: | ||
| − | {{sideicon|FFXII}} |
+ | {{sideicon|prime=FFXII}} |
| ⚫ | |||
| − | {{FFXII Enemy |
||
| − | + | {{infobox enemy |
|
| + | | release = FFXII |
||
| + | |type = Esper |
||
| + | |name = Ultima |
||
| ⚫ | |||
| ⚫ | |||
| ⚫ | |||
| + | |location = [[Great Crystal (Final Fantasy XII)|Great Crystal]] (Crystal Peak); [[Trial Mode]] [[Trial Mode#95|Stage 95]] (''Zodiac'' versions) |
||
| ⚫ | |||
| + | |aiscript = true |
||
| ⚫ | |||
| ⚫ | '''Ultima''' is an optional [[boss]] in ''[[Final Fantasy XII]]'' located in the highest reaches of the [[Great Crystal (Final Fantasy XII)|Great Crystal]] in [[Giruvegan]]. Defeating Ultima unlocks her sprite in the [[Sky Pirate's Den]] and earns the player the title of Fell Angel, and adds her license on the [[License Board]] so the player can recruit her as an [[Esper (Final Fantasy XII)|Esper]]. She is also fought in [[Trial Mode#95|Stage 95]] of the ''Zodiac'' versions' [[Trial Mode]]. In both battles, the battlefield is affected by a rotating handicap. |
||
| + | |||
| ⚫ | |||
| ⚫ | |||
| ⚫ | {{Quote|Masterpiece among the scions created by the gods, and the mastermind of the plot to rise against them. Prior to her betrayal, she was tasked with guiding souls to heaven and aiding in their reincarnation. Called the High Seraph for her angelic wings of glimmering gold, yet it was on wings of deepest black that the tainted angel Ultima rose against the gods. Since her fall, her heart is without light, and impossible to know.}} |
||
| + | |||
| + | ==Stats== |
||
| + | {{infobox enemy stats FFXII |
||
| name = Ultima |
| name = Ultima |
||
| + | | prev = Famfrit (Final Fantasy XII boss) |
||
| ⚫ | |||
| ⚫ | |||
| bestiary = 272 |
| bestiary = 272 |
||
| − | | next = Mateus (Final Fantasy XII |
+ | | next = Mateus (Final Fantasy XII boss) |
| − | | |
+ | | class = Esper |
| − | | |
+ | | genus = High Seraph |
| level = 63 |
| level = 63 |
||
| evade = 0 |
| evade = 0 |
||
| Line 33: | Line 50: | ||
| dark = Weak |
| dark = Weak |
||
| holy = Absorb |
| holy = Absorb |
||
| ⚫ | |||
| ⚫ | |||
| location = [[Great Crystal (Final Fantasy XII)|Great Crystal]] (Crystal Peak) |
| location = [[Great Crystal (Final Fantasy XII)|Great Crystal]] (Crystal Peak) |
||
| − | | bestiary location = Espers |
||
| lp = 65 |
| lp = 65 |
||
| steal 1 = [[Loot (Final Fantasy XII)#Virgo Gem|Virgo Gem]] |
| steal 1 = [[Loot (Final Fantasy XII)#Virgo Gem|Virgo Gem]] |
||
| − | | steal 2 = [[ |
+ | | steal 2 = [[Loot (Final Fantasy XII)#High Arcana|High Arcana]] |
| − | | steal |
+ | | izjs steal 2 = [[Final Fantasy XII items#Elixir|Elixir]] |
| + | | steal 3 = [[Final Fantasy XII items#Megalixir|Megalixir]] |
||
| petrify = Immune |
| petrify = Immune |
||
| stop = Immune |
| stop = Immune |
||
| Line 52: | Line 67: | ||
| oil = Immune |
| oil = Immune |
||
| disable = Immune |
| disable = Immune |
||
| − | | |
+ | | slow = Immune |
| doom = Immune |
| doom = Immune |
||
| confuse = Immune |
| confuse = Immune |
||
| Line 60: | Line 75: | ||
| lure = Immune |
| lure = Immune |
||
| faith = Immune |
| faith = Immune |
||
| ⚫ | |||
| − | | magicks = [[Holyja]], [[Curaja]], [[Renew]], [[Blindna]], [[Reflectga]] |
||
| − | | technicks = Redemption, [[Protect (Ability)|Greater Barrier]] |
||
| − | | innate augments = Safety, Null Knockback, Null VIT, Null Weather & Terrain Effects, Piercing Magic, Null Evade, Adrenaline, Spellbreaker, Last Stand, Return Damage, Spellspring, Magic CT 0 |
||
| − | | conditional augments = Attack CT 0 (After every second Holyja), Damage Resist (If Greater Barrier) |
||
| reflect = 100 |
| reflect = 100 |
||
| protect = 100 |
| protect = 100 |
||
| shell = 100 |
| shell = 100 |
||
| haste = 100 |
| haste = 100 |
||
| + | | libra immune = yes |
||
| ⚫ | |||
| + | | status effect rate = 4 |
||
| + | | magicks = [[Final Fantasy XII enemy abilities#Holyja|Holyja]], [[Final Fantasy XII enemy abilities#Curaja|Curaja]], [[Final Fantasy XII enemy abilities#Renew|Renew]], [[Final Fantasy XII enemy abilities#Blindna|Blindna]], [[Final Fantasy XII enemy abilities#Reflectga|Reflectga]] |
||
| + | | technicks = [[Final Fantasy XII enemy abilities#Redemption|Redemption]], [[Final Fantasy XII enemy abilities#Greater Barrier|Greater Barrier]] (when HP<50%; use only once) |
||
| + | | innate augments = [[Final Fantasy XII enemy abilities#Safety|Safety]], [[Final Fantasy XII enemy abilities#No Knockback|No Knockback]], [[Final Fantasy XII enemy abilities#Ignore Vitality|Ignore Vitality]], [[Final Fantasy XII enemy abilities#Ignore Weather & Landscape|Ignore Weather & Landscape]], [[Final Fantasy XII enemy abilities#Ignore Reflect|Ignore Reflect]], [[Final Fantasy XII enemy abilities#Ignore Evade|Ignore Evade]], [[Final Fantasy XII enemy abilities#Low-HP ATK+|Low-HP ATK+]], [[Final Fantasy XII enemy abilities#Low-HP Mag+|Low-HP Mag+]], [[Final Fantasy XII enemy abilities#Low-HP Def+|Low-HP Def+]], [[Final Fantasy XII enemy abilities#Reflect Damage|Reflect Damage]], [[Final Fantasy XII enemy abilities#0 MP|0 MP]], [[Final Fantasy XII enemy abilities#Magick CT0|Magick CT0]] |
||
| + | | conditional augments = After every second Holyja: [[Final Fantasy XII enemy abilities#Attack CT0|Attack CT0]]<br/>After using Greater Barrier: [[Final Fantasy XII enemy abilities#Reduce Damage|Reduce Damage]] |
||
| info = Battle conditions shift: HP Sap, MP Sap, No Attacks, No Magick, No Technicks, No Items, Magnetize |
| info = Battle conditions shift: HP Sap, MP Sap, No Attacks, No Magick, No Technicks, No Items, Magnetize |
||
| + | | charge time = 25 |
||
}} |
}} |
||
| − | {{See Also|Ultima (Ivalice)}} |
||
| ⚫ | '''Ultima''' is an optional boss in ''[[Final Fantasy XII]]'' located in the |
||
| + | ==AI script==<!--info is from Split Infinity's guide: https://gamefaqs.gamespot.com/ps2/459841-final-fantasy-xii/faqs/42270--> |
||
| ⚫ | |||
| + | {{Enemy AI FFXII |
||
| ⚫ | |||
| + | |magickname1 = [[Final Fantasy XII enemy abilities#Curaja|Curaja]] |
||
| ⚫ | {{ |
||
| + | |magickcond1 = Attack CT0; use on character under Reverse and with HP <10% (100%) |
||
| + | |magickname2 = [[Final Fantasy XII enemy abilities#Renew|Renew]] |
||
| + | |magickcond2 = Attack CT0; use on character under Reverse and with HP <10% (100%) |
||
| + | |magickname3 = [[Final Fantasy XII enemy abilities#Blindna|Blindna]] |
||
| + | |magickcond3 = No Attack CT0 & HP >50% (5%)<br/>HP <50% (100%) |
||
| + | |magickname4 = [[Final Fantasy XII enemy abilities#Reflectga|Reflectga]] |
||
| + | |magickcond4 = Attack CT0 & HP <50%; use on target without Reflect (25%) |
||
| + | |magickname5 = [[Final Fantasy XII enemy abilities#Holyja|Holyja]] |
||
| + | |magickcond5 = HP <80% use once when at least one target doesn't absorb Holy (100%)<br/>Repeat after each next 12 commands when at least one target doesn't absorb Holy (100%)<br/>HP <50% use once after Greater Barrier (100%)<br/>Repeat after each next 7 commands when at least one target doesn't absorb Holy (100%)<br/>Repeat after each next 10 commands when all targets absorb Holy (100%) |
||
| + | |magickname6 = [[Final Fantasy XII enemy abilities#Redemption|Redemption]] |
||
| + | |magickcond6 = When Attack CT0 is not active, use on a target that doesn't absorb Holy (25%) |
||
| + | |technickname1 = [[Final Fantasy XII enemy abilities#Greater Barrier|Greater Barrier]] |
||
| + | |technickcond1 = HP <50%; use once (100%) |
||
| + | |augmentname1 = [[Final Fantasy XII enemy abilities#Attack CT0|Attack CT0]] |
||
| + | |augmentcond1 = After every second Holyja |
||
| + | |augmentname2 = [[Final Fantasy XII enemy abilities#Reduce Damage|Reduce Damage]] |
||
| + | |augmentcond2 = When Greater Barrier is active |
||
| + | |targeting = |
||
| + | }} |
||
| − | == |
+ | == How to find == |
| − | Ultima can be fought after receiving the [[Treaty-Blade]]. The player must return to Waystone VIII, which is the waystone that allows access to Great Crystal from |
+ | Ultima can be fought after receiving the [[Treaty-Blade (Final Fantasy XII)|Treaty-Blade]]. The player must return to Waystone VIII, which is the [[Way Stone (Final Fantasy XII)|waystone]] that allows access to Great Crystal from Giruvegan. From the waystone, there are three paths: one goes up, one goes down and another one is sealed by Gate Scorpio. The player must follow the path going up and unseal Gate Scorpio on the following platform, then return to Waystone VIII and head through Gate Scorpio to Waystone IX, which can be used to teleport to Waystone X. |
From Waystone X the player reaches Waystone XX. On this platform there are two paths sealed by Gate Sagittarius (Gates I and II), plus other three paths; one going down, two leading up, and the last path is the one the player came in on. From the path they arrived from, the player should head directly across the platform toward the only other path heading down. Eventually they will come to a switch for Gate Sagittarius. |
From Waystone X the player reaches Waystone XX. On this platform there are two paths sealed by Gate Sagittarius (Gates I and II), plus other three paths; one going down, two leading up, and the last path is the one the player came in on. From the path they arrived from, the player should head directly across the platform toward the only other path heading down. Eventually they will come to a switch for Gate Sagittarius. |
||
| − | After unsealing the gate there will be a [[Timer|time limit]] of 71.00 seconds and the player must hurry back to Waystone XX. The player can either go back the way they came, or head up to the next platform, and then take the only path leading down, which will lead back to Waystone XX. (Taking this path is the [[Spawning |
+ | After unsealing the gate there will be a [[Timer|time limit]] of 71.00 seconds and the player must hurry back to Waystone XX. The player can either go back the way they came, or head up to the next platform, and then take the only path leading down, which will lead back to Waystone XX. (Taking this path is the [[Spawning enemies|spawn]] condition for the [[Crystal Knight]], who will appear next to the Sagittarius gates if the player has started the [[Phon Coast]] [[Phon Coast#Hunt Club|Hunt Club]] sidequest.) After reaching Waystone XX the player must open Sagittarius Gate II. |
| − | Descending from Sagittarius Gate II leads to Waystone XII, which teleports to Waystone XIV. On this platform there are two paths, one leading up and the other leading down. The player must head up to the Gate Leo switch, then return to the previous platform, as again there will be a time limit, this time of 215.00 seconds. From the platform the player should take the path going down and then take the only possible path on the next platform. On the third platform there are two paths, one leading to Gate Leo II and the other to an [[ |
+ | Descending from Sagittarius Gate II leads to Waystone XII, which teleports to Waystone XIV. On this platform there are two paths, one leading up and the other leading down. The player must head up to the Gate Leo switch, then return to the previous platform, as again there will be a time limit, this time of 215.00 seconds. From the platform the player should take the path going down and then take the only possible path on the next platform. On the third platform there are two paths, one leading to Gate Leo II and the other to an [[Excalibur (Final Fantasy XII)|Excalibur]]/[[Yagyu Darkblade (Final Fantasy XII)|Yagyu Darkblade]] [[Treasure (Final Fantasy XII)|treasure]] (depending on version), which isn't accessible yet. |
After passing through Leo II there are two more paths and Gate Gemini. The player can take either path, both leading to Waystone XV that teleports to Waystone XVI. |
After passing through Leo II there are two more paths and Gate Gemini. The player can take either path, both leading to Waystone XV that teleports to Waystone XVI. |
||
| Line 93: | Line 128: | ||
After pushing the switch for Gate Capricorn the player should return to platform XVI (with a time limit of 180.00 seconds). On platform XVI they should take the only path heading down to Gate Capricorn I and the switch for Gate Virgo. After touching the switch the player should quickly return to platform XVI (with a time limit of 108.00 seconds), and on platform XVI follow the middle path, which leads back to the Libra switch; from there the player should follow the path down to two Gates, Capricorn II and Virgo II on the next platform, unseal Gate Virgo II and cross it. |
After pushing the switch for Gate Capricorn the player should return to platform XVI (with a time limit of 180.00 seconds). On platform XVI they should take the only path heading down to Gate Capricorn I and the switch for Gate Virgo. After touching the switch the player should quickly return to platform XVI (with a time limit of 108.00 seconds), and on platform XVI follow the middle path, which leads back to the Libra switch; from there the player should follow the path down to two Gates, Capricorn II and Virgo II on the next platform, unseal Gate Virgo II and cross it. |
||
| − | In the next section, from where the player entered, they should take the right path leading up to Waystone XVII that teleports to Waystone XVIII. The path will lead to a [[Save |
+ | In the next section, from where the player entered, they should take the right path leading up to Waystone XVII that teleports to Waystone XVIII. The path will lead to a [[Save point#Final Fantasy XII|Save Crystal]]. From the Save Crystal there are three paths: the one heading down leads the Aquarius Switch, and the opposite leads to Waystone XIX, which will warp back to Waystone XX. Ultima is sealed down the path in the middle. |
| − | ==Battle== |
+ | == Battle == |
| − | [[File:FFXII |
+ | [[File:FFXII Redemption.png|left|thumb|Battle against Ultima.]] |
| − | The party will receive damage every time they attack her. Ultima uses Redemption and a normal attack that has a chance to inflict [[ |
+ | The party will receive damage every time they attack her. Ultima uses Redemption and a normal attack that has a chance to inflict [[Final Fantasy XII statuses#Sap|Sap]]. Her special attack is Holyja. Ultima is weak against [[Dark (element)|dark]] and [[Final Fantasy XII statuses#Blind|blindness]]. If afflicted with Blind Ultima will cast [[Blindna]] on herself. |
| − | At the start Ultima will cast Holyja after twelve attacks, which includes standard attacks and Redemption. |
+ | At the start Ultima will cast Holyja after twelve attacks, which includes standard attacks and Redemption. Ultima's special move has a chance of inflicting a [[Final Fantasy XII statuses|negative status]] on the party; Holyja inflicts [[Reverse (status)|Reverse]], upon which Ultima will cast [[Full Cure (ability)#Final Fantasy XII|Renew]] on the Reversed characters [[HP to one ability|leaving them at 1 HP]]. |
| − | After her HP has been drained to 80%, Ultima will cast Holyja, regardless of the number of times she attacked. When Ultima's HP drops down to around 70%, a magick field will fall, causing the following debilitations in this order: [[HP ( |
+ | After her HP has been drained to 80%, Ultima will cast Holyja, regardless of the number of times she attacked. When Ultima's HP drops down to around 70%, a magick field will fall, causing the following debilitations in this order: [[HP (stat)|HP]] decrease, [[MP (stat)|MP]] decrease, [[Attack (command)#Final Fantasy XII|Attack Command]] seal, [[Magic (command)#Final Fantasy XII|Magick Command]] Seal, [[Technicks|Technick Command]] Seal, [[Item#Final Fantasy XII|Item Command]] Seal, Increase/Lag weapon attacks' [[Charge Time]]. The seal will cycle until Ultima is defeated. When Ultima's HP drops to 70%, she uses Holyja after seven attacks instead of twelve. She also casts [[Reflectga]] on the party from time to time and casts [[Curaja]] on the reflected party members, effectively killing any party member who has the Reverse status (as Ultima's magick is piercing, thus ignoring Reflect). |
| − | + | Ultima's [[stats]] will increase as her HP depletes. When Ultima's HP drops to 30%, she uses Holyja after only three attacks, and Holyja becomes more powerful. |
|
| − | ===Strategy=== |
+ | === Strategy === |
| − | + | It is recommended for the main party members to be at least [[level]] 55 or above; level 40 or above for back-up characters. It is helpful to have three [[Final Fantasy XII armor#White Mask|White Masks]], or a [[Final Fantasy XII accessories#Sage's Ring|Sage's Ring]], to absorb Ultima's [[Holy (ability)#Final Fantasy XII|Holyja]] attack. The player should stock [[Final Fantasy XII items#Ether|Ethers]] and curative items before the fight. [[Final Fantasy XII accessories#Bubble Belt|Bubble Belts]], [[Final Fantasy XII accessories#Ring of Renewal|Rings of Renewal]], and [[Final Fantasy XII accessories#Opal Ring|Opal Rings]] are useful for additional advantages. |
|
| + | The player should not equip [[Holy (element)|holy]]-elemental weapons, such as Excalibur (found in her lair in the ''Zodiac'' versions) or [[Holy Lance (Final Fantasy XII)|Holy Lance]]. As Ultima is weak against Dark, the [[Darkga]] spell and [[Final Fantasy XII ammunition#Dark Shot|Dark Shot]] for a [[gun]] exploit this weakness, as well as [[Final Fantasy XII weapons#Ninja Swords|ninja swords]] in the original version. In the ''Zodiac'' versions, only Yagyu Darkblade is Dark-elemental, and if the player has it, it makes for an excellent weapon against Ultima, especially if coupled with the Dark-damage [[Elemental Affinity|boosting]] [[Final Fantasy XII armor#Black Robes|Black Robes]]. The blade is where the Excalibur used to be in the Great Crystal in the ''Zodiac'' versions. In the ''Zodiac Job System'' version the [[Shikari]] cannot equip Black Robes, but in ''The Zodiac Age'' the player can select two [[License Board]]s for each party member, thus possibly giving Shikari access to Black Robes. With this combination, coupled with [[Final Fantasy XII accessories#Germinas Boots|Germinas Boots]] (for added Speed), [[Final Fantasy XII statuses#Bravery|Bravery]], [[Final Fantasy XII statuses#Haste|Haste]] and [[Final Fantasy XII statuses#Berserk|Berserk]], the character can lay waste to Ultima quickly, even before the Attack command gets sealed, especially if supported by a mage that casts Darkga, and possibly a gun user with Dark Shot. |
||
| − | All [[Holy (Element)|holy]]-elemental weapons, such as Excalibur or [[List of Final Fantasy XII Weapons#Holy Lance|Holy Lance]], should be removed. As Ultima is weak against dark, the [[Darkga]] spell and [[List of Final Fantasy XII Ammunition#Dark Shot|Dark Shot]] for a [[gun]] exploit this weakness, as well as [[List of Final Fantasy XII Weapons#Ninja Swords|ninja swords]]. |
||
| − | One can unequip White Masks or Sage's Ring to lure Ultima to use Redemption, then immediately switch back |
+ | One can unequip White Masks or Sage's Ring to lure Ultima to use Redemption, then immediately switch back to absorb her attacks. Should the party be afflicted with Reverse from Ultima's special attack, one should immediately cast [[Dispelga]]/[[Dispel]]/[[Esunaga]]/[[Esuna (ability)|Esuna]], or Ultima will cast Renew on the Reversed party members. |
| − | It is recommended to equip Ring |
+ | It is recommended to equip Ring of Renewal ([[Auto-Regen|Auto Regen]]) during the magick seal, and simply cure with [[Final Fantasy XII items#X-Potion|X-Potions]], if the party has a healthy stock. |
[[File:FFXII Holyja Ultima.jpg|thumb|Ultima's special attack, Holyja.]] |
[[File:FFXII Holyja Ultima.jpg|thumb|Ultima's special attack, Holyja.]] |
||
| − | When Ultima begins casting Reflectga |
+ | When Ultima begins casting Reflectga a party member can equip the Opal Ring to cast curative magick under [[Final Fantasy XII statuses#Reflect|Reflect]]. However, this may be an opportune time to cast Darkga, resulting in the maximum of twelve hits on Ultima (if the player has a [[guest]] and all three controllable party members cast the spell; in the ''Zodiac'' versions however, only the [[Red Battlemage]] learns Darkga and the player is unlikely to have three). The Darkga caster can equip Black Robes to deal boosted damage; this is especially useful in the ''Zodiac'' versions where the damage cap is removed. |
| − | When Ultima begins casting Reflectga on the party, if the timing is right, after dispelling the party from Reflect, Ultima might cast Curaja on the characters, healing |
+ | When Ultima begins casting Reflectga on the party, if the timing is right, after dispelling the party from Reflect, Ultima might cast Curaja on the characters, healing 3,000 and above HP. If the player does not dispel Reflect in time, Ultima's Curaja will kill any party member afflicted with Reverse. There is a way to avoid Ultima casting either Renew or Curaja by keeping one party member unequipped with any kind of equipment that absorbs Holy damage. |
| − | When Ultima's stats increase when she is in low health, the party will benefit from [[Haste ( |
+ | When Ultima's stats increase when she is in low health, the party will benefit from [[Haste (ability)|Haste]], [[Bubble (ability)|Bubble]], [[Protect (ability)|Protect]], and [[Shell (ability)|Shell]], as her attacks are fast and powerful. |
| − | A good tactic to defeat Ultima is to equip everyone with |
+ | A good tactic to defeat Ultima in the original version is to equip everyone with Yagyu Darkblades and have two members in [[HP Critical]] to boost attack (if the characters have obtained the [[Augment (Final Fantasy XII)#Adrenaline|Adrenaline augment]] for 70 LP) and berserk them. The remaining member should be the decoy, and focus on healing. The party should equip Sage's Rings/White Masks when Ultima casts Holyja, and have the tanks cast [[Transfusion#Final Fantasy XII|Infuse]] to get back to HP Critical when Berserk wears off. When Ultima stops the party from using physical attacks, the player should switch the tanks for mages, and continuously use Darkga. However, it is arduous to get three Yagyu Darkblades for how rare they are. In the original version, all ninja blades are Dark-elemental, and thus can be used for the same strategy. In the ''Zodiac'' versions, only the Shikari can equip Yagyu Darkblade, a license hidden behind a [[Quickening (ability)|Quickening]] license, but with the damage cap removed, there is potential to deal much more damage even with only one darkblade-wielder. |
| − | A cheap way to win this battle is to exploit Ultima's weakness to Blind. The player can stock 99 [[ |
+ | A cheap way to win this battle is to exploit Ultima's weakness to Blind. The player can stock 99 [[Final Fantasy XII items#Eye Drops|Eye Drops]], equip a character with a [[Final Fantasy XII accessories#Nihopalaoa|Nihopalaoa]] and keep throwing Eye Drops on Ultima to inflict Blind. Ultima will immediately cast Blindna, effectively trapping her in a loop while the other two characters can attack. However, Ultima may still cast Holyja. The Blind magick will also always hit if the caster equips an [[Final Fantasy XII accessories#Indigo Pendant|Indigo Pendant]], but the MP drain and Magick Seal handicaps make this less useful than using Nihopalaoa. |
| − | == |
+ | ===Trial Mode=== |
| + | Ultima is fought in Stage 95. The stage has cycling handicaps from HP Sap, MP Sap, Magicks/Attack/Technicks commands disabled as soon as Ultima uses Holyja. The stage has 16 [[Treasure (Final Fantasy XII)|treasures]] (overlapping one another on a [[Trap (term)|trap]]) that all have [[Final Fantasy XII items#Ether|Ether]], although there is a small chance to get a [[Final Fantasy XII items#Meteorite (D)|Meteorite (D)]] with [[Final Fantasy XII accessories#Diamond Armlet|Diamond Armlet]] equipped. |
||
| − | {{Gallery|class=FFXIIa |
||
| + | |||
| ⚫ | |||
| + | The same strategy can be used against Ultima in the Trial Mode as in the main game. The following items can be stolen from her in this battle: [[Final Fantasy XII armor#White Mask|White Mask]] (common), [[Final Fantasy XII armor#White Robes|White Robes]] (uncommon) and [[Final Fantasy XII armor#Lordly Robes|Lordly Robes]] (rare). |
||
| ⚫ | |||
| ⚫ | |||
| ⚫ | |||
| − | == |
+ | == Gallery == |
| + | <gallery> |
||
| ⚫ | |||
| ⚫ | |||
| − | *Defeating Ultima adds her sprite to the game's [[Sky Pirate's Den]] and awards the player with the title of "Fell Angel". |
||
| ⚫ | |||
| ⚫ | |||
| ⚫ | |||
| + | Trial-Mode-Stage-95-FFXII-TZA.png|Trial Mode. |
||
| + | </gallery> |
||
| − | ==Related |
+ | == Related enemies == |
| − | *[[Adrammelech (Final Fantasy XII |
+ | * [[Adrammelech (Final Fantasy XII boss)|Adrammelech]] |
| − | *[[Belias (Final Fantasy XII |
+ | * [[Belias (Final Fantasy XII boss)|Belias]] |
| − | *[[Chaos (Final Fantasy XII |
+ | * [[Chaos (Final Fantasy XII boss)|Chaos]] |
| − | *[[Cúchulainn (Final Fantasy XII |
+ | * [[Cúchulainn (Final Fantasy XII boss)|Cúchulainn]] |
| − | *[[Exodus (Final Fantasy XII |
+ | * [[Exodus (Final Fantasy XII boss)|Exodus]] |
| − | *[[Famfrit (Final Fantasy XII |
+ | * [[Famfrit (Final Fantasy XII boss)|Famfrit]] |
| − | *[[Hashmal (Final Fantasy XII |
+ | * [[Hashmal (Final Fantasy XII boss)|Hashmal]] |
| − | *[[Mateus (Final Fantasy XII |
+ | * [[Mateus (Final Fantasy XII boss)|Mateus]] |
| − | *[[Shemhazai (Final Fantasy XII |
+ | * [[Shemhazai (Final Fantasy XII boss)|Shemhazai]] |
| − | *[[Zalera (Final Fantasy XII |
+ | * [[Zalera (Final Fantasy XII boss)|Zalera]] |
| − | *[[Zeromus (Final Fantasy XII |
+ | * [[Zeromus (Final Fantasy XII boss)|Zeromus]] |
| − | *[[Zodiark (Final Fantasy XII |
+ | * [[Zodiark (Final Fantasy XII boss)|Zodiark]] |
| ⚫ | |||
[[de:Ultima (FFXII Boss)]] |
[[de:Ultima (FFXII Boss)]] |
||
[[it:Ultima (Final Fantasy XII)]] |
[[it:Ultima (Final Fantasy XII)]] |
||
| + | [[Category:Bosses in Final Fantasy XII]] |
||
Revision as of 20:51, 9 January 2020
Template:Sideicon
Ultima is an optional boss in Final Fantasy XII located in the highest reaches of the Great Crystal in Giruvegan. Defeating Ultima unlocks her sprite in the Sky Pirate's Den and earns the player the title of Fell Angel, and adds her license on the License Board so the player can recruit her as an Esper. She is also fought in Stage 95 of the Zodiac versions' Trial Mode. In both battles, the battlefield is affected by a rotating handicap.
Bestiary entry
Page 1: Observations
Masterpiece among the scions created by the gods, and the mastermind of the plot to rise against them. Prior to her betrayal, she was tasked with guiding souls to heaven and aiding in their reincarnation. Called the High Seraph for her angelic wings of glimmering gold, yet it was on wings of deepest black that the tainted angel Ultima rose against the gods. Since her fall, her heart is without light, and impossible to know.
Stats
AI script
| Abilities | ||
|---|---|---|
| Type | Name | Condition |
| Curaja | Attack CT0; use on character under Reverse and with HP <10% (100%) | |
| Renew | Attack CT0; use on character under Reverse and with HP <10% (100%) | |
| Blindna | No Attack CT0 & HP >50% (5%) HP <50% (100%) | |
| Reflectga | Attack CT0 & HP <50%; use on target without Reflect (25%) | |
| Holyja | HP <80% use once when at least one target doesn't absorb Holy (100%) Repeat after each next 12 commands when at least one target doesn't absorb Holy (100%) HP <50% use once after Greater Barrier (100%) Repeat after each next 7 commands when at least one target doesn't absorb Holy (100%) Repeat after each next 10 commands when all targets absorb Holy (100%) | |
| Redemption | When Attack CT0 is not active, use on a target that doesn't absorb Holy (25%) | |
| Greater Barrier | HP <50%; use once (100%) | |
| Attack CT0 | After every second Holyja | |
| Reduce Damage | When Greater Barrier is active | |
| Properties | ||
| Type | Property | |
| Targeting | ||
| Linking | ||
| Attacks | ||
| Pursuit | ||
How to find
Ultima can be fought after receiving the Treaty-Blade. The player must return to Waystone VIII, which is the waystone that allows access to Great Crystal from Giruvegan. From the waystone, there are three paths: one goes up, one goes down and another one is sealed by Gate Scorpio. The player must follow the path going up and unseal Gate Scorpio on the following platform, then return to Waystone VIII and head through Gate Scorpio to Waystone IX, which can be used to teleport to Waystone X.
From Waystone X the player reaches Waystone XX. On this platform there are two paths sealed by Gate Sagittarius (Gates I and II), plus other three paths; one going down, two leading up, and the last path is the one the player came in on. From the path they arrived from, the player should head directly across the platform toward the only other path heading down. Eventually they will come to a switch for Gate Sagittarius.
After unsealing the gate there will be a time limit of 71.00 seconds and the player must hurry back to Waystone XX. The player can either go back the way they came, or head up to the next platform, and then take the only path leading down, which will lead back to Waystone XX. (Taking this path is the spawn condition for the Crystal Knight, who will appear next to the Sagittarius gates if the player has started the Phon Coast Hunt Club sidequest.) After reaching Waystone XX the player must open Sagittarius Gate II.
Descending from Sagittarius Gate II leads to Waystone XII, which teleports to Waystone XIV. On this platform there are two paths, one leading up and the other leading down. The player must head up to the Gate Leo switch, then return to the previous platform, as again there will be a time limit, this time of 215.00 seconds. From the platform the player should take the path going down and then take the only possible path on the next platform. On the third platform there are two paths, one leading to Gate Leo II and the other to an Excalibur/Yagyu Darkblade treasure (depending on version), which isn't accessible yet.
After passing through Leo II there are two more paths and Gate Gemini. The player can take either path, both leading to Waystone XV that teleports to Waystone XVI.
On Waystone XVI the player must follow the middle path to the switch for Gate Libra (this place will be revisited). The player must push the switch and return to platform XVI. There will be a time limit of 71.00 seconds. Facing Waystone XVI, the player should take the right path upward and on the next platform unseal Gate Libra I. The player should continue to head up from the newly opened gate to reach a platform with three paths; the player should head left and take the only path leading up.
After pushing the switch for Gate Capricorn the player should return to platform XVI (with a time limit of 180.00 seconds). On platform XVI they should take the only path heading down to Gate Capricorn I and the switch for Gate Virgo. After touching the switch the player should quickly return to platform XVI (with a time limit of 108.00 seconds), and on platform XVI follow the middle path, which leads back to the Libra switch; from there the player should follow the path down to two Gates, Capricorn II and Virgo II on the next platform, unseal Gate Virgo II and cross it.
In the next section, from where the player entered, they should take the right path leading up to Waystone XVII that teleports to Waystone XVIII. The path will lead to a Save Crystal. From the Save Crystal there are three paths: the one heading down leads the Aquarius Switch, and the opposite leads to Waystone XIX, which will warp back to Waystone XX. Ultima is sealed down the path in the middle.
Battle
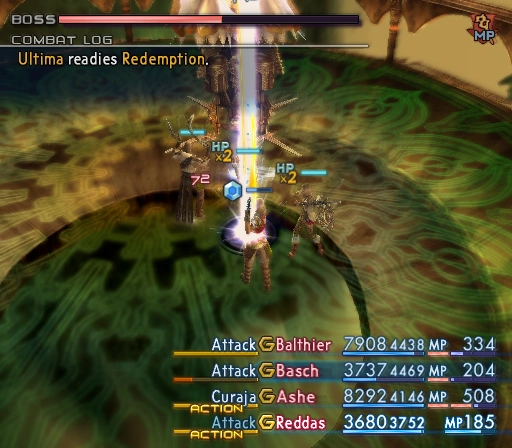
Battle against Ultima.
The party will receive damage every time they attack her. Ultima uses Redemption and a normal attack that has a chance to inflict Sap. Her special attack is Holyja. Ultima is weak against dark and blindness. If afflicted with Blind Ultima will cast Blindna on herself.
At the start Ultima will cast Holyja after twelve attacks, which includes standard attacks and Redemption. Ultima's special move has a chance of inflicting a negative status on the party; Holyja inflicts Reverse, upon which Ultima will cast Renew on the Reversed characters leaving them at 1 HP.
After her HP has been drained to 80%, Ultima will cast Holyja, regardless of the number of times she attacked. When Ultima's HP drops down to around 70%, a magick field will fall, causing the following debilitations in this order: HP decrease, MP decrease, Attack Command seal, Magick Command Seal, Technick Command Seal, Item Command Seal, Increase/Lag weapon attacks' Charge Time. The seal will cycle until Ultima is defeated. When Ultima's HP drops to 70%, she uses Holyja after seven attacks instead of twelve. She also casts Reflectga on the party from time to time and casts Curaja on the reflected party members, effectively killing any party member who has the Reverse status (as Ultima's magick is piercing, thus ignoring Reflect).
Ultima's stats will increase as her HP depletes. When Ultima's HP drops to 30%, she uses Holyja after only three attacks, and Holyja becomes more powerful.
Strategy
It is recommended for the main party members to be at least level 55 or above; level 40 or above for back-up characters. It is helpful to have three White Masks, or a Sage's Ring, to absorb Ultima's Holyja attack. The player should stock Ethers and curative items before the fight. Bubble Belts, Rings of Renewal, and Opal Rings are useful for additional advantages.
The player should not equip holy-elemental weapons, such as Excalibur (found in her lair in the Zodiac versions) or Holy Lance. As Ultima is weak against Dark, the Darkga spell and Dark Shot for a gun exploit this weakness, as well as ninja swords in the original version. In the Zodiac versions, only Yagyu Darkblade is Dark-elemental, and if the player has it, it makes for an excellent weapon against Ultima, especially if coupled with the Dark-damage boosting Black Robes. The blade is where the Excalibur used to be in the Great Crystal in the Zodiac versions. In the Zodiac Job System version the Shikari cannot equip Black Robes, but in The Zodiac Age the player can select two License Boards for each party member, thus possibly giving Shikari access to Black Robes. With this combination, coupled with Germinas Boots (for added Speed), Bravery, Haste and Berserk, the character can lay waste to Ultima quickly, even before the Attack command gets sealed, especially if supported by a mage that casts Darkga, and possibly a gun user with Dark Shot.
One can unequip White Masks or Sage's Ring to lure Ultima to use Redemption, then immediately switch back to absorb her attacks. Should the party be afflicted with Reverse from Ultima's special attack, one should immediately cast Dispelga/Dispel/Esunaga/Esuna, or Ultima will cast Renew on the Reversed party members.
It is recommended to equip Ring of Renewal (Auto Regen) during the magick seal, and simply cure with X-Potions, if the party has a healthy stock.
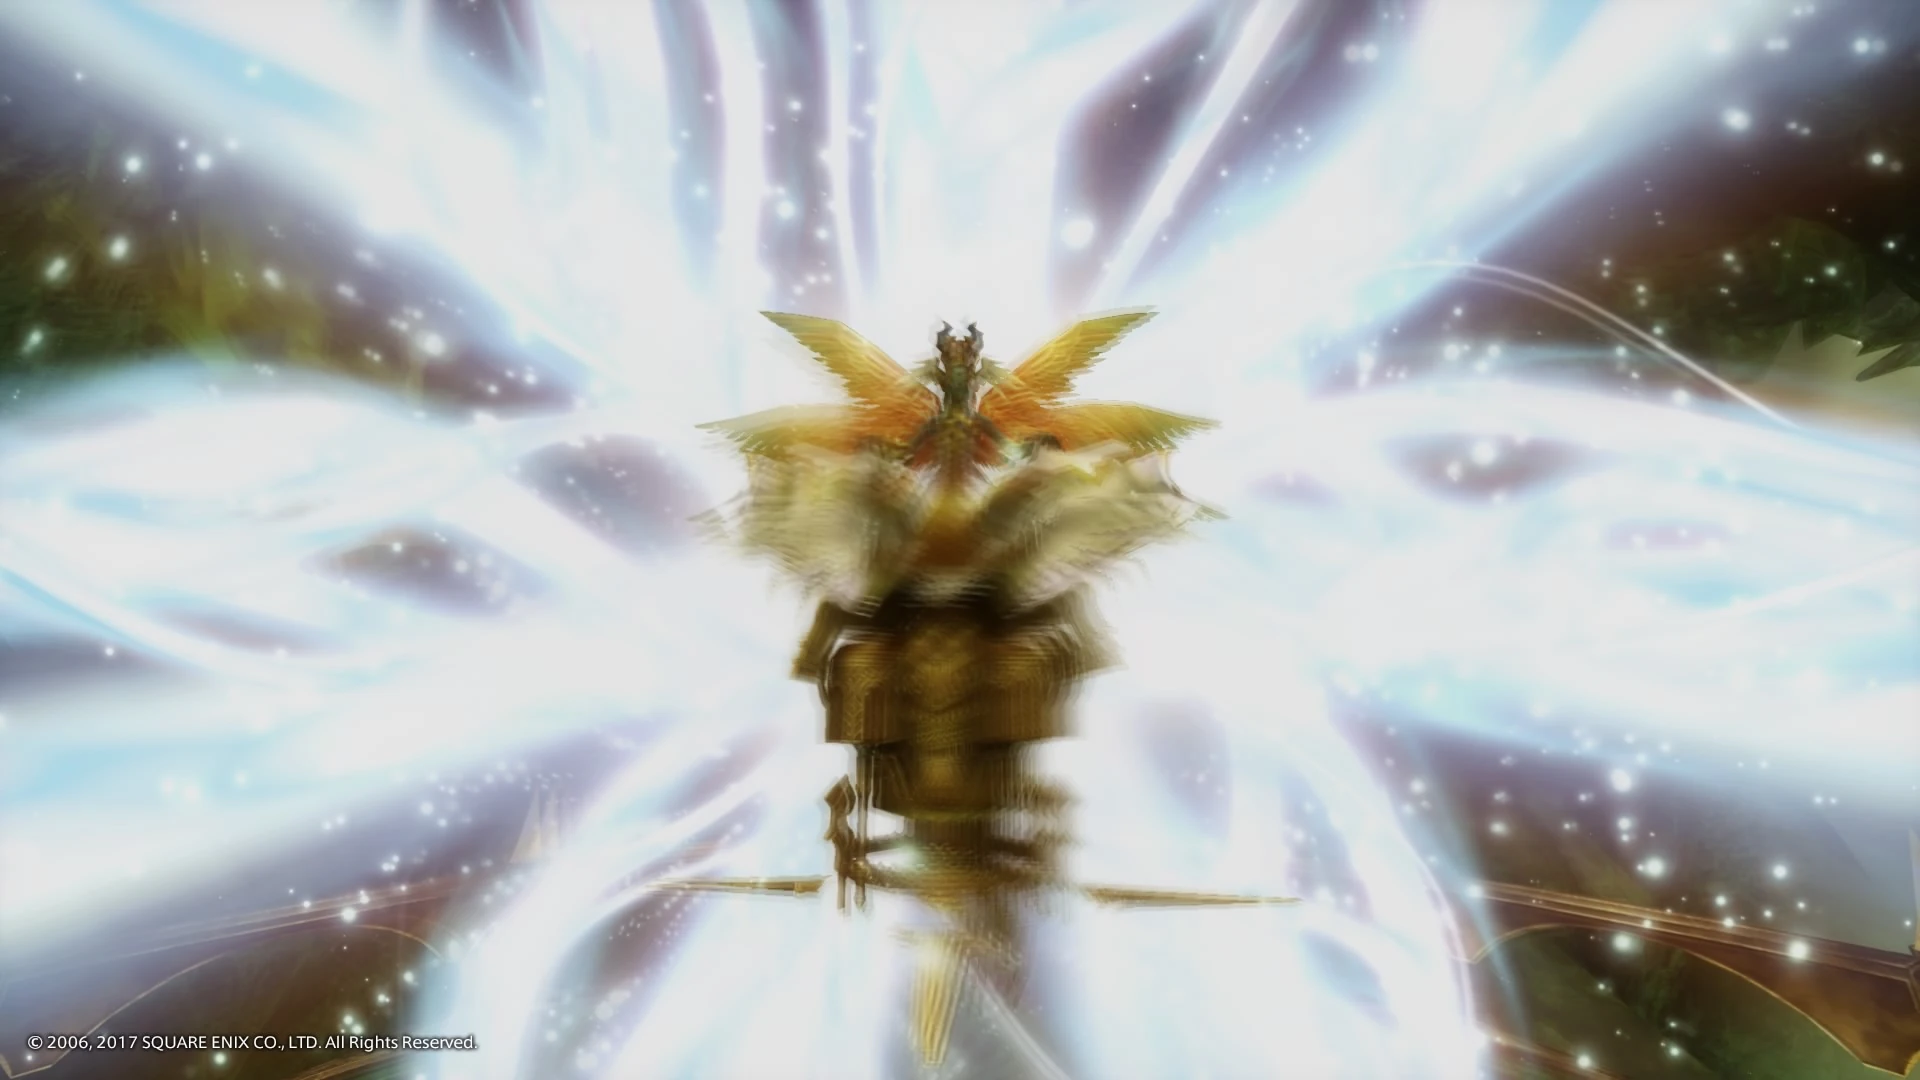

Ultima's special attack, Holyja.
When Ultima begins casting Reflectga a party member can equip the Opal Ring to cast curative magick under Reflect. However, this may be an opportune time to cast Darkga, resulting in the maximum of twelve hits on Ultima (if the player has a guest and all three controllable party members cast the spell; in the Zodiac versions however, only the Red Battlemage learns Darkga and the player is unlikely to have three). The Darkga caster can equip Black Robes to deal boosted damage; this is especially useful in the Zodiac versions where the damage cap is removed.
When Ultima begins casting Reflectga on the party, if the timing is right, after dispelling the party from Reflect, Ultima might cast Curaja on the characters, healing 3,000 and above HP. If the player does not dispel Reflect in time, Ultima's Curaja will kill any party member afflicted with Reverse. There is a way to avoid Ultima casting either Renew or Curaja by keeping one party member unequipped with any kind of equipment that absorbs Holy damage.
When Ultima's stats increase when she is in low health, the party will benefit from Haste, Bubble, Protect, and Shell, as her attacks are fast and powerful.
A good tactic to defeat Ultima in the original version is to equip everyone with Yagyu Darkblades and have two members in HP Critical to boost attack (if the characters have obtained the Adrenaline augment for 70 LP) and berserk them. The remaining member should be the decoy, and focus on healing. The party should equip Sage's Rings/White Masks when Ultima casts Holyja, and have the tanks cast Infuse to get back to HP Critical when Berserk wears off. When Ultima stops the party from using physical attacks, the player should switch the tanks for mages, and continuously use Darkga. However, it is arduous to get three Yagyu Darkblades for how rare they are. In the original version, all ninja blades are Dark-elemental, and thus can be used for the same strategy. In the Zodiac versions, only the Shikari can equip Yagyu Darkblade, a license hidden behind a Quickening license, but with the damage cap removed, there is potential to deal much more damage even with only one darkblade-wielder.
A cheap way to win this battle is to exploit Ultima's weakness to Blind. The player can stock 99 Eye Drops, equip a character with a Nihopalaoa and keep throwing Eye Drops on Ultima to inflict Blind. Ultima will immediately cast Blindna, effectively trapping her in a loop while the other two characters can attack. However, Ultima may still cast Holyja. The Blind magick will also always hit if the caster equips an Indigo Pendant, but the MP drain and Magick Seal handicaps make this less useful than using Nihopalaoa.
Trial Mode
Ultima is fought in Stage 95. The stage has cycling handicaps from HP Sap, MP Sap, Magicks/Attack/Technicks commands disabled as soon as Ultima uses Holyja. The stage has 16 treasures (overlapping one another on a trap) that all have Ether, although there is a small chance to get a Meteorite (D) with Diamond Armlet equipped.
The same strategy can be used against Ultima in the Trial Mode as in the main game. The following items can be stolen from her in this battle: White Mask (common), White Robes (uncommon) and Lordly Robes (rare).
Gallery
.JPG "Ultima (FFXII).JPG (24 KB)")
")
")
")