mNo edit summary Tag: sourceedit |
No edit summary Tag: sourceedit |
||
| Line 142: | Line 142: | ||
}} |
}} |
||
{{See Also|Reno}} |
{{See Also|Reno}} |
||
| − | '''Turks:Reno''' is a recurring boss in ''[[Final Fantasy VII]]'', fought a maximum of four times |
+ | '''Turks:Reno''' is a recurring [[boss]] in ''[[Final Fantasy VII]]'', fought a maximum of four times. Only the first is mandatory. The player can choose to avoid the locations of the possible second and third battles, and can refuse to fight the fourth. |
Turks:Reno is often accompanied by [[Turks:Rude]], and at one point fights alongside [[Turks:Elena]]. |
Turks:Reno is often accompanied by [[Turks:Rude]], and at one point fights alongside [[Turks:Elena]]. |
||
| Line 148: | Line 148: | ||
All of the Turks always retreat from [[Battle (term)|battle]] when defeated; however, the player always receives some [[Experience point|EXP]], [[Ability Points|AP]] and [[Item drop|items]] for defeating them, although in some battles the player can only collect the spoils for the Turk they defeat first. |
All of the Turks always retreat from [[Battle (term)|battle]] when defeated; however, the player always receives some [[Experience point|EXP]], [[Ability Points|AP]] and [[Item drop|items]] for defeating them, although in some battles the player can only collect the spoils for the Turk they defeat first. |
||
| − | When fought in Gongaga and Sector 8, it is possible to get a [[attack formations#Final Fantasy VII| |
+ | When fought in [[Gongaga]] and [[Sector 8]], it is possible to get a [[attack formations#Final Fantasy VII|preemptive attack]] on Reno because there are [[Random encounter|random battles]] in the room he is fought in. |
==Formations== |
==Formations== |
||
| Line 209: | Line 209: | ||
==Battles== |
==Battles== |
||
| − | ===First |
+ | ===First battle - Sector 7=== |
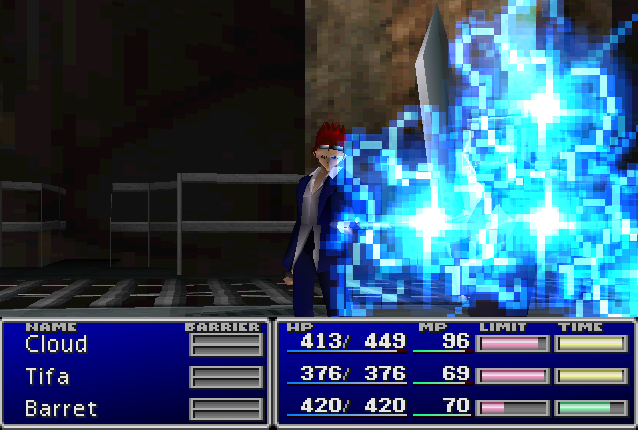
[[File:FFVII Electro-mag Rod.png|thumb|left|Reno uses Electro-mag Rod.]] |
[[File:FFVII Electro-mag Rod.png|thumb|left|Reno uses Electro-mag Rod.]] |
||
| − | [[Cloud Strife]], [[Barret Wallace]], and [[Tifa Lockhart]] |
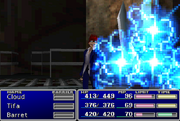
+ | [[Cloud Strife]], [[Barret Wallace]], and [[Tifa Lockhart]] encounter Turks:Reno on top of the [[Sector 7]] Support Pillar. Turks:Reno resists [[Lightning (element)|Lightning]] and is immune to most [[status effect]]s. He uses his Short Staff as standard physical attack. His best attack is Electro-mag Rod, which can temporarily [[Paralysis|paralyze]] a party member, although he can also use it as a counter-attack if hit with Lightning damage. |
| − | Reno's Pyramid always renders a party member [[imprisoned]] and flags them defeated; if all party members are trapped in Pyramids, it is [[Game Over (term)|Game Over]]. An unaffected character can perform a physical attack (magic also works but is unnecessary) on the imprisoned character to break the pyramid. [[Fire (ability)|Fire]] and [[Blizzard (ability)|Ice]] are effective and tend to do twice as much damage as physical attacks. |
+ | Reno's Pyramid always renders a party member [[imprisoned]] and flags them defeated; if all party members are trapped in Pyramids, it is [[Game Over (term)|Game Over]]. An unaffected character can perform a physical attack ([[Magic (Final Fantasy VII)|magic]] also works but is unnecessary) on the imprisoned character to break the pyramid. [[Fire (ability)|Fire]] and [[Blizzard (ability)|Ice]] are effective and tend to do twice as much damage as physical attacks. |
Turks:Reno will escape once his HP is depleted. |
Turks:Reno will escape once his HP is depleted. |
||
| − | ===Second |
+ | ===Second battle - Gongaga=== |
| − | The party next encounters Reno alongside Rude in the |
+ | The party next encounters Reno alongside Rude in the Gongaga Jungle. This is an optional location that can be skipped on the party's way to [[Cosmo Canyon]]. This battle is also one of the few boss battles in ''Final Fantasy VII'' where the player can get a preemptive battle. |
| − | Turks:Reno favors |
+ | Turks:Reno favors Turk Light, which does the most damage of his abilities. Despite its appearance it does not do fire-based damage. He will use [[List of Final Fantasy VII enemy abilities#Electroprod|Electroprod]] as a counter-attack if hit with Lightning damage. |
| − | Whichever of the two Turks, Turks:Reno or Turks:Rude is defeated first is the one whose loot |
+ | Whichever of the two [[Turks]], Turks:Reno or Turks:Rude, is defeated first is the one whose loot is collected by the party, and also determines the EXP and AP received. Reno is the default target, and his item drop is an unusually powerful item for this level, a seven-slot staff for [[Aerith Gainsborough|Aeris]]: the [[List of Final Fantasy VII weapons#Fairy Tale|Fairy Tale]]; Rude's is a [[X-Potion#Final Fantasy VII|X-Potion]]. |
| − | While this battle is optional, the player can get a small bit of story from taking part |
+ | While this battle is optional, the player can get a small bit of story from taking part. |
| − | ===Third |
+ | ===Third battle - Gelnika=== |
[[File:FFVII Neo Turk Light.png|thumb|left|Reno uses Neo Turk Light.]] |
[[File:FFVII Neo Turk Light.png|thumb|left|Reno uses Neo Turk Light.]] |
||
| − | The party encounters Turks:Reno for the third time at the [[Gelnika]] |
+ | The party encounters Turks:Reno for the third time at the [[Gelnika]], another optional location. Turks:Reno is again accompanied by Turks:Rude. |
Reno can only be found in the Gelnika if the party travels there immediately after receiving the [[Submarine (Final Fantasy VII)|submarine]], before [[Midgar]] is [[Raid on Midgar|attacked by Diamond Weapon]]. If the player misses their chance, any visit to the Gelnika will find it empty of the Turks. |
Reno can only be found in the Gelnika if the party travels there immediately after receiving the [[Submarine (Final Fantasy VII)|submarine]], before [[Midgar]] is [[Raid on Midgar|attacked by Diamond Weapon]]. If the player misses their chance, any visit to the Gelnika will find it empty of the Turks. |
||
| − | + | Reno's Neo Turk Light attack always inflicts [[Confuse (status)|Confusion]] on a target. He will use [[List of Final Fantasy VII enemy abilities#Electroprod 2|Electroprod 2]] as a counter-attack if hit with Lightning damage. This is the first opportunity to [[Steal#Final Fantasy VII|steal]] the [[List of Final Fantasy VII accessories#Tough Ring|Tough Ring]] accessory. It increases both [[Vitality (stat)|Vitality]] and [[Spirit (stat)|Spirit]] by 50. |
|
| − | ===Fourth |
+ | ===Fourth battle - Midgar Underground=== |
| − | The |
+ | The final time the party may fight Reno is beneath Midgar, in the Sector 8 Underground. This fight is optional, and may be skipped by telling the Turks that "you don't feel like fighting", as long as the player has completed the [[sidequest]] involving the Turks in [[Wutai Village]]. This battle can also be skipped if the player avoids stepping on a specific part of the floor; if one runs behind the middle pillar of the area where the battle is supposed to start as soon as the area begins loading, the battle never triggers. |
| − | This battle can be preemptive. If this happens, however, Turks:Elena will still get the first turn and she has [[ |
+ | This battle can be preemptive. If this happens, however, Turks:Elena will still get the first turn and she has [[Sneak Attack (ability)|Sneak Attack]] enabled for the battle. |
| − | + | Turks:Reno fights alongside Turks:Rude and Turks:Elena. Once one of the three Turks is beaten, all of them will run, meaning no EXP or items from the other two. A good idea will be defeat the three Turks with one attack to get more EXP and AP. |
|
This is the second opportunity to steal the Tough Ring accessory (known as the Touph Ring in the [[PlayStation]] version). Turks:Reno has the lowest Vitality of the three Turks, so to end this battle quickly, the party should focus their attacks to Turks:Reno. |
This is the second opportunity to steal the Tough Ring accessory (known as the Touph Ring in the [[PlayStation]] version). Turks:Reno has the lowest Vitality of the three Turks, so to end this battle quickly, the party should focus their attacks to Turks:Reno. |
||
| Line 543: | Line 543: | ||
*[[Turks:Elena]] |
*[[Turks:Elena]] |
||
*[[Rufus (boss)|Rufus]] |
*[[Rufus (boss)|Rufus]] |
||
| − | |||
[[Category:Final Fantasy VII Bosses]] |
[[Category:Final Fantasy VII Bosses]] |
||
Revision as of 17:54, 9 July 2016
Template:Sideicon Template:FFVII Enemy Template:See Also Turks:Reno is a recurring boss in Final Fantasy VII, fought a maximum of four times. Only the first is mandatory. The player can choose to avoid the locations of the possible second and third battles, and can refuse to fight the fourth.
Turks:Reno is often accompanied by Turks:Rude, and at one point fights alongside Turks:Elena.
All of the Turks always retreat from battle when defeated; however, the player always receives some EXP, AP and items for defeating them, although in some battles the player can only collect the spoils for the Turk they defeat first.
When fought in Gongaga and Sector 8, it is possible to get a preemptive attack on Reno because there are random battles in the room he is fought in.
Formations
| # | Formation |
|---|---|
| 412 | Turks:Reno (Sector 7), Pyramid A, Pyramid B, Pyramid C |
| 413 | Turks:Reno (Sector 7), Pyramid A, Pyramid B, Pyramid C |
| 414 | Turks:Reno (Sector 7), Pyramid A, Pyramid B, Pyramid C |
| 539 | Turks:Reno (Gongaga), Turks:Rude (Gongaga) |
| 807 | Turks:Reno (Gelnika), Turks:Rude (Gelnika) |
| 840 | Row 1: Turks:Elena Row 2: Turks:Reno (Sector 8), Turks:Rude (Sector 8) |
| 841 | Row 1: Turks:ElenaA Row 2: Turks:Reno (Sector 8), Turks:Rude (Sector 8) Row 3: Turks:ElenaB |
| 842 | Row 1: Turks:ElenaA Row 2: Turks:Reno (Sector 8), Turks:Rude (Sector 8) Row 3: Turks:ElenaB |
| 843 | Row 1: Turks:ElenaA Row 2: Turks:Reno (Sector 8), Turks:Rude (Sector 8) Row 3: Turks:ElenaB |
Locations
| Sector 7 Slums | |
|---|---|
| Plate Support Upper | 412 (fixed) |
| Gongaga | |
| Reactor Jungle Path | 539 (fixed) |
| Gelnika | |
| Hallway | 807 (fixed) |
| Sector 8 Tunnel | |
| Tunnel 7 | 840 (fixed) |
Battles
First battle - Sector 7
Reno uses Electro-mag Rod.
Cloud Strife, Barret Wallace, and Tifa Lockhart encounter Turks:Reno on top of the Sector 7 Support Pillar. Turks:Reno resists Lightning and is immune to most status effects. He uses his Short Staff as standard physical attack. His best attack is Electro-mag Rod, which can temporarily paralyze a party member, although he can also use it as a counter-attack if hit with Lightning damage.
Reno's Pyramid always renders a party member imprisoned and flags them defeated; if all party members are trapped in Pyramids, it is Game Over. An unaffected character can perform a physical attack (magic also works but is unnecessary) on the imprisoned character to break the pyramid. Fire and Ice are effective and tend to do twice as much damage as physical attacks.
Turks:Reno will escape once his HP is depleted.
Second battle - Gongaga
The party next encounters Reno alongside Rude in the Gongaga Jungle. This is an optional location that can be skipped on the party's way to Cosmo Canyon. This battle is also one of the few boss battles in Final Fantasy VII where the player can get a preemptive battle.
Turks:Reno favors Turk Light, which does the most damage of his abilities. Despite its appearance it does not do fire-based damage. He will use Electroprod as a counter-attack if hit with Lightning damage.
Whichever of the two Turks, Turks:Reno or Turks:Rude, is defeated first is the one whose loot is collected by the party, and also determines the EXP and AP received. Reno is the default target, and his item drop is an unusually powerful item for this level, a seven-slot staff for Aeris: the Fairy Tale; Rude's is a X-Potion.
While this battle is optional, the player can get a small bit of story from taking part.
Third battle - Gelnika

Reno uses Neo Turk Light.
The party encounters Turks:Reno for the third time at the Gelnika, another optional location. Turks:Reno is again accompanied by Turks:Rude.
Reno can only be found in the Gelnika if the party travels there immediately after receiving the submarine, before Midgar is attacked by Diamond Weapon. If the player misses their chance, any visit to the Gelnika will find it empty of the Turks.
Reno's Neo Turk Light attack always inflicts Confusion on a target. He will use Electroprod 2 as a counter-attack if hit with Lightning damage. This is the first opportunity to steal the Tough Ring accessory. It increases both Vitality and Spirit by 50.
Fourth battle - Midgar Underground
The final time the party may fight Reno is beneath Midgar, in the Sector 8 Underground. This fight is optional, and may be skipped by telling the Turks that "you don't feel like fighting", as long as the player has completed the sidequest involving the Turks in Wutai Village. This battle can also be skipped if the player avoids stepping on a specific part of the floor; if one runs behind the middle pillar of the area where the battle is supposed to start as soon as the area begins loading, the battle never triggers.
This battle can be preemptive. If this happens, however, Turks:Elena will still get the first turn and she has Sneak Attack enabled for the battle.
Turks:Reno fights alongside Turks:Rude and Turks:Elena. Once one of the three Turks is beaten, all of them will run, meaning no EXP or items from the other two. A good idea will be defeat the three Turks with one attack to get more EXP and AP.
This is the second opportunity to steal the Tough Ring accessory (known as the Touph Ring in the PlayStation version). Turks:Reno has the lowest Vitality of the three Turks, so to end this battle quickly, the party should focus their attacks to Turks:Reno.
AI script
Declare TurnTaken
Declare Count = 2
Declare DisableChars
Declare Char
Declare Warning = 0
Declare Counter = 0
Declare SelectedTarget
TurnTaken = 0
Count = Count + 1
DisableChars = 0
DisableChars = DisableChars + 1
Next Char
Activate Pyramid A
Remove Death on Pyramid A
Pyramid A HP = Pyramid A Max HP
Use Pyramid on 1st opponent
TurnTaken = 1
Count = 0
Activate Pyramid B
Remove Death on Pyramid B
Pyramid B HP = Pyramid B Max HP
Use Pyramid on 2nd opponent
TurnTaken = 1
Count = 0
Activate Pyramid C
Remove Death on Pyramid C
Pyramid C HP = Pyramid C Max HP
Use Pyramid on 3rd opponent
TurnTaken = 1
Count = 0
Display Message "Reno "Try and break it if you can.""
Warning = 1
Use Electro-mag Rod on SelectedTarget
Counter = 0
Use Short Staff on random opponent
Use Electro-mag Rod on random opponent
SelectedTarget = last magic attacker
Counter = 1
Remove Pyramid A
Remove Pyramid B
Remove Pyramid C
Remove Sleep/Poison/Silence/Haste/Slow/Regen/Death-sentence/Manipulate/Berserk from Self
Display Message "Reno "It's time.""
Turn off Death Handling for Self
Use (Report)
This battle has an additional script for the character party, which is stated below. What this does is prevent characters who are imprisoned by Pyramids from being targeted.
Deactivate 1st opponent
Deactivate 2nd opponent
Deactivate 3rd opponent
AI: Main {
- TempVar:TurnTaken = 0
- If (Rude has Death Status) Then
- {
- Choose Self
- Use <(Report)> on Target
- Remove Self
- TempVar:TurnTaken = 1
- }
- If ((TempVar:TurnTaken == 0) & (TempVar:Counter == 1)) Then
- {
- Choose SelectTar
- Use Electroprod on Target
- TempVar:Counter = 0
- } Else {
- Choose Random Opponent
- 1/2 Chance: Use <Short Staff> on Target
- 1/2 Chance: Use Turk Light on Target
- }
} AI: Counter - Death {
- Remove Sleep/Poison/Silence/Haste/Slow/Regen/Death-sentence/
- Manipulate/Berserk Statuses from Turks:Reno
- Print Message [Reno "We may be retreating, but...]
- Print Message [we're still victorious."]
- Turn off Death Handling for Turks:Reno
- Choose Self
- Use <(Report)> on Target
} AI: Counter - Magical {
- If (Last Sub-Command == 0x21 (Bolt) or 0x22 (Bolt2) or 0x23 (Bolt3)) Then
- {
- SelectTar = Turks:Reno's Last Attacker (Magical)
- TempVar:Counter = 1
- }
}
AI: Main {
- If (TempVar:Counter == 1) Then
- {
- Choose SelectTar
- Use Electroprod 2 on Target
- TempVar:Counter = 0
- } Else {
- Choose Random Opponent
- 1/2 Chance: Use <Short Staff> on Target
- 1/2 Chance: Use Neo Turk Light on Target
- }
} AI: Counter - Death {
- Remove Sleep/Poison/Silence/Haste/Slow/Regen/Death-sentence/Manipulate/
- Berserk Statuses from Turks:Reno
- Print Message [Reno "These guys are pretty tough."]
- Turn off Death Handling for Turks:Reno
- Choose Self
- Use <(Report)> on Target
} AI: Counter - Magical {
- If (Last Sub-Command == 0x21 (Bolt) or 0x22 (Bolt2) or 0x23 (Bolt3)) Then
- {
- SelectTar = Turks:Reno's Last Attacker (Magical)
- TempVar:Counter = 1
- }
}
AI: Main {
- If (Count == 0) Then
- {
- Choose Random Opponent
- Use <Short Staff> on Target
- Count = Count + 1
- } Else If (Count == 1) Then {
- Choose Random Opponent
- 1/2 Chance: Use Electroprod on Target
- 1/2 Chance: Use <Short Staff> on Target
- Count = Count + 1
- } Else {
- Choose Random Opponent
- Use Turk Light on Target
- Count = 0
- }
} AI: Counter - Death {
- If (BattleVar:TurksFlee == 0) Then
- {
- BattleVar:TurksFlee = 1
- Print Message [Reno "Let's call it a day."]
- Choose Self
- Use <(Report)> on Target
- Remove Turks:Elena
- Remove Turks:Reno
- Remove Turks:Rude
- }
}
Gallery
")
")
")
Trivia
- The Raid on Midgar glitch allows one to skip the entire return to Midgar on disc 2, including the battle against the Turks.
Related enemies
- Pyramid
- Turks:Rude
- Turks:Elena
- Rufus