The Bozjan Southern Front is a ![]() Field operation introduced in patch 5.35 of Final Fantasy XIV: Shadowbringers as part of the Save the Queen: Blades of Gunnhildr storyline. It sees players work to reclaim and push through the zone by engaging in various activities.
Field operation introduced in patch 5.35 of Final Fantasy XIV: Shadowbringers as part of the Save the Queen: Blades of Gunnhildr storyline. It sees players work to reclaim and push through the zone by engaging in various activities.
Story[]
Following the successful recreation of the Blades of Gunnhildr by Gerolt, Bozjan Resistance leader Bajsaljen has rallied the various resistance groups under one banner, and commenced an assault on the area surrounding Castrum Lacus Litore. The Warrior of Light is deployed to the field to help turn the tide of battle alongside the successors of the recreated weapons.
Locations[]
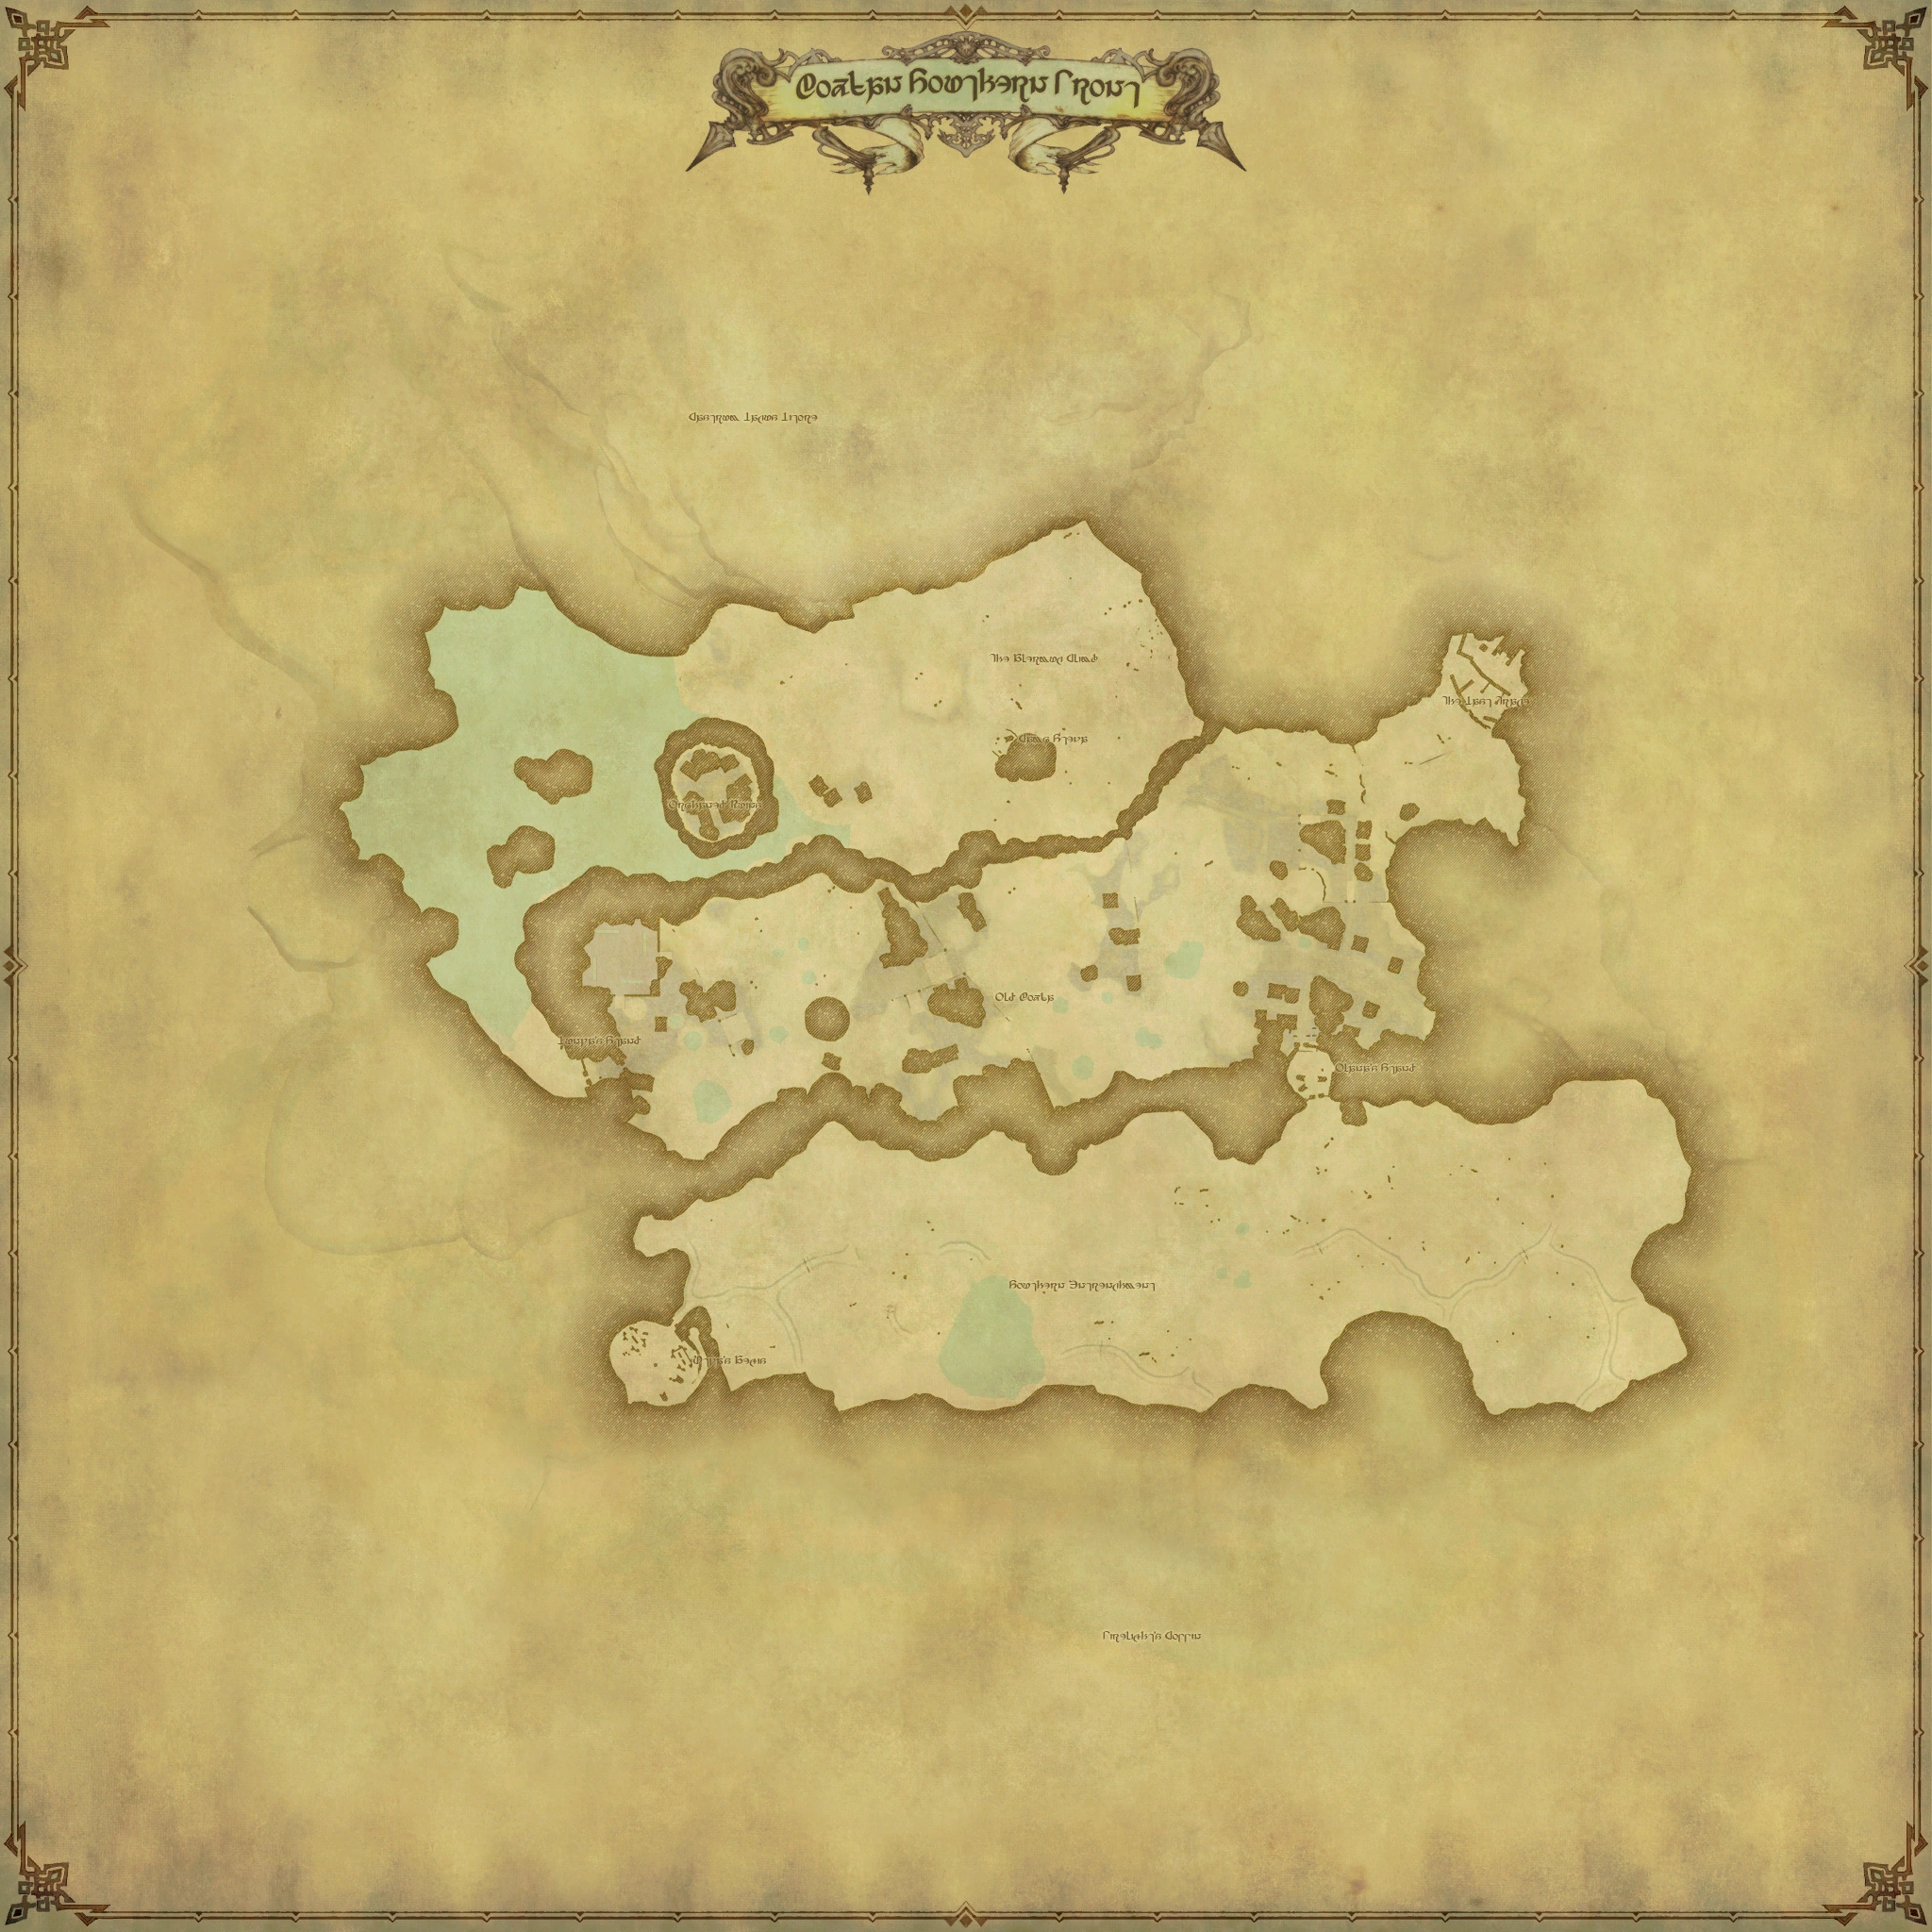
Aetherytes[]
- Utya's Aegis
- Olana's Stand
- Lunya's Stand
- Camp Steva
Areas[]
- Southern Entrenchment
- Old Bozja
- The Last Trace
- The Alermuc Climb
- Orphaned Ruins
- Castrum Lacus Litore
Settlements[]
- Utya's Aegis - The base camp of the Bozjan Resistance in their battle against the IVth Imperial Legion.
Weather[]
The Bozjan Southern Front's climate may exhibit any of the following weather conditions:
| Weather | Frequency |
|---|---|
| 52% | |
| 12% | |
| 12% | |
| 12% | |
| 12% |
Gameplay[]
Leveling[]
Inside the instance, players will be synced to level 80 and item level 430. Players are able to change jobs while inside the instance, provided the job is at least level 71, in which the job will be upscaled to 80. By participating in the instance, players can earn experience to help level these jobs.
Resistance Rank[]
Resistance Rank is the main form of progression in the Southern Front, beginning at Rank 1 before capping at Rank 25. To upgrade Resistance Rank, players must reach certain thresholds of Mettle, a form of experience points that is earned by participating in Skirmishes and Critical Engagements, and then talk to the Mission Commander NPC.
Upgrading your Resistance Rank opens up new story quests within the instance, increases the awarded mettle received from Skirmishes and Critical Engagements and increases both the range of lost actions you can appraise and the amount you can hold at once. The aforementioned quests also open up further sections of the field for exploration. Aethernet shards within the instance can be used to travel around the map. After reaching Rank 5, if a player is KO'd on the field, they will lose mettle, and even more so if they return to the spawn point, with heavier punishments at higher ranks. However, the player will not rank down if they fall past a rank up threshold.
After reaching Resistance Rank 10 and following the story quests, the player can unlock the ability to participate in the special Critical Engagement ![]() The Battle of Castrum Lacus Litore. This Engagement spawns after both one hour has passed since an instance has opened, and there are enough players with the ability to queue within, after which it will spawn again after every 90 minutes from the beginning of the previous Engagement til the instance empties, provided enough people can enter. If the player's instance timer for the Bozjan Southern front instance is lower than the timer for Castrum Lacus Litore at any time, then the former will extend to match the latter. The timer can also be shortened by players completing Skirmishes and other Critical Engagements in the field, Completing Castrum Lacus Litore rewards 50 weekly tomestones, a lot more mettle for completion, 5 Loathsome Memories of the Dying, if players are upgrading their Resistance weapons, and 70-100 Bozjan Coins, depending on the progress done for the prisoner objectives.. These coins can be traded at the base camp for special gear that can be upgraded to have special Bozja-specific effects. The upgrade items can also drop as loot from Castrum Lacus Litore.
The Battle of Castrum Lacus Litore. This Engagement spawns after both one hour has passed since an instance has opened, and there are enough players with the ability to queue within, after which it will spawn again after every 90 minutes from the beginning of the previous Engagement til the instance empties, provided enough people can enter. If the player's instance timer for the Bozjan Southern front instance is lower than the timer for Castrum Lacus Litore at any time, then the former will extend to match the latter. The timer can also be shortened by players completing Skirmishes and other Critical Engagements in the field, Completing Castrum Lacus Litore rewards 50 weekly tomestones, a lot more mettle for completion, 5 Loathsome Memories of the Dying, if players are upgrading their Resistance weapons, and 70-100 Bozjan Coins, depending on the progress done for the prisoner objectives.. These coins can be traded at the base camp for special gear that can be upgraded to have special Bozja-specific effects. The upgrade items can also drop as loot from Castrum Lacus Litore.
After completing the Resistance story quests, Bozjan coins can also be obtained from Skirmishes and Critical Engagements.
Lost actions[]
Lost actions are special duty actions that can be obtained from items known as Forgotten Fragments. The Fragments can be obtained by slaying monsters on the field or from participating in Critical Engagements. To obtain the actions from these fragments, they must be presented to the Resistance Appraiser NPC, and are subsequently stored in the Lost Finds cache. From the cache, actions can be equipped in the player's Lost Finds Holster which allows a certain amount of actions to be carried at once. The ability-type actions can be assigned to the duty action buttons and be utilized on the field to give players an advantage, while the item-type actions can simply be used from the Holster.
Skirmishes[]
Skirmishes are random battles that occur on the field of the Southern Front. Similar to FATEs, they can be joined by anyone who enters the site of the Skirmish. Skirmishes range from fighting a group of enemies, battling specific targets, defending Resistance Fighters from oppressive forces or obtaining materials. On top of awarding mettle and other items, specific Skirmishes will trigger Critical Engagements upon completion.
| Name | Rank | Location | Time limit | Objective |
|---|---|---|---|---|
| Description Spawn conditions (if any) | ||||
| 1 | Southern Entrenchment (x20 y26) | 20 minutes | Defeat the 4th Legion troops and shadow familiars. | |
| A unit of imperial mages has weaved their way across the battlefield and is now dangerously close to Utya's Aegis. They must be repelled before they can strike at the Resistance outpost. | ||||
| 1 | Southern Entrenchment (x24 y27) | 20 minutes | Defeat the reconnaissance slashers. | |
| The IVth Legion has deployed a detachment of unmanned warmachina with one simple objective: wreak as much havoc as possible. | ||||
| 1 | Southern Entrenchment (x20 y26) | 20 minutes | Defeat Hernais the Tenacious and the tamed panther. | |
| Hernais the Tenacious has a pack of trained beasts at his beck and call in addition to being a formidable opponent himself. His assault on Utya's Aegis must be halted at all costs. | ||||
| 1 | Southern Entrenchment (x24 y27) | 20 minutes | Defeat the 4th Legion troops and fire familiars. | |
| Scouts report that an enemy patrol has halted to rest in an easily assaulted position. Seize this opportunity to thin the imperials' ranks. | ||||
| 1 | Southern Entrenchment (x27 y29) | 20 minutes | Defeat Gamma R-1 the armored weapon escorts. | |
| The IVth Legion's advanced magitek soldiers are a terrifying amalgamation of man and machine. The Resistance's front line will surely suffer heavy losses if these hulking menaces are allowed to continue their rampage unabated.
Spawn Conditions
| ||||
| 1 | Southern Entrenchment (x33 y29) | 20 minutes | Defeat the blooming snapweeds. | |
| Drawn by the literal heat of battle, a host of blooming snapweeds has taken to feasting on hapless combatants. While your allies in the Resistance would be more than pleased if they were to thin the numbers of imperials, these voracious seedkin pay little attention to which faction they are devouring. | ||||
| 1 | Southern Entrenchment (x28 y26) | 20 minutes | Defeat Daguza the Shrewd and his minions. | |
| Daguza, known not-so-affectionately as “Hamshanks” by his peers, has gained a reputation as a fearsome beastmaster. He and his horde will need to be eliminated to make way for the Resistance troops. | ||||
| 1 | Southern Entrenchment (x17 y26) | 20 minutes | Defeat the spirulina. | |
| The imperial centurion Clarricie is known not only for her prowess in battle, but also for her collection of bizarre pets. Unfortunately for the Resistance, these creatures happen to be incredibly ferocious and hungry for warm flesh.
| ||||
| 1 | Southern Entrenchment (x33 y29) | 20 minutes | Defeat Construct 10. | |
| Not only has the Empire excavated an ancient automaton, they have repurposed it for combat. While the Ironworks engineers would surely like to study it more closely, they will have to wait until after it has been smashed to pieces. | ||||
| 1 | Southern Entrenchment (x28 y26) | 20 minutes | Defeat Dyunbu the Blessed and her minions. | |
| A detachment of conscripted mages led by Dyunbu the Blessed has been making a name for themselves as a particularly troublesome group of foes, least of all because of their commander's gift for healing. While the attacking of chirurgeons and other medics is generally frowned upon, her presence on the front line can no longer be tolerated. | ||||
| 5 | Old Bozja (x30 y22) | 20 minutes | Defeat Hernais the Tenacious and his minions. | |
| Hernais the Tenacious and his menagerie are poised to strike at Olana's Stand. They must be repelled before the Resistance outpost is overrun with fiends. | ||||
| 5 | Old Bozja (x26 y18) | 20 minutes | Defeat Daguza the Shrewd and his minions. | |
| Daguza's collection of beasts includes the incredibly dangerous red chocobo. They are able to call forth flaming meteors with alarming accuracy, a far cry from other, more amicable breeds.
Spawn Conditions
| ||||
| 5 | Old Bozja (x31 y17) | 20 minutes | Help Llofii the Forthright defeat Clarricie the Resplendent and her minions. | |
| A summoner formerly in the employ of the Empire has decided to cut her ties and flee with an experimental creature. The Resistance has taken pity on her and the poor beast and has arranged for their escape, though as one might expect, imperial pursuers are not far behind.
Spawn conditions:
| ||||
| 5 | Old Bozja (x25 y22) | 20 minutes | Deliver magitek parts to the Resistance appropriator. | |
| The imperials are using the battlefield as a testing site for the latest magitek weaponry. The Resistance would put a stop to these experiments and gather as many pieces of Garlean technology as possible for their research into the enemy.
Spawn conditions:
| ||||
| 5 | Old Bozja (x17 y23) | 20 minutes | Destroy the imperial supply crates. | |
| The imperial forces are planning to establish a refueling and repair station for their warmachina. They have even gone so far as to leave their supplies out in the open, though not entirely undefended. | ||||
| 5 | Old Bozja (x30 y22) | 20 minutes | Defeat the magitek laborer. | |
| The Resistance had previously defeated an ancient automaton, only for it to reappear with improved combat capabilities. There is no telling the havoc it will wreak if left to its own devices. | ||||
| 5 | Old Bozja (x17 y23) | 20 minutes | Defeat Dyunbu the Blessed and her minions. | |
| Dyunbu the Blessed and her troops have struck camp in a position of strategic significance, obstructing the advance of the Resistance. A swift assault should send them packing, opening a path for your allies. | ||||
| 5 | Old Bozja (x25 y22) | 20 minutes | Defeat the necrophagus hounds and vodorigas. | |
| Voidsent are invariably drawn to sites where blood is spilled, that they may feed on the aether of those fallen in battle. Though this poses as much of a threat to the Empire as it does the Resistance, the front line cannot advance until these fiends are eliminated. | ||||
| 5 | Old Bozja (x18 y20) | 20 minutes | Help the Resistance troops defeat the 4th Legion troops and fire familiars. | |
| A Resistance unit has found itself swarmed by imperial forces. Without aid, they will surely be overwhelmed. | ||||
| 5 | Old Bozja (x18 y20) | 20 minutes | Defeat Sartauvoir the Inferno. | |
| An influential centurion─and powerful pyromancer─has arrived to chastise the Resistance. Snuff Sartauvoir's flame before all are consumed in fiery devastation.
Spawn conditions:
| ||||
| 8 | The Alermuc Climb (x24 y17) | 20 minutes | Defeat Clarricie the Respledent and Feathered Rainbow. | |
| Clarricie has brought several of her exotic pets for a leisurely stroll on the battlefield, and possibly to slay a few Resistance troops for good measure. Worst of all is her so-called “Feathered Rainbow,” which is not only a voracious predator, but offensively gaudy. | ||||
| 8 | The Alermuc Climb (x20 y14) | 20 minutes | Defeat the tamed drakes and ziz. | |
| With their master having been slain in battle, a pack of trained beasts now roams the southern front, ravenously devouring anything unfortunate enough to draw too close. | ||||
| 8 | The Alermuc Climb (x11 y15) | 20 minutes | Defeat Daguza the Shrewd and his minions. | |
| Despite Daguza commanding an impressive assortment of beasts, he is not opposed to bolstering his ranks with more sentient beings. Your Bozjan allies strongly recommend ignoring his attempts to recruit you and simply pummeling his hideous face instead. | ||||
| 8 | The Alermuc Climb (x20 y17) | 20 minutes | Defeat the Mark XII-B magitek laborer. | |
| Once more, the ancient automaton has taken to the battlefield, deadlier than ever. Your Resistance allies can but hope it is still within their power to defeat it.
Spawn Conditions
| ||||
| 8 | The Alermuc Climb (x14 y15) | 20 minutes | Defeat the leucrocota. | |
| The Empire's magitek-enhanced soldiers continue to harry the Resistance's front line. A unit led by Dabog, the magitek-enhanced pilot, poses an immediate threat to your Bozjan allies and must be eliminated at all costs. | ||||
| 8 | The Alermuc Climb (x24 y17) | 20 minutes | Defeat the 4th Legion duplicarii and scrapers. | |
| A number of imperial soldiers have been seen attempting to excavate an unknown object from the battlefield. Whatever it may be, it likely spells trouble for the Resistance, so they must be prevented from locating the prize they seek. | ||||
| 8 | The Alermuc Climb (x20 y14) | 20 minutes | Deliver crates of imperial supplies to the Resistance appropriator. | |
| An imperial detachment has been sighted transporting supplies across the battlefield, and the Resistance aims to requisition these valuable resources for themselves.
Spawn conditions:
| ||||
| 8 | The Alermuc Climb (x11 y20) | 20 minutes | Defeat the 4th Legion troops and archaeodemons. | |
| As the battle intensifies, so too does its power to draw forth fell creatures from the void. A horde of archaeodemons has descended upon the southern front, laying waste to all in their path. | ||||
| 8 | The Alermuc Climb (x20 y17) | 20 minutes | Defeat Dyunbu the Blessed and her minions. | |
| The imperial mage detachment led by Dyunbu the Blessed has joined with other units after their previous defeats. Though some common ground may yet be found between their leader and the Resistance, it seems that for the time being, conflict is unavoidable.
Spawn conditions:
| ||||
| 8 | The Alermuc Climb (x20 y17) | 20 minutes | Defeat the Cacus and Sartauvoir the Inferno. | |
| As the Resistance prepares to strike directly at Castrum Lacus Litore, the way is barred by both Sartauvoir quo Soranus and Sicinius mal Vellutus, two of the deadliest opponents to grace the southern front. Though the elite members of Gunnhildr's Blades have entered the fray, even their considerable strength may not be enough to emerge victorious.
Spawn conditions:
| ||||
| 8 | The Alermuc Climb (x14 y15) | 20 minutes | Defeat the 4th Legion beastmasters and tamed canis pugnaces. | |
| The subordinates of Hernais the Tenacious have unleashed their hounds to maul any Resistance troops that draw near to Castrum Lacus Litore. Your task is to send them running with their tails between their legs. | ||||
| 8 | The Alermuc Climb (x11 y20) | 20 minutes | Defeat the magitek avenger, colossus, and rearguard prototypes. | |
| It appears there is no end to Sicinius mal Vellutus's magitek monstrosities, as yet more of his unmanned warmachina take to the field. With each of his creations deadlier than the last, the Resistance will be hard-pressed to repel them without your aid. | ||||
Critical Engagements[]
Critical Engagements are special semi-instanced encounters that have a chance to be triggered in the Southern Front. Unlike Skirmishes, Engagements bar off the area they take place in, and must be registered for via the Bozja Finder. When an Engagement is spawned (either by the completion of specific Skirmishes or the killing of certain magitek mobs), a notification is sent to all players on the field, allowing a time for players to register. Engagements allow either 24 or 48 players to enter them, and if there are more than those amounts registered, then the players are randomly selected to join. The mechanics for Engagements are generally more challenging and less forgiving than Skirmishes. Priority for entering Engagements can be obtained via two methods: completing the Skirmishes that spawn the Engagement, or utilizing special Bozjan Clusters earned from slaying the magitek mobs that exist throughout the field, with the priority from spawning being more weighted. Engagements spawn either by themselves or as a pair, however outside of these, another Engagement cannot be spawn until the currently available Engagement(s) is completed.
Duels[]
Upon completing certain Critical Engagements, a Duel can be triggered. Duels are 1v1 semi-instanced battles against powerful enemy NPCs. To qualify for a Duel, a player must complete the preceding Engagement without dying or being hit by any of the avoidable Area of Effect attacks (disconnection, crashing, or other force quits from the game during an engagement count towards this penalty). Once qualified, players will receive a notification for the Duel, which they can either accept or decline. If multiple players qualify and accept, then one will be chosen at random from the pool. Duels are highly challenging, however if they are completed successfully all players near the dueling area at the time of completion receive a buff to mettle gain, alongside several items for the winning player's use. In the event a player qualifies for a duel, but is not selected to participate, they will earn Notoriety, a special resource that increases the likelihood the player will be selected for the next Duel they qualify for. Being selected for the Duel will reduce Notoriety to zero.
| Name | Rank | Location | Time limit | Player limit | Objective |
|---|---|---|---|---|---|
| Description Spawn conditions (if any) | |||||
| 1 | Southern Entrenchment (x17 y27) | 20 minutes | 48 | Defeat Peerifool. | |
| Clarricie's latest ploy is to send the loathsome seedkin Peerifool into the fray. Its cloying stench alone is enough to repel all but the most steadfast of warriors, and even they will struggle to withstand its relentless assault.
Spawn conditions:
| |||||
| 1 | Southern Entrenchment (x22 y28) | 20 minutes | 48 | Defeat Canis Dirus. | |
| Following a series of resounding defeats, the imperial mages have resorted to desperate measures by summoning the ferocious Canis Dirus. Whether each of its three heads is capable of independent thought is unclear, but they are all equally determined to devour as many Resistance fighters as possible. | |||||
| 1 | Southern Entrenchment (x27 y29) | 20 minutes | 48 | Defeat Vigilia. | |
| The experimental magitek soldier Dabog has been assigned to pilot Vigilia, the culmination of the Empire's research into scorpion-type warmachina. This unit alone would level the Resistance's base of operations if allowed to draw too close, so every effort must be made to silence it.
Spawn conditions:
| |||||
| 1 | Southern Entrenchment (x31 y26) | 20 minutes | 1 | Defeat Gabriel. | |
| Dabog, the magitek-enhanced pilot, takes to the air in one of the most advanced weapons at the Empire's disposal: the flying warmachina known simply as Gabriel. If allowed to continue strafing the Resistance front line, your comrades will have little hope of reaching the enemy castrum.
Spawn conditions:
| |||||
| 1 | Southern Entrenchment (x35 y25) | 20 minutes | 48 | Defeat Akbaba and the 4th Legion beastmaster. | |
| The Empire has unleashed the dreaded Akbaba, a winged fiend that feasts on the corpses of those slain in battle. It is also not opposed to going the extra malm and creating said corpses itself, specifically from members of the Resistance. | |||||
| 5 | Old Bozja (x31 y17) | 20 minutes | 48 | Defeat Spartoi. | |
| Llofii has freed the experimental monoceros from her former masters and the unlikely pair are making good their escape. Just as it seems they will finally be able to put the Empire behind them, the deadly Spartoi appears to block their path.
Spawn conditions:
| |||||
| 5 | Old Bozja (x26 y18) | 20 minutes | 48 | Defeat Red Comet. | |
| Unlike their yellow-plumed cousins, the red chocobo is rarely a welcome sight, least of all on the battlefield. None are more belligerent than the particularly large specimen known as Red Comet, who has been a constant nuisance to both sides of the conflict since he first arrived.
Spawn conditions:
| |||||
| 5 | Old Bozja (x23 y20) | 20 minutes | 1 | Defeat Lyon the Beast King. | |
| Known for his unmatched command of a variety of ferocious beasts, Lyon is one of the most feared adversaries the Bozjan Resistance has faced to date. This formidable foe must be overcome for them to have any chance at victory.
Spawn conditions:
| |||||
| 5 | Old Bozja (x20 y24) | 20 minutes | 48 | Defeat the imperial pyromancers and pyroboli. | |
| The mages serving the Empire have decided to pursue a more explosive means of subduing their foes. As such, they have deployed several pyroboli to quite literally level the playing field.
Spawn conditions: | |||||
| 5 | Old Bozja (x14 y21) | 20 minutes | 48 | Defeat the Patriot. | |
| The Empire's magitek soldiers possess a wealth of machina with which to torment their foes, but few are more nightmarish than the Patriot. With its far-reaching appendages and all-seeing optical sensors, it is designed to utterly destroy those who would dare violate the borders of Garlean territory.
Spawn conditions:
| |||||
| 8 | The Alermuc Climb (x9 y18) | 20 minutes | 48 | Defeat the eale. | |
| Though it may seem no more than a rather large and unsightly bovine at first glance, the eale is in fact one of the deadliest creatures at the Empire's command. It also has an extraordinarily high threshold for pain, and is not afraid to dish out a fair share in return.
Spawn conditions: | |||||
| 8 | The Alermuc Climb (x14 y18) | 20 minutes | 48 | Defeat Dáinsleif. | |
| While Sicinius mal Vellutus is known for restoring ancient machinery, he is not one to snub more recent technological advancements. One such example is the Dáinsleif, an impressive nine-tailed warmachina that resembles a fox in appearance and animalistic cunning.
Spawn conditions:
| |||||
| 8 | The Alermuc Climb (x18 y15) | 20 minutes | 1 | Defeat Sartauvoir the Inferno. | |
| Of all the mages assigned to the IVth Legion, Sartauvoir quo Soranus is one of the most experienced...and most sadistic. The Bozjan southern front has provided him with the perfect arena to demonstrate his remarkable control of flame and take part in his favorite pastime: burning people alive.
Spawn conditions:
| |||||
| 8 | The Alermuc Climb (x20 y17) | 20 minutes | 48 | Defeat the Mark XIII-X magitek laborer. | |
| Sicinius mal Vellutus's apparent obsession with perfecting his series of constructs has given rise to his most dangerous creation yet. If you were to reduce this mechanical fiend to scrap metal, perhaps it would discourage your imperial adversary from any further dabbling. Or perhaps not.
Spawn conditions:
| |||||
| 8 | The Alermuc Climb (x23 y14) | 20 minutes | 48 | Defeat Chlevnik. | |
| Chlevnik is the result of experimental combat drugs being used on the corpse of a behemoth, forcing it back to life. Racked with agony, it seeks to exact its revenge on mankind for the terrible fate that has befallen it.
Spawn conditions:
| |||||
| 10 | Castrum Lacus Litore (x18 y13) | 20 minutes, +10 minutes upon defeating each boss. | 48 | See Castrum Lacus Litore. | |
| At long last, the enemy stronghold is but a stone's throw away. With your Resistance comrades at your side, all that remains is the final assault.
Spawn conditions:
| |||||
Gallery[]
")
")
")
")