Intangir Bot (talk | contribs) m (Renaming categories in accordance with Forum:Category overhaul and categories for redirects) |
Intangir Bot (talk | contribs) m (Bot: Automated text replacement (-{{-}} +{{clear}})) |
||
| (2 intermediate revisions by 2 users not shown) | |||
| Line 4: | Line 4: | ||
==Stats== |
==Stats== |
||
He has some of the worst [[stats]], both physically and magically. His [[MP (stat)|MP]] does not exceed 90 to ensure the player cannot cast [[Meteor (Final Fantasy IV)|Meteor]] with him (Meteor costs 99 MP). Unlike other characters, Tellah's physical stats (save for his [[HP (stat)|HP]]) actually decrease when he [[level]]s up, implying his age is catching up with him, preventing him from gaining strength. |
He has some of the worst [[stats]], both physically and magically. His [[MP (stat)|MP]] does not exceed 90 to ensure the player cannot cast [[Meteor (Final Fantasy IV)|Meteor]] with him (Meteor costs 99 MP). Unlike other characters, Tellah's physical stats (save for his [[HP (stat)|HP]]) actually decrease when he [[level]]s up, implying his age is catching up with him, preventing him from gaining strength. |
||
| + | |||
===2D Stats=== |
===2D Stats=== |
||
{|class="full-width FFIV article-table" style="text-align:center" |
{|class="full-width FFIV article-table" style="text-align:center" |
||
| − | |+''' Tellah {{foot|(2D)| |
+ | |+''' Tellah {{foot|(2D)|data extracted from PSP version}}''' |
|-class="a" |
|-class="a" |
||
!style="width:10%"|Level |
!style="width:10%"|Level |
||
| Line 62: | Line 63: | ||
|22 |
|22 |
||
|- |
|- |
||
| − | !class="b"|{{foot|70*|At random afterward, see |
+ | !class="b"|{{foot|70*|At random afterward, see table below}} |
|1621 |
|1621 |
||
|90 |
|90 |
||
| Line 89: | Line 90: | ||
|rdm |
|rdm |
||
|- |
|- |
||
| − | !class="b"|{{foot|99*| |
+ | !class="b"|{{foot|99*|9998917 exp}} |
|2361 |
|2361 |
||
|90 |
|90 |
||
| Line 99: | Line 100: | ||
|- |
|- |
||
|} |
|} |
||
| − | |||
[[File:FFIV PSP Tellah Level Up Possibilities.png|thumb|right|330px|Tellah's level up possibilities.]] |
[[File:FFIV PSP Tellah Level Up Possibilities.png|thumb|right|330px|Tellah's level up possibilities.]] |
||
{|class="half-width FFIV article-table" style="text-align:center" |
{|class="half-width FFIV article-table" style="text-align:center" |
||
| − | |+''' Level up possibilities {{foot|-Tellah-| |
+ | |+''' Level up possibilities {{foot|-Tellah-|Data extracted from PSP version}}''' |
|-class="a" |
|-class="a" |
||
!style="width:13%"|Possibility |
!style="width:13%"|Possibility |
||
| Line 155: | Line 155: | ||
|- |
|- |
||
|} |
|} |
||
| − | {{ |
+ | {{clear}} |
| + | |||
===3D Stats=== |
===3D Stats=== |
||
{|class="full-width FFIV article-table" style="text-align:center" |
{|class="full-width FFIV article-table" style="text-align:center" |
||
| Line 223: | Line 224: | ||
|64 |
|64 |
||
|- |
|- |
||
| − | !class="b"|{{foot|70*| |
+ | !class="b"|{{foot|70*|Depends on augments in character's battle menu afterward}} |
|3021 |
|3021 |
||
|90 |
|90 |
||
| Line 233: | Line 234: | ||
|- |
|- |
||
|} |
|} |
||
| − | When Tellah joins the party on [[Mount Ordeals]], |
+ | When Tellah joins the party on [[Mount Ordeals]], he joins at the same level he left the party in [[Damcyan]] and with the same equipment. |
==Abilities== |
==Abilities== |
||
| − | |||
Tellah can cast both [[White Magic (Final Fantasy IV)|White]] and [[Black Magic (Final Fantasy IV)|Black Magic]]. When he first joins, he only knows a handful of spells: the Black Magic spells [[Black Magic (Final Fantasy IV)#Fire|Fire]], [[Black Magic (Final Fantasy IV)#Blizzard|Blizzard]], [[Black Magic (Final Fantasy IV)#Thunder|Thunder]], [[Black Magic (Final Fantasy IV)#Stop|Stop]] and [[Black Magic (Final Fantasy IV)#Osmose|Osmose]], and the White Magic spells [[White Magic (Final Fantasy IV)#Cura|Cura]], [[White Magic (Final Fantasy IV)#Life|Life]], [[White Magic (Final Fantasy IV)#Blink|Blink]], [[White Magic (Final Fantasy IV)#Esuna|Esuna]], [[White Magic (Final Fantasy IV)#Confuse|Confuse]], and [[White Magic (Final Fantasy IV)#Teleport|Teleport]]. In the 3D versions, Tellah begins with 3 more spells : [[Sleep (ability)#Final Fantasy IV|Sleep]], [[Poison (ability)#Final Fantasy IV|Poison]] and [[Silence (ability)|Silence]] while he loses [[Black Magic (Final Fantasy IV)#Stop|Stop]]. |
Tellah can cast both [[White Magic (Final Fantasy IV)|White]] and [[Black Magic (Final Fantasy IV)|Black Magic]]. When he first joins, he only knows a handful of spells: the Black Magic spells [[Black Magic (Final Fantasy IV)#Fire|Fire]], [[Black Magic (Final Fantasy IV)#Blizzard|Blizzard]], [[Black Magic (Final Fantasy IV)#Thunder|Thunder]], [[Black Magic (Final Fantasy IV)#Stop|Stop]] and [[Black Magic (Final Fantasy IV)#Osmose|Osmose]], and the White Magic spells [[White Magic (Final Fantasy IV)#Cura|Cura]], [[White Magic (Final Fantasy IV)#Life|Life]], [[White Magic (Final Fantasy IV)#Blink|Blink]], [[White Magic (Final Fantasy IV)#Esuna|Esuna]], [[White Magic (Final Fantasy IV)#Confuse|Confuse]], and [[White Magic (Final Fantasy IV)#Teleport|Teleport]]. In the 3D versions, Tellah begins with 3 more spells : [[Sleep (ability)#Final Fantasy IV|Sleep]], [[Poison (ability)#Final Fantasy IV|Poison]] and [[Silence (ability)|Silence]] while he loses [[Black Magic (Final Fantasy IV)#Stop|Stop]]. |
||
| − | Once {{foot|[[Cecil Harvey|Cecil]] becomes a [[Paladin (job)|Paladin]]|Event}}, he remembers all his spells especially [[Curaja]], [[Arise#Final Fantasy IV|Arise]] and the "-ga" elementals. He |
+ | Once {{foot|[[Cecil Harvey|Cecil]] becomes a [[Paladin (job)|Paladin]]|Event}}, he remembers all his spells especially [[Curaja]], [[Arise#Final Fantasy IV|Arise]] and the "-ga" elementals. He can use Meteor if a [[Final Fantasy IV items#Soma Drop|Soma Drop]] or the MP +50% augment is used on him. However, the player is unlikely to see it on a first playthrough since the two aforementioned items are unavailable during the time Tellah is in the party. This can be worked around by hacking the items, by hacking Tellah in the party when the items are available or, in the 3D remake, by beginning a [[New Game Plus#Final Fantasy IV|new game plus]] with the items already in the inventory. Tellah will never be able to cast [[Holy (ability)|Holy]], [[Stop (ability)#Final Fantasy IV|Stop]] (3D only), [[Quake (ability)|Quake]], [[Death (ability)|Death]] and [[Flare (ability)|Flare]]. |
| + | |||
{|class="Full-width" |
{|class="Full-width" |
||
|valign="top"| |
|valign="top"| |
||
| Line 245: | Line 246: | ||
|-class="a" |
|-class="a" |
||
!width="30%" rowspan="2"|Spell |
!width="30%" rowspan="2"|Spell |
||
| − | !width="70%" colspan="4"|Level |
+ | !width="70%" colspan="4"|Level |
|-class="a" |
|-class="a" |
||
!width="35%"|2D{{foot|SNES, PS, GBA, PSP}} |
!width="35%"|2D{{foot|SNES, PS, GBA, PSP}} |
||
| Line 303: | Line 304: | ||
|-class="a" |
|-class="a" |
||
!width="30%" rowspan="2"|Spell |
!width="30%" rowspan="2"|Spell |
||
| − | !width="70%" colspan="4"|Level |
+ | !width="70%" colspan="4"|Level |
|-class="a" |
|-class="a" |
||
!width="35%"|2D{{foot|SNES, PS, GBA, PSP}} |
!width="35%"|2D{{foot|SNES, PS, GBA, PSP}} |
||
| Line 357: | Line 358: | ||
|-class="a" |
|-class="a" |
||
!width="30%" rowspan="2"|Spell |
!width="30%" rowspan="2"|Spell |
||
| − | !width="70%" colspan="4"|Level |
+ | !width="70%" colspan="4"|Level |
|-class="a" |
|-class="a" |
||
!width="35%"|2D{{foot|SNES, PS, GBA, PSP}} |
!width="35%"|2D{{foot|SNES, PS, GBA, PSP}} |
||
| Line 376: | Line 377: | ||
!class="b"|[[Stop (ability)#Final Fantasy IV|Stop]] |
!class="b"|[[Stop (ability)#Final Fantasy IV|Stop]] |
||
|Known |
|Known |
||
| − | | |
+ | |— |
|- |
|- |
||
!class="b"|[[Osmose (ability)#Final Fantasy IV|Osmose]] |
!class="b"|[[Osmose (ability)#Final Fantasy IV|Osmose]] |
||
| Line 415: | Line 416: | ||
|-class="a" |
|-class="a" |
||
!width="30%" rowspan="2"|Spell |
!width="30%" rowspan="2"|Spell |
||
| − | !width="70%" colspan="4"|Level |
+ | !width="70%" colspan="4"|Level |
|-class="a" |
|-class="a" |
||
!width="35%"|2D{{foot|SNES, PS, GBA, PSP}} |
!width="35%"|2D{{foot|SNES, PS, GBA, PSP}} |
||
| Line 458: | Line 459: | ||
|} |
|} |
||
|} |
|} |
||
| − | {{ |
+ | {{clear}} |
[[File:FFIV Recall DS.jpg|thumb|right|Tellah using Recall.]] |
[[File:FFIV Recall DS.jpg|thumb|right|Tellah using Recall.]] |
||
| − | Tellah has access to the [[Recall]] ability, which allows him to cast a random Black Magic spell. Once [[Cecil Harvey|Cecil]] becomes a [[Paladin (job)|Paladin]], Tellah loses Recall in the PS, Advance and PSP versions but keeps the ability to use it in the 3D remakes, which may cast a spell he does not normally have access to. This ability was removed in the North American SNES release. |
+ | Tellah has access to the [[Recall]] ability, which allows him to cast a random Black Magic spell. Once [[Cecil Harvey|Cecil]] becomes a [[Paladin (job)|Paladin]], Tellah loses Recall in the PS, Advance and PSP versions but keeps the ability to use it in the 3D remakes, which may cast a spell he does not normally have access to. This ability was removed in the North American SNES release. |
| + | |||
| + | The spells Tellah can use with Recall are: |
||
{|class="half-width" |
{|class="half-width" |
||
|width="33%" valign="top"| |
|width="33%" valign="top"| |
||
| Line 545: | Line 548: | ||
|} |
|} |
||
|} |
|} |
||
| − | {{ |
+ | {{clear}} |
==Equipment== |
==Equipment== |
||
| ⚫ | Tellah can equip [[Rod (weapon type)|rods]], [[Staff (weapon type)|staves]], [[Hat (equipment type)|hats]], clothes, [[Robe (equipment type)|robes]], [[armlets]] and [[rings]]. In the 2D versions, he starts with a [[Final Fantasy IV weapons#Staff|Staff]] and a [[Final Fantasy IV armor#Gaia Gear|Gaia Gear]]. In the 3D versions, he has [[Final Fantasy IV 3D weapons#Staff|Staff]], a [[Final Fantasy IV 3D armor#Gaia Gear|Gaia Gear]] and an [[Final Fantasy IV 3D armor#Iron Armlet|Iron Armlet]]. |
||
| − | |||
| ⚫ | Tellah |
||
{|class="half-width FFIV article-table" |
{|class="half-width FFIV article-table" |
||
| − | |+'''Weapons [[Final Fantasy IV weapons|2D]] & [[Final Fantasy IV 3D weapons| |
+ | |+'''Weapons [[Final Fantasy IV weapons|2D]] & [[Final Fantasy IV 3D weapons|3D]]''' |
|-class="a" |
|-class="a" |
||
!width="25%"|Rods |
!width="25%"|Rods |
||
| Line 558: | Line 560: | ||
|- |
|- |
||
|valign="top"| |
|valign="top"| |
||
| − | *[[Rod (weapon)|Rod]] [[Final Fantasy IV weapons#Rod|2D]] [[Final Fantasy IV 3D weapons#Rod|3D]] |
+ | *[[Rod (weapon)|Rod]] ([[Final Fantasy IV weapons#Rod|2D]], [[Final Fantasy IV 3D weapons#Rod|3D]]) |
| − | *[[Ice Rod]] [[Final Fantasy IV weapons#Ice Rod|2D]] [[Final Fantasy IV 3D weapons#Ice Rod|3D]] |
+ | *[[Ice Rod]] ([[Final Fantasy IV weapons#Ice Rod|2D]], [[Final Fantasy IV 3D weapons#Ice Rod|3D]]) |
| − | *[[Flame Rod]] [[Final Fantasy IV weapons#Flame Rod|2D]] [[Final Fantasy IV 3D weapons#Flame Rod|3D]] |
+ | *[[Flame Rod]] ([[Final Fantasy IV weapons#Flame Rod|2D]], [[Final Fantasy IV 3D weapons#Flame Rod|3D]]) |
| − | *[[Thunder Rod]] [[Final Fantasy IV weapons#Thunder Rod|2D]] [[Final Fantasy IV 3D weapons#Thunder Rod|3D]] |
+ | *[[Thunder Rod]] ([[Final Fantasy IV weapons#Thunder Rod|2D]], [[Final Fantasy IV 3D weapons#Thunder Rod|3D]]) |
| − | *[[Polymorph Rod]] [[Final Fantasy IV weapons#Polymorph Rod|2D]] [[Final Fantasy IV 3D weapons#Polymorph Rod|3D]] |
+ | *[[Polymorph Rod]] ([[Final Fantasy IV weapons#Polymorph Rod|2D]], [[Final Fantasy IV 3D weapons#Polymorph Rod|3D]]) |
| − | *[[Faerie Rod]] [[Final Fantasy IV weapons#Faerie Rod|2D]] [[Final Fantasy IV 3D weapons#Faerie Rod|3D]] |
+ | *[[Faerie Rod]] ([[Final Fantasy IV weapons#Faerie Rod|2D]], [[Final Fantasy IV 3D weapons#Faerie Rod|3D]]) |
| − | *[[Lilith Rod]] [[Final Fantasy IV weapons#Lilith Rod|2D]] [[Final Fantasy IV 3D weapons#Lilith Rod|3D]] |
+ | *[[Lilith Rod]] ([[Final Fantasy IV weapons#Lilith Rod|2D]], [[Final Fantasy IV 3D weapons#Lilith Rod|3D]]) |
| − | *[[Stardust Rod]] [[Final Fantasy IV weapons#Stardust Rod|2D]] [[Final Fantasy IV 3D weapons#Stardust Rod|3D]] |
+ | *[[Stardust Rod]] ([[Final Fantasy IV weapons#Stardust Rod|2D]] [[Final Fantasy IV 3D weapons#Stardust Rod|3D]]) |
|valign="top"| |
|valign="top"| |
||
| − | *[[Staff (weapon)|Staff]] [[Final Fantasy IV weapons#Staff|2D]] [[Final Fantasy IV 3D weapons#Staff|3D]] |
+ | *[[Staff (weapon)|Staff]] ([[Final Fantasy IV weapons#Staff|2D]], [[Final Fantasy IV 3D weapons#Staff|3D]]) |
| − | *[[Healing Staff]] [[Final Fantasy IV weapons#Healing Staff|2D]] [[Final Fantasy IV 3D weapons#Healing Staff|3D]] |
+ | *[[Healing Staff]] ([[Final Fantasy IV weapons#Healing Staff|2D]], [[Final Fantasy IV 3D weapons#Healing Staff|3D]]) |
| − | *[[Mythril Staff]] [[Final Fantasy IV weapons#Mythril Staff|2D]] [[Final Fantasy IV 3D weapons#Mythril Staff|3D]] |
+ | *[[Mythril Staff]] ([[Final Fantasy IV weapons#Mythril Staff|2D]], [[Final Fantasy IV 3D weapons#Mythril Staff|3D]]) |
| − | *[[Power Staff]] [[Final Fantasy IV weapons#Power Staff|2D]] [[Final Fantasy IV 3D weapons#Power Staff|3D]] |
+ | *[[Power Staff]] ([[Final Fantasy IV weapons#Power Staff|2D]], [[Final Fantasy IV 3D weapons#Power Staff|3D]]) |
| − | *[[Aura Staff]] [[Final Fantasy IV weapons#Aura Staff|2D]] [[Final Fantasy IV 3D weapons#Aura Staff|3D]] |
+ | *[[Aura Staff]] ([[Final Fantasy IV weapons#Aura Staff|2D]], [[Final Fantasy IV 3D weapons#Aura Staff|3D]]) |
| − | *[[Rune Staff]] [[Final Fantasy IV weapons#Rune Staff|2D]] [[Final Fantasy IV 3D weapons#Rune Staff|3D]] |
+ | *[[Rune Staff]] ([[Final Fantasy IV weapons#Rune Staff|2D]], [[Final Fantasy IV 3D weapons#Rune Staff|3D]]) |
| − | *[[Sage's Staff]] [[Final Fantasy IV weapons#Sage's Staff|2D]] [[Final Fantasy IV 3D weapons#Sage's Staff|3D]] |
+ | *[[Sage's Staff]] ([[Final Fantasy IV weapons#Sage's Staff|2D]], [[Final Fantasy IV 3D weapons#Sage's Staff|3D]]) |
|} |
|} |
||
| Line 585: | Line 587: | ||
|- |
|- |
||
|valign="top"| |
|valign="top"| |
||
| − | *[[Hero's Shield]] [[Final Fantasy IV armor#Hero's Shield|2D]]{{Foot|Advance and The Complete Collection only}} |
+ | *[[Hero's Shield]] ([[Final Fantasy IV armor#Hero's Shield|2D]]{{Foot|Advance and The Complete Collection only}}) |
|valign="top"| |
|valign="top"| |
||
| − | *[[Leather Cap]] [[Final Fantasy IV armor#Leather Cap|2D]] [[Final Fantasy IV 3D armor#Leather Cap|3D]] |
+ | *[[Leather Cap]] ([[Final Fantasy IV armor#Leather Cap|2D]], [[Final Fantasy IV 3D armor#Leather Cap|3D]]) |
| − | *[[Headband]] [[Final Fantasy IV armor#Headband|2D]] [[Final Fantasy IV 3D armor#Headband|3D]] |
+ | *[[Headband]] ([[Final Fantasy IV armor#Headband|2D]], [[Final Fantasy IV 3D armor#Headband|3D]]) |
| − | *[[Feathered Cap]] [[Final Fantasy IV armor#Feathered Cap|2D]] [[Final Fantasy IV 3D armor#Feathered Cap|3D]] |
+ | *[[Feathered Cap]] ([[Final Fantasy IV armor#Feathered Cap|2D]], [[Final Fantasy IV 3D armor#Feathered Cap|3D]]) |
| − | *[[Green Beret]] [[Final Fantasy IV armor#Green Beret|2D]] [[Final Fantasy IV 3D armor#Green Beret|3D]] |
+ | *[[Green Beret]] ([[Final Fantasy IV armor#Green Beret|2D]], [[Final Fantasy IV 3D armor#Green Beret|3D]]) |
| − | *[[Wizard's Hat]] [[Final Fantasy IV armor#Wizard's Hat|2D]] [[Final Fantasy IV 3D armor#Wizard's Hat|3D]] |
+ | *[[Wizard's Hat]] ([[Final Fantasy IV armor#Wizard's Hat|2D]], [[Final Fantasy IV 3D armor#Wizard's Hat|3D]]) |
| − | *[[Black Cowl]] [[Final Fantasy IV armor#Black Cowl|2D]] [[Final Fantasy IV 3D armor#Black Cowl|3D]] |
+ | *[[Black Cowl]] ([[Final Fantasy IV armor#Black Cowl|2D]], [[Final Fantasy IV 3D armor#Black Cowl|3D]]) |
| − | *[[Sage's Miter]] [[Final Fantasy IV armor#Sage's Miter|2D]] [[Final Fantasy IV 3D armor#Sage's Miter|3D]] |
+ | *[[Sage's Miter]] ([[Final Fantasy IV armor#Sage's Miter|2D]], [[Final Fantasy IV 3D armor#Sage's Miter|3D]]) |
| − | *[[Ribbon (equipment)|Ribbon]] [[Final Fantasy IV armor#Ribbon|2D]] [[Final Fantasy IV 3D armor#Ribbon|3D]] |
+ | *[[Ribbon (equipment)|Ribbon]] ([[Final Fantasy IV armor#Ribbon|2D]], [[Final Fantasy IV 3D armor#Ribbon|3D]]) |
| − | *[[Glass Mask]] [[Final Fantasy IV armor#Glass Mask|2D]] [[Final Fantasy IV 3D armor#Glass Mask|3D]] |
+ | *[[Glass Mask]] ([[Final Fantasy IV armor#Glass Mask|2D]], [[Final Fantasy IV 3D armor#Glass Mask|3D]]) |
|valign="top"| |
|valign="top"| |
||
| − | *[[Clothing]] [[Final Fantasy IV armor#Clothing|2D]] [[Final Fantasy IV 3D armor#Clothing|3D]] |
+ | *[[Clothing]] ([[Final Fantasy IV armor#Clothing|2D]], [[Final Fantasy IV 3D armor#Clothing|3D]]) |
| − | *Prison Garb [[Final Fantasy IV armor#Prison Garb|2D]] [[Final Fantasy IV 3D armor#Prison Garb|3D]] |
+ | *Prison Garb ([[Final Fantasy IV armor#Prison Garb|2D]], [[Final Fantasy IV 3D armor#Prison Garb|3D]]) |
| − | *[[Leather Clothing]] [[Final Fantasy IV armor#Leather Clothing|2D]] [[Final Fantasy IV 3D armor#Leather Clothing|3D]] |
+ | *[[Leather Clothing]] ([[Final Fantasy IV armor#Leather Clothing|2D]], [[Final Fantasy IV 3D armor#Leather Clothing|3D]]) |
| − | *[[Bard's Tunic]] [[Final Fantasy IV armor#Bard's Tunic|2D]] [[Final Fantasy IV 3D armor#Bard's Tunic|3D]] |
+ | *[[Bard's Tunic]] ([[Final Fantasy IV armor#Bard's Tunic|2D]], [[Final Fantasy IV 3D armor#Bard's Tunic|3D]]) |
| − | *[[Gaia Gear]] [[Final Fantasy IV armor#Gaia Gear|2D]] [[Final Fantasy IV 3D armor#Gaia Gear|3D]] |
+ | *[[Gaia Gear]] ([[Final Fantasy IV armor#Gaia Gear|2D]], [[Final Fantasy IV 3D armor#Gaia Gear|3D]]) |
| − | *[[Kenpogi]] [[Final Fantasy IV armor#Kenpogi|2D]] [[Final Fantasy IV 3D armor#Kenpo Gi|3D]] |
+ | *[[Kenpogi]] ([[Final Fantasy IV armor#Kenpogi|2D]], [[Final Fantasy IV 3D armor#Kenpo Gi|3D]]) |
| − | *[[Sage's Surplice]] [[Final Fantasy IV armor#Sage's Surplice|2D]] [[Final Fantasy IV 3D armor#Sage's Surplice|3D]] |
+ | *[[Sage's Surplice]] ([[Final Fantasy IV armor#Sage's Surplice|2D]], [[Final Fantasy IV 3D armor#Sage's Surplice|3D]]) |
| − | *[[Black Belt Gi]] [[Final Fantasy IV armor#Black Belt Gi|2D]] [[Final Fantasy IV 3D armor#Black Belt Gi |
+ | *[[Black Belt Gi]] ([[Final Fantasy IV armor#Black Belt Gi|2D]], [[Final Fantasy IV 3D armor#Black Belt Gi|3D]]) |
| − | *[[Power Sash]] [[Final Fantasy IV armor#Power Sash|2D]] [[Final Fantasy IV 3D armor#Power Sash|3D]] |
+ | *[[Power Sash]] ([[Final Fantasy IV armor#Power Sash|2D]], [[Final Fantasy IV 3D armor#Power Sash|3D]]) |
| − | *[[Black Robe]] [[Final Fantasy IV armor#Black Robe|2D]] [[Final Fantasy IV 3D armor#Black Robe|3D]] |
+ | *[[Black Robe]] ([[Final Fantasy IV armor#Black Robe|2D]], [[Final Fantasy IV 3D armor#Black Robe|3D]]) |
| − | *[[Luminous Robe]] [[Final Fantasy IV armor#Luminous Robe|2D]] [[Final Fantasy IV 3D armor#Luminous Robe|3D]] |
+ | *[[Luminous Robe]] ([[Final Fantasy IV armor#Luminous Robe|2D]], [[Final Fantasy IV 3D armor#Luminous Robe|3D]]) |
| − | *[[White Robe]] [[Final Fantasy IV armor#White Robe|2D]] [[Final Fantasy IV 3D armor#White Robe|3D]] |
+ | *[[White Robe]] ([[Final Fantasy IV armor#White Robe|2D]], [[Final Fantasy IV 3D armor#White Robe|3D]]) |
| − | *[[Adamant Armor]] [[Final Fantasy IV armor#Adamant Armor|2D]] [[Final Fantasy IV 3D armor#Adamant Armor|3D]] |
+ | *[[Adamant Armor]] ([[Final Fantasy IV armor#Adamant Armor|2D]] [[Final Fantasy IV 3D armor#Adamant Armor|3D]]) |
|valign="top"| |
|valign="top"| |
||
| − | *[[Cursed Ring]] [[Final Fantasy IV armor#Cursed Ring|2D]] [[Final Fantasy IV 3D armor#Cursed Ring|3D]] |
+ | *[[Cursed Ring]] ([[Final Fantasy IV armor#Cursed Ring|2D]], [[Final Fantasy IV 3D armor#Cursed Ring|3D]]) |
| − | *[[Iron Armlet]] [[Final Fantasy IV armor#Iron Armlet|2D]] [[Final Fantasy IV 3D armor#Iron Armlet|3D]] |
+ | *[[Iron Armlet]] ([[Final Fantasy IV armor#Iron Armlet|2D]], [[Final Fantasy IV 3D armor#Iron Armlet|3D]]) |
| − | *[[Ruby Ring]] [[Final Fantasy IV armor#Ruby Ring|2D]] [[Final Fantasy IV 3D armor#Ruby Ring|3D]] |
+ | *[[Ruby Ring]] ([[Final Fantasy IV armor#Ruby Ring|2D]], [[Final Fantasy IV 3D armor#Ruby Ring|3D]]) |
| − | *[[Silver Armlet]] [[Final Fantasy IV armor#Silver Armlet|2D]] [[Final Fantasy IV 3D armor#Silver Armlet|3D]] |
+ | *[[Silver Armlet]] ([[Final Fantasy IV armor#Silver Armlet|2D]], [[Final Fantasy IV 3D armor#Silver Armlet|3D]]) |
| − | *[[Rune Armlet]] [[Final Fantasy IV armor#Rune Armlet|2D]] [[Final Fantasy IV 3D armor#Rune Armlet|3D]] |
+ | *[[Rune Armlet]] ([[Final Fantasy IV armor#Rune Armlet|2D]], [[Final Fantasy IV 3D armor#Rune Armlet|3D]]) |
| − | *[[Diamond Armlet]] [[Final Fantasy IV armor#Diamond Armlet|2D]] [[Final Fantasy IV 3D armor#Diamond Armlet|3D]] |
+ | *[[Diamond Armlet]] ([[Final Fantasy IV armor#Diamond Armlet|2D]], [[Final Fantasy IV 3D armor#Diamond Armlet|3D]]) |
| − | *[[Protect Ring]] [[Final Fantasy IV armor#Protect Ring|2D]] [[Final Fantasy IV 3D armor#Protect Ring|3D]] |
+ | *[[Protect Ring]] ([[Final Fantasy IV armor#Protect Ring|2D]], [[Final Fantasy IV 3D armor#Protect Ring|3D]]) |
| − | *[[Crystal Ring]] [[Final Fantasy IV armor#Crystal Ring|2D]] [[Final Fantasy IV 3D armor#Crystal Ring|3D]] |
+ | *[[Crystal Ring]] ([[Final Fantasy IV armor#Crystal Ring|2D]], [[Final Fantasy IV 3D armor#Crystal Ring|3D]]) |
|} |
|} |
||
| ⚫ | |||
| ⚫ | |||
| − | [[Category: |
+ | [[Category:Character gameplay in Final Fantasy IV]] |
Revision as of 00:19, 9 January 2020
Tellah is a playable character in Final Fantasy IV.
Stats
He has some of the worst stats, both physically and magically. His MP does not exceed 90 to ensure the player cannot cast Meteor with him (Meteor costs 99 MP). Unlike other characters, Tellah's physical stats (save for his HP) actually decrease when he levels up, implying his age is catching up with him, preventing him from gaining strength.
2D Stats
| Level | HP | MP | Strength | Speed | Stamina | Intellect | Spirit |
|---|---|---|---|---|---|---|---|
| 20 | 340 | 90 | 5 | 8 | 7 | 16 | 16 |
| 30 | 594 | 90 | 1 | 11 | 1 | 16 | 16 |
| 40 | 853 | 90 | 1 | 16 | 1 | 16 | 16 |
| 50 | 1118 | 90 | 1 | 21 | 1 | 20 | 20 |
| 60 | 1371 | 90 | 1 | 24 | 1 | 22 | 22 |
| 70*At random afterward, see table below | 1621 | 90 | 1 | 26 | 1 | 24 | 24 |
| 80 | 1876 | 90 | rdm | rdm | rdm | rdm | rdm |
| 90 | 2132 | 90 | rdm | rdm | rdm | rdm | rdm |
| 99*9998917 exp | 2361 | 90 | rdm | rdm | rdm | rdm | rdm |
Tellah's level up possibilities.
| Possibility | Strength | Speed | Stamina | Intellect | Spirit |
|---|---|---|---|---|---|
| 1 | -1 | -1 | -1 | -1 | -1 |
| 2 | 0 | 0 | 0 | 0 | 0 |
| 3 | +1 | +1 | 0 | 0 | 0 |
| 4 | 0 | +1 | 0 | +1 | 0 |
| 5 | 0 | +1 | 0 | 0 | +1 |
| 6 | 0 | +1 | +1 | +1 | +1 |
3D Stats
| Level | HP | MP | Strength | Speed | Stamina | Intellect | Spirit |
|---|---|---|---|---|---|---|---|
| 13 | 219 | 90 | 6 | 7 | 8 | 25 | 23 |
| 20 | 388 | 90 | 5 | 7 | 7 | 31 | 29 |
| 30 | 718 | 90 | 4 | 6 | 6 | 40 | 38 |
| 40 | 1145 | 90 | 3 | 5 | 5 | 48 | 47 |
| 50 | 1667 | 90 | 3 | 5 | 3 | 57 | 56 |
| 60 | 2299 | 90 | 2 | 4 | 2 | 66 | 64 |
| 70*Depends on augments in character's battle menu afterward | 3021 | 90 | 1 | 3 | 1 | 74 | 73 |
When Tellah joins the party on Mount Ordeals, he joins at the same level he left the party in Damcyan and with the same equipment.
Abilities
Tellah can cast both White and Black Magic. When he first joins, he only knows a handful of spells: the Black Magic spells Fire, Blizzard, Thunder, Stop and Osmose, and the White Magic spells Cura, Life, Blink, Esuna, Confuse, and Teleport. In the 3D versions, Tellah begins with 3 more spells : Sleep, Poison and Silence while he loses Stop.
Once Cecil becomes a PaladinEvent, he remembers all his spells especially Curaja, Arise and the "-ga" elementals. He can use Meteor if a Soma Drop or the MP +50% augment is used on him. However, the player is unlikely to see it on a first playthrough since the two aforementioned items are unavailable during the time Tellah is in the party. This can be worked around by hacking the items, by hacking Tellah in the party when the items are available or, in the 3D remake, by beginning a new game plus with the items already in the inventory. Tellah will never be able to cast Holy, Stop (3D only), Quake, Death and Flare.
|
|
|
| ||||||||||||||||||||||||||||||||||||||||||||||||||||||||||||||||||||||||||||||||||||||||||||||||||||||||||||||||||||||||||||||||||||||||||||||||||||||||||||||||
Tellah using Recall.
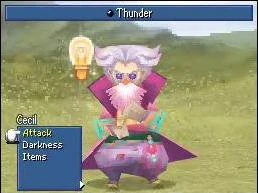
Tellah has access to the Recall ability, which allows him to cast a random Black Magic spell. Once Cecil becomes a Paladin, Tellah loses Recall in the PS, Advance and PSP versions but keeps the ability to use it in the 3D remakes, which may cast a spell he does not normally have access to. This ability was removed in the North American SNES release.
The spells Tellah can use with Recall are:
|
| ||||||||||||||||||||||||||||||||||||||||||||||||||||
Equipment
Tellah can equip rods, staves, hats, clothes, robes, armlets and rings. In the 2D versions, he starts with a Staff and a Gaia Gear. In the 3D versions, he has Staff, a Gaia Gear and an Iron Armlet.
| Rods | Staves |
|---|---|
|
|
| Shield | Head | Body | Arms |
|---|---|---|---|
|
|
|
|