An autonomous antipersonnel weapon manufactured by Shinra's Advanced Weaponry Division. Able to warp space-time and seemingly disappear into thin air. It warps close to targets and strikes with its hammer.
Enemy Intel
Sledgeworm is an enemy in Final Fantasy VII Remake, fought in the Drum of the Shinra Building in Chapter 17 - "Deliverance from Chaos". Sledgeworms can also be fought in the Shinra Combat Simulator as part of the "vs. 3-C SOLDIER Candidates" challenge.
Stats[]
Battle[]
The Sledgeworm is a slippery enemy that quickly moves between the holes in the ground, and cannot be targeted while underground. He is difficult to pin down due to that, plus its resistance to flinching. Its many tools to attack the player from both close and long range can be dangerous when fought in high numbers. Its main form to attack is to appear in a hole far away from the player and launch small shockwaves along the ground, which can be either blocked or dodged.
Occasionally, the Sledgeworm will emerge from holes near the player and use melee attacks with its mallet; if the player dodges, the Sledgeworm will be pressured. Its Torpid Strike attack inflicts ![]() Stop in a radius around it; if it hits the player, the Sledgeworm will usually follow it up with Rock Hard, which deals massive damage in a large area. This attack cannot be blocked.
Stop in a radius around it; if it hits the player, the Sledgeworm will usually follow it up with Rock Hard, which deals massive damage in a large area. This attack cannot be blocked.
Once the player inflicts enough damage, the Sledgeworm will go on a rampage and attack more aggressively, while a build-up of energy is by the electric currents coursing through its body. The Sledgeworm will then start charging the entire battlefield, with all the holes also building-up. Once the energy reaches its peak, the Sledgeworm will discharge a massive blast through all the holes, dealing heavy damage and launching characters in the air. This attack cannot be blocked.
Much like other mechanical enemies, the Sledgeworm is weak to ![]() Lightning. The Sledgeworm pressured status lasts for a long time and will carry over when it moves between holes.
Lightning. The Sledgeworm pressured status lasts for a long time and will carry over when it moves between holes.
Hard Mode[]
On the hard difficulty, the Sledgeworm will move around faster through the holes, making it even harder to pin down. It'll also use Rock Hard more often, and its energy build-up will be faster. When fought in multiple numbers, it'll often coordinate its ranged shockwave attack, which can stunlock the player.
Strategy[]

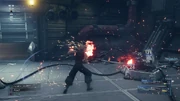
The Sledgeworm moves between the holes in the floor.
Since the Sledgeworm moves quickly between holes, it is recommended to use the right analog stick to rotate the camera to scout the battlefield to find out where it'll appear next. It is also important to pay attention to the small reticule that appears on the sides of the screen, which notifies that the Sledgeworm has emerged outside of the player's field of view. Constantly pressing the right analog stick to lock-on is also useful to quickly find the Sledgeworm.
Pairing the ![]() Lightning Materia with
Lightning Materia with ![]() Elemental Materia in a weapon exploits the Sledgeworm's weakness. Ideally, the player should try to hit the Sledgeworm with spells and abilities that are executed quickly, to strike it before it goes underground. Using
Elemental Materia in a weapon exploits the Sledgeworm's weakness. Ideally, the player should try to hit the Sledgeworm with spells and abilities that are executed quickly, to strike it before it goes underground. Using ![]() Thunder as soon as the Sledgeworm emerges from one of the holes is the most effective way to raise its stagger gauge and pressure it, since its cast is fast. Equipping one of the non-active characters with
Thunder as soon as the Sledgeworm emerges from one of the holes is the most effective way to raise its stagger gauge and pressure it, since its cast is fast. Equipping one of the non-active characters with ![]() Synergy Materia paired with
Synergy Materia paired with ![]() Lightning Materia allows a quick barrage of spells that will stop the Sledgeworm on its tracks, specially if cast while on Aerith's Arcane Ward.
Lightning Materia allows a quick barrage of spells that will stop the Sledgeworm on its tracks, specially if cast while on Aerith's Arcane Ward.
If the Sledgeworm goes into melee range, it's recommended to have Cloud's Punisher Mode and/or Counterstance ready for a possible counter opportunity. However, if the Sledgeworm uses Rock Hard or Torpid Strike, it is recommended to move far away from it; this attack's range is very deceptive and can hit the player even if they're not close. Cloud's superior melee range means the can quickly close the gap when approaching the Sledgeworm, with attacks such as Focused Thrust and the spin attack from the ![]() Deadly Dodge Materia.
Deadly Dodge Materia.
It is best to not use Barret's offensive abilities unless the Sledgeworm is staggered, since the startup for them is long and gives the Sledgeworm enough time to dive underground. Aerith should lay Arcane Ward and Fleeting Familiar as soon as possible and pelt the Sledgeworm with Thunder whenever it emerges from a hole. Tifa can use Unbridled Strength and strike the Sledgeworm with Omnistrike to quickly pressure it, and also use parry to close the gap, since it has the fastest animation.
Gallery[]
")
")
")
")
")
")
")
")