Intangir Bot (talk | contribs) m (relinking, replaced: Cure → Cure) |
No edit summary |
||
| (48 intermediate revisions by 11 users not shown) | |||
| Line 1: | Line 1: | ||
| − | {{FFVIII |
+ | {{sideicon|prime=FFVIII}} |
| + | {{infobox enemy |
||
| ⚫ | |||
| − | | |
+ | | release = FFVIII |
| ⚫ | |||
| ⚫ | |||
| + | |name = Seifer |
||
| ⚫ | |||
| romaji = Saifā |
| romaji = Saifā |
||
| − | | |
+ | | image = Seifer-ffviii-battle.png |
| + | | location = [[Deling City]]; [[Galbadia Garden]]; [[Lunatic Pandora]] |
||
| + | |character=Seifer Almasy |
||
| ⚫ | |||
| ⚫ | |||
| ⚫ | '''Seifer''' is a [[boss]] in ''[[Final Fantasy VIII]]'', fought four times in the game. In the first battle, [[Squall Leonhart/Gameplay|Squall]] faces Seifer one-on-one. Then [[Edea (boss)|Edea]] replaces him, and Squall is joined by [[Rinoa Heartilly/Gameplay|Rinoa]] and [[Irvine Kinneas/Gameplay|Irvine]]. |
||
| + | |||
| + | In the second battle, Seifer is faced alone. In the third battle, Edea joins Seifer. At the fourth battle, Seifer is again faced alone. The player can prepare for each battle by [[Junction system|junctioning]] [[Final Fantasy VIII elements#Fire|Fire]] to elemental defense, as Seifer always uses Fire magic. |
||
| + | |||
| + | ==Stats== |
||
| + | {{infobox enemy stats FFVIII |
||
| + | | name = Seifer |
||
| 1 prev = Iguion (Final Fantasy VIII) |
| 1 prev = Iguion (Final Fantasy VIII) |
||
| 1 bestiary = 049 |
| 1 bestiary = 049 |
||
| − | | 1 next = Edea ( |
+ | | 1 next = Edea (boss)##050 |
| − | | 1 |
+ | | 1 low min = 1 |
| − | | 1 |
+ | | 1 low max = 19 |
| − | | 1 |
+ | | 1 high min = 20 |
| − | | 1 |
+ | | 1 high max = 20 |
| − | | 1 |
+ | | 1 hp a = 1.25 |
| − | | 1 |
+ | | 1 hp b = 25 |
| − | | 1 |
+ | | 1 hp c = 150 |
| − | | 1 |
+ | | 1 str a = 20 |
| − | | 1 |
+ | | 1 str b = 5 |
| − | | 1 |
+ | | 1 str c = 70 |
| − | | 1 |
+ | | 1 str d = 200 |
| − | | 1 |
+ | | 1 mag a = 90 |
| − | | 1 |
+ | | 1 mag b = 100 |
| − | | 1 |
+ | | 1 mag c = 50 |
| − | | 1 |
+ | | 1 mag d = 100 |
| − | | 1 |
+ | | 1 vit a = 1 |
| − | | 1 |
+ | | 1 vit b = 1 |
| − | | 1 |
+ | | 1 vit c = 80 |
| − | | 1 |
+ | | 1 vit d = 3 |
| − | | 1 |
+ | | 1 spr a = 1 |
| − | | 1 |
+ | | 1 spr b = 4 |
| − | | 1 |
+ | | 1 spr c = 120 |
| − | | 1 |
+ | | 1 spr d = 3 |
| − | | 1 |
+ | | 1 spd a = 0 |
| − | | 1 |
+ | | 1 spd b = 3 |
| − | | 1 |
+ | | 1 spd c = 5 |
| − | | 1 |
+ | | 1 spd d = 12 |
| − | | 1 |
+ | | 1 eva a = 0 |
| − | | 1 |
+ | | 1 eva b = 10 |
| − | | 1 |
+ | | 1 eva c = 3 |
| − | | 1 |
+ | | 1 eva d = 30 |
| − | | 1 |
+ | | 1 ap = 0 |
| − | | 1 |
+ | | 1 poison = 150 |
| − | | 1 |
+ | | 1 death = 155 |
| − | | 1 |
+ | | 1 poison status = 155 |
| − | | 1 |
+ | | 1 petrify = 155 |
| − | | 1 |
+ | | 1 blind = 155 |
| − | | 1 |
+ | | 1 silence = 155 |
| − | | 1 |
+ | | 1 berserk = 155 |
| − | | 1 |
+ | | 1 zombie = 155 |
| − | | 1 |
+ | | 1 sleep = 100 |
| − | | 1 |
+ | | 1 slow = 10 |
| − | | 1 |
+ | | 1 stop = 155 |
| − | | 1 |
+ | | 1 doom = 155 |
| − | | 1 |
+ | | 1 petrifying = 155 |
| − | | 1 |
+ | | 1 float = 155 |
| − | | 1 |
+ | | 1 confuse = 155 |
| + | | 1 eject = 155 |
||
| ⚫ | |||
| − | | 1 |
+ | | 1 lvmod = 155 |
| − | | 1 |
+ | | 1 location = [[Deling City]] |
| ⚫ | |||
| ⚫ | |||
| + | | 1 mug rate = 6 |
||
| ⚫ | |||
| + | | 1 drop rate = 0 |
||
| ⚫ | |||
| − | | 1 |
+ | | 1 low mug 1 = [[Final Fantasy VIII items#Hero|Hero]] |
| ⚫ | |||
| − | | 1 Low Drop 1 = Nothing |
||
| ⚫ | |||
| − | | 1 Low Drop 2 = Nothing |
||
| ⚫ | |||
| − | | 1 Low Drop 3 = Nothing |
||
| ⚫ | |||
| − | | 1 Low Drop 4 = Nothing |
||
| ⚫ | |||
| ⚫ | |||
| − | | 1 |
+ | | 1 high mug 1 = [[Final Fantasy VIII items#Hero|Hero]] |
| ⚫ | |||
| − | | 1 Low Other Information = None |
||
| − | | 1 |
+ | | 1 high mug 3 = [[Final Fantasy VIII items#Hero|Hero]] |
| − | | 1 |
+ | | 1 high mug 4 = [[Final Fantasy VIII items#Hero|Hero]] |
| − | | 1 |
+ | | 1 high draw = [[Fira (Final Fantasy VIII)|Fira]]<br/>[[Cura (Final Fantasy VIII)|Cura]]<br/>[[Life (Final Fantasy VIII)|Life]] |
| ⚫ | |||
| ⚫ | |||
| ⚫ | |||
| − | | 1 High Drop 1 = Nothing |
||
| ⚫ | |||
| − | | 1 High Drop 2 = Nothing |
||
| − | | 1 High Drop 3 = Nothing |
||
| − | | 1 High Drop 4 = Nothing |
||
| − | | 1 High Draw = [[Fira]]<br>[[Cura]]<br>[[Raise|Life]] |
||
| ⚫ | |||
| − | | 1 High Attacks = [[Fira]] |
||
| − | | 1 High Other Information = None |
||
| ⚫ | |||
| ⚫ | |||
| 2 bestiary = 079 |
| 2 bestiary = 079 |
||
| − | | 2 next = |
+ | | 2 next = ##080 |
| − | | 2 |
+ | | 2 low min = 1 |
| − | | 2 |
+ | | 2 low max = 19 |
| − | | 2 |
+ | | 2 mid min = 20 |
| − | | 2 |
+ | | 2 mid max = 29 |
| − | | 2 |
+ | | 2 high min = 30 |
| − | | 2 |
+ | | 2 high max = 31 |
| − | | 2 |
+ | | 2 hp b = 300 |
| − | | 2 |
+ | | 2 hp c = 1000 |
| − | | 2 |
+ | | 2 str a = 65 |
| − | | 2 |
+ | | 2 str b = 1 |
| − | | 2 |
+ | | 2 str c = 120 |
| − | | 2 |
+ | | 2 str d = 50 |
| − | | 2 |
+ | | 2 mag a = 85 |
| − | | 2 |
+ | | 2 mag b = 80 |
| − | | 2 |
+ | | 2 mag c = 100 |
| − | | 2 |
+ | | 2 mag d = 150 |
| − | | 2 |
+ | | 2 vit a = 2 |
| − | | 2 |
+ | | 2 vit b = 2 |
| − | | 2 |
+ | | 2 vit c = 12 |
| − | | 2 |
+ | | 2 vit d = 2 |
| − | | 2 |
+ | | 2 spr a = 1 |
| − | | 2 |
+ | | 2 spr b = 5 |
| − | | 2 |
+ | | 2 spr c = 135 |
| − | | 2 |
+ | | 2 spr d = 4 |
| − | | 2 |
+ | | 2 spd a = 0 |
| − | | 2 |
+ | | 2 spd b = 1 |
| − | | 2 |
+ | | 2 spd c = 30 |
| − | | 2 |
+ | | 2 spd d = 10 |
| − | | 2 |
+ | | 2 eva a = 0 |
| − | | 2 |
+ | | 2 eva b = 8 |
| − | | 2 |
+ | | 2 eva c = 2 |
| − | | 2 |
+ | | 2 eva d = 24 |
| − | | 2 |
+ | | 2 ap = 20 |
| − | | 2 |
+ | | 2 poison = 150 |
| − | | 2 |
+ | | 2 death = 155 |
| − | | 2 |
+ | | 2 poison status = 155 |
| − | | 2 |
+ | | 2 petrify = 155 |
| − | | 2 |
+ | | 2 blind = 100 |
| − | | 2 |
+ | | 2 silence = 100 |
| − | | 2 |
+ | | 2 berserk = 155 |
| − | | 2 |
+ | | 2 zombie = 155 |
| − | | 2 |
+ | | 2 sleep = 100 |
| − | | 2 |
+ | | 2 haste = 155 |
| − | | 2 |
+ | | 2 slow = 155 |
| − | | 2 |
+ | | 2 stop = 155 |
| − | | 2 |
+ | | 2 doom = 155 |
| + | | 2 petrifying = 155 |
||
| ⚫ | |||
| + | | 2 float = 155 |
||
| ⚫ | |||
| − | | 2 |
+ | | 2 confuse = 155 |
| − | | 2 |
+ | | 2 eject = 155 |
| + | | 2 lvmod = 155 |
||
| ⚫ | |||
| ⚫ | |||
| ⚫ | |||
| ⚫ | |||
| ⚫ | |||
| + | | 2 mug rate = 12 |
||
| ⚫ | |||
| + | | 2 drop rate = 99 |
||
| ⚫ | |||
| − | | 2 |
+ | | 2 low mug 1 = [[Final Fantasy VIII items#Mega Phoenix|Mega Phoenix]] x8 |
| − | | 2 |
+ | | 2 low mug 2 = [[Final Fantasy VIII items#Mega Phoenix|Mega Phoenix]] x8 |
| − | | 2 |
+ | | 2 low mug 3 = [[Final Fantasy VIII items#Mega Phoenix|Mega Phoenix]] x8 |
| ⚫ | |||
| ⚫ | |||
| − | | 2 |
+ | | 2 low drop 1 = [[Final Fantasy VIII items#Mega-Potion|Mega-Potion]] x8 |
| ⚫ | |||
| − | | 2 Low Other Information = None |
||
| − | | 2 |
+ | | 2 low drop 3 = [[Final Fantasy VIII items#Mega-Potion|Mega-Potion]] x8 |
| − | | 2 |
+ | | 2 low drop 4 = [[Final Fantasy VIII items#Mega-Potion|Mega-Potion]] x8 |
| ⚫ | |||
| ⚫ | |||
| + | | 2 low attacks = Demon Slice, [[Fira (ability)|Fira]], [[Firaga (ability)|Firaga]], [[Hi-Potion]] |
||
| ⚫ | |||
| − | | 2 |
+ | | 2 mid mug 1 = [[Final Fantasy VIII items#Mega Phoenix|Mega Phoenix]] x8 |
| − | | 2 |
+ | | 2 mid mug 2 = [[Final Fantasy VIII items#Mega Phoenix|Mega Phoenix]] x8 |
| − | | 2 |
+ | | 2 mid mug 3 = [[Final Fantasy VIII items#Mega Phoenix|Mega Phoenix]] x8 |
| − | | 2 |
+ | | 2 mid mug 4 = [[Final Fantasy VIII items#Mega Phoenix|Mega Phoenix]] x8 |
| ⚫ | |||
| − | | 2 Mid Draw = [[Fira]]<br>[[Thundara]]<br>[[Dispel]]<br>[[Haste (Ability)|Haste]] |
||
| − | | 2 |
+ | | 2 mid drop 2 = [[Final Fantasy VIII items#Mega-Potion|Mega-Potion]] x8 |
| ⚫ | |||
| − | | 2 Mid Other Information = None |
||
| − | | 2 |
+ | | 2 mid drop 4 = [[Final Fantasy VIII items#Mega-Potion|Mega-Potion]] x8 |
| + | | 2 mid draw = [[Fira (Final Fantasy VIII)|Fira]]<br/>[[Thundara (Final Fantasy VIII)|Thundara]]<br/>[[Dispel (Final Fantasy VIII)|Dispel]]<br/>[[Haste (Final Fantasy VIII)|Haste]] |
||
| ⚫ | |||
| + | | 2 mid attacks = Demon Slice, [[Fira (ability)|Fira]], [[Firaga (ability)|Firaga]], [[Hi-Potion]] |
||
| ⚫ | |||
| − | | 2 |
+ | | 2 high mug 1 = [[Final Fantasy VIII items#Mega Phoenix|Mega Phoenix]] x8 |
| − | | 2 |
+ | | 2 high mug 2 = [[Final Fantasy VIII items#Mega Phoenix|Mega Phoenix]] x8 |
| − | | 2 |
+ | | 2 high mug 3 = [[Final Fantasy VIII items#Mega Phoenix|Mega Phoenix]] x8 |
| − | | 2 |
+ | | 2 high mug 4 = [[Final Fantasy VIII items#Mega Phoenix|Mega Phoenix]] x8 |
| − | | 2 |
+ | | 2 high drop 1 = [[Final Fantasy VIII items#Mega-Potion|Mega-Potion]] x8 |
| ⚫ | |||
| − | | 2 High Draw = [[Firaga]]<br>[[Thundaga]]<br>[[Dispel]]<br>[[Haste (Ability)|Haste]] |
||
| − | | 2 |
+ | | 2 high drop 3 = [[Final Fantasy VIII items#Mega-Potion|Mega-Potion]] x8 |
| ⚫ | |||
| − | | 2 High Other Information = None |
||
| + | | 2 high draw = [[Firaga (Final Fantasy VIII)|Firaga]]<br/>[[Thundaga (Final Fantasy VIII)|Thundaga]]<br/>[[Dispel (Final Fantasy VIII)|Dispel]]<br/>[[Haste (Final Fantasy VIII)|Haste]] |
||
| + | | 2 high attacks = Demon Slice, [[Fira (ability)|Fira]], [[Firaga (ability)|Firaga]], [[Hi-Potion]] |
||
| 3 image = [[File:VIII seifer critical render.png|200px]] |
| 3 image = [[File:VIII seifer critical render.png|200px]] |
||
| − | | 3 prev = |
+ | | 3 prev = ##079 |
| 3 bestiary = 080 |
| 3 bestiary = 080 |
||
| − | | 3 next = Edea ( |
+ | | 3 next = Edea (boss)##081 |
| − | | 3 |
+ | | 3 low min = 1 |
| − | | 3 |
+ | | 3 low max = 19 |
| − | | 3 |
+ | | 3 mid min = 20 |
| − | | 3 |
+ | | 3 mid max = 29 |
| − | | 3 |
+ | | 3 high min = 30 |
| − | | 3 |
+ | | 3 high max = 32 |
| − | | 3 |
+ | | 3 hp b = 200 |
| − | | 3 |
+ | | 3 hp c = 1000 |
| − | | 3 |
+ | | 3 str a = 75 |
| − | | 3 |
+ | | 3 str b = 5 |
| − | | 3 |
+ | | 3 str c = 60 |
| − | | 3 |
+ | | 3 str d = 40 |
| − | | 3 |
+ | | 3 mag a = 88 |
| − | | 3 |
+ | | 3 mag b = 80 |
| − | | 3 |
+ | | 3 mag c = 100 |
| − | | 3 |
+ | | 3 mag d = 150 |
| − | | 3 |
+ | | 3 vit a = 2 |
| − | | 3 |
+ | | 3 vit b = 20 |
| − | | 3 |
+ | | 3 vit c = 80 |
| − | | 3 |
+ | | 3 vit d = 1 |
| − | | 3 |
+ | | 3 spr a = 1 |
| − | | 3 |
+ | | 3 spr b = 6 |
| − | | 3 |
+ | | 3 spr c = 130 |
| − | | 3 |
+ | | 3 spr d = 4 |
| − | | 3 |
+ | | 3 spd a = 0 |
| − | | 3 |
+ | | 3 spd b = 1 |
| − | | 3 |
+ | | 3 spd c = 8 |
| − | | 3 |
+ | | 3 spd d = 24 |
| − | | 3 |
+ | | 3 eva a = 0 |
| − | | 3 |
+ | | 3 eva b = 6 |
| − | | 3 |
+ | | 3 eva c = 4 |
| − | | 3 |
+ | | 3 eva d = 18 |
| − | | 3 |
+ | | 3 ap = 20 |
| − | | 3 |
+ | | 3 poison = 150 |
| − | | 3 |
+ | | 3 death = 155 |
| − | | 3 |
+ | | 3 poison status = 155 |
| − | | 3 |
+ | | 3 petrify = 155 |
| − | | 3 |
+ | | 3 blind = 155 |
| − | | 3 |
+ | | 3 silence = 155 |
| − | | 3 |
+ | | 3 berserk = 155 |
| − | | 3 |
+ | | 3 zombie = 155 |
| − | | 3 |
+ | | 3 sleep = 100 |
| − | | 3 |
+ | | 3 slow = 10 |
| − | | 3 |
+ | | 3 stop = 155 |
| − | | 3 |
+ | | 3 doom = 155 |
| + | | 3 petrifying = 155 |
||
| ⚫ | |||
| + | | 3 float = 155 |
||
| ⚫ | |||
| − | | 3 |
+ | | 3 confuse = 155 |
| − | | 3 |
+ | | 3 eject = 155 |
| + | | 3 lvmod = 155 |
||
| ⚫ | |||
| ⚫ | |||
| ⚫ | |||
| ⚫ | |||
| ⚫ | |||
| + | | 3 mug rate = 12 |
||
| ⚫ | |||
| + | | 3 drop rate = 99 |
||
| ⚫ | |||
| − | | 3 |
+ | | 3 low mug 1 = [[Final Fantasy VIII items#Hero|Hero]] |
| − | | 3 |
+ | | 3 low mug 2 = [[Final Fantasy VIII items#Hero|Hero]] |
| − | | 3 |
+ | | 3 low mug 3 = [[Final Fantasy VIII items#Holy War|Holy War]] |
| ⚫ | |||
| ⚫ | |||
| − | | 3 |
+ | | 3 low drop 1 = [[Final Fantasy VIII items#Hero|Hero]] |
| ⚫ | |||
| − | | 3 Low Other Information = None |
||
| − | | 3 |
+ | | 3 low drop 3 = [[Final Fantasy VIII items#Holy War|Holy War]] |
| − | | 3 |
+ | | 3 low drop 4 = [[Final Fantasy VIII items#Holy War|Holy War]] |
| ⚫ | |||
| ⚫ | |||
| + | | 3 low attacks = [[Fira (ability)|Fira]] |
||
| ⚫ | |||
| − | | 3 |
+ | | 3 mid mug 1 = [[Final Fantasy VIII items#Hero|Hero]] |
| − | | 3 |
+ | | 3 mid mug 2 = [[Final Fantasy VIII items#Hero|Hero]] |
| − | | 3 |
+ | | 3 mid mug 3 = [[Final Fantasy VIII items#Holy War|Holy War]] |
| − | | 3 |
+ | | 3 mid mug 4 = [[Final Fantasy VIII items#Holy War|Holy War]] |
| ⚫ | |||
| − | | 3 Mid Draw = [[Fira]]<br>[[Thundara]]<br>[[Dispel]]<br>[[Haste (Ability)|Haste]] |
||
| − | | 3 |
+ | | 3 mid drop 2 = [[Final Fantasy VIII items#Hero|Hero]] |
| ⚫ | |||
| − | | 3 Mid Other Information = None |
||
| − | | 3 |
+ | | 3 mid drop 4 = [[Final Fantasy VIII items#Holy War|Holy War]] |
| + | | 3 mid draw = [[Fira (Final Fantasy VIII)|Fira]]<br/>[[Thundara (Final Fantasy VIII)|Thundara]]<br/>[[Dispel (Final Fantasy VIII)|Dispel]]<br/>[[Haste (Final Fantasy VIII)|Haste]] |
||
| ⚫ | |||
| + | | 3 mid attacks = [[Fira (ability)|Fira]] |
||
| ⚫ | |||
| − | | 3 |
+ | | 3 high mug 1 = [[Final Fantasy VIII items#Hero|Hero]] |
| − | | 3 |
+ | | 3 high mug 2 = [[Final Fantasy VIII items#Hero|Hero]] |
| − | | 3 |
+ | | 3 high mug 3 = [[Final Fantasy VIII items#Holy War|Holy War]] |
| − | | 3 |
+ | | 3 high mug 4 = [[Final Fantasy VIII items#Holy War|Holy War]] |
| − | | 3 |
+ | | 3 high drop 1 = [[Final Fantasy VIII items#Hero|Hero]] |
| ⚫ | |||
| − | | 3 High Draw = [[Firaga]]<br>[[Thundaga]]<br>[[Dispel]]<br>[[Haste (Ability)|Haste]] |
||
| ⚫ | |||
| − | | 3 High Attacks = [[Fira]] |
||
| ⚫ | |||
| − | | 3 High Other Information = None |
||
| + | | 3 high draw = [[Firaga (Final Fantasy VIII)|Firaga]]<br/>[[Thundaga (Final Fantasy VIII)|Thundaga]]<br/>[[Dispel (Final Fantasy VIII)|Dispel]]<br/>[[Haste (Final Fantasy VIII)|Haste]] |
||
| − | | 4 image = [[File:Seifermodel.jpg|110px]] |
||
| + | | 3 high attacks = [[Fira (ability)|Fira]] |
||
| ⚫ | |||
| 4 prev = Right Probe |
| 4 prev = Right Probe |
||
| 4 bestiary = 097 |
| 4 bestiary = 097 |
||
| − | | 4 next = Adel ( |
+ | | 4 next = Adel (boss) |
| − | | 4 |
+ | | 4 low min = 1 |
| − | | 4 |
+ | | 4 low max = 19 |
| − | | 4 |
+ | | 4 mid min = 20 |
| − | | 4 |
+ | | 4 mid max = 29 |
| − | | 4 |
+ | | 4 high min = 30 |
| − | | 4 |
+ | | 4 high max = 45 |
| − | | 4 |
+ | | 4 hp b = 700 |
| − | | 4 |
+ | | 4 hp c = 3000 |
| − | | 4 |
+ | | 4 str a = 80 |
| − | | 4 |
+ | | 4 str b = 5 |
| − | | 4 |
+ | | 4 str c = 145 |
| − | | 4 |
+ | | 4 str d = 60 |
| − | | 4 |
+ | | 4 mag a = 190 |
| − | | 4 |
+ | | 4 mag b = 1 |
| − | | 4 |
+ | | 4 mag c = 19 |
| − | | 4 |
+ | | 4 mag d = 5 |
| − | | 4 |
+ | | 4 vit a = 1 |
| − | | 4 |
+ | | 4 vit b = 20 |
| − | | 4 |
+ | | 4 vit c = 100 |
| − | | 4 |
+ | | 4 vit d = 2 |
| − | | 4 |
+ | | 4 spr a = 1 |
| − | | 4 |
+ | | 4 spr b = 20 |
| − | | 4 |
+ | | 4 spr c = 120 |
| − | | 4 |
+ | | 4 spr d = 2 |
| − | | 4 |
+ | | 4 spd a = 0 |
| − | | 4 |
+ | | 4 spd b = 4 |
| − | | 4 |
+ | | 4 spd c = 46 |
| − | | 4 |
+ | | 4 spd d = 16 |
| − | | 4 |
+ | | 4 eva a = 0 |
| − | | 4 |
+ | | 4 eva b = 10 |
| − | | 4 |
+ | | 4 eva c = 0 |
| − | | 4 |
+ | | 4 eva d = 20 |
| − | | 4 |
+ | | 4 ap = 40 |
| − | | 4 |
+ | | 4 poison = 150 |
| − | | 4 |
+ | | 4 death = 155 |
| − | | 4 |
+ | | 4 poison status = 155 |
| − | | 4 |
+ | | 4 petrify = 155 |
| − | | 4 |
+ | | 4 blind = 155 |
| − | | 4 |
+ | | 4 silence = 155 |
| − | | 4 |
+ | | 4 berserk = 155 |
| − | | 4 |
+ | | 4 zombie = 155 |
| − | | 4 |
+ | | 4 sleep = 155 |
| − | | 4 |
+ | | 4 haste = 155 |
| − | | 4 |
+ | | 4 slow = 155 |
| − | | 4 |
+ | | 4 stop = 155 |
| − | | 4 |
+ | | 4 regen = 155 |
| − | | 4 |
+ | | 4 reflect = 155 |
| − | | 4 |
+ | | 4 doom = 155 |
| − | | 4 |
+ | | 4 petrifying = 155 |
| − | | 4 |
+ | | 4 float = 155 |
| + | | 4 confuse = 155 |
||
| ⚫ | |||
| − | | 4 |
+ | | 4 eject = 155 |
| − | | 4 |
+ | | 4 lvmod = 155 |
| + | | 4 gravity = 155 |
||
| ⚫ | |||
| + | | 4 location = [[Lunatic Pandora]] |
||
| ⚫ | |||
| ⚫ | |||
| ⚫ | |||
| + | | 4 mug rate = 12 |
||
| ⚫ | |||
| + | | 4 drop rate = 99 |
||
| ⚫ | |||
| − | | 4 |
+ | | 4 low mug 1 = [[Final Fantasy VIII items#Hero|Hero]] |
| − | | 4 |
+ | | 4 low mug 2 = [[Final Fantasy VIII items#Hero|Hero]] |
| − | | 4 |
+ | | 4 low mug 3 = [[Final Fantasy VIII items#Holy War|Holy War]] |
| ⚫ | |||
| − | | 4 Low Draw = [[Fire (Ability)|Fire]]<br>[[Thunder]]<br>[[Blizzard]] |
||
| − | | 4 |
+ | | 4 low drop 1 = [[Final Fantasy VIII items#Hero|Hero]] |
| ⚫ | |||
| − | | 4 Low Other Information = None |
||
| − | | 4 |
+ | | 4 low drop 3 = [[Final Fantasy VIII items#Holy War|Holy War]] |
| − | | 4 |
+ | | 4 low drop 4 = [[Final Fantasy VIII items#Holy War|Holy War]] |
| − | | 4 |
+ | | 4 low draw = [[Fire (Final Fantasy VIII)|Fire]]<br/>[[Thunder (Final Fantasy VIII)|Thunder]]<br/>[[Blizzard (Final Fantasy VIII)|Blizzard]] |
| + | | 4 low attacks = Bloodfest, [[Firaga (ability)|Firaga]], [[Flare (ability)|Flare]] |
||
| − | | 4 Mid Mug 4 = [[List of Final Fantasy VIII Items#Holy War|Holy War]] |
||
| + | | 4 low info = None |
||
| − | | 4 Mid Drop 1 = [[List of Final Fantasy VIII Items#Hero|Hero]] |
||
| − | | 4 |
+ | | 4 mid mug 1 = [[Final Fantasy VIII items#Hero|Hero]] |
| − | | 4 |
+ | | 4 mid mug 2 = [[Final Fantasy VIII items#Hero|Hero]] |
| − | | 4 |
+ | | 4 mid mug 3 = [[Final Fantasy VIII items#Holy War|Holy War]] |
| ⚫ | |||
| − | | 4 Mid Draw = [[Fira]]<br>[[Thundara]]<br>[[Blizzara]] |
||
| − | | 4 |
+ | | 4 mid drop 1 = [[Final Fantasy VIII items#Hero|Hero]] |
| ⚫ | |||
| − | | 4 Mid Other Information = None |
||
| − | | 4 |
+ | | 4 mid drop 3 = [[Final Fantasy VIII items#Holy War|Holy War]] |
| − | | 4 |
+ | | 4 mid drop 4 = [[Final Fantasy VIII items#Holy War|Holy War]] |
| − | | 4 |
+ | | 4 mid draw = [[Fira (Final Fantasy VIII)|Fira]]<br/>[[Thundara (Final Fantasy VIII)|Thundara]]<br/>[[Blizzara (Final Fantasy VIII)|Blizzara]] |
| + | | 4 mid attacks = Bloodfest, [[Firaga (ability)|Firaga]], [[Flare (ability)|Flare]] |
||
| − | | 4 High Mug 4 = [[List of Final Fantasy VIII Items#Holy War|Holy War]] |
||
| + | | 4 mid info = None |
||
| − | | 4 High Drop 1 = [[List of Final Fantasy VIII Items#Hero|Hero]] |
||
| − | | 4 |
+ | | 4 high mug 1 = [[Final Fantasy VIII items#Hero|Hero]] |
| − | | 4 |
+ | | 4 high mug 2 = [[Final Fantasy VIII items#Hero|Hero]] |
| − | | 4 |
+ | | 4 high mug 3 = [[Final Fantasy VIII items#Holy War|Holy War]] |
| ⚫ | |||
| − | | 4 High Draw = [[Firaga]]<br>[[Thundaga]]<br>[[Blizzaga]]<br>[[Aura (Ability)|Aura]] |
||
| − | | 4 |
+ | | 4 high drop 1 = [[Final Fantasy VIII items#Hero|Hero]] |
| ⚫ | |||
| − | | 4 High Other Information = None |
||
| ⚫ | |||
| ⚫ | |||
| + | | 4 high draw = [[Firaga (Final Fantasy VIII)|Firaga]]<br/>[[Thundaga (Final Fantasy VIII)|Thundaga]]<br/>[[Blizzaga (Final Fantasy VIII)|Blizzaga]]<br/>[[Aura (Final Fantasy VIII)|Aura]] |
||
| + | | 4 high attacks = Bloodfest, [[Firaga (ability)|Firaga]], [[Flare (ability)|Flare]] |
||
| + | | 4 high info = None |
||
}} |
}} |
||
| ⚫ | |||
| − | {{See Also|Seifer Almasy}} |
||
| ⚫ | '''Seifer''' is a boss in ''[[Final Fantasy VIII]]'', fought four times in the game. In the first battle, [[Squall Leonhart|Squall]] faces Seifer one-on-one. Then [[Edea |
||
| − | == |
+ | == Battle == |
| − | ===First |
+ | === First encounter === |
| + | {{Quote|Thought I was dead, eh? Not until I fulfill my dream!|Seifer}} |
||
| − | Seifer is fought one-on-one with |
+ | Seifer is fought one-on-one with Squall at Edea's parade. Seifer's strongest attack is the [[Fira (ability)#Final Fantasy VIII|Fira]] spell, which he will rarely use. Instead, he will usually attack with the [[Final Fantasy VIII weapons#Hyperion|Hyperion]], which will occasionally trigger, dealing slightly more damage. |
| − | ===Second |
+ | === Second encounter === |
| − | Seifer is |
+ | Seifer is fought in [[Galbadia Garden]]. [[Draw (Final Fantasy VIII)|Drawing]] and casting [[Haste (Final Fantasy VIII)|Haste]] will make the battle go faster. He will not use Fira, instead preferring to attack with [[Gunblade (weapon type)|gunblade]] attacks and the Hyperion still only triggers rarely. When his health is sufficiently low, he will say "Ready to die Squall?", and will attack Squall with [[Demon Slice]], which deals roughly 1500 damage. After that he will start to use Demon Slice regularly, as well as continuing to use his physical attack. |
| − | ===Third |
+ | === Third encounter === |
| − | Seifer is now joined by [[Edea ( |
+ | Seifer is now joined by [[Edea (boss)|Edea]], but she will not attack, choosing merely to watch the fight. Seifer, still recovering from the last battle, has less HP. His attacks are more powerful, and he once again uses Fira. The easiest way to defeat Seifer is to draw and cast Haste on the party, and simply attack him. Keeping an eye on his HP may be wise, as renewing Haste on the party will help with the next battle. When Seifer falls Edea will intervene, triggering another boss battle. |
| − | ===Final |
+ | === Final encounter === |
| − | Seifer is faced for the final time in [[Lunatic Pandora]]. He has changed in both attitude and appearance. His coat is ragged and he now sees himself as a revolutionary. Seifer attacks with physical attacks, and at low HP employs a new attack, |
+ | Seifer is faced for the final time in [[Lunatic Pandora]]. He has changed in both attitude and appearance. His coat is ragged and he now sees himself as a revolutionary. Seifer attacks with physical attacks, and at low HP employs a new attack, [[Bloodfest (Limit)|Bloodfest]], which deals high damage to the entire party. |
| + | |||
| + | [[File:Drawing magic from Seifer from FFVIII Remastered.png|thumb|Drawing Aura from Seifer.]] |
||
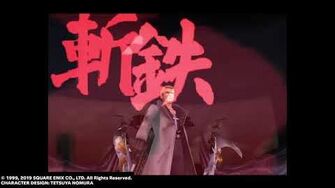
| + | The player should equip [[Mug#Final Fantasy VIII|Mug]] to steal a [[Final Fantasy VIII items#Hero|Hero]] from him and draw [[Aura (Final Fantasy VIII)|Aura]] spells, as Seifer is the only opponent in the entire game who possesses it. If the party has obtained the [[Guardian Force|GF]] [[Odin (Final Fantasy VIII)|Odin]], he will be summoned, but Seifer unleashes [[Zantetsuken Reverse]] to slice Odin in half. |
||
| + | |||
| + | [[Gilgamesh (Final Fantasy VIII)|Gilgamesh]] claims [[Zantetsuken (weapon)|Odin's sword]]. If the battle is not won within 13 turns, Gilgamesh arrives and defeats Seifer. If the player deals enough damage before the turn limit, Gilgamesh will also appear. If Odin has not been obtained before this battle, Gilgamesh does not appear, and [[permanently missable content|is unobtainable]] for the remainder of the game. |
||
| + | |||
| + | ==Behind the scenes== |
||
| ⚫ | |||
| + | The gunblade models in these battles exist separately from Seifer. This is how all player characters work, and Seifer is a [[Guest|temporary playable character]] with this weapon. Due to this, the gunblade models count as enemies though they are never targetable. They are called "Gunblade" and have [[Gerogero]]'s [[Scan (Final Fantasy VIII)|Scan]] information. |
||
| + | {{clear}} |
||
| + | |||
| ⚫ | |||
| + | <gallery> |
||
| + | FFVIII Gunblade Attack.png|Gunblade. |
||
| ⚫ | |||
| ⚫ | |||
| ⚫ | |||
| + | </gallery> |
||
| + | |||
| + | [[File:Seifer uses "Zantetsuken Reverse" to defeat Odin in FINAL FANTASY VIII Remastered|thumb|center|335 px]] |
||
| ⚫ | |||
| − | {{Gallery |
||
| ⚫ | |||
| ⚫ | |||
| ⚫ | |||
| ⚫ | |||
| ⚫ | |||
[[de:Cifer (Boss)]] |
[[de:Cifer (Boss)]] |
||
| − | [[Category:Final Fantasy VIII |
+ | [[Category:Bosses in Final Fantasy VIII]] |
Revision as of 18:50, 26 April 2020
Template:Sideicon
Are you ready for another scar?
Seifer to Squall
Seifer is a boss in Final Fantasy VIII, fought four times in the game. In the first battle, Squall faces Seifer one-on-one. Then Edea replaces him, and Squall is joined by Rinoa and Irvine.
In the second battle, Seifer is faced alone. In the third battle, Edea joins Seifer. At the fourth battle, Seifer is again faced alone. The player can prepare for each battle by junctioning Fire to elemental defense, as Seifer always uses Fire magic.
Stats
#049
#079
#080
#097
Battle
First encounter
Thought I was dead, eh? Not until I fulfill my dream!
Seifer
Seifer is fought one-on-one with Squall at Edea's parade. Seifer's strongest attack is the Fira spell, which he will rarely use. Instead, he will usually attack with the Hyperion, which will occasionally trigger, dealing slightly more damage.
Second encounter
Seifer is fought in Galbadia Garden. Drawing and casting Haste will make the battle go faster. He will not use Fira, instead preferring to attack with gunblade attacks and the Hyperion still only triggers rarely. When his health is sufficiently low, he will say "Ready to die Squall?", and will attack Squall with Demon Slice, which deals roughly 1500 damage. After that he will start to use Demon Slice regularly, as well as continuing to use his physical attack.
Third encounter
Seifer is now joined by Edea, but she will not attack, choosing merely to watch the fight. Seifer, still recovering from the last battle, has less HP. His attacks are more powerful, and he once again uses Fira. The easiest way to defeat Seifer is to draw and cast Haste on the party, and simply attack him. Keeping an eye on his HP may be wise, as renewing Haste on the party will help with the next battle. When Seifer falls Edea will intervene, triggering another boss battle.
Final encounter
Seifer is faced for the final time in Lunatic Pandora. He has changed in both attitude and appearance. His coat is ragged and he now sees himself as a revolutionary. Seifer attacks with physical attacks, and at low HP employs a new attack, Bloodfest, which deals high damage to the entire party.
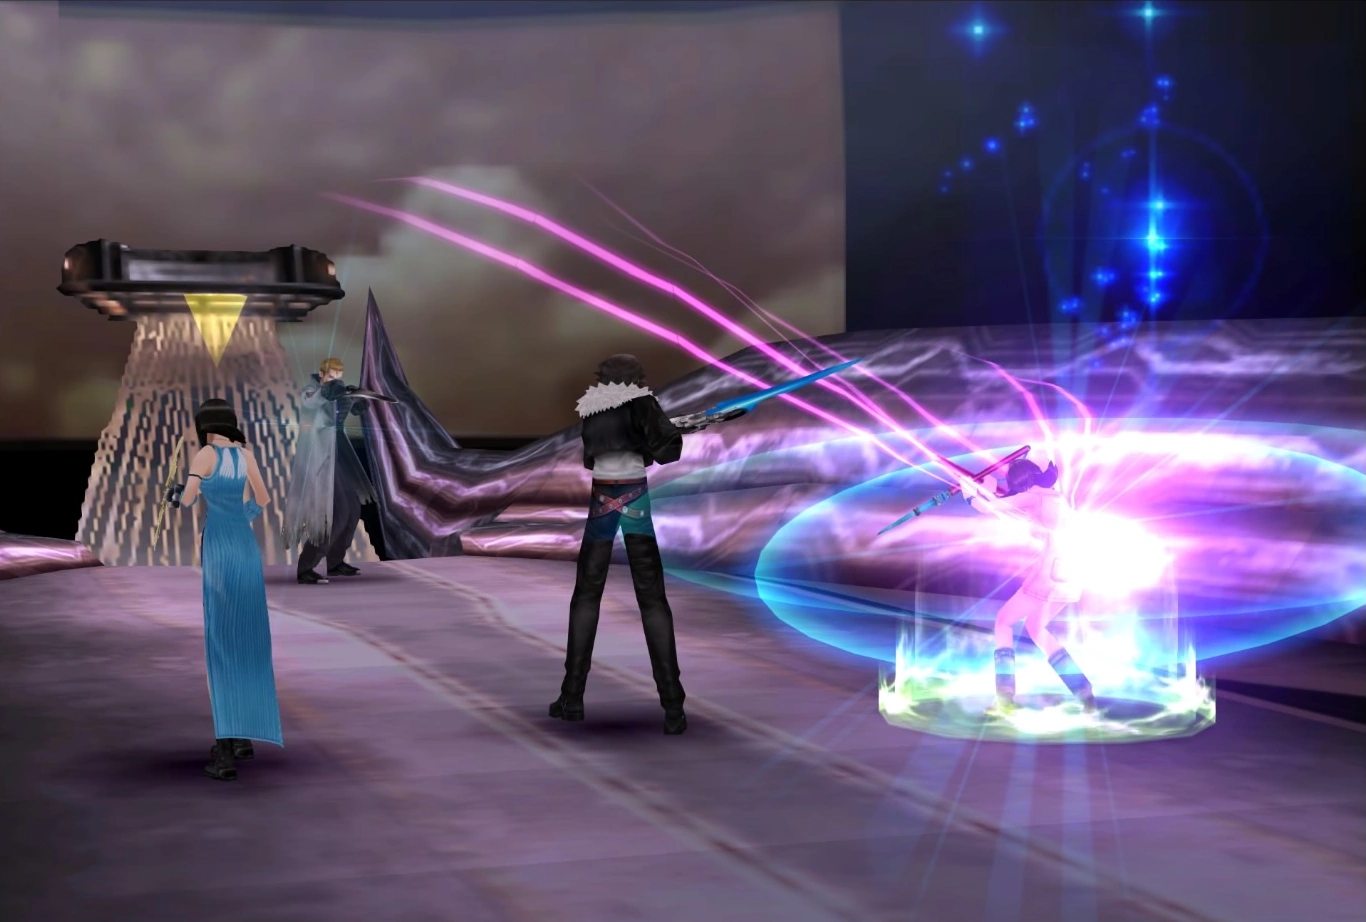

Drawing Aura from Seifer.
The player should equip Mug to steal a Hero from him and draw Aura spells, as Seifer is the only opponent in the entire game who possesses it. If the party has obtained the GF Odin, he will be summoned, but Seifer unleashes Zantetsuken Reverse to slice Odin in half.
Gilgamesh claims Odin's sword. If the battle is not won within 13 turns, Gilgamesh arrives and defeats Seifer. If the player deals enough damage before the turn limit, Gilgamesh will also appear. If Odin has not been obtained before this battle, Gilgamesh does not appear, and is unobtainable for the remainder of the game.
Behind the scenes
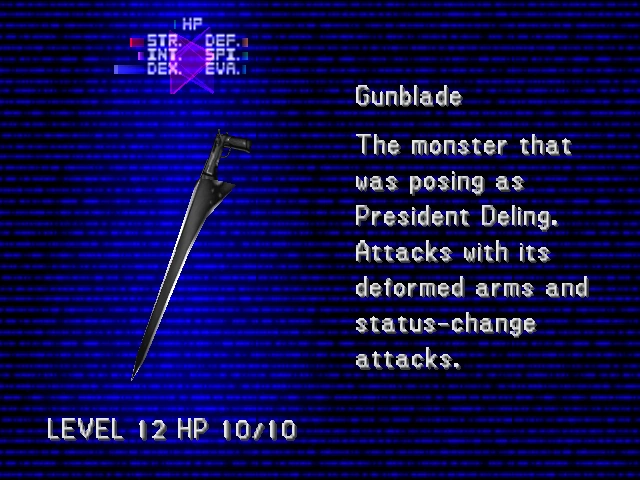
The Gunblade's Scan
The gunblade models in these battles exist separately from Seifer. This is how all player characters work, and Seifer is a temporary playable character with this weapon. Due to this, the gunblade models count as enemies though they are never targetable. They are called "Gunblade" and have Gerogero's Scan information.
Gallery
")
")
")
")