(Adding categories) |
m (this page could use some more slight rewrites) |
||
| (48 intermediate revisions by 15 users not shown) | |||
| Line 1: | Line 1: | ||
| + | {{sideicon|prime=FFT}} |
||
| − | {{Expand|Data on each mission, how to unlock, and prizes for the mode}} |
||
| + | {{IncompleteTable|FFT}} |
||
| − | [[File:FFT_Multiplayer_Mode.jpg|thumb|right|A battle in a Rendezvous Mission.]] |
||
| + | {{Images|FFT|place the Front view, Back view, Side view, Back side view, and Overhead grid images}} |
||
| − | '''Rendezvous Missions''' are a series of optional multiplayer co-op battles in ''[[Final Fantasy Tactics: The War of the Lions]]''. They are unlocked during the course of the game, and can be started by going to any [[Tavern]] in [[Ivalice (Final Fantasy Tactics)|Ivalice]]. Each player selects between one and four characters, and then controls them during the battle. Together they fight a battle against computer-controlled enemies, who happen to be some of the most difficult opponents in the entire game. The battle is lost once all characters are defeated, not just the ones for one player. The battle will also end if one player turns off his or her PSP, puts it to "sleep", or selects the "Quit" option. All battles can be fought as many times as the players wish. |
||
| + | [[File:FFT Multiplayer Mode.jpg|thumb|right|A battle in a Rendezvous.]] |
||
| + | {{Q|Rendezvous? Well, sometimes people look to hire two groups of adventures for a job. That's how you meet up with t'other one.|Tavern Patron}} |
||
| + | '''Rendezvous''' {{J|共同戦線|Kyōdō Sensen|Joint Front}} are a series of optional multiplayer co-op battles in ''[[Final Fantasy Tactics|Final Fantasy Tactics: The War of the Lions]]'' for the [[PlayStation Portable|PSP]]. It is unlocked in Chapter 1 after the events at [[Eagrose Castle]], a cutscene will automatically play once the player reaches [[Magick City of Gariland]] while heading to [[Siedge Weald]]. Each player selects between one and four units, and then controls them during the battle. Together they fight a battle against powerful computer-controlled enemies. |
||
| + | Rendezvous enemies will sometimes have equipment that their jobs aren't able to equip normally, making them more powerful than their main story counterparts. Such example is Delita being equipped with the [[Final Fantasy Tactics weapons#Chaos Blade|Chaos Blade]] and [[Final Fantasy Tactics armor#Ribbon|Ribbon]], two items his [[Holy Knight (Tactics)|Holy Knight]] job cannot equipped under normal circumstances. |
||
| − | There are no negative results for playing in the Rendezvous Mode. All items used are returned, all gil lost is restored, and characters do not die, instead they leave the battle when their timer runs out rather than turn into a crystal or chest. This results in there being no notes of events such as character deaths or additional kills added to the Chronicles notes. But EXP is not gained during battle, however characters do gain JP. All Jobs and skill sets are open for use, except [[Arithmeticks]] skill, as well as the Entice and Poaching abilities. |
||
| + | Since the multiplayer element was removed in the [[iOS]] and [[Android (system)|Android]] version, Rendezvous is not available in the said iteration of the game. |
||
| − | At the end of each mission, both players each receive one to five [[Treasure Chest (Object)|Treasure Chest]]s, depending upon the players' combined performance during the battle. This is determined based upon the total number of characters used, enemies killed, remaining teammates at the end of the fight. The items in the Chests are semi-random, with better treasure appearing to higher level players and with some equipment only found in one specific mission. |
||
| − | == |
+ | == Profile == |
| + | Beginning midway through Chapter 1, new Rendezvous missions will continue to become available as the player progress through the main story. Missions that the player can unlock as they play through the main story are appropriate for units at that stage of the game. So, the missions unlocked in Chapter 2 can be tackled while the player is still in Chapter 2, and so on. The exception is the last four Rendezvous missions, unlocked by completing the main story. The enemies will always be at higher levels, regardless of their own levels. |
||
| − | [[File:FFT_Multiplayer_Mode_Treasure.jpg|thumb|right|Choosing a Treasure Chest in Rendezvous Missions.]] |
||
| − | *Chocobo Defense |
||
| − | *Chicken Race |
||
| − | *Treasure Hunt |
||
| − | *Teioh |
||
| − | *Lost Heirloom |
||
| − | *The Fete |
||
| − | *Desert Minefield |
||
| − | *Littering |
||
| − | *Shades of the Past |
||
| − | *The Knights Templar |
||
| − | *All-Star Melee |
||
| − | *The Guarded Temple |
||
| − | *Nightmares |
||
| − | *Brave Story |
||
| − | *An Ill Wind |
||
| + | A mission may be selected as long at least one of the two players has unlocked it, though both players must have at least progressed through the first few battles of the game to make the Rendezvous option appear in a Tavern. |
||
| − | {{FFT}} |
||
| + | |||
| − | l |
||
| + | To start a Rendezvous mission, have each player go to the Tavern and choose Rendezvous Mode and "Start a Mission." The hosting player (Player 1) should choose to host a mission and the other player should choose to join. Rendezvous can only be played over a local (ad hoc) connection. Each mission can be played an unlimited number of times, regardless of whether they win or lose. Rendezvous missions do not cost gil. |
||
| − | [[Category: Final Fantasy Tactics]] |
||
| + | |||
| − | [[Category:Gameplay Elements]] |
||
| + | The experience level of the enemies they face in Rendezvous scales with their own unit's levels. So, simply leveling up won't really help them win the battles. Of course, learning new abilities, gaining equipment, and using the Degenerator traps described [[Stat growth (Tactics)#Leveling Down|here]] will help. |
||
| + | |||
| + | The specific victory and loss conditions for each battle are different. For details on each mission, see the list of missions below. |
||
| + | |||
| + | If one player has all of their characters eliminated, the other player can keep playing. Both players will still be awarded items at the end of the mission. |
||
| + | |||
| + | The player can give up on a mission partway through by clicking on a blank tile and choosing the "Quit" option. If either player chooses to do this, the mission is forfeited and both players are returned to the Tavern. |
||
| + | |||
| + | A mission also ends if either PSP goes to sleep or if the connection is broken. If one player has all of their unit's KO'd, that player should keep their system running so the other player can continue trying to complete the mission. |
||
| + | |||
| + | == Rules == |
||
| + | Rendezvous differs from the main story combat: |
||
| + | * The player cannot permanently lose items or characters in this mode. Stolen and broken items, and items consumed using [[Throw (ability)|Throw]], Iaido, and the Items commands, are restored to the player at the end of battle. Units cannot die permanently because they simply teleport out of the battle when their KO counter reaches zero. Since they're not permanent deaths, these do not count as Casualties on the Chronicle screen. Anyone turned into a Malboro by Malboro Spores ability is turned back into a human. This makes some abilities more useful in Rendezvous since the player no longer has to worry about losing their rare items. Elixirs can be used for restoring HP and MP, the Masamune and Chirijiraden for Iaidos can be used freely and other rare and powerful weapons like the Chaos Blade can be thrown without losing them permanently. |
||
| + | * The player will keep items that they obtain from chests, stealing, and catching them from enemies using Sticky Fingers. They cannot keep weapons caught when their units throws them. They must win the battle in order to keep the gained items; they are lost if they fail the mission. |
||
| + | * The [[Arithmeticks]] command is completely off-limits in Rendezvous and cannot be used. |
||
| + | * Only JP is earned. In addition to earning JP, the player can also learn and keep abilities from crystals. Magick that can be learned from being hit with it can also be learned and kept. The player will have to win the battle to keep their abilities or they are lost if they fail the mission. Since the player cannot gain levels, the Wild Boar's Bequeath Bacon is ineffective in Rendezvous. |
||
| + | * Bravery and Faith can be changed for the duration of a battle, but there are no permanent changes. |
||
| + | * Monsters cannot be poached for items. Poaching a monster will still remove it from the map, but no items will be added to the Poachers' Den. |
||
| + | * While the Traitor status gained from Entice or Tame can still be used to recruit enemies onto their side for the duration of the battle, they cannot join the player's team permanently afterwards. |
||
| + | * Similarly, the Greater Malboro's ability, Malboro Spores still turns a unit into a Malboro for the duration of the battle, but this does not affect that unit permanently. |
||
| + | * There are no traps and no items that can be found using the Treasure Hunter ability, even on tiles where there are traps/items in the main story. |
||
| + | * The player cannot be put their units under AI control. |
||
| + | * The game cannot be paused. However, when one player is moving, the other player can scroll around the map and look at unit's status. |
||
| + | * Although Bonus Coin is earned after a battle, gil cannot be gained or lost within a battle from Gil Snapper, Steal/Plunder Gil, Glitterlust, Beg, or from treasure chests. |
||
| + | * Enemies killed during Rendezvous are not added to the player's Kills tally on the Chronicle screen and aren't counted towards unlocking [[Dark Knight (Tactics)|Dark Knight]]. |
||
| + | |||
| + | Two of the Rendezvous missions; specifically "The Knights Templar" and "Brave Story" involve a sequence of battles. In these missions, the player move immediately from one battle to the next. They will not be able to change their units or equipment between battles. |
||
| + | |||
| + | Most gameplay elements carry over between each battle in the sequence: |
||
| + | * HP/MP are not restored. |
||
| + | * KO'd units are not revived. |
||
| + | * Consumed or thrown items are not restored in the player's inventory until the end of the mission. |
||
| + | * Broken equipment remains broken until the end of the mission. |
||
| + | |||
| + | However, there are a few things that are restored between battles: |
||
| + | * Status conditions other than KO are removed between battles. |
||
| + | * Changes in stats which includes Bravery and Faith are restored to their original value between battles. |
||
| + | * The counter over KO'd characters is set back at 3. |
||
| + | * Equipment that starts the player off with beneficial status effects like Invisible or Reraise has this effect at the start of each battle. |
||
| + | |||
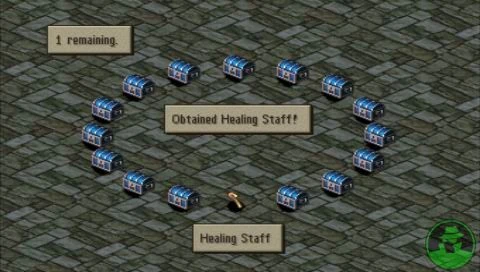
| + | == Treasure chests == |
||
| + | [[File:FFT Multiplayer Mode Treasure.jpg|thumb|right|Choosing a treasure chest.]] |
||
| + | After winning a Rendezvous battle, each player will be presented with a ring of treasure chests, and can open one to five of them based on their performance during battle. No treasure chests are awarded if they fail the mission. Since these battles are a cooperative effort, both players will always earn the same number of treasure chests, even if one player had their party completely wiped out. |
||
| + | |||
| + | The number of treasure chests the player can open is determined by how well they fought. They can open more treasure chests when they: |
||
| + | * Deploy fewer units. Typically, each player can deploy up to a total of 3 units. |
||
| + | * KO more enemies. Some missions don't require them to KO every enemy, but KOing more of them will earn them more treasure chests. |
||
| + | * Do not have any of their own units be KO'd at the end of battle. If the units are KO'd during battle but later revived, this does not penalize the player. |
||
| + | |||
| + | The contents of the treasure chests are determined by different factors: |
||
| + | * The average level of their units. |
||
| + | * Most missions have a cap on item quality. The tougher the mission, the better the items the player can get. |
||
| + | |||
| + | Note that the quality and quantity of items the player receive are determined by completely different factors. Even a poor performance on the later missions will earn them a chance at rare items; they just won't get as many of them. On the other hand, blowing through early missions will not get them unique items, no matter how efficiently they fight or how high their level is. Different items are placed in the treasure chests for each player. |
||
| + | |||
| + | == Titles and star rating == |
||
| + | In addition to treasures, the player will also be awarded a "title" for clearing each mission. For example, completing the Chocobo Defense mission earns the player the "Defender of the Wild" title. These titles are just for show. |
||
| + | |||
| + | Each title comes with a star rating, on a scale from 1 to 5. The star rating is simply equal to the number of chests the player were awarded at the end of the mission. In the Tavern, the game tracks the player's highest star ratings for each mission, so they can challenge themselves to try and earn a 5 stars on every mission. |
||
| + | |||
| + | == List of missions == |
||
| + | === Chocobo Defense === |
||
| + | {{Q|Fovoham's chocobos face poaching on a scale never before seen. If naught is done, their population will fall to levels from which they cannot hope to recover. Please, save the birds from these soulless poachers before the sound of warking is forever lost to the windflats!|Society for the Protection of Endangered Wildfowl}} |
||
| + | Chocobo Defense is immediately available once Multiplayer Mode is unlocked. The objective is to protect the two guest chocobos. The player has to defeat all enemies to win, but if either of the guest chocobos are [[Knocked Out|KO'd]], the player loses. |
||
| + | |||
| + | {{FFT BI |
||
| + | |front img = Windmill Shed 1.gif |
||
| + | |side img = Windmill Shed 2.gif |
||
| + | |back img = Windmill Shed 3.gif |
||
| + | |back side img = Windmill Shed 4.gif |
||
| + | |grid img = Windmill Shed OH.png |
||
| + | |location = Windflat Mill |
||
| + | |condition = Protect the [[Chocobo (Tactics)|chocobos]] |
||
| + | |team = 1 |
||
| + | |capacity = 3 (per player) |
||
| + | |units =<br/> |
||
| + | *4 [[Squire (Tactics)|Squires]] |
||
| + | *3 [[Chemist (Tactics)|Chemists]] |
||
| + | *1 [[Thief (Tactics)|Thief]] |
||
| + | |enemy lvl = |
||
| + | |recommend = |
||
| + | |item = |
||
| + | |info = If the player's equipment is stolen during this battle, they'll get it back afterwards. |
||
| + | |trophies= None |
||
| + | |weather= Clear |
||
| + | |terrain = Soil, Grassland, Flagstone, Stone Outcropping, Brick, Roof |
||
| + | |geomancy = Sinkhole, Tanglevine, Contortion, Tremor, Wind Slash, Wind Blast |
||
| + | }} |
||
| + | |||
| + | === Chicken Race === |
||
| + | {{Q|We are conducting a test of courage in the form of a fenland race. Should you wish to prove your mettle, join us at your own peril.|Lionheart Adventurers}} |
||
| + | Chicken Race becomes available in Chapter 2. The objective is to defeat all enemies to win, but if the party is KO'd, the player loses. All enemies are [[Undead]] opponents, so the player should use that to their advantage. The area is filled with a poisonous swamp which hinders movement, as any character who stops within it will be inflicted with the [[Poison (status)|Poison]] status effect. |
||
| + | |||
| + | {{FFT BI |
||
| + | |front img = |
||
| + | |side img = |
||
| + | |back img = |
||
| + | |back side img = |
||
| + | |grid img = |
||
| + | |location = Tchigolith Fenlands |
||
| + | |condition = Defeat all enemies |
||
| + | |team = 1 |
||
| + | |capacity = 3 (per player) |
||
| + | |units =<br/> |
||
| + | *3 [[Knight (Tactics)|Knights]] |
||
| + | *2 [[Archer (Tactics)|Archers]] |
||
| + | *1 [[Black Mage (Tactics)|Black Mage]] |
||
| + | *1 [[Time Mage (Tactics)|Time Mage]] |
||
| + | *3 [[Ghost (Tactics)|Revenant]] |
||
| + | |enemy lvl = |
||
| + | |recommend = |
||
| + | |item = |
||
| + | |info = All enemies are [[Undead]]. |
||
| + | |trophies= None |
||
| + | |weather= Day |
||
| + | |terrain = Soil, Wasteland, Grassland, Stone Outcropping, Tree, Poisonous Fen |
||
| + | |geomancy = Sinkhole, Tanglevine, Tremor, Quicksand |
||
| + | }} |
||
| + | |||
| + | === Treasure Hunt === |
||
| + | {{Q|An item of no small importance appears to have fallen from its wagon sometime during out last journey. Any man, woman, or child who returns it to us before brigands claim it as their own will be handsomely rewarded.|Gallionne Caravans}} |
||
| + | Treasure Hunt becomes available in Chapter 2. The objective is to either get the treasure chest that is on the opposite side of the map or defeat all enemies. The player will lose when the enemy takes the treasure chest or the player's party is KO'd. |
||
| + | |||
| + | {{FFT BI |
||
| + | |front img = Dolbodar Swamp 1.png |
||
| + | |side img = Dolbodar Swamp 2.png |
||
| + | |back img = Dolbodar Swamp 3.png |
||
| + | |back side img = Dolbodar Swamp 4.png |
||
| + | |grid img = Dolbodar Swamp OH.png |
||
| + | |location = Dorvauldar Marsh |
||
| + | |condition = |
||
| + | |team = 1 |
||
| + | |capacity = 3 (per player) |
||
| + | |units =<br/> |
||
| + | *3 [[Thief (Tactics)|Thieves]] |
||
| + | *2 [[Monk (Tactics)|Monks]] |
||
| + | *2 [[Archer (Tactics)|Archers]] |
||
| + | *1 [[Squire (Tactics)|Squire]] |
||
| + | |enemy lvl = |
||
| + | |recommend = |
||
| + | |item = |
||
| + | |info = The thieves of both genders are able to use [[Thief (Tactics)#Steal Heart|Steal Heart]]. |
||
| + | |trophies= None |
||
| + | |weather= Day |
||
| + | |terrain = Soil, Grassland, Reeds, Swamp |
||
| + | |geomancy = Sinkhole, Tanglevine, Quicksand |
||
| + | }} |
||
| + | |||
| + | === Teioh === |
||
| + | {{Q|Every hunter has heard tell of Teioh, the fastest black chocobo alive. Many a hunter has tried his hand at capturing the elusive bird, but as of yet, none have prevailed. We seek the ones who can.|Fraternal Order of Huntsmen}} |
||
| + | [[Teioh]] becomes available after completing [[Castled City of Zaland]] battle. The objective is to KO the [[black chocobo]] called Teioh. |
||
| + | |||
| + | {{FFT BI |
||
| + | |front img = Araguay Woods 1.png |
||
| + | |back img = Araguay Woods 2.png |
||
| + | |side img = Araguay Woods 3.png |
||
| + | |back side img = Araguay Woods 4.png |
||
| + | |grid img = Araguay Woods OH.png |
||
| + | |location = Araguay Woods |
||
| + | |condition = Defeat [[Teioh]] |
||
| + | |team = 1 |
||
| + | |capacity = 3 (per player) |
||
| + | |units =<br/> |
||
| + | *4 [[Chocobo (Tactics)|Chocobos]] |
||
| + | *2 Red Chocobo |
||
| + | *2 [[Pig (Tactics)|Pig]] |
||
| + | *1 [[Panther (Tactics)|Red Panther]] |
||
| + | *[[Teioh]] (black chocobo) |
||
| + | |enemy lvl = |
||
| + | |recommend = |
||
| + | |item = |
||
| + | |info = Teioh has over 1000 HP even when the party has low level. |
||
| + | |trophies= None |
||
| + | |weather= Clear day |
||
| + | |terrain = Soil, Grassland, Tree, Cross Section |
||
| + | |geomancy = Sinkhole, Tanglevine |
||
| + | }} |
||
| + | |||
| + | === Lost Heirloom === |
||
| + | {{Q|Foulest fortune! My most prized family heirloom, Saint Ajora's Tear, was stolen by cowardly rouges. Would that some honorable knights might retrieve it for me! Failing that, dishonorable sellswords would do.|Count Thanes}} |
||
| + | Lost Heirloom becomes available after completing Goug Lowtown battle. The objective is to defeat all enemies. |
||
| + | |||
| + | {{FFT BI |
||
| + | |front img = Slums in Goug 1.png |
||
| + | |side img = Slums in Goug 2.png |
||
| + | |back img = Slums in Goug 3.png |
||
| + | |back side img = Slums in Goug 4.png |
||
| + | |grid img = Slums in Goug OH.png |
||
| + | |location = Goug Lowtown |
||
| + | |condition = Defeat all enemies. |
||
| + | |team = 1 |
||
| + | |capacity = 2 (per player) |
||
| + | |units = <br/> |
||
| + | *3 [[Thief (Tactics)|Thieves]] |
||
| + | *2 [[Knight (Tactics)|Knights]] |
||
| + | *2 [[Time Mage (Tactics)|Time Mages]] |
||
| + | *3 [[Archer (Tactics)|Archers]] |
||
| + | |enemy lvl = |
||
| + | |recommend = |
||
| + | |item = |
||
| + | |info = |
||
| + | |trophies= None |
||
| + | |weather= Night |
||
| + | |terrain = Grassland, Flagstone, Wooden Floor, Coffer, Roof, Chimney |
||
| + | |geomancy = Tanglevine, Contortion, Will-o'-the-Wisp, Wind Blast |
||
| + | }} |
||
| + | |||
| + | === The Fete === |
||
| + | {{Q|You are cordially invited to attend our evening fete. Enjoy such hospitality as you have never seen! There will be a rousing performance, with an exhilarating climax just for you. We do so hope you will come.|Swirling Silks Dance Troupe}} |
||
| + | The Fete becomes available in Chapter 3. The objective is to defeat all enemies. |
||
| + | |||
| + | {{FFT BI |
||
| + | |front img = Inside of Lionel Castle 1.gif |
||
| + | |side img = Inside of Lionel Castle 2.gif |
||
| + | |back img = Inside of Lionel Castle 3.gif |
||
| + | |back side img = Inside of Lionel Castle 4.gif |
||
| + | |grid img = Inside of Lionel Castle OH.png |
||
| + | |location = Lionel Castle Oratory |
||
| + | |condition = Defeat all enemies |
||
| + | |units =<br/> |
||
| + | *3 [[Dancer (Tactics)|Dancers]] |
||
| + | *3 [[Bard (Tactics)|Bards]] |
||
| + | *2 [[Monk (Tactics)|Monks]] |
||
| + | *2 [[Knight (Tactics)|Knights]] |
||
| + | |team = 1 |
||
| + | |capacity = 3 (per player) |
||
| + | |enemy lvl = |
||
| + | |recommend = |
||
| + | |item = |
||
| + | |info = |
||
| + | |trophies = None |
||
| + | |weather = Indoors (no special effects) |
||
| + | |terrain = Flagstone, Furnishings, Stairs, Carpet, Cross Section, Barrier |
||
| + | |geomancy = Contortion, Wind Slash, Will-o'-the-Wisp |
||
| + | }} |
||
| + | |||
| + | === Desert Minefield === |
||
| + | {{Q|I've a need to cross the desert, but with the abundance of those blasted bombs, I would not dare set foot there alone. I seek a learned guide to escort me on my way.|Govis}} |
||
| + | Desert Minefield becomes available right after the First Floor of the Monastery Vaults has been completed. The objective is to have Govis reach the other side of the battlefield or eliminates all enemies. |
||
| + | |||
| + | {{FFT BI |
||
| + | |front img = |
||
| + | |side img = |
||
| + | |back img = |
||
| + | |back side img = |
||
| + | |grid img = |
||
| + | |location = Zeklaus Desert |
||
| + | |condition = Protect Govis |
||
| + | |units =<br/> |
||
| + | *2 [[Bomb (Tactics)|Bombs]] |
||
| + | *4 Grenades |
||
| + | *5 Exploders |
||
| + | |team = 1 |
||
| + | |capacity = 2 (per player) |
||
| + | |enemy lvl = |
||
| + | |recommend = |
||
| + | |item = |
||
| + | |info = |
||
| + | |trophies= None |
||
| + | |weather= Clear day |
||
| + | |terrain = Stone Outcropping, Tree, Sand |
||
| + | |geomancy = Tremor, Sandstorm |
||
| + | }} |
||
| + | |||
| + | === Littering === |
||
| + | {{Q|I am plagued at every hour of the day. Some damnable fools persist in lobbing dangerous items into my courtyard from the overlooking rooftops. Would there were a peaceful solution to the problem, but I fear enlisting the aid of warriors is my only choice.|Count Hattori}} |
||
| + | Littering becomes available right after the player completes [[Walled City of Yardrow]]. The player must defeat all enemies. |
||
| + | |||
| + | {{FFT BI |
||
| + | |front img = Goland Coal City 1.png |
||
| + | |side img = Goland Coal City 2.png |
||
| + | |back img = Goland Coal City 3.png |
||
| + | |back side img = Goland Coal City 4.png |
||
| + | |grid img = Goland Coal City OH.png |
||
| + | |location = Gollund |
||
| + | |condition = Defeat all enemies |
||
| + | |team = 1 |
||
| + | |capacity = 3 (per player) |
||
| + | |units = <br/> |
||
| + | *10 [[Ninja (Tactics)|Ninja]] |
||
| + | |enemy lvl = |
||
| + | |recommend = |
||
| + | |item = |
||
| + | |info = |
||
| + | |trophies= None |
||
| + | |weather= Light Snow |
||
| + | |terrain = Flagstone, Wooden Floor, Snow, Roof, Chimney |
||
| + | |geomancy = Contortion, Will-o'-the-Wisp, Snowstorm, Wind Blast |
||
| + | }} |
||
| + | |||
| + | === Shades of the Past === |
||
| + | {{Q|I am an exorcist attempting to banish spirits with a particularly strong attachment to this world. My every attempt to exorcise them has met with failure, and there is little more I can do. I await men or women capable of dealing with ghosts in a less...sophisticated manner.|Master Sampson}} |
||
| + | Shades of the Past becomes available in Chapter 4. |
||
| + | |||
| + | {{FFT BI |
||
| + | |front img = |
||
| + | |side img = |
||
| + | |back img = |
||
| + | |back side img = |
||
| + | |grid img = |
||
| + | |location = Brigands' Den |
||
| + | |condition = Defeat all enemies |
||
| + | |team = 1 |
||
| + | |capacity = 3 (per player) |
||
| + | |units = <br/> |
||
| + | *[[Milleuda Folles|Milleuda]] |
||
| + | *5 [[Knight (Tactics)|Knights]] |
||
| + | *2 [[Archer (Tactics)|Archers]] |
||
| + | *2 [[White Mage (Tactics)|White Mages]] |
||
| + | |enemy lvl = |
||
| + | |recommend = |
||
| + | |item = |
||
| + | |info = |
||
| + | |trophies= None |
||
| + | |weather= Day, Rainstorm |
||
| + | |terrain = Ocean, Grassland, Flagstone, Wooden Floor |
||
| + | |geomancy = Torrent, Tanglevine, Contortion, Will-o'-the-Wisp |
||
| + | }} |
||
| + | |||
| + | === The Knights Templar === |
||
| + | {{Q|We seek the strong and pious to serve the gods' will as sworn members of the Knights Templar. Prove your martial prowess by crossing swords with our ranks, and you may well find yourself among them.|Mullonde Church of Glabados}} |
||
| + | The Knights Templar becomes available after the player completes the Fort Besselat Sluice battle. It is a string of four consecutive battles, with no chance to heal, change equipment or abilities in between the battles. |
||
| + | |||
| + | {{FFT BI |
||
| + | |front img = Hall of St. Murond Temple 1.png |
||
| + | |side img = Hall of St. Murond Temple 2.png |
||
| + | |back img = Hall of St. Murond Temple 3.png |
||
| + | |back side img = Hall of St. Murond Temple 4.png |
||
| + | |grid img = Hall of St. Murond Temple OH.png |
||
| + | |location = Mullonde Cathedral Nave |
||
| + | |condition = Defeat all enemies |
||
| + | |team = 1 |
||
| + | |capacity = 3 (per player) |
||
| + | |units = <br/> |
||
| + | *1st Battle: [[Wiegraf Folles|Wiegraf]], [[Isilud Tengille|Isilud]], 4 [[Archer (Tactics)|Archers]], 4 [[Squire (Tactics)|Squires]] |
||
| + | *2nd Battle: [[Cletienne Duroi|Cletienne]], 3 [[Summoner (Tactics)|Summoners]], 2 [[Black Mage (Tactics)|Black Mages]], 2 [[White Mage (Tactics)|White Mages]], 2 [[Time Mage (Tactics)|Time Mages]] |
||
| + | *3rd Battle: [[Barich Fendsor|Barich]], 4 [[Chemist (Tactics)|Chemists]], 4 [[Orator (Tactics)|Orator]] |
||
| + | *4th Battle: [[Folmarv Tengille|Folmarv]], [[Loffrey Wodring|Loffrey]], 3 [[Knight (Tactics)|Knights]], 3 [[Dragoon (Tactics)|Dragoon]], 2 [[White Mage (Tactics)|White Mages]] |
||
| + | |enemy lvl = |
||
| + | |recommend = |
||
| + | |item = |
||
| + | |info = |
||
| + | |trophies= None |
||
| + | |weather= Indoors |
||
| + | |terrain = Canal, Flagstone, Furnishings, Carpet, Cross Section |
||
| + | |geomancy = Torrent, Contortion, Wind Slash, Will-o'-the-Wisp |
||
| + | }} |
||
| + | |||
| + | === All-Star Melee === |
||
| + | {{Q|A group of ne'er-do-wells has been terrorizing the city, but such is their strength and cunning that we have yet been unable to quell them. Rich reward awaits those who bring these blackguards to justice.|Gariland City Guard}} |
||
| + | All-Star Melee becomes available after the player completes the Mullonde Cathedral Sanctuary battle. |
||
| + | |||
| + | {{FFT BI |
||
| + | |front img = Magic City Gariland 1.gif |
||
| + | |side img = Magic City Gariland 2.png |
||
| + | |back img = Magic City Gariland 3.png |
||
| + | |back side img = Magic City Gariland 4.png |
||
| + | |grid img = Magic City Gariland OH.png |
||
| + | |location = Magick City of Gariland |
||
| + | |condition= Defeat all enemies |
||
| + | |team= 1 |
||
| + | |capacity= 3 (per player) |
||
| + | |units=<br/> |
||
| + | *[[Ramza Beoulve|Ramza]] |
||
| + | *[[Cidolfus Orlandeau|Orlandeau]] |
||
| + | *[[Agrias Oaks|Agrias]] |
||
| + | *[[Mustadio Bunansa|Mustadio]] |
||
| + | *[[Meliadoul Tengille|Meliadoul]] |
||
| + | *[[Rapha Galthena|Rapha]] |
||
| + | *[[Marach Galthena|Marach]] |
||
| + | *[[Beowulf Cadmus|Beowulf]] |
||
| + | *[[Reis Duelar|Reis]] |
||
| + | |enemy lvl = |
||
| + | |recommend = |
||
| + | |item = |
||
| + | |info = |
||
| + | |trophies= None |
||
| + | |weather= Clear |
||
| + | |terrain = Canal, Grassland, Flagstone, Tree, Bridge, Wooden Floor, Coffer, Roof, Chimney |
||
| + | |geomancy = Torrent, Tanglevine, Contortion, Wind Slash, Will-o'-the-Wisp, Wind Blast |
||
| + | }} |
||
| + | |||
| + | === The Guarded Temple === |
||
| + | {{Q|There is a temple said to house an artefact of unparalleled value, but the temple's fearsome guardians have foiled all previous attempts to retrieve it. We are in search of stalwart steel to defeat the guardians and claim the holy treasure.|League of Treasure Hunters}} |
||
| + | The Guarded Temple becomes available after the player beats the game, and saves when the prompted. When the player loads the file back up, this mission will be available in the tavern. Another requirement is the completion of the [[Nelveska Temple]] side quest. |
||
| + | |||
| + | {{FFT BI |
||
| + | |front img = Nelveska Temple 1.png |
||
| + | |side img = Nelveska Temple 2.png |
||
| + | |back img = Nelveska Temple 3.png |
||
| + | |back side img = Nelveska Temple 4.png |
||
| + | |grid img = Nelveska Temple OH.png |
||
| + | |location = Nelveska Temple |
||
| + | |condition = Defeat all enemies |
||
| + | |team = 1 |
||
| + | |capacity = 3 (per player) |
||
| + | |units =<br/> |
||
| + | *10 [[Automaton (Tactics)|Automaton]] |
||
| + | |enemy lvl = |
||
| + | |recommend = |
||
| + | |item = |
||
| + | |info = |
||
| + | |weather = Sunny |
||
| + | |trophies = None |
||
| + | |terrain = Soil, Grassland, Flagstone, Stone Outcropping, Stairs, Sand |
||
| + | |geomancy = Sinkhole, Tanglevine, Contortion, Tremor, Will-o'-the-Wisp, Sandstorm |
||
| + | }} |
||
| + | |||
| + | === Nightmares === |
||
| + | {{Q|I have scary dreams every time I go to sleep. I make water in my beddings and Mother scolds me each morn. Please, make them go away!|Little Jack}} |
||
| + | Nightmares becomes available after the player beats the game, and saves when the prompted. When the player loads the file back up, this mission will be available in tavern. |
||
| + | |||
| + | {{FFT BI |
||
| + | |front img = Underground Cemetary of Limberry Castle 1.gif |
||
| + | |side img = Underground Cemetary of Limberry Castle 2.gif |
||
| + | |back img = Underground Cemetary of Limberry Castle 3.gif |
||
| + | |back side img = Underground Cemetary of Limberry Castle 4.gif |
||
| + | |grid img = Underground Cemetary of Limberry Castle OH.png |
||
| + | |location = Limberry Castle Undercroft |
||
| + | |condition = Defeat all enemies |
||
| + | |team = 1 |
||
| + | |capacity = 3 (per player) |
||
| + | |units =<br/> |
||
| + | *[[Cúchulainn (Tactics)|Cúchulainn]] |
||
| + | *[[Belias (Tactics)|Belias]] |
||
| + | *[[Zalera (Tactics)|Zalera]] |
||
| + | *[[Adrammelech (Tactics)|Adrammelech]] |
||
| + | *[[Hashmal (Tactics)|Hashmal]] |
||
| + | *5 [[Ultima Demon]]s |
||
| + | |enemy lvl = |
||
| + | |recommend = |
||
| + | |item = |
||
| + | |info = |
||
| + | |trophies = None |
||
| + | |weather= Indoors |
||
| + | |terrain = Canal, Flagstone, Gravestone, Bridge, Coffin, Cross Section |
||
| + | |geomancy = Torrent, Contortion, Wind Slash |
||
| + | }} |
||
| + | |||
| + | === Brave Story === |
||
| + | {{Q|The end to this story is not yet written. There are others with roles to play, and their tales, too, can now be told. Come, that I might enlighten you with the truth.|Edell, Orbonne Monastery Gardener}} |
||
| + | Brave Story becomes available after the player beats the game, and saves when prompted. When the player loads the file back up, this mission will be available in tavern. It is series of ten individual battles. The player does not have the ability to heal in between the battles, or reorganize their battle party. They will automatically be taken to the next battle when the current battle is cleared. |
||
| + | |||
| + | {{FFT BI |
||
| + | |front img = |
||
| + | |side img = |
||
| + | |back img = |
||
| + | |back side img = |
||
| + | |grid img = |
||
| + | |location = Monastery Vaults - Fifth Level |
||
| + | |condition = Defeat all enemies |
||
| + | |team = 1 |
||
| + | |capacity = 3 (per player) |
||
| + | |units =<br/> |
||
| + | *1st Battle: [[Cloud Strife/Tactics|Cloud]], [[Luso Clemens|Luso]], 3 [[Chocobo (Tactics)|Chocobo]], 3 black chocobo, 2 Red Chocobo |
||
| + | *2nd Battle: [[Balthier]], [[Mustadio Bunansa|Mustadio]], 4 [[Orator (Tactics)|Orators]], 4 [[Chemist (Tactics)|Chemists]] |
||
| + | *3rd Battle: 5 [[Onion Knight (Tactics)|Onion Knights]], 2 [[Aevis (Tactics)|Cockatrices]], 1 [[Ahriman (Tactics)|Plague]], 2 [[Minotaur (Tactics)|Sekhret]] |
||
| + | *4th Battle: [[Cúchulainn (Tactics)|Cúchulainn]], [[Elidibus (Tactics)|Elidibus]], 5 [[Malboro (Tactics)|Great Malboro]], 3 [[Knight (Tactics)|Knights]] |
||
| + | *5th Battle: [[Dycedarg Beoulve|Dycedarg]], [[Zalbaag Beoulve|Zalbaag]], [[Goffard Gaffgarion|Gaffgarion]], [[Argath Thadalfus|Argath]], 6 [[Dragoon (Tactics)|Dragoons]] |
||
| + | *6th Battle: [[Alma Beoulve|Alma]], [[Ovelia Atkascha|Ovelia]], [[Cidolfus Orlandeau|Orlandeau]], [[Orran Durai|Orran]], [[Agrias Oaks|Agrias]], [[Rapha Galthena|Rapha]], [[Marach Galthena|Marach]], 2 [[Time Mage (Tactics)|Time Mages]], 1 [[Mystic (Tactics)|Mystic]] |
||
| + | *7th Battle: [[Messam Elmdore|Elmdore]], [[Celia]], [[Lettie]], [[Zalbaag Beoulve|Zalbaag]] (Undead), 6 [[Archaeodaemon (Tactics)|Archaeodaemons]] |
||
| + | *8th Battle: [[Beowulf Cadmus|Beowulf]], [[Reis Duelar|Reis]], [[Aliste Rosenheim|Aliste]], [[Bremondt Freitberg|Bremondt]], 2 [[Hydra (Tactics)|Hydras]], 2 Greater Hydras, 2 Tiamats |
||
| + | *9th Battle: [[Folmarv Tengille|Folmarv]], [[Wiegraf Folles|Wiegraf]], [[Isilud Tengille|Isilud]], [[Loffrey Wodring|Loffrey]], [[Meliadoul Tengille|Meliadoul]], [[Cletienne Duroi|Cletienne]], [[Barich Fendsor|Barich]], [[Zalmour Lucianada|Zalmour]], 2 [[Time Mage (Tactics)|Time Mages]] |
||
| + | *10th Battle: [[Delita Heiral|Delita]], [[Valmafra Lenande|Valmafra]], 8 [[Dark Knight (Tactics)|Dark Knights]] |
||
| + | |enemy lvl = |
||
| + | |recommend = |
||
| + | |item = |
||
| + | |info = |
||
| + | |trophies = None |
||
| + | |weather= Indoors |
||
| + | |terrain = Book, Brick, Wooden Floor, Darkness |
||
| + | |geomancy = Wind Slash, Will-o'-the-Wisp |
||
| + | }} |
||
| + | |||
| + | === An Ill Wind === |
||
| + | {{Q|An unearthly wind howls through the ruins of Ziekden Fortress, chilling grown men to their marrow. Mayhap it's naught more than superstitious fear, but we offer a reward to any who would investigate nonetheless.|Eagrose Castle Guard}} |
||
| + | An Ill Wind becomes available after the player beats the game, and saves when prompted. When the player loads the file back up, this mission will be available in tavern. |
||
| + | |||
| + | {{FFT BI |
||
| + | |front img = Fort Zeakden 1.png |
||
| + | |side img = Fort Zeakden 2.png |
||
| + | |back img = Fort Zeakden 3.png |
||
| + | |back side img = Fort Zeakden 4.png |
||
| + | |grid img = Fort Zeakden OH.png |
||
| + | |location = Ziekden Fortress |
||
| + | |condition = Defeat all enemies |
||
| + | |team = 1 |
||
| + | |capacity = 3 (per player) |
||
| + | |units =<br/> |
||
| + | *10 [[Argath Thadalfus|Argath]] ([[Deathknight]]) |
||
| + | |enemy lvl = |
||
| + | |recommend = |
||
| + | |item = |
||
| + | |info = |
||
| + | |trophies= None |
||
| + | |weather= Day, light snow |
||
| + | |terrain = Bridge, Wooden Floor, Snow |
||
| + | |geomancy = Wind Slash, Will-o'-the-Wisp, Snowstorm |
||
| + | }} |
||
| + | |||
| + | == Items == |
||
| + | The items below are found in Rendezvous, but there are also some different multiplayer-only items that are only available in [[Melee (Tactics)|Melee]]. If the player is playing the iOS version, they will be able to buy the PSP exclusive items by completing the main story once and then visiting a Poachers' Den. |
||
| + | |||
| + | {|class="full-width"| |
||
| + | |style="width:25%" vstyle="text-align:top"|List of items: |
||
| + | * [[Final Fantasy Tactics weapons#Sasuke's Blade|Sasuke's Blade]] |
||
| + | * [[Final Fantasy Tactics weapons#Nagnarok|Nagnarok]] |
||
| + | * [[Final Fantasy Tactics weapons#Materia Blade|Materia Blade]] |
||
| + | * [[Final Fantasy Tactics weapons#Moonblade|Moonblade]] |
||
| + | * [[Final Fantasy Tactics weapons#Defender|Defender]] |
||
| + | * [[Final Fantasy Tactics weapons#Save the Queen|Save the Queen]] |
||
| + | * [[Final Fantasy Tactics weapons#Excalibur|Excalibur]] |
||
| + | * [[Final Fantasy Tactics weapons#Ragnarok|Ragnarok]] |
||
| + | * [[Final Fantasy Tactics weapons#Durandal|Durandal]] |
||
| + | * [[Final Fantasy Tactics weapons#Chaos Blade|Chaos Blade]] |
||
| + | * [[Final Fantasy Tactics weapons#Masamune|Masamune]] |
||
| + | * [[Final Fantasy Tactics weapons#Chirijiraden|Chirijiraden]] |
||
| + | * [[Final Fantasy Tactics weapons#Golden Axe|Golden Axe]] |
||
| + | * [[Final Fantasy Tactics weapons#Dragon Rod|Dragon Rod]] |
||
| + | * [[Final Fantasy Tactics weapons#Stardust Rod|Stardust Rod]] |
||
| + | |style="width:25%" vstyle="text-align:top"|<br/> |
||
| + | * [[Final Fantasy Tactics weapons#Crown Sceptre|Crown Sceptre]] |
||
| + | * [[Final Fantasy Tactics weapons#Healing Staff|Healing Staff]] |
||
| + | * [[Final Fantasy Tactics weapons#Dreamwaker|Dreamwaker]] |
||
| + | * [[Final Fantasy Tactics weapons#Scorpion Tail|Scorpion Tail]] |
||
| + | * [[Final Fantasy Tactics weapons#Ras Algethi|Ras Algethi]] |
||
| + | * [[Final Fantasy Tactics weapons#Fomalhaut|Fomalhaut]] |
||
| + | * [[Final Fantasy Tactics weapons#Glacial Gun|Glacial Gun]] |
||
| + | * [[Final Fantasy Tactics weapons#Blaze Gun|Blaze Gun]] |
||
| + | * [[Final Fantasy Tactics weapons#Blaster|Blaster]] |
||
| + | * [[Final Fantasy Tactics weapons#Artemis Bow|Artemis Bow]] |
||
| + | * [[Final Fantasy Tactics weapons#Yoichi Bow|Yoichi Bow]] |
||
| + | * [[Final Fantasy Tactics weapons#Perseus Bow|Perseus Bow]] |
||
| + | * [[Final Fantasy Tactics weapons#Sagittarius Bow|Sagittarius Bow]] |
||
| + | * [[Final Fantasy Tactics weapons#Faerie Harp|Faerie Harp]] |
||
| + | * [[Final Fantasy Tactics weapons#Omnilex|Omnilex]] |
||
| + | |style="width:25%" vstyle="text-align:top"|<br/> |
||
| + | * [[Final Fantasy Tactics weapons#Holy Lance|Holy Lance]] |
||
| + | * [[Final Fantasy Tactics weapons#Dragon Whisker|Dragon Whisker]] |
||
| + | * [[Final Fantasy Tactics weapons#Gungnir|Gungnir]] |
||
| + | * [[Final Fantasy Tactics weapons#Fallingstar Bag|Fallingstar Bag]] |
||
| + | * [[Final Fantasy Tactics weapons#Wyrmweave Silk|Wyrmweave Silk]] |
||
| + | * [[Final Fantasy Tactics weapons#Deathbringer|Deathbringer]] |
||
| + | * [[Final Fantasy Tactics weapons#Valhalla|Valhalla]] |
||
| + | * [[Final Fantasy Tactics armor#Kaiser Shield|Kaiser Shield]] |
||
| + | * [[Final Fantasy Tactics armor#Venetian Shield|Venetian Shield]] |
||
| + | * [[Final Fantasy Tactics armor#Genji Shield|Genji Shield]] |
||
| + | * [[Final Fantasy Tactics armor#Onion Shield|Onion Shield]] |
||
| + | * [[Final Fantasy Tactics armor#Genji Helm|Genji Helm]] |
||
| + | * [[Final Fantasy Tactics armor#Vanguard Helm|Vanguard Helm]] |
||
| + | * [[Final Fantasy Tactics armor#Brass Coronet|Brass Coronet]] |
||
| + | * [[Final Fantasy Tactics armor#Cachusha|Cachusha]] |
||
| + | |style="width:25%" vstyle="text-align:top"|<br/> |
||
| + | * [[Final Fantasy Tactics armor#Barette|Barette]] |
||
| + | * [[Final Fantasy Tactics armor#Ribbon|Ribbon]] |
||
| + | * [[Final Fantasy Tactics armor#Genji Armor|Genji Armor]] |
||
| + | * [[Final Fantasy Tactics armor#Grand Armor|Grand Armor]] |
||
| + | * [[Final Fantasy Tactics armor#Onion Armor|Onion Armor]] |
||
| + | * [[Final Fantasy Tactics armor#Ninja Gear|Ninja Gear]] |
||
| + | * [[Final Fantasy Tactics armor#Mirage Vest|Mirage Vest]] |
||
| + | * [[Final Fantasy Tactics armor#Rubber Suit|Rubber Suit]] |
||
| + | * [[Final Fantasy Tactics accessories#Gaius Caligae|Gaius Caligae]] |
||
| + | * [[Final Fantasy Tactics accessories#Genji Glove|Genji Glove]] |
||
| + | * [[Final Fantasy Tactics accessories#Brigand's Gloves|Brigand's Gloves]] |
||
| + | * [[Final Fantasy Tactics accessories#Sage's Ring|Sage's Ring]] |
||
| + | * [[Final Fantasy Tactics accessories#Invisibility Cloak|Invisibility Cloak]] |
||
| + | * [[Final Fantasy Tactics accessories#Sortilége|Sortilége]] |
||
| + | * [[Final Fantasy Tactics accessories#Chantage|Chantage]] |
||
| + | |} |
||
| + | |||
| + | == Etymology == |
||
| + | ''Rendezvous'' is a French word that means to visit or to meet. |
||
| + | |||
| + | {{navbox FFT}} |
||
| + | [[Category:Gameplay in Final Fantasy Tactics]] |
||
Revision as of 05:11, 22 May 2019
Template:Sideicon Template:IncompleteTable Template:Images

A battle in a Rendezvous.
Rendezvous? Well, sometimes people look to hire two groups of adventures for a job. That's how you meet up with t'other one.
Tavern Patron
Rendezvous (共同戦線, Kyōdō Sensen?, lit. Joint Front) are a series of optional multiplayer co-op battles in Final Fantasy Tactics: The War of the Lions for the PSP. It is unlocked in Chapter 1 after the events at Eagrose Castle, a cutscene will automatically play once the player reaches Magick City of Gariland while heading to Siedge Weald. Each player selects between one and four units, and then controls them during the battle. Together they fight a battle against powerful computer-controlled enemies.
Rendezvous enemies will sometimes have equipment that their jobs aren't able to equip normally, making them more powerful than their main story counterparts. Such example is Delita being equipped with the Chaos Blade and Ribbon, two items his Holy Knight job cannot equipped under normal circumstances.
Since the multiplayer element was removed in the iOS and Android version, Rendezvous is not available in the said iteration of the game.
Profile
Beginning midway through Chapter 1, new Rendezvous missions will continue to become available as the player progress through the main story. Missions that the player can unlock as they play through the main story are appropriate for units at that stage of the game. So, the missions unlocked in Chapter 2 can be tackled while the player is still in Chapter 2, and so on. The exception is the last four Rendezvous missions, unlocked by completing the main story. The enemies will always be at higher levels, regardless of their own levels.
A mission may be selected as long at least one of the two players has unlocked it, though both players must have at least progressed through the first few battles of the game to make the Rendezvous option appear in a Tavern.
To start a Rendezvous mission, have each player go to the Tavern and choose Rendezvous Mode and "Start a Mission." The hosting player (Player 1) should choose to host a mission and the other player should choose to join. Rendezvous can only be played over a local (ad hoc) connection. Each mission can be played an unlimited number of times, regardless of whether they win or lose. Rendezvous missions do not cost gil.
The experience level of the enemies they face in Rendezvous scales with their own unit's levels. So, simply leveling up won't really help them win the battles. Of course, learning new abilities, gaining equipment, and using the Degenerator traps described here will help.
The specific victory and loss conditions for each battle are different. For details on each mission, see the list of missions below.
If one player has all of their characters eliminated, the other player can keep playing. Both players will still be awarded items at the end of the mission.
The player can give up on a mission partway through by clicking on a blank tile and choosing the "Quit" option. If either player chooses to do this, the mission is forfeited and both players are returned to the Tavern.
A mission also ends if either PSP goes to sleep or if the connection is broken. If one player has all of their unit's KO'd, that player should keep their system running so the other player can continue trying to complete the mission.
Rules
Rendezvous differs from the main story combat:
- The player cannot permanently lose items or characters in this mode. Stolen and broken items, and items consumed using Throw, Iaido, and the Items commands, are restored to the player at the end of battle. Units cannot die permanently because they simply teleport out of the battle when their KO counter reaches zero. Since they're not permanent deaths, these do not count as Casualties on the Chronicle screen. Anyone turned into a Malboro by Malboro Spores ability is turned back into a human. This makes some abilities more useful in Rendezvous since the player no longer has to worry about losing their rare items. Elixirs can be used for restoring HP and MP, the Masamune and Chirijiraden for Iaidos can be used freely and other rare and powerful weapons like the Chaos Blade can be thrown without losing them permanently.
- The player will keep items that they obtain from chests, stealing, and catching them from enemies using Sticky Fingers. They cannot keep weapons caught when their units throws them. They must win the battle in order to keep the gained items; they are lost if they fail the mission.
- The Arithmeticks command is completely off-limits in Rendezvous and cannot be used.
- Only JP is earned. In addition to earning JP, the player can also learn and keep abilities from crystals. Magick that can be learned from being hit with it can also be learned and kept. The player will have to win the battle to keep their abilities or they are lost if they fail the mission. Since the player cannot gain levels, the Wild Boar's Bequeath Bacon is ineffective in Rendezvous.
- Bravery and Faith can be changed for the duration of a battle, but there are no permanent changes.
- Monsters cannot be poached for items. Poaching a monster will still remove it from the map, but no items will be added to the Poachers' Den.
- While the Traitor status gained from Entice or Tame can still be used to recruit enemies onto their side for the duration of the battle, they cannot join the player's team permanently afterwards.
- Similarly, the Greater Malboro's ability, Malboro Spores still turns a unit into a Malboro for the duration of the battle, but this does not affect that unit permanently.
- There are no traps and no items that can be found using the Treasure Hunter ability, even on tiles where there are traps/items in the main story.
- The player cannot be put their units under AI control.
- The game cannot be paused. However, when one player is moving, the other player can scroll around the map and look at unit's status.
- Although Bonus Coin is earned after a battle, gil cannot be gained or lost within a battle from Gil Snapper, Steal/Plunder Gil, Glitterlust, Beg, or from treasure chests.
- Enemies killed during Rendezvous are not added to the player's Kills tally on the Chronicle screen and aren't counted towards unlocking Dark Knight.
Two of the Rendezvous missions; specifically "The Knights Templar" and "Brave Story" involve a sequence of battles. In these missions, the player move immediately from one battle to the next. They will not be able to change their units or equipment between battles.
Most gameplay elements carry over between each battle in the sequence:
- HP/MP are not restored.
- KO'd units are not revived.
- Consumed or thrown items are not restored in the player's inventory until the end of the mission.
- Broken equipment remains broken until the end of the mission.
However, there are a few things that are restored between battles:
- Status conditions other than KO are removed between battles.
- Changes in stats which includes Bravery and Faith are restored to their original value between battles.
- The counter over KO'd characters is set back at 3.
- Equipment that starts the player off with beneficial status effects like Invisible or Reraise has this effect at the start of each battle.
Treasure chests
Choosing a treasure chest.
After winning a Rendezvous battle, each player will be presented with a ring of treasure chests, and can open one to five of them based on their performance during battle. No treasure chests are awarded if they fail the mission. Since these battles are a cooperative effort, both players will always earn the same number of treasure chests, even if one player had their party completely wiped out.
The number of treasure chests the player can open is determined by how well they fought. They can open more treasure chests when they:
- Deploy fewer units. Typically, each player can deploy up to a total of 3 units.
- KO more enemies. Some missions don't require them to KO every enemy, but KOing more of them will earn them more treasure chests.
- Do not have any of their own units be KO'd at the end of battle. If the units are KO'd during battle but later revived, this does not penalize the player.
The contents of the treasure chests are determined by different factors:
- The average level of their units.
- Most missions have a cap on item quality. The tougher the mission, the better the items the player can get.
Note that the quality and quantity of items the player receive are determined by completely different factors. Even a poor performance on the later missions will earn them a chance at rare items; they just won't get as many of them. On the other hand, blowing through early missions will not get them unique items, no matter how efficiently they fight or how high their level is. Different items are placed in the treasure chests for each player.
Titles and star rating
In addition to treasures, the player will also be awarded a "title" for clearing each mission. For example, completing the Chocobo Defense mission earns the player the "Defender of the Wild" title. These titles are just for show.
Each title comes with a star rating, on a scale from 1 to 5. The star rating is simply equal to the number of chests the player were awarded at the end of the mission. In the Tavern, the game tracks the player's highest star ratings for each mission, so they can challenge themselves to try and earn a 5 stars on every mission.
List of missions
Chocobo Defense
Fovoham's chocobos face poaching on a scale never before seen. If naught is done, their population will fall to levels from which they cannot hope to recover. Please, save the birds from these soulless poachers before the sound of warking is forever lost to the windflats!
Society for the Protection of Endangered Wildfowl
Chocobo Defense is immediately available once Multiplayer Mode is unlocked. The objective is to protect the two guest chocobos. The player has to defeat all enemies to win, but if either of the guest chocobos are KO'd, the player loses.
Template:FFT BI
Chicken Race
We are conducting a test of courage in the form of a fenland race. Should you wish to prove your mettle, join us at your own peril.
Lionheart Adventurers
Chicken Race becomes available in Chapter 2. The objective is to defeat all enemies to win, but if the party is KO'd, the player loses. All enemies are Undead opponents, so the player should use that to their advantage. The area is filled with a poisonous swamp which hinders movement, as any character who stops within it will be inflicted with the Poison status effect.
Template:FFT BI
Treasure Hunt
An item of no small importance appears to have fallen from its wagon sometime during out last journey. Any man, woman, or child who returns it to us before brigands claim it as their own will be handsomely rewarded.
Gallionne Caravans
Treasure Hunt becomes available in Chapter 2. The objective is to either get the treasure chest that is on the opposite side of the map or defeat all enemies. The player will lose when the enemy takes the treasure chest or the player's party is KO'd.
Template:FFT BI
Teioh
Every hunter has heard tell of Teioh, the fastest black chocobo alive. Many a hunter has tried his hand at capturing the elusive bird, but as of yet, none have prevailed. We seek the ones who can.
Fraternal Order of Huntsmen
Teioh becomes available after completing Castled City of Zaland battle. The objective is to KO the black chocobo called Teioh.
Template:FFT BI
Lost Heirloom
Foulest fortune! My most prized family heirloom, Saint Ajora's Tear, was stolen by cowardly rouges. Would that some honorable knights might retrieve it for me! Failing that, dishonorable sellswords would do.
Count Thanes
Lost Heirloom becomes available after completing Goug Lowtown battle. The objective is to defeat all enemies.
Template:FFT BI
The Fete
You are cordially invited to attend our evening fete. Enjoy such hospitality as you have never seen! There will be a rousing performance, with an exhilarating climax just for you. We do so hope you will come.
Swirling Silks Dance Troupe
The Fete becomes available in Chapter 3. The objective is to defeat all enemies.
Template:FFT BI
Desert Minefield
I've a need to cross the desert, but with the abundance of those blasted bombs, I would not dare set foot there alone. I seek a learned guide to escort me on my way.
Govis
Desert Minefield becomes available right after the First Floor of the Monastery Vaults has been completed. The objective is to have Govis reach the other side of the battlefield or eliminates all enemies.
Template:FFT BI
Littering
I am plagued at every hour of the day. Some damnable fools persist in lobbing dangerous items into my courtyard from the overlooking rooftops. Would there were a peaceful solution to the problem, but I fear enlisting the aid of warriors is my only choice.
Count Hattori
Littering becomes available right after the player completes Walled City of Yardrow. The player must defeat all enemies.
Template:FFT BI
Shades of the Past
I am an exorcist attempting to banish spirits with a particularly strong attachment to this world. My every attempt to exorcise them has met with failure, and there is little more I can do. I await men or women capable of dealing with ghosts in a less...sophisticated manner.
Master Sampson
Shades of the Past becomes available in Chapter 4.
Template:FFT BI
The Knights Templar
We seek the strong and pious to serve the gods' will as sworn members of the Knights Templar. Prove your martial prowess by crossing swords with our ranks, and you may well find yourself among them.
Mullonde Church of Glabados
The Knights Templar becomes available after the player completes the Fort Besselat Sluice battle. It is a string of four consecutive battles, with no chance to heal, change equipment or abilities in between the battles.
Template:FFT BI
All-Star Melee
A group of ne'er-do-wells has been terrorizing the city, but such is their strength and cunning that we have yet been unable to quell them. Rich reward awaits those who bring these blackguards to justice.
Gariland City Guard
All-Star Melee becomes available after the player completes the Mullonde Cathedral Sanctuary battle.
Template:FFT BI
The Guarded Temple
There is a temple said to house an artefact of unparalleled value, but the temple's fearsome guardians have foiled all previous attempts to retrieve it. We are in search of stalwart steel to defeat the guardians and claim the holy treasure.
League of Treasure Hunters
The Guarded Temple becomes available after the player beats the game, and saves when the prompted. When the player loads the file back up, this mission will be available in the tavern. Another requirement is the completion of the Nelveska Temple side quest.
Template:FFT BI
Nightmares
I have scary dreams every time I go to sleep. I make water in my beddings and Mother scolds me each morn. Please, make them go away!
Little Jack
Nightmares becomes available after the player beats the game, and saves when the prompted. When the player loads the file back up, this mission will be available in tavern.
Template:FFT BI
Brave Story
The end to this story is not yet written. There are others with roles to play, and their tales, too, can now be told. Come, that I might enlighten you with the truth.
Edell, Orbonne Monastery Gardener
Brave Story becomes available after the player beats the game, and saves when prompted. When the player loads the file back up, this mission will be available in tavern. It is series of ten individual battles. The player does not have the ability to heal in between the battles, or reorganize their battle party. They will automatically be taken to the next battle when the current battle is cleared.
Template:FFT BI
An Ill Wind
An unearthly wind howls through the ruins of Ziekden Fortress, chilling grown men to their marrow. Mayhap it's naught more than superstitious fear, but we offer a reward to any who would investigate nonetheless.
Eagrose Castle Guard
An Ill Wind becomes available after the player beats the game, and saves when prompted. When the player loads the file back up, this mission will be available in tavern.
Template:FFT BI
Items
The items below are found in Rendezvous, but there are also some different multiplayer-only items that are only available in Melee. If the player is playing the iOS version, they will be able to buy the PSP exclusive items by completing the main story once and then visiting a Poachers' Den.
| List of items: |
Etymology
Rendezvous is a French word that means to visit or to meet.