m (→Items) Tag: sourceedit |
No edit summary Tag: sourceedit |
||
| Line 36: | Line 36: | ||
The '''Omega Ruins''', also known as '''Omega Dungeon''' in the [[Menu (Final Fantasy X)|menu]] at the [[Monster Arena]], is a large [[dungeon]] located within a small group of islands to the east of [[Spira]]'s main continent in ''[[Final Fantasy X]]''. Rather maze-like, like [[Inside Sin]], this place must be mapped by the player. Navigating the dark passages, [[Tidus]] and his friends will encounter some of the toughest [[Fiend (Final Fantasy X)|fiends]] in the game, including the [[Master Tonberry (Final Fantasy X)|Master Tonberry]] and [[Great Malboro (Final Fantasy X)|Great Malboro]], while also coming across [[Treasure chest (object)|chests]], which yield some handy (albeit random) treasures. |
The '''Omega Ruins''', also known as '''Omega Dungeon''' in the [[Menu (Final Fantasy X)|menu]] at the [[Monster Arena]], is a large [[dungeon]] located within a small group of islands to the east of [[Spira]]'s main continent in ''[[Final Fantasy X]]''. Rather maze-like, like [[Inside Sin]], this place must be mapped by the player. Navigating the dark passages, [[Tidus]] and his friends will encounter some of the toughest [[Fiend (Final Fantasy X)|fiends]] in the game, including the [[Master Tonberry (Final Fantasy X)|Master Tonberry]] and [[Great Malboro (Final Fantasy X)|Great Malboro]], while also coming across [[Treasure chest (object)|chests]], which yield some handy (albeit random) treasures. |
||
| − | At the end of the cave, two deadly |
+ | At the end of the cave, two deadly [[boss]]es await the party's arrival. |
A traitor to [[Yevon]], [[Omega (Final Fantasy X)|Omega]], was executed for treason centuries ago, his malicious spirit still haunting these ruins. His hatred has turned him into the fiendish [[Omega Weapon (Final Fantasy X)|Omega Weapon]]. His hatred for Yevon was so strong, he also spawned a lesser Weapon: [[Ultima Weapon (Final Fantasy X)|Ultima]]. |
A traitor to [[Yevon]], [[Omega (Final Fantasy X)|Omega]], was executed for treason centuries ago, his malicious spirit still haunting these ruins. His hatred has turned him into the fiendish [[Omega Weapon (Final Fantasy X)|Omega Weapon]]. His hatred for Yevon was so strong, he also spawned a lesser Weapon: [[Ultima Weapon (Final Fantasy X)|Ultima]]. |
||
==Coordinates== |
==Coordinates== |
||
| − | To be unlocked on the [[Fahrenheit|airship]] |
+ | To be unlocked on the [[Fahrenheit|airship]] map, the coordinates 69-75x and 33-38y have to be found using the search function. |
==Items== |
==Items== |
||
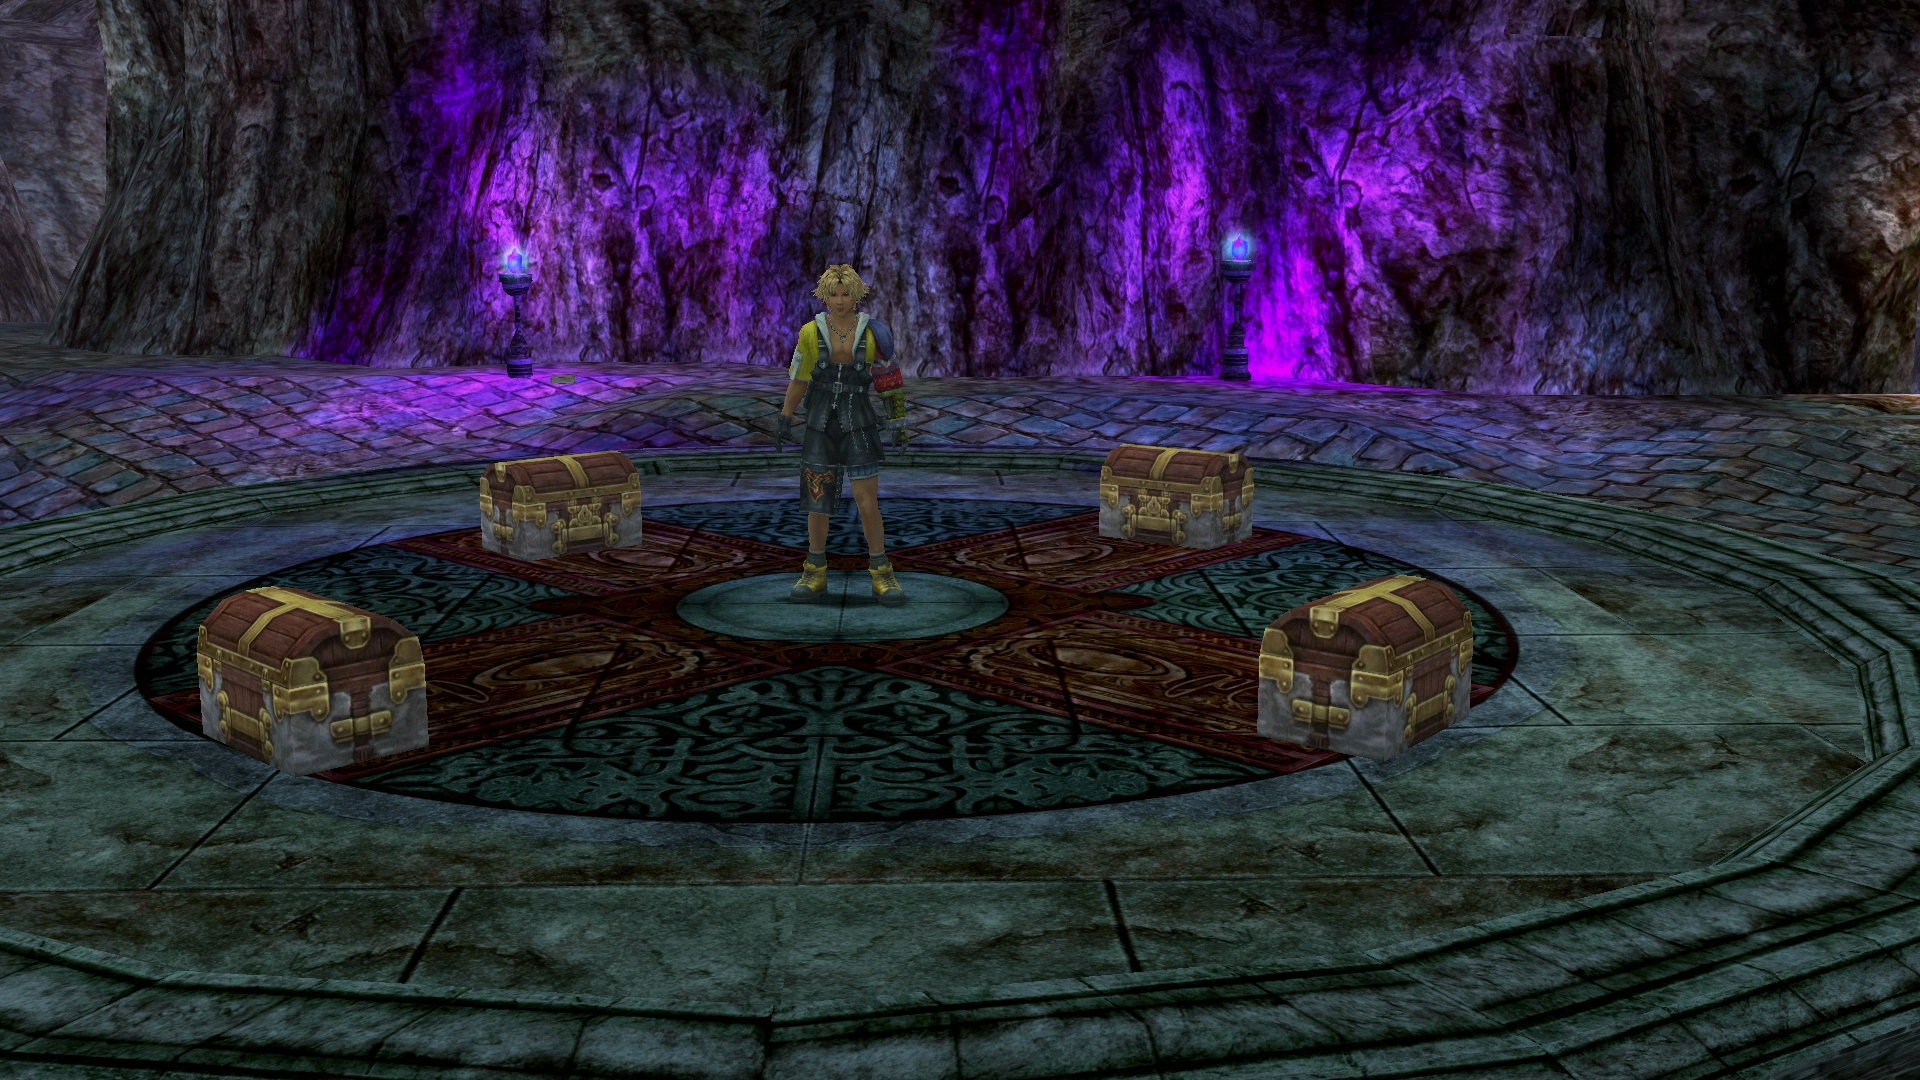
[[File:FFX Omega Ruins.png|thumb|Treasure chests in Omega Ruins, with the final volume of the Al Bhed Primers near the wall.]] |
[[File:FFX Omega Ruins.png|thumb|Treasure chests in Omega Ruins, with the final volume of the Al Bhed Primers near the wall.]] |
||
| − | The treasures are randomly either a treasure or a [[Mimic (Final Fantasy X)|Mimic]]. If the treasure is a Mimic, the nearby chests disappear. If one opens a chest but leaves the chest group, the other chests will disappear even if the |
+ | The treasures are randomly either a treasure or a [[Mimic (Final Fantasy X)|Mimic]]. If the treasure is a Mimic, the nearby chests disappear. If one opens a chest but leaves the chest group, the other chests will disappear even if the Mimic did not appear. The idea is to avoid a Mimic in all four groups to earn 99 [[List of Final Fantasy X items#Warp Sphere|Warp Spheres]]. |
| − | + | The only way to get 99 Warp Spheres is to save the game before entering for the first time due to "RNG" (random number generator) function, which is something else entirely, and not exclusively at the whim of the "random" factors set in-game at Load or by the console. Upon landing at the ruins, the "odds" are set on whether players can succeed at opening every chest, or not (1 chance for success possible in 240 attempts, without guarantee). Saving (anywhere) after visiting Omega Ruins locks in those odds. Once set, they cannot be changed thereafter for that playthrough. The exception is the PC [[Final Fantasy X/X-2 HD Remaster|HD remake]] version, where players can reroll to get the 99 Warp Spheres by using the save in the ruins. |
|
| − | Should one pick wrongly along the way and encounter a Mimic, do a [[ |
+ | Should one pick wrongly along the way and encounter a Mimic, the player should do a [[soft reset]] by reloading the file save and try again. The "timing of opening chests" or "the order in which the player open the chests", do not influence the chance to get 99 Warp Spheres. |
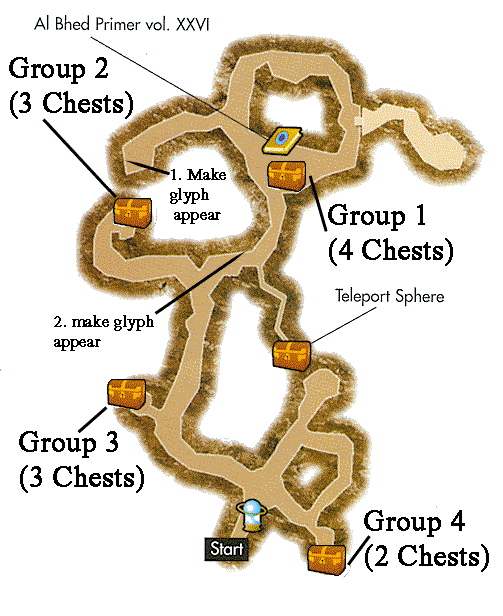
| − | + | It is recommended to use the diagram to get the [[List of Final Fantasy X items#Teleport Sphere|Teleport Sphere]] by activating the glyphs. For that, the player must move to the west corridor from the entrance, follow the path up to a doormat glyph on the wall, head north to find a chamber with four chests, head northwest into a side corridor with another glyph, activate it, and return to the "doormat" one. The glyph is now working and it raises a bridge out to a chest suspended above the central stage. |
|
[[File:Omega ruins.gif|right|200px|Chest locations (Omega Ruins).]] |
[[File:Omega ruins.gif|right|200px|Chest locations (Omega Ruins).]] |
||
| Line 68: | Line 68: | ||
#[[List of Final Fantasy X items#Warp Sphere|Warp Sphere]] x99 |
#[[List of Final Fantasy X items#Warp Sphere|Warp Sphere]] x99 |
||
| − | These are the normal |
+ | These are the normal treasure chests: |
*[[Al Bhed Primer|Al Bhed Primer vol. XXVI]] (near last four treasure chests) |
*[[Al Bhed Primer|Al Bhed Primer vol. XXVI]] (near last four treasure chests) |
||
*[[List of Final Fantasy X items#Teleport Sphere|Teleport Sphere]] (activate the two glyphs) |
*[[List of Final Fantasy X items#Teleport Sphere|Teleport Sphere]] (activate the two glyphs) |
||
Revision as of 00:09, 19 May 2016
Template:Sideicon

Oh, shut up and help me remodel the Omega Ruins page!
- Adding a Locations section, with images and brief descriptions of the areas within the location.
This request can be discussed on the associated discussion page. Remove this notice upon completion.
Template:FFX Location The Omega Ruins, also known as Omega Dungeon in the menu at the Monster Arena, is a large dungeon located within a small group of islands to the east of Spira's main continent in Final Fantasy X. Rather maze-like, like Inside Sin, this place must be mapped by the player. Navigating the dark passages, Tidus and his friends will encounter some of the toughest fiends in the game, including the Master Tonberry and Great Malboro, while also coming across chests, which yield some handy (albeit random) treasures.
At the end of the cave, two deadly bosses await the party's arrival.
A traitor to Yevon, Omega, was executed for treason centuries ago, his malicious spirit still haunting these ruins. His hatred has turned him into the fiendish Omega Weapon. His hatred for Yevon was so strong, he also spawned a lesser Weapon: Ultima.
Coordinates
To be unlocked on the airship map, the coordinates 69-75x and 33-38y have to be found using the search function.
Items
Treasure chests in Omega Ruins, with the final volume of the Al Bhed Primers near the wall.
The treasures are randomly either a treasure or a Mimic. If the treasure is a Mimic, the nearby chests disappear. If one opens a chest but leaves the chest group, the other chests will disappear even if the Mimic did not appear. The idea is to avoid a Mimic in all four groups to earn 99 Warp Spheres.
The only way to get 99 Warp Spheres is to save the game before entering for the first time due to "RNG" (random number generator) function, which is something else entirely, and not exclusively at the whim of the "random" factors set in-game at Load or by the console. Upon landing at the ruins, the "odds" are set on whether players can succeed at opening every chest, or not (1 chance for success possible in 240 attempts, without guarantee). Saving (anywhere) after visiting Omega Ruins locks in those odds. Once set, they cannot be changed thereafter for that playthrough. The exception is the PC HD remake version, where players can reroll to get the 99 Warp Spheres by using the save in the ruins.
Should one pick wrongly along the way and encounter a Mimic, the player should do a soft reset by reloading the file save and try again. The "timing of opening chests" or "the order in which the player open the chests", do not influence the chance to get 99 Warp Spheres.
It is recommended to use the diagram to get the Teleport Sphere by activating the glyphs. For that, the player must move to the west corridor from the entrance, follow the path up to a doormat glyph on the wall, head north to find a chamber with four chests, head northwest into a side corridor with another glyph, activate it, and return to the "doormat" one. The glyph is now working and it raises a bridge out to a chest suspended above the central stage.
The chests contain the following items:
- Lv. 4 Key Sphere
- Defending Bracer
- Turnover
- Lv. 3 Key Sphere x2
- Defending Armlet
- Friend Sphere x2
- Lv. 4 Key Sphere
- Phantom Ring
- Cactuar Wizard
- Warmonger
- Teleport Sphere x2
- Warp Sphere x99
These are the normal treasure chests:
- Al Bhed Primer vol. XXVI (near last four treasure chests)
- Teleport Sphere (activate the two glyphs)
- Friend Sphere
- Magic Sphere (return to where Omega Weapon was fought after his defeat)
Enemies
- Zaurus, ???
- Zaurus, ??? (Ruminant Mimic)
- Zaurus, ??? (Mech Mimic)
- Zaurus, ??? (Roc Mimic)
- Zaurus, ??? (Basilisk Mimic)
- Zaurus x2, Floating Death
- Master Coeurl x2, Floating Death
- Black Element x2, Spirit
- Halma x2, Spirit
- Machea x2
- Puroboros x3
- Defender Z x2
- Adamantoise
- Wraith
- Demonolith x2
- Varuna
- Great Malboro (always Ambush battle)
- Master Tonberry
- Ultima Weapon (Boss)
- Before defeating Omega Weapon
Note: In each of nine circular platforms (except the first) there will be a fight. If the player leaves the area and returns, all battles in each circular platform will be reset.
- Defender Z x2
- Adamantoise
- Demonolith x2
- Varuna
- Great Malboro (always Ambush battle)
- Master Tonberry
- Wraith x2, ???
- Gemini (sword), Gemini (club)
- Omega Weapon (Boss)
- After defeating Omega Weapon
- Puroboros x3
- Defender Z x2
- Demonolith x2
- Varuna
- Great Malboro (always Ambush battle)
- Master Tonberry
- Gemini (sword), Gemini (club)
Musical themes
Template:Listen
The theme that plays in the exterior of the Omega Ruins is "Beyond the Darkness". "Gloom" plays while in the Ruins.
Gallery
Template:Gallery
Template:FFX Template:Sidequests