mNo edit summary Tag: sourceedit |
No edit summary |
||
| (44 intermediate revisions by 9 users not shown) | |||
| Line 1: | Line 1: | ||
| − | {{sideicon|FFXII}} |
+ | {{sideicon|prime=FFXII|FFBE}} |
| − | {{Expand|Adding a Locations section, with images and brief descriptions of the areas within the location}} |
+ | {{Expand|FFXII|FFXII|Adding a Locations section, with images and brief descriptions of the areas within the location}} |
| + | {{infobox location |
||
| − | [[File:Namyensa.jpg|250px|right|thumb|Nam-Yensa Sandsea.]] |
||
| + | |name=Nam-Yensa Sandsea |
||
| − | The '''Nam-Yensa Sandsea''' {{J|大砂海ナム・エンサ|Dai Sakai Namu Ensa}} is a location in the land of [[Ivalice (Final Fantasy XII)|Ivalice]] in ''[[Final Fantasy XII]]''. Just west of the [[Ogir-Yensa Sandsea]], it is the only way to access [[Tomb of Raithwall]]. |
||
| + | |release=FFXII |
||
| + | |japanese=大砂海ナム・エンサ |
||
| + | |romaji=Dai Sakai Namu Ensa |
||
| + | |lit= |
||
| + | |image=Namyensa.jpg |
||
| + | |type=[[Desert (location)|Desert]] |
||
| + | |region=[[Jagd Yensa]] |
||
| + | |items=*[[#Treasures|Treasures]] |
||
| + | *Many found in [[#Shops|shops]] |
||
| + | |enemies=*[[Alraune (Final Fantasy XII)|Alraune]] |
||
| + | *[[Danbania]] (Docile) |
||
| + | *[[Urutan-Yensa]] |
||
| + | *[[Yensa]] |
||
| + | *[[Axebeak (Final Fantasy XII)|Axebeak]] |
||
| + | *[[Bagoly (Final Fantasy XII)|Bagoly]] |
||
| + | *[[Bull Danbania]] (Docile) |
||
| + | *[[Bull Yensa]] |
||
| + | *[[Wyvern (Final Fantasy XII)|Wyvern]] |
||
| + | *[[Urutan Eater]] (Optional Event Boss) |
||
| + | *Rares and Hunts |
||
| + | |quests=*[[#Hunts|Hunts]]: [[Wyvern Lord]], [[Belito]] |
||
| + | *[[#Rare Game|Rare Game]]: [[Megabomb]], [[Imdugud (Final Fantasy XII)|Imdugud]], [[Victanir]] |
||
| + | }} |
||
| + | The '''Nam-Yensa Sandsea''' is a location in the land of [[Ivalice (Final Fantasy XII)|Ivalice]] in ''[[Final Fantasy XII]]''. Just west of the [[Ogir-Yensa Sandsea]], it is the only way to access [[Tomb of Raithwall]]. |
||
| − | ==[[Sage Knowledge]]== |
+ | == [[Sage Knowledge]] == |
| − | {{ |
+ | {{Quote|The desert in the west of the Jagd Yensa. Fine sand beats in waves against the feet of the rolling dunes of this region which, together with the Ogir-Yensa Sandsea, is called the Great Yensan Sandsea. To the west of the Nam-Yensa lies the gorge known as the Valley of the Dead, so called because it has been the scene of many an ill-starred adventurer's demise.|Sage Knowledge 50, Nam-Yensa Sandsea}} |
| + | |||
| + | == Story == |
||
| + | {{spoiler}} |
||
| + | [[File:Queen of the Urutan.jpg|thumb|250px|Queen of the Urutan.]] |
||
| + | While trekking across the Sandsea towards the Tomb of Raithwall, [[Vaan]] and the party encounter a Sandsea [[Moogle (race)|Moogle]] who claims a Urutan-Yensa had asked for help in defeating their blood-enemy, the [[Urutan Eater]], and in exchange is ready to reward them with a treasure. The party searches through the Nam-Yensa Sandsea where they find a group of Urutan-Yensa fighting the Titantoise, and proceeds to defeat it. |
||
| + | |||
| + | When they return to the Sandsea Moogle, he says the Urutan wants to give a reward, but they need to find him. The party searches for the Urutan, and stumble upon a rare gathering of Urutan-Yensa. There, they find the one asking for help being tried for shaming the community by asking help from outsiders. The Queen of the Urutan "condemns him to dust", and the Urutan burns and vanishes. |
||
| + | |||
| + | The Sandsea Moogle tries to plead his case, but the Queen warns the moogle she might have punished him too, though merciful that she is, the Queen spares his life. Once the Urutans leave, the moogle notices a rare flower blossoming. He believes this is the treasure the rogue Urutan-Yensa had wanted to show them; a flower that is detested by the [[Garuda (Final Fantasy XII)|Garuda]] for its smell. The party picks some Eksir Berries from the "Rogue Urutan Flower", and continue their journey. |
||
| + | {{endspoiler}} |
||
| − | == |
+ | == Locations == |
The Nam-Yensa Sandsea is located to the west of the Ogir-Yensa Sandsea, in the [[Jagd Yensa]] region. To the west in the Valley of the Dead lies the Tomb of Raithwall. |
The Nam-Yensa Sandsea is located to the west of the Ogir-Yensa Sandsea, in the [[Jagd Yensa]] region. To the west in the Valley of the Dead lies the Tomb of Raithwall. |
||
| − | *The Sandscale Bank (to the Ogir-Yensa Sandsea) |
+ | * The Sandscale Bank (to the Ogir-Yensa Sandsea) |
| − | *The Urutan-Yensa Sea |
+ | * The Urutan-Yensa Sea |
| − | *Withering Shores (enter additional area from Zertinan Caverns) |
+ | * Withering Shores (enter additional area from Zertinan Caverns) |
| − | *Augur Hill (to the Ogir-Yensa Sandsea) |
+ | * Augur Hill (to the Ogir-Yensa Sandsea) |
| − | *Yellow Sands (to Zertinan Caverns) |
+ | * Yellow Sands (to Zertinan Caverns) |
| − | *Demesne of the Sandqueen |
+ | * Demesne of the Sandqueen |
| − | *Trail of Fading Warmth (to the Tomb of Raithwall) |
+ | * Trail of Fading Warmth (to the Tomb of Raithwall) |
| − | *Simoon Bluff |
+ | * Simoon Bluff |
| − | {{ |
+ | {{Location section|Final Fantasy XII}} |
| − | ===[[Weather]]=== |
+ | === [[Weather]] === |
There are two possible weather conditions in Nam-Yensa Sandsea: |
There are two possible weather conditions in Nam-Yensa Sandsea: |
||
| − | *Sunny |
+ | * Sunny |
| − | *Cloudy (dust is blown in the air, sky is discolored) |
+ | * Cloudy (dust is blown in the air, sky is discolored) |
The Nam-Yensa Sandsea is of sand terrain, which makes all [[Earth (element)|Earth]] attacks 20% more powerful than usual. |
The Nam-Yensa Sandsea is of sand terrain, which makes all [[Earth (element)|Earth]] attacks 20% more powerful than usual. |
||
| − | == |
+ | == Treasures == |
| − | {{See |
+ | {{See|Treasure (Final Fantasy XII)}} |
| + | Treasures that always spawn are [[Balance]], [[Embroidered Tippet]] and [[Turtleshell Choker]]. |
||
| − | Unlike in most areas, plenty of different equipment can be found in randomly spawning treasures in the Nam-Yensa region. Recovery items, such as [[List of Final Fantasy XII items#Potion|Potions]], [[List of Final Fantasy XII items#Hi-Potion|Hi-Potions]] and [[List of Final Fantasy XII items#Ether|Ethers]] are also common. With the [[List of Final Fantasy XII accessories#Diamond Armlet|Diamond Armlet]] equipped the common item treasure is Knot of Rust, and the rare item is [[List of Final Fantasy XII items#Elixir|Elixir]] or Holy Mote. |
||
| − | + | Unlike in most areas, plenty of different equipment can be found in randomly spawning treasures in the Nam-Yensa region. Recovery items, such as [[Final Fantasy XII items#Potion|Potions]], [[Final Fantasy XII items#Hi-Potion|Hi-Potions]] and [[Final Fantasy XII items#Ether|Ethers]] are also common. With the [[Final Fantasy XII accessories#Diamond Armlet|Diamond Armlet]] equipped the common item treasure is Knot of Rust, and the rare item is [[Final Fantasy XII items#Elixir|Elixir]] or Holy Mote. |
|
| − | In the |
+ | In the Augur Hill region the treasure that spawns nearest to the exit to Ogir-Yensa may contain the [[Final Fantasy XII armor#Iron Helm|Iron Helm]] and the treasure a bit to the west and north from that can be the dagger [[Chopper (Final Fantasy XII)|Chopper]]. The treasure on the little "island" in the middle of the area can be the [[Final Fantasy XII accessories#Leather Gorget|Leather Gorget]]. |
| − | + | In the Urutan Yensa Sea area, the Chopper can again be found in a treasure and the treasure in the section furthest to the east of the map may have the [[Final Fantasy XII armor#Lambent Hat|Lambent Hat]]. The westernmost treasure in the Yellow Sands area can have the [[Killer Bow (Final Fantasy XII)|Killer Bow]]. The dead-end bit at the Demesne of the Sand Queen may have the [[Final Fantasy XII armor#Iron Armor|Iron Armor]]. In Simoon Bluff, there is an oil rig to the west of the entrance to the area. |
|
| − | + | At the very end there are two treasures that can spawn, and can have the [[Cypress Pole (Final Fantasy XII)|Cypress Pole]] and [[Final Fantasy XII accessories#Amber Armlet|Amber Armlet]] in them. [[Wizard's Staff (Final Fantasy XII)|Wizard's Staff]] may be found in the treasure on the ground next to the oil rig, and the treasure in the westernmost section can be the [[Final Fantasy XII armor#Windbreaker|Windbreaker]]. The treasure in the northeastern section is always the gambit for Foe: flying, unless it is [[gil]]. |
|
| + | The Withering Shores is an area which can only be accessed from the [[Zertinan Caverns]]. The treasure that spawns randomly nearest to the entrance to the cave, is either [[Final Fantasy XII accessories#Argyle Armlet|Argyle Armlet]] or the [[Ancient Sword (Final Fantasy XII)|Ancient Sword]] if the treasure is items rather than gil. The treasure on the stairs leading up is 90% gil, but if it is items, it can be an Elixir. The treasure at the very top can be [[Final Fantasy XII accessories#Rose Corsage|Rose Corsage]] or [[Vega (Final Fantasy XII)|Vega]]. |
||
| − | ====The Urutan-Yensa Sea==== |
||
| + | |||
| − | <div class="tabber"> |
||
| + | === The Urutan-Yensa Sea === |
||
| − | <div class="tabbertab" title="FFXII"> |
||
| + | ;Zodiac |
||
| − | {|class="full-width FFXII table" style="text-align:center" |
||
| + | {|class="full-width FFXII article-table" style="text-align:center" |
||
| − | |-class="a" |
||
| − | !style="width:20%"|Chest |
||
| − | !style="width:10%"|Spawns |
||
| − | !style="width:10%"|Holds Gil% |
||
| − | !style="width:30%" colspan="3"|Normal Treasure |
||
| − | !style="width:30%" colspan="3"|Diamond Armlet Treasure |
||
| − | |- |
||
| − | |class="b" rowspan="2"|1 |
||
| − | |rowspan="2"|75% |
||
| − | |rowspan="2"|50% |
||
| − | |class="a" width="10%"|Gil |
||
| − | |class="a" width="10%"|Item 1 |
||
| − | |class="a" width="10%"|Item 2 |
||
| − | |class="a" width="10%"|Gil |
||
| − | |class="a" width="10%"|Common |
||
| − | |class="a" width="10%"|Rare |
||
| − | |- |
||
| − | |≤ 150 gil |
||
| − | |Potion |
||
| − | |[[List of Final Fantasy XII armor#Lambent Hat|Lambent Hat]] |
||
| − | |≤ 600 gil |
||
| − | |Knot of Rust |
||
| − | |Elixir |
||
| − | |- |
||
| − | |class="b" rowspan="2"|2 |
||
| − | |rowspan="2"|75% |
||
| − | |rowspan="2"|50% |
||
| − | |class="a" width="10%"|Gil |
||
| − | |class="a" width="10%"|Item 1 |
||
| − | |class="a" width="10%"|Item 2 |
||
| − | |class="a" width="10%"|Gil |
||
| − | |class="a" width="10%"|Common |
||
| − | |class="a" width="10%"|Rare |
||
| − | |- |
||
| − | |≤ 160 gil |
||
| − | |Phoenix Down |
||
| − | |[[List of Final Fantasy XII weapons#Chopper|Chopper]] |
||
| − | |≤ 800 gil |
||
| − | |Knot of Rust |
||
| − | |Elixir |
||
| − | |- |
||
| − | |class="b" rowspan="2"|3 |
||
| − | |rowspan="2"|83% |
||
| − | |rowspan="2"|45% |
||
| − | |class="a" width="10%"|Gil |
||
| − | |class="a" width="10%"|Item 1 |
||
| − | |class="a" width="10%"|Item 2 |
||
| − | |class="a" width="10%"|Gil |
||
| − | |class="a" width="10%"|Common |
||
| − | |class="a" width="10%"|Rare |
||
| − | |- |
||
| − | |≤ 300 gil |
||
| − | |Potion |
||
| − | |Ether |
||
| − | |≤ 900 gil |
||
| − | |Knot of Rust |
||
| − | |Holy Mote |
||
| − | |}</div> |
||
| − | <div class="tabbertab" title="IZJS"> |
||
| − | {|class="full-width FFXII table" style="text-align:center" |
||
|-class="a" |
|-class="a" |
||
!style="width:20%"|Chest |
!style="width:20%"|Chest |
||
| Line 177: | Line 152: | ||
|- |
|- |
||
|Hi-Potion |
|Hi-Potion |
||
| − | |[[ |
+ | |[[Heavy Lance (Final Fantasy XII)|Heavy Lance]] |
|Knot of Rust |
|Knot of Rust |
||
|Meteorite (A) |
|Meteorite (A) |
||
| Line 208: | Line 183: | ||
|Knot of Rust |
|Knot of Rust |
||
|Meteorite (A) |
|Meteorite (A) |
||
| + | |} |
||
| − | |}</div></div> |
||
| + | ;Original |
||
| − | |||
| + | {|class="full-width FFXII article-table" style="text-align:center" |
||
| − | ====Withering Shores==== |
||
| − | <div class="tabber"> |
||
| − | <div class="tabbertab" title="FFXII"> |
||
| − | {|class="full-width FFXII table" style="text-align:center" |
||
|-class="a" |
|-class="a" |
||
!style="width:20%"|Chest |
!style="width:20%"|Chest |
||
| Line 221: | Line 193: | ||
!style="width:30%" colspan="3"|Diamond Armlet Treasure |
!style="width:30%" colspan="3"|Diamond Armlet Treasure |
||
|- |
|- |
||
| − | |class="b" rowspan="2"| |
+ | |class="b" rowspan="2"|1 |
| − | |rowspan="2"| |
+ | |rowspan="2"|75% |
|rowspan="2"|50% |
|rowspan="2"|50% |
||
|class="a" width="10%"|Gil |
|class="a" width="10%"|Gil |
||
| Line 231: | Line 203: | ||
|class="a" width="10%"|Rare |
|class="a" width="10%"|Rare |
||
|- |
|- |
||
| − | |≤ |
+ | |≤ 150 gil |
| + | |Potion |
||
| − | |[[List of Final Fantasy XII accessories#Argyle Armlet|Argyle Armlet]] |
||
| − | |[[ |
+ | |[[Final Fantasy XII armor#Lambent Hat|Lambent Hat]] |
| − | |≤ |
+ | |≤ 600 gil |
|Knot of Rust |
|Knot of Rust |
||
|Elixir |
|Elixir |
||
|- |
|- |
||
| − | |class="b" rowspan="2"| |
+ | |class="b" rowspan="2"|2 |
| − | |rowspan="2"| |
+ | |rowspan="2"|75% |
| − | |rowspan="2"| |
+ | |rowspan="2"|50% |
|class="a" width="10%"|Gil |
|class="a" width="10%"|Gil |
||
|class="a" width="10%"|Item 1 |
|class="a" width="10%"|Item 1 |
||
| Line 248: | Line 220: | ||
|class="a" width="10%"|Rare |
|class="a" width="10%"|Rare |
||
|- |
|- |
||
| − | |≤ |
+ | |≤ 160 gil |
| + | |Phoenix Down |
||
| − | |Hi-Potion |
||
| + | |[[Chopper (Final Fantasy XII)|Chopper]] |
||
| − | |Elixir |
||
| − | |≤ |
+ | |≤ 800 gil |
|Knot of Rust |
|Knot of Rust |
||
| + | |Elixir |
||
| − | |Holy Mote |
||
|- |
|- |
||
| − | |class="b" rowspan="2"| |
+ | |class="b" rowspan="2"|3 |
| − | |rowspan="2"| |
+ | |rowspan="2"|83% |
| − | |rowspan="2"| |
+ | |rowspan="2"|45% |
|class="a" width="10%"|Gil |
|class="a" width="10%"|Gil |
||
|class="a" width="10%"|Item 1 |
|class="a" width="10%"|Item 1 |
||
| Line 265: | Line 237: | ||
|class="a" width="10%"|Rare |
|class="a" width="10%"|Rare |
||
|- |
|- |
||
| − | |≤ 100 gil |
||
| − | |[[List of Final Fantasy XII accessories#Rose Corsage|Rose Corsage]] |
||
| − | |[[List of Final Fantasy XII weapons#Vega|Vega]] |
||
|≤ 300 gil |
|≤ 300 gil |
||
| + | |Potion |
||
| + | |Ether |
||
| + | |≤ 900 gil |
||
|Knot of Rust |
|Knot of Rust |
||
| + | |Holy Mote |
||
| − | |Elixir |
||
| − | |} |
+ | |} |
| + | {{clear}} |
||
| − | <div class="tabbertab" title="IZJS"> |
||
| + | === Withering Shores === |
||
| − | {|class="full-width FFXII table" style="text-align:center" |
||
| + | ;Zodiac |
||
| + | {|class="full-width FFXII article-table" style="text-align:center" |
||
|-class="a" |
|-class="a" |
||
!style="width:20%"|Chest |
!style="width:20%"|Chest |
||
| Line 334: | Line 308: | ||
|- |
|- |
||
|Hi-Ether |
|Hi-Ether |
||
| − | |[[ |
+ | |[[Final Fantasy XII armor#Winged Helm|Winged Helm]] |
|Knot of Rust |
|Knot of Rust |
||
|Meteorite (A) |
|Meteorite (A) |
||
| Line 348: | Line 322: | ||
|- |
|- |
||
|Hi-Ether |
|Hi-Ether |
||
| − | |[[ |
+ | |[[Final Fantasy XII armor#Chainmail|Chainmail]] |
|Knot of Rust |
|Knot of Rust |
||
|Meteorite (A) |
|Meteorite (A) |
||
| Line 356: | Line 330: | ||
|0% |
|0% |
||
|N/A |
|N/A |
||
| − | |colspan="4"|[[ |
+ | |colspan="4"|[[Final Fantasy XII accessories#Turtleshell Choker|Turtleshell Choker]] |
|} |
|} |
||
| − | *'''''{{A|1}}''''' - Chest does not respawn. |
+ | * '''''{{A|1}}''''' - Chest does not respawn. |
| + | ;Original |
||
| − | |||
| + | {|class="full-width FFXII article-table" style="text-align:center" |
||
| − | ====Augur Hill==== |
||
| − | <div class="tabber"> |
||
| − | <div class="tabbertab" title="FFXII"> |
||
| − | {|class="full-width FFXII table" style="text-align:center" |
||
|-class="a" |
|-class="a" |
||
!style="width:20%"|Chest |
!style="width:20%"|Chest |
||
| Line 371: | Line 342: | ||
!style="width:30%" colspan="3"|Diamond Armlet Treasure |
!style="width:30%" colspan="3"|Diamond Armlet Treasure |
||
|- |
|- |
||
| − | |class="b" rowspan="2"| |
+ | |class="b" rowspan="2"|4 |
|rowspan="2"|65% |
|rowspan="2"|65% |
||
| − | |rowspan="2"| |
+ | |rowspan="2"|50% |
|class="a" width="10%"|Gil |
|class="a" width="10%"|Gil |
||
|class="a" width="10%"|Item 1 |
|class="a" width="10%"|Item 1 |
||
| Line 382: | Line 353: | ||
|- |
|- |
||
|≤ 100 gil |
|≤ 100 gil |
||
| + | |[[Final Fantasy XII accessories#Argyle Armlet|Argyle Armlet]] |
||
| − | |Ether |
||
| − | |[[ |
+ | |[[Ancient Sword (Final Fantasy XII)|Ancient Sword]] |
|≤ 300 gil |
|≤ 300 gil |
||
|Knot of Rust |
|Knot of Rust |
||
|Elixir |
|Elixir |
||
|- |
|- |
||
| − | |class="b" rowspan="2"| |
+ | |class="b" rowspan="2"|5 |
| − | |rowspan="2"| |
+ | |rowspan="2"|77% |
| − | |rowspan="2"| |
+ | |rowspan="2"|90% |
|class="a" width="10%"|Gil |
|class="a" width="10%"|Gil |
||
|class="a" width="10%"|Item 1 |
|class="a" width="10%"|Item 1 |
||
| Line 398: | Line 369: | ||
|class="a" width="10%"|Rare |
|class="a" width="10%"|Rare |
||
|- |
|- |
||
| − | |≤ |
+ | |≤ 700 gil |
| − | |Potion |
+ | |Hi-Potion |
| − | |[[List of Final Fantasy XII weapons#Chopper|Chopper]] |
||
| − | |≤ 300 gil |
||
| − | |Knot of Rust |
||
|Elixir |
|Elixir |
||
| + | |≤ 2,200 gil |
||
| − | |- |
||
| − | |class="b" rowspan="2"|9 |
||
| − | |rowspan="2"|80% |
||
| − | |rowspan="2"|35% |
||
| − | |class="a" width="10%"|Gil |
||
| − | |class="a" width="10%"|Item 1 |
||
| − | |class="a" width="10%"|Item 2 |
||
| − | |class="a" width="10%"|Gil |
||
| − | |class="a" width="10%"|Common |
||
| − | |class="a" width="10%"|Rare |
||
| − | |- |
||
| − | |≤ 300 gil |
||
| − | |Phoenix Down |
||
| − | |Ether |
||
| − | |≤ 500 gil |
||
|Knot of Rust |
|Knot of Rust |
||
|Holy Mote |
|Holy Mote |
||
|- |
|- |
||
| − | |class="b" rowspan="2"| |
+ | |class="b" rowspan="2"|6 |
| − | |rowspan="2"|80% |
||
| − | |rowspan="2"|30% |
||
| − | |class="a" width="10%"|Gil |
||
| − | |class="a" width="10%"|Item 1 |
||
| − | |class="a" width="10%"|Item 2 |
||
| − | |class="a" width="10%"|Gil |
||
| − | |class="a" width="10%"|Common |
||
| − | |class="a" width="10%"|Rare |
||
| − | |- |
||
| − | |≤ 290 gil |
||
| − | |Potion |
||
| − | |G-Ally: status = SLE |
||
| − | |≤ 600 gil |
||
| − | |Knot of Rust |
||
| − | |Elixir |
||
| − | |- |
||
| − | |class="b" rowspan="2"|11 |
||
| − | |rowspan="2"|80% |
||
| − | |rowspan="2"|35% |
||
| − | |class="a" width="10%"|Gil |
||
| − | |class="a" width="10%"|Item 1 |
||
| − | |class="a" width="10%"|Item 2 |
||
| − | |class="a" width="10%"|Gil |
||
| − | |class="a" width="10%"|Common |
||
| − | |class="a" width="10%"|Rare |
||
| − | |- |
||
| − | |≤ 150 gil |
||
| − | |Hi-Potion |
||
| − | |[[List of Final Fantasy XII accessories#Leather Gorget|Leather Gorget]] |
||
| − | |≤ 800 gil |
||
| − | |Knot of Rust |
||
| − | |Elixir |
||
| − | |- |
||
| − | |class="b" rowspan="2"|12 |
||
| − | |rowspan="2"|80% |
||
|rowspan="2"|60% |
|rowspan="2"|60% |
||
| + | |rowspan="2"|55% |
||
|class="a" width="10%"|Gil |
|class="a" width="10%"|Gil |
||
|class="a" width="10%"|Item 1 |
|class="a" width="10%"|Item 1 |
||
| Line 466: | Line 386: | ||
|class="a" width="10%"|Rare |
|class="a" width="10%"|Rare |
||
|- |
|- |
||
| − | |≤ |
+ | |≤ 100 gil |
| + | |[[Final Fantasy XII accessories#Rose Corsage|Rose Corsage]] |
||
| − | |Potion |
||
| + | |[[Vega (Final Fantasy XII)|Vega]] |
||
| − | |Reflectga Mote |
||
| − | |≤ |
+ | |≤ 300 gil |
|Knot of Rust |
|Knot of Rust |
||
| + | |Elixir |
||
| − | |Holy Mote |
||
| − | |} |
+ | |} |
| + | |||
| − | <div class="tabbertab" title="IZJS"> |
||
| + | === Augur Hill === |
||
| − | {|class="full-width FFXII table" style="text-align:center" |
||
| + | ;Zodiac |
||
| + | {|class="full-width FFXII article-table" style="text-align:center" |
||
|-class="a" |
|-class="a" |
||
!style="width:20%"|Chest |
!style="width:20%"|Chest |
||
| Line 602: | Line 524: | ||
|Knot of Rust |
|Knot of Rust |
||
|Meteorite (B) |
|Meteorite (B) |
||
| + | |} |
||
| − | |}</div></div> |
||
| + | ;Original |
||
| − | |||
| + | {|class="full-width FFXII article-table" style="text-align:center" |
||
| − | ====Yellow Sands==== |
||
| − | <div class="tabber"> |
||
| − | <div class="tabbertab" title="FFXII"> |
||
| − | {|class="full-width FFXII table" style="text-align:center" |
||
|-class="a" |
|-class="a" |
||
!style="width:20%"|Chest |
!style="width:20%"|Chest |
||
| Line 615: | Line 534: | ||
!style="width:30%" colspan="3"|Diamond Armlet Treasure |
!style="width:30%" colspan="3"|Diamond Armlet Treasure |
||
|- |
|- |
||
| − | |class="b" rowspan="2"| |
+ | |class="b" rowspan="2"|7 |
| − | |rowspan="2"| |
+ | |rowspan="2"|65% |
|rowspan="2"|40% |
|rowspan="2"|40% |
||
|class="a" width="10%"|Gil |
|class="a" width="10%"|Gil |
||
| Line 625: | Line 544: | ||
|class="a" width="10%"|Rare |
|class="a" width="10%"|Rare |
||
|- |
|- |
||
| − | |≤ |
+ | |≤ 100 gil |
| + | |Ether |
||
| − | |Hi-Potion |
||
| − | |[[ |
+ | |[[Final Fantasy XII armor#Iron Helm|Iron Helm]] |
| − | |≤ |
+ | |≤ 300 gil |
|Knot of Rust |
|Knot of Rust |
||
|Elixir |
|Elixir |
||
|- |
|- |
||
| − | |class="b" rowspan="2"| |
+ | |class="b" rowspan="2"|8 |
| − | |rowspan="2"| |
+ | |rowspan="2"|65% |
| − | |rowspan="2"| |
+ | |rowspan="2"|40% |
|class="a" width="10%"|Gil |
|class="a" width="10%"|Gil |
||
|class="a" width="10%"|Item 1 |
|class="a" width="10%"|Item 1 |
||
| Line 644: | Line 563: | ||
|≤ 100 gil |
|≤ 100 gil |
||
|Potion |
|Potion |
||
| + | |[[Chopper (Final Fantasy XII)|Chopper]] |
||
| − | |Balance Mote |
||
| − | |≤ |
+ | |≤ 300 gil |
|Knot of Rust |
|Knot of Rust |
||
|Elixir |
|Elixir |
||
|- |
|- |
||
| − | |class="b" rowspan="2"| |
+ | |class="b" rowspan="2"|9 |
| − | |rowspan="2"| |
+ | |rowspan="2"|80% |
| − | |rowspan="2"| |
+ | |rowspan="2"|35% |
|class="a" width="10%"|Gil |
|class="a" width="10%"|Gil |
||
|class="a" width="10%"|Item 1 |
|class="a" width="10%"|Item 1 |
||
| Line 660: | Line 579: | ||
|- |
|- |
||
|≤ 300 gil |
|≤ 300 gil |
||
| + | |Phoenix Down |
||
| − | |G-Foe: flying |
||
| + | |Ether |
||
| − | |G-Foe: HP >= 1000 |
||
| − | |≤ |
+ | |≤ 500 gil |
|Knot of Rust |
|Knot of Rust |
||
| + | |Holy Mote |
||
| − | |Elixir |
||
|- |
|- |
||
| − | |class="b" rowspan="2"| |
+ | |class="b" rowspan="2"|10 |
| − | |rowspan="2"| |
+ | |rowspan="2"|80% |
| − | |rowspan="2"| |
+ | |rowspan="2"|30% |
|class="a" width="10%"|Gil |
|class="a" width="10%"|Gil |
||
|class="a" width="10%"|Item 1 |
|class="a" width="10%"|Item 1 |
||
| Line 676: | Line 595: | ||
|class="a" width="10%"|Rare |
|class="a" width="10%"|Rare |
||
|- |
|- |
||
| − | |≤ |
+ | |≤ 290 gil |
|Potion |
|Potion |
||
| + | |G-Ally: status = SLE |
||
| − | |Ether |
||
| − | |≤ |
+ | |≤ 600 gil |
|Knot of Rust |
|Knot of Rust |
||
| + | |Elixir |
||
| − | |Holy Mote |
||
|- |
|- |
||
| − | |class="b" rowspan="2"| |
+ | |class="b" rowspan="2"|11 |
| − | |rowspan="2"| |
+ | |rowspan="2"|80% |
| − | |rowspan="2"| |
+ | |rowspan="2"|35% |
|class="a" width="10%"|Gil |
|class="a" width="10%"|Gil |
||
|class="a" width="10%"|Item 1 |
|class="a" width="10%"|Item 1 |
||
| Line 694: | Line 613: | ||
|- |
|- |
||
|≤ 150 gil |
|≤ 150 gil |
||
| − | |Potion |
+ | |Hi-Potion |
| + | |[[Final Fantasy XII accessories#Leather Gorget|Leather Gorget]] |
||
| − | |Handkerchief |
||
| − | |≤ |
+ | |≤ 800 gil |
|Knot of Rust |
|Knot of Rust |
||
| + | |Elixir |
||
| − | |Hi-Ether |
||
|- |
|- |
||
| − | |class="b" rowspan="2"| |
+ | |class="b" rowspan="2"|12 |
| − | |rowspan="2"| |
+ | |rowspan="2"|80% |
| − | |rowspan="2"| |
+ | |rowspan="2"|60% |
|class="a" width="10%"|Gil |
|class="a" width="10%"|Gil |
||
|class="a" width="10%"|Item 1 |
|class="a" width="10%"|Item 1 |
||
| Line 710: | Line 629: | ||
|class="a" width="10%"|Rare |
|class="a" width="10%"|Rare |
||
|- |
|- |
||
| − | |≤ |
+ | |≤ 400 gil |
|Potion |
|Potion |
||
| + | |Reflectga Mote |
||
| − | |Echo Herbs |
||
| − | |≤ |
+ | |≤ 1,000 gil |
|Knot of Rust |
|Knot of Rust |
||
| + | |Holy Mote |
||
| − | |Hi-Ether |
||
| − | |} |
+ | |} |
| + | {{clear}} |
||
| − | <div class="tabbertab" title="IZJS"> |
||
| + | === Yellow Sands === |
||
| − | {|class="full-width FFXII table" style="text-align:center" |
||
| + | ;Zodiac |
||
| + | {|class="full-width FFXII article-table" style="text-align:center" |
||
|-class="a" |
|-class="a" |
||
!style="width:20%"|Chest |
!style="width:20%"|Chest |
||
| Line 849: | Line 770: | ||
|Knot of Rust |
|Knot of Rust |
||
|Meteorite (A) |
|Meteorite (A) |
||
| + | |} |
||
| − | |}</div></div> |
||
| + | ;Original |
||
| − | |||
| + | {|class="full-width FFXII article-table" style="text-align:center" |
||
| − | ====Demesne of the Sandqueen==== |
||
| − | <div class="tabber"> |
||
| − | <div class="tabbertab" title="FFXII"> |
||
| − | {|class="full-width FFXII table" style="text-align:center" |
||
|-class="a" |
|-class="a" |
||
!style="width:20%"|Chest |
!style="width:20%"|Chest |
||
| Line 862: | Line 780: | ||
!style="width:30%" colspan="3"|Diamond Armlet Treasure |
!style="width:30%" colspan="3"|Diamond Armlet Treasure |
||
|- |
|- |
||
| − | |class="b" rowspan="2"| |
+ | |class="b" rowspan="2"|13 |
| − | |rowspan="2"| |
+ | |rowspan="2"|60% |
| − | |rowspan="2"| |
+ | |rowspan="2"|40% |
|class="a" width="10%"|Gil |
|class="a" width="10%"|Gil |
||
|class="a" width="10%"|Item 1 |
|class="a" width="10%"|Item 1 |
||
| Line 872: | Line 790: | ||
|class="a" width="10%"|Rare |
|class="a" width="10%"|Rare |
||
|- |
|- |
||
| − | |≤ |
+ | |≤ 120 gil |
| + | |Hi-Potion |
||
| − | |Phoenix Down |
||
| + | |[[Killer Bow (Final Fantasy XII)|Killer Bow]] |
||
| − | |Ether |
||
| − | |≤ |
+ | |≤ 480 gil |
|Knot of Rust |
|Knot of Rust |
||
|Elixir |
|Elixir |
||
|- |
|- |
||
| − | |class="b" rowspan="2"| |
+ | |class="b" rowspan="2"|14 |
|rowspan="2"|77% |
|rowspan="2"|77% |
||
|rowspan="2"|23% |
|rowspan="2"|23% |
||
| Line 889: | Line 807: | ||
|class="a" width="10%"|Rare |
|class="a" width="10%"|Rare |
||
|- |
|- |
||
| − | |≤ |
+ | |≤ 100 gil |
|Potion |
|Potion |
||
|Balance Mote |
|Balance Mote |
||
| Line 896: | Line 814: | ||
|Elixir |
|Elixir |
||
|- |
|- |
||
| − | |class="b" rowspan="2"| |
+ | |class="b" rowspan="2"|15 |
|rowspan="2"|77% |
|rowspan="2"|77% |
||
| − | |rowspan="2"| |
+ | |rowspan="2"|23% |
|class="a" width="10%"|Gil |
|class="a" width="10%"|Gil |
||
|class="a" width="10%"|Item 1 |
|class="a" width="10%"|Item 1 |
||
| Line 906: | Line 824: | ||
|class="a" width="10%"|Rare |
|class="a" width="10%"|Rare |
||
|- |
|- |
||
| − | |≤ |
+ | |≤ 300 gil |
| + | |G-Foe: flying |
||
| − | |Potion |
||
| − | |G-Foe: HP >= |
+ | |G-Foe: HP >= 1000 |
| − | |≤ |
+ | |≤ 600 gil |
|Knot of Rust |
|Knot of Rust |
||
|Elixir |
|Elixir |
||
|- |
|- |
||
| − | |class="b" rowspan="2"| |
+ | |class="b" rowspan="2"|16 |
|rowspan="2"|77% |
|rowspan="2"|77% |
||
|rowspan="2"|23% |
|rowspan="2"|23% |
||
| Line 923: | Line 841: | ||
|class="a" width="10%"|Rare |
|class="a" width="10%"|Rare |
||
|- |
|- |
||
| − | |≤ |
+ | |≤ 100 gil |
|Potion |
|Potion |
||
| + | |Ether |
||
| − | |Antidote |
||
|≤ 450 gil |
|≤ 450 gil |
||
|Knot of Rust |
|Knot of Rust |
||
| + | |Holy Mote |
||
| − | |Elixir |
||
|- |
|- |
||
| − | |class="b" rowspan="2"| |
+ | |class="b" rowspan="2"|17 |
| − | |rowspan="2"| |
+ | |rowspan="2"|77% |
| − | |rowspan="2"| |
+ | |rowspan="2"|23% |
|class="a" width="10%"|Gil |
|class="a" width="10%"|Gil |
||
|class="a" width="10%"|Item 1 |
|class="a" width="10%"|Item 1 |
||
| Line 941: | Line 859: | ||
|- |
|- |
||
|≤ 150 gil |
|≤ 150 gil |
||
| − | | |
+ | |Potion |
| + | |Handkerchief |
||
| − | |[[List of Final Fantasy XII armor#Iron Armor|Iron Armor]] |
||
| − | |≤ |
+ | |≤ 500 gil |
|Knot of Rust |
|Knot of Rust |
||
| + | |Hi-Ether |
||
| − | |Holy Mote |
||
|- |
|- |
||
| − | |class="b" rowspan="2"| |
+ | |class="b" rowspan="2"|18 |
|rowspan="2"|77% |
|rowspan="2"|77% |
||
| − | |rowspan="2"| |
+ | |rowspan="2"|23% |
|class="a" width="10%"|Gil |
|class="a" width="10%"|Gil |
||
|class="a" width="10%"|Item 1 |
|class="a" width="10%"|Item 1 |
||
| Line 957: | Line 875: | ||
|class="a" width="10%"|Rare |
|class="a" width="10%"|Rare |
||
|- |
|- |
||
| − | |≤ |
+ | |≤ 100 gil |
| − | | |
+ | |Potion |
| + | |Echo Herbs |
||
| − | |G-Foe: HP < 1000 |
||
|≤ 450 gil |
|≤ 450 gil |
||
|Knot of Rust |
|Knot of Rust |
||
| + | |Hi-Ether |
||
| − | |Elixir |
||
| − | |} |
+ | |} |
| + | {{clear}} |
||
| − | <div class="tabbertab" title="IZJS"> |
||
| + | === Demesne of the Sandqueen === |
||
| − | {|class="full-width FFXII table" style="text-align:center" |
||
| + | ;Zodiac |
||
| + | {|class="full-width FFXII article-table" style="text-align:center" |
||
|-class="a" |
|-class="a" |
||
!style="width:20%"|Chest |
!style="width:20%"|Chest |
||
| Line 998: | Line 918: | ||
|- |
|- |
||
|Potion |
|Potion |
||
| − | |[[ |
+ | |[[Final Fantasy XII armor#Balaclava|Balaclava]] |
|Knot of Rust |
|Knot of Rust |
||
|Meteorite (A) |
|Meteorite (A) |
||
| Line 1,088: | Line 1,008: | ||
|- |
|- |
||
|Gold Needle |
|Gold Needle |
||
| − | |[[ |
+ | |[[Final Fantasy XII armor#Wizard's Hat|Wizard's Hat]] |
|Knot of Rust |
|Knot of Rust |
||
|Meteorite (A) |
|Meteorite (A) |
||
|} |
|} |
||
| − | *'''''{{A|1}}''''' - Chest does not respawn. |
+ | * '''''{{A|1}}''''' - Chest does not respawn. |
| + | ;Original |
||
| − | |||
| + | {|class="full-width FFXII article-table" style="text-align:center" |
||
| − | ====Trail of Fading Warmth==== |
||
| − | This chest only appears in the ''International Zodiac Job System'' version. |
||
| − | |||
| − | {|class="full-width FFXII table" style="text-align:center" |
||
| − | |-class="a" |
||
| − | !style="width:20%"|Chest |
||
| − | !style="width:10%"|Spawns |
||
| − | !style="width:10%"|Holds Gil% |
||
| − | !style="width:10%"|Gil |
||
| − | !style="width:25%" colspan="2"|Normal Treasure |
||
| − | !style="width:25%" colspan="2"|Diamond Armlet Treasure |
||
| − | |- |
||
| − | |class="b" rowspan="2"|41 |
||
| − | |rowspan="2"|10% |
||
| − | |rowspan="2"|10% |
||
| − | |rowspan="2"|≤ 11,000 gil |
||
| − | |rowspan="2" colspan="2"|Knot of Rust |
||
| − | |class="a" width="12%"|Common |
||
| − | |class="a" width="12%"|Rare |
||
| − | |- |
||
| − | |Knot of Rust |
||
| − | |Meteorite (B) |
||
| − | |} |
||
| − | |||
| − | ====Simoon Bluff==== |
||
| − | <div class="tabber"> |
||
| − | <div class="tabbertab" title="FFXII"> |
||
| − | {|class="full-width FFXII table" style="text-align:center" |
||
|-class="a" |
|-class="a" |
||
!style="width:20%"|Chest |
!style="width:20%"|Chest |
||
| Line 1,129: | Line 1,022: | ||
!style="width:30%" colspan="3"|Diamond Armlet Treasure |
!style="width:30%" colspan="3"|Diamond Armlet Treasure |
||
|- |
|- |
||
| − | |class="b" rowspan="2"| |
+ | |class="b" rowspan="2"|19 |
| − | |rowspan="2"| |
+ | |rowspan="2"|77% |
|rowspan="2"|23% |
|rowspan="2"|23% |
||
|class="a" width="10%"|Gil |
|class="a" width="10%"|Gil |
||
| Line 1,139: | Line 1,032: | ||
|class="a" width="10%"|Rare |
|class="a" width="10%"|Rare |
||
|- |
|- |
||
| − | |≤ |
+ | |≤ 150 gil |
| − | |Potion |
||
| − | |G-Foe: HP = 100% |
||
| − | |≤ 500 gil |
||
| − | |Knot of Rust |
||
| − | |Elixir |
||
| − | |- |
||
| − | |class="b" rowspan="2"|26 |
||
| − | |rowspan="2"|60% |
||
| − | |rowspan="2"|50% |
||
| − | |class="a" width="10%"|Gil |
||
| − | |class="a" width="10%"|Item 1 |
||
| − | |class="a" width="10%"|Item 2 |
||
| − | |class="a" width="10%"|Gil |
||
| − | |class="a" width="10%"|Common |
||
| − | |class="a" width="10%"|Rare |
||
| − | |- |
||
| − | |≤ 120 gil |
||
|Phoenix Down |
|Phoenix Down |
||
| + | |Ether |
||
| − | |[[List of Final Fantasy XII weapons#Wizard's Staff|Wizard's Staff]] |
||
| − | |≤ |
+ | |≤ 450 gil |
|Knot of Rust |
|Knot of Rust |
||
|Elixir |
|Elixir |
||
|- |
|- |
||
| − | |class="b" rowspan="2"| |
+ | |class="b" rowspan="2"|20 |
| − | |rowspan="2"| |
+ | |rowspan="2"|77% |
|rowspan="2"|23% |
|rowspan="2"|23% |
||
|class="a" width="10%"|Gil |
|class="a" width="10%"|Gil |
||
| Line 1,173: | Line 1,049: | ||
|class="a" width="10%"|Rare |
|class="a" width="10%"|Rare |
||
|- |
|- |
||
| − | |≤ |
+ | |≤ 150 gil |
| + | |Potion |
||
| − | |Antidote |
||
| + | |Balance Mote |
||
| − | |[[List of Final Fantasy XII accessories#Amber Armlet|Amber Armlet]] |
||
| − | |≤ |
+ | |≤ 450 gil |
|Knot of Rust |
|Knot of Rust |
||
|Elixir |
|Elixir |
||
|- |
|- |
||
| − | |class="b" rowspan="2"| |
+ | |class="b" rowspan="2"|21 |
| − | |rowspan="2"| |
+ | |rowspan="2"|77% |
| − | |rowspan="2"| |
+ | |rowspan="2"|20% |
|class="a" width="10%"|Gil |
|class="a" width="10%"|Gil |
||
|class="a" width="10%"|Item 1 |
|class="a" width="10%"|Item 1 |
||
| Line 1,190: | Line 1,066: | ||
|class="a" width="10%"|Rare |
|class="a" width="10%"|Rare |
||
|- |
|- |
||
| − | |≤ |
+ | |≤ 150 gil |
| + | |Potion |
||
| − | |Phoenix Down |
||
| + | |G-Foe: HP >= 500 |
||
| − | |[[List of Final Fantasy XII weapons#Cypress Pole|Cypress Pole]] |
||
| − | |≤ |
+ | |≤ 450 gil |
|Knot of Rust |
|Knot of Rust |
||
|Elixir |
|Elixir |
||
|- |
|- |
||
| − | |class="b" rowspan="2"| |
+ | |class="b" rowspan="2"|22 |
|rowspan="2"|77% |
|rowspan="2"|77% |
||
| − | |rowspan="2"| |
+ | |rowspan="2"|23% |
| − | |class="a" width="10%"|Gil |
||
| − | |class="a" width="20%" colspan="2"|Item |
||
| − | |class="a" width="10%"|Gil |
||
| − | |class="a" width="10%"|Common |
||
| − | |class="a" width="10%"|Rare |
||
| − | |- |
||
| − | |≤ 150 gil |
||
| − | |colspan="2"|G-Foe: flying |
||
| − | |≤ 500 gil |
||
| − | |Knot of Rust |
||
| − | |Holy Mote |
||
| − | |- |
||
| − | |class="b" rowspan="2"|30 |
||
| − | |rowspan="2"|60% |
||
| − | |rowspan="2"|50% |
||
|class="a" width="10%"|Gil |
|class="a" width="10%"|Gil |
||
|class="a" width="10%"|Item 1 |
|class="a" width="10%"|Item 1 |
||
| Line 1,222: | Line 1,083: | ||
|class="a" width="10%"|Rare |
|class="a" width="10%"|Rare |
||
|- |
|- |
||
| − | |≤ |
+ | |≤ 250 gil |
|Potion |
|Potion |
||
| + | |Antidote |
||
| − | |[[List of Final Fantasy XII armor#Windbreaker|Windbreaker]] |
||
| − | |≤ |
+ | |≤ 450 gil |
|Knot of Rust |
|Knot of Rust |
||
|Elixir |
|Elixir |
||
|- |
|- |
||
| − | |class="b" rowspan="2"| |
+ | |class="b" rowspan="2"|23 |
| − | |rowspan="2"| |
+ | |rowspan="2"|60% |
| − | |rowspan="2"| |
+ | |rowspan="2"|50% |
|class="a" width="10%"|Gil |
|class="a" width="10%"|Gil |
||
|class="a" width="10%"|Item 1 |
|class="a" width="10%"|Item 1 |
||
| Line 1,239: | Line 1,100: | ||
|class="a" width="10%"|Rare |
|class="a" width="10%"|Rare |
||
|- |
|- |
||
| − | |≤ |
+ | |≤ 150 gil |
| + | |Hi-Potion |
||
| − | |Ether |
||
| + | |[[Final Fantasy XII armor#Iron Armor|Iron Armor]] |
||
| − | |Reflectga Mote |
||
| − | |≤ |
+ | |≤ 450 gil |
|Knot of Rust |
|Knot of Rust |
||
|Holy Mote |
|Holy Mote |
||
|- |
|- |
||
| − | |class="b" rowspan="2"| |
+ | |class="b" rowspan="2"|24 |
| − | |rowspan="2"| |
+ | |rowspan="2"|77% |
| − | |rowspan="2"| |
+ | |rowspan="2"|20% |
|class="a" width="10%"|Gil |
|class="a" width="10%"|Gil |
||
|class="a" width="10%"|Item 1 |
|class="a" width="10%"|Item 1 |
||
| Line 1,256: | Line 1,117: | ||
|class="a" width="10%"|Rare |
|class="a" width="10%"|Rare |
||
|- |
|- |
||
| − | |≤ |
+ | |≤ 150 gil |
| − | |Potion |
+ | |Hi-Potion |
| + | |G-Foe: HP < 1000 |
||
| − | |Balance Mote |
||
|≤ 450 gil |
|≤ 450 gil |
||
|Knot of Rust |
|Knot of Rust |
||
|Elixir |
|Elixir |
||
| − | |} |
+ | |} |
| + | |||
| − | <div class="tabbertab" title="IZJS"> |
||
| + | === Trail of Fading Warmth === |
||
| − | {|class="full-width FFXII table" style="text-align:center" |
||
| + | This chest only appears in the ''Zodiac'' versions. |
||
| + | |||
| + | {|class="full-width FFXII article-table" style="text-align:center" |
||
| + | |-class="a" |
||
| + | !style="width:20%"|Chest |
||
| + | !style="width:10%"|Spawns |
||
| + | !style="width:10%"|Holds Gil% |
||
| + | !style="width:10%"|Gil |
||
| + | !style="width:25%" colspan="2"|Normal Treasure |
||
| + | !style="width:25%" colspan="2"|Diamond Armlet Treasure |
||
| + | |- |
||
| + | |class="b" rowspan="2"|41 |
||
| + | |rowspan="2"|10% |
||
| + | |rowspan="2"|10% |
||
| + | |rowspan="2"|≤ 11,000 gil |
||
| + | |rowspan="2" colspan="2"|Knot of Rust |
||
| + | |class="a" width="12%"|Common |
||
| + | |class="a" width="12%"|Rare |
||
| + | |- |
||
| + | |Knot of Rust |
||
| + | |Meteorite (B) |
||
| + | |} |
||
| + | {{clear}} |
||
| + | === Simoon Bluff === |
||
| + | ;Zodiac |
||
| + | {|class="full-width FFXII article-table" style="text-align:center" |
||
|-class="a" |
|-class="a" |
||
!style="width:20%"|Chest |
!style="width:20%"|Chest |
||
| Line 1,311: | Line 1,198: | ||
|- |
|- |
||
|Remedy |
|Remedy |
||
| − | |[[ |
+ | |[[Lohengrin (Final Fantasy XII)|Lohengrin]] |
|Knot of Rust |
|Knot of Rust |
||
|Meteorite (A) |
|Meteorite (A) |
||
| Line 1,319: | Line 1,206: | ||
|0% |
|0% |
||
|N/A |
|N/A |
||
| − | |colspan="4"|[[ |
+ | |colspan="4"|[[Final Fantasy XII accessories#Embroidered Tippet|Embroidered Tippet]] |
|- |
|- |
||
|class="b" rowspan="2"|46 |
|class="b" rowspan="2"|46 |
||
| Line 1,331: | Line 1,218: | ||
|- |
|- |
||
|Remedy |
|Remedy |
||
| − | |[[ |
+ | |[[Chopper (Final Fantasy XII)|Chopper]] |
|Knot of Rust |
|Knot of Rust |
||
|Meteorite (A) |
|Meteorite (A) |
||
| Line 1,345: | Line 1,232: | ||
|- |
|- |
||
|Gold Needle |
|Gold Needle |
||
| − | |[[ |
+ | |[[Final Fantasy XII armor#Soldier's Cap|Soldier's Cap]] |
|Knot of Rust |
|Knot of Rust |
||
|Meteorite (A) |
|Meteorite (A) |
||
| Line 1,359: | Line 1,246: | ||
|- |
|- |
||
|Hi-Potion |
|Hi-Potion |
||
| − | |[[ |
+ | |[[Final Fantasy XII armor#Chanter's Djellaba|Chanter's Djellaba]] |
|Knot of Rust |
|Knot of Rust |
||
|Meteorite (B) |
|Meteorite (B) |
||
| Line 1,373: | Line 1,260: | ||
|- |
|- |
||
|Potion |
|Potion |
||
| − | |[[ |
+ | |[[Sirius (Final Fantasy XII)|Sirius]] |
|Knot of Rust |
|Knot of Rust |
||
|Meteorite (C) |
|Meteorite (C) |
||
| Line 1,387: | Line 1,274: | ||
|- |
|- |
||
|Hi-Ether |
|Hi-Ether |
||
| − | |[[ |
+ | |[[Final Fantasy XII armor#Lambent Hat|Lambent Hat]] |
|Knot of Rust |
|Knot of Rust |
||
|Meteorite (A) |
|Meteorite (A) |
||
| Line 1,401: | Line 1,288: | ||
|- |
|- |
||
|Ether |
|Ether |
||
| − | |[[ |
+ | |[[Final Fantasy XII armor#Heavy Coat|Heavy Coat]] |
|Knot of Rust |
|Knot of Rust |
||
|Meteorite (A) |
|Meteorite (A) |
||
| Line 1,411: | Line 1,298: | ||
|colspan="4"|N/A |
|colspan="4"|N/A |
||
|} |
|} |
||
| − | *'''''{{A|1}}''''' - Chest does not respawn. |
+ | * '''''{{A|1}}''''' - Chest does not respawn. |
| + | ;Original |
||
| + | {|class="full-width FFXII article-table" style="text-align:center" |
||
| + | |-class="a" |
||
| + | !style="width:20%"|Chest |
||
| + | !style="width:10%"|Spawns |
||
| + | !style="width:10%"|Holds Gil% |
||
| + | !style="width:30%" colspan="3"|Normal Treasure |
||
| + | !style="width:30%" colspan="3"|Diamond Armlet Treasure |
||
| + | |- |
||
| + | |class="b" rowspan="2"|25 |
||
| + | |rowspan="2"|70% |
||
| + | |rowspan="2"|23% |
||
| + | |class="a" width="10%"|Gil |
||
| + | |class="a" width="10%"|Item 1 |
||
| + | |class="a" width="10%"|Item 2 |
||
| + | |class="a" width="10%"|Gil |
||
| + | |class="a" width="10%"|Common |
||
| + | |class="a" width="10%"|Rare |
||
| + | |- |
||
| + | |≤ 200 gil |
||
| + | |Potion |
||
| + | |G-Foe: HP = 100% |
||
| + | |≤ 500 gil |
||
| + | |Knot of Rust |
||
| + | |Elixir |
||
| + | |- |
||
| + | |class="b" rowspan="2"|26 |
||
| + | |rowspan="2"|60% |
||
| + | |rowspan="2"|50% |
||
| + | |class="a" width="10%"|Gil |
||
| + | |class="a" width="10%"|Item 1 |
||
| + | |class="a" width="10%"|Item 2 |
||
| + | |class="a" width="10%"|Gil |
||
| + | |class="a" width="10%"|Common |
||
| + | |class="a" width="10%"|Rare |
||
| + | |- |
||
| + | |≤ 120 gil |
||
| + | |Phoenix Down |
||
| + | |[[Wizard's Staff (Final Fantasy XII)|Wizard's Staff]] |
||
| + | |≤ 500 gil |
||
| + | |Knot of Rust |
||
| + | |Elixir |
||
| + | |- |
||
| + | |class="b" rowspan="2"|27 |
||
| + | |rowspan="2"|70% |
||
| + | |rowspan="2"|23% |
||
| + | |class="a" width="10%"|Gil |
||
| + | |class="a" width="10%"|Item 1 |
||
| + | |class="a" width="10%"|Item 2 |
||
| + | |class="a" width="10%"|Gil |
||
| + | |class="a" width="10%"|Common |
||
| + | |class="a" width="10%"|Rare |
||
| + | |- |
||
| + | |≤ 180 gil |
||
| + | |Antidote |
||
| + | |[[Final Fantasy XII accessories#Amber Armlet|Amber Armlet]] |
||
| + | |≤ 600 gil |
||
| + | |Knot of Rust |
||
| + | |Elixir |
||
| + | |- |
||
| + | |class="b" rowspan="2"|28 |
||
| + | |rowspan="2"|60% |
||
| + | |rowspan="2"|50% |
||
| + | |class="a" width="10%"|Gil |
||
| + | |class="a" width="10%"|Item 1 |
||
| + | |class="a" width="10%"|Item 2 |
||
| + | |class="a" width="10%"|Gil |
||
| + | |class="a" width="10%"|Common |
||
| + | |class="a" width="10%"|Rare |
||
| + | |- |
||
| + | |≤ 160 gil |
||
| + | |Phoenix Down |
||
| + | |[[Cypress Pole (Final Fantasy XII)|Cypress Pole]] |
||
| + | |≤ 600 gil |
||
| + | |Knot of Rust |
||
| + | |Elixir |
||
| + | |- |
||
| + | |class="b" rowspan="2"|29 |
||
| + | |rowspan="2"|77% |
||
| + | |rowspan="2"|20% |
||
| + | |class="a" width="10%"|Gil |
||
| + | |class="a" width="20%" colspan="2"|Item |
||
| + | |class="a" width="10%"|Gil |
||
| + | |class="a" width="10%"|Common |
||
| + | |class="a" width="10%"|Rare |
||
| + | |- |
||
| + | |≤ 150 gil |
||
| + | |colspan="2"|G-Foe: flying |
||
| + | |≤ 500 gil |
||
| + | |Knot of Rust |
||
| + | |Holy Mote |
||
| + | |- |
||
| + | |class="b" rowspan="2"|30 |
||
| + | |rowspan="2"|60% |
||
| + | |rowspan="2"|50% |
||
| + | |class="a" width="10%"|Gil |
||
| + | |class="a" width="10%"|Item 1 |
||
| + | |class="a" width="10%"|Item 2 |
||
| + | |class="a" width="10%"|Gil |
||
| + | |class="a" width="10%"|Common |
||
| + | |class="a" width="10%"|Rare |
||
| + | |- |
||
| + | |≤ 150 gil |
||
| + | |Potion |
||
| + | |[[Final Fantasy XII armor#Windbreaker|Windbreaker]] |
||
| + | |≤ 500 gil |
||
| + | |Knot of Rust |
||
| + | |Elixir |
||
| + | |- |
||
| + | |class="b" rowspan="2"|31 |
||
| + | |rowspan="2"|65% |
||
| + | |rowspan="2"|10% |
||
| + | |class="a" width="10%"|Gil |
||
| + | |class="a" width="10%"|Item 1 |
||
| + | |class="a" width="10%"|Item 2 |
||
| + | |class="a" width="10%"|Gil |
||
| + | |class="a" width="10%"|Common |
||
| + | |class="a" width="10%"|Rare |
||
| + | |- |
||
| + | |≤ 800 gil |
||
| + | |Ether |
||
| + | |Reflectga Mote |
||
| + | |≤ 2,000 gil |
||
| + | |Knot of Rust |
||
| + | |Holy Mote |
||
| + | |- |
||
| + | |class="b" rowspan="2"|32 |
||
| + | |rowspan="2"|70% |
||
| + | |rowspan="2"|23% |
||
| + | |class="a" width="10%"|Gil |
||
| + | |class="a" width="10%"|Item 1 |
||
| + | |class="a" width="10%"|Item 2 |
||
| + | |class="a" width="10%"|Gil |
||
| + | |class="a" width="10%"|Common |
||
| + | |class="a" width="10%"|Rare |
||
| + | |- |
||
| + | |≤ 220 gil |
||
| + | |Potion |
||
| + | |Balance Mote |
||
| + | |≤ 450 gil |
||
| + | |Knot of Rust |
||
| + | |Elixir |
||
| + | |} |
||
| − | == |
+ | == Quests == |
| + | === Hunts === |
||
| − | {{spoiler}} |
||
| + | {{See|Hunt (Final Fantasy XII)}} |
||
| − | [[File:Queen of the Urutan.jpg|thumb|250px|Queen of the Urutan.]] |
||
| + | The [[Wyvern Lord]] is a Rank II Mark that becomes available after the events of [[Dreadnought Leviathan|Dreadnought ''Leviathan'']] when [[Ashelia B'nargin Dalmasca/Gameplay|Ashe]] joins the party. A breed of Avion, Wyvern Lord is encountered in the Simoon Bluff area, petitioned by Sherral in Rabanastre's weapon shop. |
||
| − | While trekking across the Sandsea towards the Tomb of Raithwall, [[Vaan]] and the party encounter a Sandsea [[Moogle (race)|Moogle]] who claims a Urutan-Yensa had asked for help in defeating their blood-enemy, the [[Emeralditan|Urutan Eater]], and in exchange is ready to reward them with a treasure. The party searches through the Nam-Yensa Sandsea where they find a group of Urutan-Yensa fighting the Titantoise, and proceeds to defeat it. |
||
| + | The [[Belito]] is an Elite Mark petitioned by [[Montblanc]] in Rabanastre that becomes available after the events in [[Draklor Laboratory]]. It is said to be a sandstorm creating creature that lurks in the Nam-Yensa Sandsea, its bill depicting a red-skinned Mirrorknight. However, the truth of the Mark's nature becomes apparent when the party arrives at the site of the battle. |
||
| − | When they return to the Sandsea Moogle, he says the Urutan wants to give a reward, but they need to find him. The party searches for the Urutan, and stumble upon a rare gathering of Urutan-Yensa. There, they find the one asking for help being tried for shaming the community by asking help from outsiders. The Queen of the Urutan "condemns him to dust", and the Urutan burns and vanishes. |
||
| + | To find the mark, the player must begin in Ogir-Yensa Sandsea's Central Junction and follow a path through Zertinan Caverns. The northern exit will lead to a dead-end in Nam-Yensa Sandsea's Withering Shore, where [[Monid]] is found and a cutscene will initiate the battle. |
||
| − | The Sandsea Moogle tries to plead his case, but the Queen warns the moogle she might have punished him too, though merciful that she is, the Queen spares his life. Once the Urutans leave, the moogle notices a rare flower blossoming. He believes this is the treasure the rogue Urutan-Yensa had wanted to show them; a flower that is detested by the [[Garuda (Final Fantasy XII)|Garuda]] for its smell. The party picks some Eksir Berries from the "Rogue Urutan Flower", and continue their journey. |
||
| − | {{endspoiler}} |
||
| − | == |
+ | === Rare Game === |
| + | {{See|Rare Game}} |
||
| − | ===Hunts=== |
||
| + | The player must have spoken to the "Huntmaster" in [[Phon Coast]] and defeated [[Thalassinon (Final Fantasy XII)|Thalassinon]] to trigger the start of the Rare Game quest. Afterward there is a 40% chance [[Victanir]] will appear in the western portion of the Yellow Sands area (the area to the left of where the Urutan-Yensa spawn). Victanir will be almost invisible, so the player cannot see it until they are close. Once they run into Victanir, it will become visible. |
||
| − | {{See Also|Hunt (Final Fantasy XII)}} |
||
| − | The [[Wyvern Lord]] is a Rank II Mark that becomes available after the events of ''[[Dreadnought Leviathan]]'' when [[Ashelia B'nargin Dalmasca/Gameplay|Ashe]] joins the party. A breed of Avion, Wyvern Lord is encountered in the Simoon Bluff area, petitioned by Sherral in Rabanastre's weapon shop. |
||
| + | [[File:Imdugud-FFXII-TZA.jpg|thumb|Imdugud.]] |
||
| − | ==Enemies== |
||
| + | [[Imdugud (Final Fantasy XII)|Imdugud]] spawns in the Withering Shores zone in the portion of the zone accessible only through the Zertinan Caverns. After the player defeats every [[Bagoly (Final Fantasy XII)|Bagoly]] in the area, the player must then position the party on the center of the circular platform and wait a few seconds (the platform where the party faces [[Ba'Gamnan (Final Fantasy XII boss)|Ba'Gamnan]] for the second time). Imdugud will spawn near the shore on the opposite side of the zone and fly over towards the platform. |
||
| − | *[[Alraune (Final Fantasy XII)|Alraune]] |
||
| + | |||
| − | *[[Danbania]] (Docile) |
||
| + | Exact positioning on the center of the platform is key to spawning this enemy. If the player isn't in the exact position, Imdugud can take a long time to appear. If the player takes too long to defeat it, it will fly away temporarily, though it will not heal itself. |
||
| − | *[[Urutan-Yensa]] |
||
| + | |||
| − | *[[Yensa]] |
||
| + | [[Megabomb]] will appear in the Demesne of the Sandqueen area after [[Chain (term)#Final Fantasy XII|chaining]] 21 or more foes. |
||
| − | *[[Axebeak (Final Fantasy XII)|Axebeak]] |
||
| + | |||
| − | *[[Bagoly (Final Fantasy XII)|Bagoly]] |
||
| + | == Enemies == |
||
| − | *[[Bull Danbania]] (Docile) |
||
| + | * [[Alraune (Final Fantasy XII)|Alraune]] |
||
| − | *[[Bull Yensa]] |
||
| + | * [[Danbania]] (Docile) |
||
| − | *[[Wyvern (Final Fantasy XII)|Wyvern]] |
||
| − | *[[Urutan |
+ | * [[Urutan-Yensa]] |
| − | *[[ |
+ | * [[Yensa]] |
| − | *[[ |
+ | * [[Axebeak (Final Fantasy XII)|Axebeak]] |
| + | * [[Bagoly (Final Fantasy XII)|Bagoly]] |
||
| − | *[[Victanir]] (Rare) |
||
| − | *[[ |
+ | * [[Bull Danbania]] (Docile) |
| + | * [[Bull Yensa]] |
||
| − | *[[Belito]] (Elite Mark) |
||
| + | * [[Wyvern (Final Fantasy XII)|Wyvern]] |
||
| + | * [[Urutan Eater]] (Optional Event Boss) |
||
| + | * [[Megabomb]] (Rare) |
||
| + | * [[Imdugud (Final Fantasy XII)|Imdugud]] (Rare) |
||
| + | * [[Victanir]] (Rare) |
||
| + | * [[Wyvern Lord]] (Mark) |
||
| + | * [[Belito]] (Elite Mark) |
||
| + | |||
| + | == Shops == |
||
| + | === [[Dyce]] === |
||
| + | Dyce appears in the Trail of Fading Warmth. After the player defeats [[Garuda (Final Fantasy XII)|Garuda]], he moves to the entrance of the Tomb of Raithwall. After completing the Tomb of Raithwall, he relocates to the [[Balfonheim Port]] for the remainder of the game. |
||
| + | ==== [[Final Fantasy XII weapons|Weapons]] ==== |
||
| − | ==Shops== |
||
| + | {{multicol-begin}} |
||
| − | ===[[Dyce]]=== |
||
| + | ;Original |
||
| − | Dyce appears near the entrance to the Tomb of Raithwall. After the player defeats [[Garuda (Final Fantasy XII)|Garuda]], he will relocate to the [[Balfonheim Port]] for the remainder of the game. |
||
| + | {|class="half-width article-table FFXII" style="text-align:center" |
||
| − | {|cellpadding="5" |
||
| − | |valign="top"| |
||
| − | ====[[List of Final Fantasy XII weapons|Weapons]]==== |
||
| − | <div class="half-width tabber"> |
||
| − | <div class="tabbertab" title="FFXII"> |
||
| − | {|class="half-width table FFXII" style="text-align:center" |
||
|-class="a" |
|-class="a" |
||
!width="70%"|Name |
!width="70%"|Name |
||
!width="30%"|Cost |
!width="30%"|Cost |
||
|- |
|- |
||
| − | !class="b"|[[ |
+ | !class="b"|[[Capella (Final Fantasy XII)|Capella]] |
|1,400 gil |
|1,400 gil |
||
|- |
|- |
||
| − | !class="b"|[[ |
+ | !class="b"|[[Killer Bow (Final Fantasy XII)|Killer Bow]] |
|2,000 gil |
|2,000 gil |
||
|} |
|} |
||
| + | {{multicol-separator}} |
||
| − | </div> |
||
| + | ;Zodiac |
||
| − | <div class="tabbertab" title="IZJS"> |
||
| − | {|class="half-width table FFXII" style="text-align:center" |
+ | {|class="half-width article-table FFXII" style="text-align:center" |
|-class="a" |
|-class="a" |
||
!width="70%"|Name |
!width="70%"|Name |
||
!width="30%"|Cost |
!width="30%"|Cost |
||
|- |
|- |
||
| − | !class="b"|[[ |
+ | !class="b"|[[Lohengrin (Final Fantasy XII)|Lohengrin]] |
|3,200 gil |
|3,200 gil |
||
|- |
|- |
||
| − | !class="b"|[[ |
+ | !class="b"|[[Heavy Lance (Final Fantasy XII)|Heavy Lance]] |
|3,500 gil |
|3,500 gil |
||
|- |
|- |
||
| − | !class="b"|[[ |
+ | !class="b"|[[Longbow (Final Fantasy XII)|Longbow]] |
|4,600 gil |
|4,600 gil |
||
|- |
|- |
||
| − | !class="b"|[[ |
+ | !class="b"|[[Sirius (Final Fantasy XII)|Sirius]] |
|2,600 gil |
|2,600 gil |
||
|- |
|- |
||
| − | !class="b"|[[ |
+ | !class="b"|[[Chopper (Final Fantasy XII)|Chopper]] |
|3,200 gil |
|3,200 gil |
||
|- |
|- |
||
| − | !class="b"|[[ |
+ | !class="b"|[[Paramina Crossbow (Final Fantasy XII)|Paramina Crossbow]] |
|3,300 gil |
|3,300 gil |
||
|- |
|- |
||
| − | !class="b"|[[ |
+ | !class="b"|[[Healing Rod (Final Fantasy XII)|Healing Rod]] |
|2,590 gil |
|2,590 gil |
||
|- |
|- |
||
| − | !class="b"|[[ |
+ | !class="b"|[[Ancient Sword (Final Fantasy XII)|Ancient Sword]] |
|2,450 gil |
|2,450 gil |
||
|- |
|- |
||
| − | !class="b"|[[ |
+ | !class="b"|[[Kogarasumaru (Final Fantasy XII)|Kogarasumaru]] |
|2,500 gil |
|2,500 gil |
||
|- |
|- |
||
| − | !class="b"|[[ |
+ | !class="b"|[[Musk Stick (Final Fantasy XII)|Musk Stick]] |
|3,040 gil |
|3,040 gil |
||
|- |
|- |
||
| − | !class="b"|[[ |
+ | !class="b"|[[Killer Bow (Final Fantasy XII)|Killer Bow]] |
|2,500 gil |
|2,500 gil |
||
|- |
|- |
||
| − | !class="b"|[[ |
+ | !class="b"|[[War Hammer (Final Fantasy XII)|War Hammer]] |
|2,500 gil |
|2,500 gil |
||
|- |
|- |
||
| − | !class="b"|[[ |
+ | !class="b"|[[Bhuj (Final Fantasy XII)|Bhuj]] |
|2,200 gil |
|2,200 gil |
||
|- |
|- |
||
| − | !class="b"|[[ |
+ | !class="b"|[[Wizard's Staff (Final Fantasy XII)|Wizard's Staff]] |
|1,350 gil |
|1,350 gil |
||
| − | |- |
||
|} |
|} |
||
| + | {{multicol-end}} |
||
| − | </div></div> |
||
| + | {{clear}} |
||
| − | |||
| + | ==== [[Final Fantasy XII armor|Armor]] ==== |
||
| − | |valign="top"| |
||
| + | {{multicol-begin}} |
||
| − | ====[[List of Final Fantasy XII armor|Armor]]==== |
||
| + | ;Original |
||
| − | <div class="half-width tabber"> |
||
| + | {|class="half-width article-table FFXII" style="text-align:center" |
||
| − | <div class="tabbertab" title="FFXII"> |
||
| − | {|class="half-width table FFXII" style="text-align:center" |
||
|-class="a" |
|-class="a" |
||
!width="70%"|Name |
!width="70%"|Name |
||
| Line 1,528: | Line 1,560: | ||
|― |
|― |
||
|} |
|} |
||
| + | {{multicol-separator}} |
||
| − | </div> |
||
| + | ;Zodiac |
||
| − | <div class="tabbertab" title="IZJS"> |
||
| − | {|class="half-width table FFXII" style="text-align:center" |
+ | {|class="half-width article-table FFXII" style="text-align:center" |
|-class="a" |
|-class="a" |
||
!width="70%"|Name |
!width="70%"|Name |
||
!width="30%"|Cost |
!width="30%"|Cost |
||
|- |
|- |
||
| − | !class="b"|[[ |
+ | !class="b"|[[Final Fantasy XII armor#Soldier's Cap|Soldier's Cap]] |
|1,400 gil |
|1,400 gil |
||
|- |
|- |
||
| − | !class="b"|[[ |
+ | !class="b"|[[Final Fantasy XII armor#Heavy Coat|Heavy Coat]] |
|1,400 gil |
|1,400 gil |
||
|- |
|- |
||
| − | !class="b"|[[ |
+ | !class="b"|[[Final Fantasy XII armor#Lambent Hat|Lambent Hat]] |
|1,400 gil |
|1,400 gil |
||
|- |
|- |
||
| − | !class="b"|[[ |
+ | !class="b"|[[Final Fantasy XII armor#Chanter's Djellaba|Chanter's Djellaba]] |
|1,400 gil |
|1,400 gil |
||
|- |
|- |
||
| − | !class="b"|[[ |
+ | !class="b"|[[Final Fantasy XII armor#Winged Helm|Winged Helm]] |
|2,400 gil |
|2,400 gil |
||
|- |
|- |
||
| − | !class="b"|[[ |
+ | !class="b"|[[Final Fantasy XII armor#Chainmail|Chainmail]] |
|2,300 gil |
|2,300 gil |
||
|- |
|- |
||
| − | !class="b"|[[ |
+ | !class="b"|[[Final Fantasy XII armor#Golden Shield|Golden Shield]] |
|2,000 gil |
|2,000 gil |
||
|- |
|- |
||
| − | !class="b"|[[ |
+ | !class="b"|[[Final Fantasy XII armor#Balaclava|Balaclava]] |
|1,000 gil |
|1,000 gil |
||
|- |
|- |
||
| − | !class="b"|[[ |
+ | !class="b"|[[Final Fantasy XII armor#Windbreaker|Windbreaker]] |
|1,000 gil |
|1,000 gil |
||
|- |
|- |
||
| − | !class="b"|[[ |
+ | !class="b"|[[Final Fantasy XII armor#Wizard's Hat|Wizard's Hat]] |
|1,000 gil |
|1,000 gil |
||
|- |
|- |
||
| − | !class="b"|[[ |
+ | !class="b"|[[Final Fantasy XII armor#Wizard's Robes|Wizard's Robes]] |
|1,000 gil |
|1,000 gil |
||
|- |
|- |
||
| − | !class="b"|[[ |
+ | !class="b"|[[Final Fantasy XII armor#Barbut|Barbut]] |
|1,800 gil |
|1,800 gil |
||
|- |
|- |
||
| − | !class="b"|[[ |
+ | !class="b"|[[Final Fantasy XII armor#Linen Cuirass|Linen Cuirass]] |
|1,800 gil |
|1,800 gil |
||
|- |
|- |
||
| − | !class="b"|[[ |
+ | !class="b"|[[Final Fantasy XII armor#Round Shield|Round Shield]] |
|1,100 gil |
|1,100 gil |
||
| − | |- |
||
|} |
|} |
||
| + | {{multicol-end}} |
||
| − | </div></div> |
||
| + | {{clear}} |
||
| − | |} |
||
| + | ==== [[Final Fantasy XII accessories|Accessories]] ==== |
||
| − | |||
| + | {{multicol-begin}} |
||
| − | {|cellpadding="5" |
||
| + | ;Original |
||
| − | |valign="top"| |
||
| + | {|class="half-width article-table FFXII" style="text-align:center" |
||
| − | ====[[List of Final Fantasy XII accessories|Accessories]]==== |
||
| − | <div class="half-width tabber"> |
||
| − | <div class="tabbertab" title="FFXII"> |
||
| − | {|class="half-width table FFXII" style="text-align:center" |
||
|-class="a" |
|-class="a" |
||
!width="70%"|Name |
!width="70%"|Name |
||
!width="30%"|Cost |
!width="30%"|Cost |
||
|- |
|- |
||
| − | !class="b"|[[ |
+ | !class="b"|[[Final Fantasy XII accessories/Original#Rose Corsage|Rose Corsage]] |
|800 gil |
|800 gil |
||
|- |
|- |
||
| − | !class="b"|[[ |
+ | !class="b"|[[Final Fantasy XII accessories/Original#Amber Armlet|Amber Armlet]] |
|6,600 gil |
|6,600 gil |
||
|- |
|- |
||
| − | !class="b"|[[ |
+ | !class="b"|[[Final Fantasy XII accessories/Original#Sash|Sash]] |
|500 gil |
|500 gil |
||
|- |
|- |
||
| − | !class="b"|[[ |
+ | !class="b"|[[Final Fantasy XII accessories/Original#Argyle Armlet|Argyle Armlet]] |
|800 gil |
|800 gil |
||
|} |
|} |
||
| + | {{multicol-separator}} |
||
| − | </div> |
||
| + | ;Zodiac |
||
| − | <div class="tabbertab" title="IZJS"> |
||
| − | {|class="half-width table FFXII" style="text-align:center" |
+ | {|class="half-width article-table FFXII" style="text-align:center" |
|-class="a" |
|-class="a" |
||
!width="70%"|Name |
!width="70%"|Name |
||
!width="30%"|Cost |
!width="30%"|Cost |
||
|- |
|- |
||
| − | !class="b"|[[ |
+ | !class="b"|[[Final Fantasy XII accessories#Nishijin Belt|Nishijin Belt]] |
|800 gil |
|800 gil |
||
|- |
|- |
||
| − | !class="b"|[[ |
+ | !class="b"|[[Final Fantasy XII accessories#Black Belt|Black Belt]] |
|600 gil |
|600 gil |
||
|- |
|- |
||
| − | !class="b"|[[ |
+ | !class="b"|[[Final Fantasy XII accessories#Rose Corsage|Rose Corsage]] |
|800 gil |
|800 gil |
||
|- |
|- |
||
| − | !class="b"|[[ |
+ | !class="b"|[[Final Fantasy XII accessories#Leather Gorget|Leather Gorget]] |
|1,200 gil |
|1,200 gil |
||
|- |
|- |
||
| − | !class="b"|[[ |
+ | !class="b"|[[Final Fantasy XII accessories#Tourmaline Ring|Tourmaline Ring]] |
|300 gil |
|300 gil |
||
|- |
|- |
||
| − | !class="b"|[[ |
+ | !class="b"|[[Final Fantasy XII accessories#Steel Gorget|Steel Gorget]] |
|1,300 gil |
|1,300 gil |
||
|- |
|- |
||
| − | !class="b"|[[ |
+ | !class="b"|[[Final Fantasy XII accessories#Argyle Armlet|Argyle Armlet]] |
|600 gil |
|600 gil |
||
|- |
|- |
||
| − | !class="b"|[[ |
+ | !class="b"|[[Final Fantasy XII accessories#Bangle|Bangle]] |
|500 gil |
|500 gil |
||
| − | |- |
||
|} |
|} |
||
| + | {{multicol-end}} |
||
| − | </div></div> |
||
| + | {{clear}} |
||
| − | |||
| + | ==== [[Final Fantasy XII magicks|Magicks]] ==== |
||
| − | |valign="top"| |
||
| + | {{multicol-begin}} |
||
| − | ====[[List of Final Fantasy XII magicks|Magicks]]==== |
||
| + | ;Original |
||
| − | <div class="half-width tabber"> |
||
| + | {|class="half-width article-table FFXII" style="text-align:center" |
||
| − | <div class="tabbertab" title="FFXII"> |
||
| − | {|class="half-width table FFXII" style="text-align:center" |
||
|-class="a" |
|-class="a" |
||
!width="70%"|Name |
!width="70%"|Name |
||
| Line 1,697: | Line 1,723: | ||
|500 gil |
|500 gil |
||
|} |
|} |
||
| + | {{multicol-separator}} |
||
| − | </div> |
||
| + | ;Zodiac |
||
| − | <div class="tabbertab" title="IZJS"> |
||
| − | {|class="half-width table FFXII" style="text-align:center" |
+ | {|class="half-width article-table FFXII" style="text-align:center" |
|-class="a" |
|-class="a" |
||
!width="70%"|Name |
!width="70%"|Name |
||
| Line 1,719: | Line 1,745: | ||
|1,800 gil |
|1,800 gil |
||
|- |
|- |
||
| − | !class="b"|[[Water (ability)| |
+ | !class="b"|[[Water (ability)|Aqua]] |
|700 gil |
|700 gil |
||
|- |
|- |
||
| Line 1,733: | Line 1,759: | ||
!class="b"|[[Blizzard (ability)|Blizzard]] |
!class="b"|[[Blizzard (ability)|Blizzard]] |
||
|240 gil |
|240 gil |
||
| − | |- |
||
| − | |} |
||
| − | </div></div> |
||
|} |
|} |
||
| + | {{multicol-end}} |
||
| + | {{clear}} |
||
| + | ==== [[Final Fantasy XII ammunition|Ammunition]] ==== |
||
| − | {|cellpadding="5" |
||
| + | {{multicol-begin}} |
||
| − | |valign="top"| |
||
| + | ;Original |
||
| − | ====[[List of Final Fantasy XII ammunition|Ammunition]]==== |
||
| − | + | {|class="half-width article-table FFXII" style="text-align:center" |
|
| − | <div class="tabbertab" title="FFXII"> |
||
| − | {|class="half-width table FFXII" style="text-align:center" |
||
|-class="a" |
|-class="a" |
||
!width="70%"|Name |
!width="70%"|Name |
||
!width="30%"|Cost |
!width="30%"|Cost |
||
|- |
|- |
||
| − | !class="b"|[[ |
+ | !class="b"|[[Final Fantasy XII ammunition#Onion Arrows|Onion Arrows]] |
|100 gil |
|100 gil |
||
|- |
|- |
||
| − | !class="b"|[[ |
+ | !class="b"|[[Final Fantasy XII ammunition#Onion Bolts|Onion Bolts]] |
|100 gil |
|100 gil |
||
|- |
|- |
||
| − | !class="b"|[[ |
+ | !class="b"|[[Final Fantasy XII ammunition#Onion Shot|Onion Shot]] |
|100 gil |
|100 gil |
||
|- |
|- |
||
| − | !class="b"|[[ |
+ | !class="b"|[[Final Fantasy XII ammunition#Onion Bombs|Onion Bombs]] |
|100 gil |
|100 gil |
||
|} |
|} |
||
| + | {{multicol-separator}} |
||
| − | </div> |
||
| + | ;Zodiac |
||
| − | <div class="tabbertab" title="IZJS"> |
||
| − | {|class="half-width table FFXII" style="text-align:center" |
+ | {|class="half-width article-table FFXII" style="text-align:center" |
|-class="a" |
|-class="a" |
||
!width="70%"|Name |
!width="70%"|Name |
||
!width="30%"|Cost |
!width="30%"|Cost |
||
|- |
|- |
||
| − | !class="b"|[[ |
+ | !class="b"|[[Final Fantasy XII ammunition#Onion Arrows|Onion Arrows]] |
|100 gil |
|100 gil |
||
|- |
|- |
||
| − | !class="b"|[[ |
+ | !class="b"|[[Final Fantasy XII ammunition#Onion Bolts|Onion Bolts]] |
|100 gil |
|100 gil |
||
|- |
|- |
||
| − | !class="b"|[[ |
+ | !class="b"|[[Final Fantasy XII ammunition#Onion Shot|Onion Shot]] |
|100 gil |
|100 gil |
||
|- |
|- |
||
| − | !class="b"|[[ |
+ | !class="b"|[[Final Fantasy XII ammunition#Onion Bombs|Onion Bombs]] |
|100 gil |
|100 gil |
||
|} |
|} |
||
| + | {{multicol-end}} |
||
| − | </div></div> |
||
| + | {{clear}} |
||
| − | |||
| + | ==== [[Technicks]] ==== |
||
| − | |valign="top"| |
||
| + | {{multicol-begin}} |
||
| − | ====[[Technicks]]==== |
||
| + | ;Original |
||
| − | <div class="half-width tabber"> |
||
| + | {|class="half-width article-table FFXII" style="text-align:center" |
||
| − | <div class="tabbertab" title="FFXII"> |
||
| − | {|class="half-width table FFXII" style="text-align:center" |
||
|-class="a" |
|-class="a" |
||
!width="70%"|Name |
!width="70%"|Name |
||
| Line 1,793: | Line 1,815: | ||
|― |
|― |
||
|} |
|} |
||
| + | {{multicol-separator}} |
||
| − | </div> |
||
| + | ;Zodiac |
||
| − | <div class="tabbertab" title="IZJS"> |
||
| − | {|class="half-width table FFXII" style="text-align:center" |
+ | {|class="half-width article-table FFXII" style="text-align:center" |
|-class="a" |
|-class="a" |
||
!width="70%"|Name |
!width="70%"|Name |
||
| Line 1,803: | Line 1,825: | ||
|5,000 gil |
|5,000 gil |
||
|- |
|- |
||
| − | !class="b"|[[ |
+ | !class="b"|[[Horology]] |
|2,000 gil |
|2,000 gil |
||
|- |
|- |
||
| − | !class="b"|[[Charge |
+ | !class="b"|[[Technicks#Charge|Charge]] |
|1,500 gil |
|1,500 gil |
||
|- |
|- |
||
| Line 1,814: | Line 1,836: | ||
!class="b"|[[Libra (ability)|Libra]] |
!class="b"|[[Libra (ability)|Libra]] |
||
|400 gil |
|400 gil |
||
| − | |- |
||
|} |
|} |
||
| + | {{multicol-end}} |
||
| − | </div></div> |
||
| + | {{clear}} |
||
| − | |} |
||
| + | ==== [[Final Fantasy XII items|Items]] ==== |
||
| − | |||
| + | {{multicol-begin}} |
||
| − | {|cellpadding="5" |
||
| + | ;Original |
||
| − | |valign="top"| |
||
| + | {|class="half-width article-table FFXII" style="text-align:center" |
||
| − | ====[[List of Final Fantasy XII items|Items]]==== |
||
| − | <div class="half-width tabber"> |
||
| − | <div class="tabbertab" title="FFXII"> |
||
| − | {|class="half-width table FFXII" style="text-align:center" |
||
|-class="a" |
|-class="a" |
||
!width="70%"|Name |
!width="70%"|Name |
||
!width="30%"|Cost |
!width="30%"|Cost |
||
|- |
|- |
||
| − | !class="b"|[[ |
+ | !class="b"|[[Final Fantasy XII items#Potion|Potion]] |
|70 gil |
|70 gil |
||
|- |
|- |
||
| − | !class="b"|[[ |
+ | !class="b"|[[Final Fantasy XII items#Antidote|Antidote]] |
|50 gil |
|50 gil |
||
|- |
|- |
||
| − | !class="b"|[[Eye Drops]] |
+ | !class="b"|[[Final Fantasy XII items#Eye Drops|Eye Drops]] |
|50 gil |
|50 gil |
||
|- |
|- |
||
| − | !class="b"|[[Phoenix Down]] |
+ | !class="b"|[[Final Fantasy XII items#Phoenix Down|Phoenix Down]] |
|250 gil |
|250 gil |
||
|- |
|- |
||
| − | !class="b"|[[Echo Herbs]] |
+ | !class="b"|[[Final Fantasy XII items#Echo Herbs|Echo Herbs]] |
|50 gil |
|50 gil |
||
|- |
|- |
||
| − | !class="b"|[[Gold Needle]] |
+ | !class="b"|[[Final Fantasy XII items#Gold Needle|Gold Needle]] |
|100 gil |
|100 gil |
||
|- |
|- |
||
| − | !class="b"|[[Alarm Clock]] |
+ | !class="b"|[[Final Fantasy XII items#Prince's Kiss|Alarm Clock]] |
|50 gil |
|50 gil |
||
|- |
|- |
||
| − | !class="b"|[[Handkerchief]] |
+ | !class="b"|[[Final Fantasy XII items#Handkerchief|Handkerchief]] |
|50 gil |
|50 gil |
||
|- |
|- |
||
| − | !class="b"|[[Hi-Potion]] |
+ | !class="b"|[[Final Fantasy XII items#Hi-Potion|Hi-Potion]] |
|210 gil |
|210 gil |
||
|} |
|} |
||
| + | {{multicol-separator}} |
||
| − | </div> |
||
| + | ;Zodiac |
||
| − | <div class="tabbertab" title="IZJS"> |
||
| − | {|class="half-width table FFXII" style="text-align:center" |
+ | {|class="half-width article-table FFXII" style="text-align:center" |
|-class="a" |
|-class="a" |
||
!width="70%"|Name |
!width="70%"|Name |
||
!width="30%"|Cost |
!width="30%"|Cost |
||
|- |
|- |
||
| − | !class="b"|[[Hi-Potion]] |
+ | !class="b"|[[Final Fantasy XII items#Hi-Potion|Hi-Potion]] |
|180 gil |
|180 gil |
||
|- |
|- |
||
| − | !class="b"|[[ |
+ | !class="b"|[[Final Fantasy XII items#Nu Khai Sand|Nu Khai Sand]] |
|50 gil |
|50 gil |
||
|- |
|- |
||
| − | !class="b"|[[ |
+ | !class="b"|[[Final Fantasy XII items#Chronos Tear|Chronos Tear]] |
|60 gil |
|60 gil |
||
|- |
|- |
||
| − | !class="b"|[[Gold Needle]] |
+ | !class="b"|[[Final Fantasy XII items#Gold Needle|Gold Needle]] |
|80 gil |
|80 gil |
||
|- |
|- |
||
| − | !class="b"|[[ |
+ | !class="b"|[[Final Fantasy XII items#Prince's Kiss|Prince's Kiss]] |
|50 gil |
|50 gil |
||
|- |
|- |
||
| − | !class="b"|[[Handkerchief]] |
+ | !class="b"|[[Final Fantasy XII items#Handkerchief|Handkerchief]] |
|50 gil |
|50 gil |
||
|- |
|- |
||
| − | !class="b"|[[Phoenix Down]] |
+ | !class="b"|[[Final Fantasy XII items#Phoenix Down|Phoenix Down]] |
|200 gil |
|200 gil |
||
|- |
|- |
||
| − | !class="b"|[[Echo Herbs]] |
+ | !class="b"|[[Final Fantasy XII items#Echo Herbs|Echo Herbs]] |
|50 gil |
|50 gil |
||
|- |
|- |
||
| − | !class="b"|[[ |
+ | !class="b"|[[Final Fantasy XII items#Antidote|Antidote]] |
|50 gil |
|50 gil |
||
|- |
|- |
||
| − | !class="b"|[[Eye Drops]] |
+ | !class="b"|[[Final Fantasy XII items#Eye Drops|Eye Drops]] |
|50 gil |
|50 gil |
||
|- |
|- |
||
| − | !class="b"|[[ |
+ | !class="b"|[[Final Fantasy XII items#Potion|Potion]] |
|60 gil |
|60 gil |
||
| − | |- |
||
| − | |} |
||
| − | </div></div> |
||
|} |
|} |
||
| + | {{multicol-end}} |
||
| − | ==Musical themes== |
+ | == Musical themes == |
| − | {{ |
+ | {{audio|filename=FFXII The Yensan Sandsea.ogg|title="The Yensan Sandsea"}} |
| − | The |
+ | The Nam-Yensa Sandsea has had three different background themes with each release of ''Final Fantasy XII''. In the original version, both the Ogir-Yensa and the Nam-Yensa Sandseas shared "The Yensan Sandsea" {{J|大砂海|Dai Sakai}} background theme. In the ''International'' release, the Nam-Yensa Sandsea instead uses the "[[Cerobi Steppe#Music|Cerobi Steppe]]" theme. For the ''Zodiac Age'' release, a new background theme titled "The Nam-Yensa Sandsea" plays as the environment theme. |
| + | |||
| − | {{-}} |
||
| + | All three themes were composed by [[Hitoshi Sakimoto]]. |
||
| + | {{clear}} |
||
| + | |||
| + | == Map == |
||
| + | In the original version, the map is found on a small island between two bridges in Augur Hill. In ''The Zodiac Age'', the map was moved to Ogir-Yensa Sandsea Platform 1 - East Tanks area next to the Ogir-Yensa map. |
||
| − | ==Map== |
||
<div style="overflow:auto; width: 100%; height:300px"> |
<div style="overflow:auto; width: 100%; height:300px"> |
||
[[File:FF12 Map - Nam-Yensa Sandsea.png]]</div> |
[[File:FF12 Map - Nam-Yensa Sandsea.png]]</div> |
||
| + | [[:File:Map_25_Nam_Yensa_Sandsea.png|Map from the original ''Final Fantasy XII'' with all treasure information.]] |
||
| − | ==Gallery== |
||
| + | |||
| − | <gallery class="FFXIIa"> |
||
| + | == Other appearances == |
||
| + | === ''[[Final Fantasy Brave Exvius]]'' === |
||
| + | [[File:FFBE Nam-Yensa Sandsea.png|right|150px]] |
||
| + | {{Location section|Final Fantasy Brave Exvius}} |
||
| + | {{clear}} |
||
| + | |||
| + | == Gallery == |
||
| + | <gallery> |
||
Urutan-eater.jpg|Urutan Eater is the Urutan Yensa's mortal enemy. |
Urutan-eater.jpg|Urutan Eater is the Urutan Yensa's mortal enemy. |
||
Wyvern Lord.jpg|Wyvern Lord is a mark in Nam-Yensa Sandsea. |
Wyvern Lord.jpg|Wyvern Lord is a mark in Nam-Yensa Sandsea. |
||
FFXII-nam-yensa-sandsea-save-crystal.jpg|Save Crystal area. |
FFXII-nam-yensa-sandsea-save-crystal.jpg|Save Crystal area. |
||
| + | Monid-FFXII-TZA.png |
||
</gallery> |
</gallery> |
||
| − | {{FFXII}} |
+ | {{navbox setting FFXII}} |
| − | [[Category:Final Fantasy XII |
+ | [[Category:Locations in Final Fantasy XII]] |
[[Category:Deserts]] |
[[Category:Deserts]] |
||
Revision as of 08:08, 28 January 2020
Template:Sideicon

Oh, shut up and help me remodel the Nam-Yensa Sandsea page!
- Adding a Locations section, with images and brief descriptions of the areas within the location.
This request can be discussed on the associated discussion page. Remove this notice upon completion.
The Nam-Yensa Sandsea is a location in the land of Ivalice in Final Fantasy XII. Just west of the Ogir-Yensa Sandsea, it is the only way to access Tomb of Raithwall.
Sage Knowledge
The desert in the west of the Jagd Yensa. Fine sand beats in waves against the feet of the rolling dunes of this region which, together with the Ogir-Yensa Sandsea, is called the Great Yensan Sandsea. To the west of the Nam-Yensa lies the gorge known as the Valley of the Dead, so called because it has been the scene of many an ill-starred adventurer's demise.
Sage Knowledge 50, Nam-Yensa Sandsea
Story
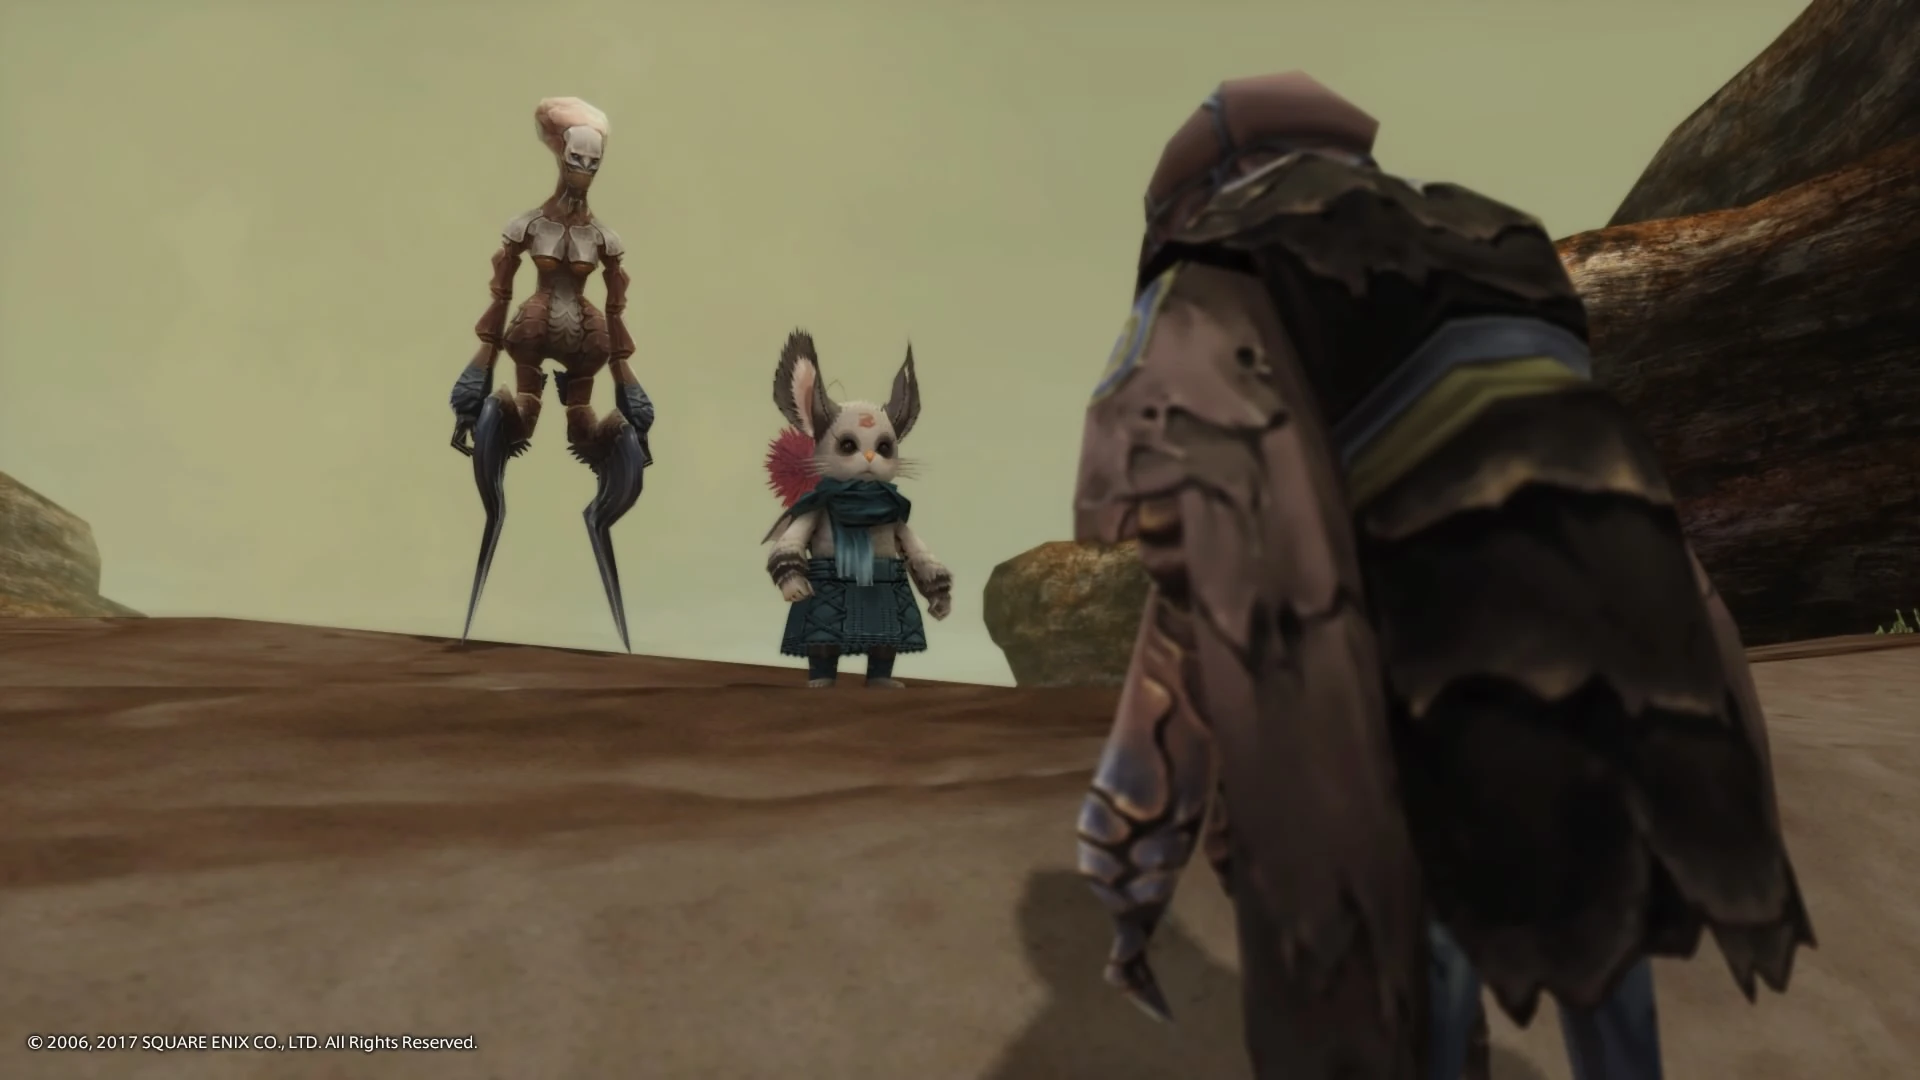

Queen of the Urutan.
While trekking across the Sandsea towards the Tomb of Raithwall, Vaan and the party encounter a Sandsea Moogle who claims a Urutan-Yensa had asked for help in defeating their blood-enemy, the Urutan Eater, and in exchange is ready to reward them with a treasure. The party searches through the Nam-Yensa Sandsea where they find a group of Urutan-Yensa fighting the Titantoise, and proceeds to defeat it.
When they return to the Sandsea Moogle, he says the Urutan wants to give a reward, but they need to find him. The party searches for the Urutan, and stumble upon a rare gathering of Urutan-Yensa. There, they find the one asking for help being tried for shaming the community by asking help from outsiders. The Queen of the Urutan "condemns him to dust", and the Urutan burns and vanishes.
The Sandsea Moogle tries to plead his case, but the Queen warns the moogle she might have punished him too, though merciful that she is, the Queen spares his life. Once the Urutans leave, the moogle notices a rare flower blossoming. He believes this is the treasure the rogue Urutan-Yensa had wanted to show them; a flower that is detested by the Garuda for its smell. The party picks some Eksir Berries from the "Rogue Urutan Flower", and continue their journey.
Locations
The Nam-Yensa Sandsea is located to the west of the Ogir-Yensa Sandsea, in the Jagd Yensa region. To the west in the Valley of the Dead lies the Tomb of Raithwall.
- The Sandscale Bank (to the Ogir-Yensa Sandsea)
- The Urutan-Yensa Sea
- Withering Shores (enter additional area from Zertinan Caverns)
- Augur Hill (to the Ogir-Yensa Sandsea)
- Yellow Sands (to Zertinan Caverns)
- Demesne of the Sandqueen
- Trail of Fading Warmth (to the Tomb of Raithwall)
- Simoon Bluff
Weather
There are two possible weather conditions in Nam-Yensa Sandsea:
- Sunny
- Cloudy (dust is blown in the air, sky is discolored)
The Nam-Yensa Sandsea is of sand terrain, which makes all Earth attacks 20% more powerful than usual.
Treasures
Treasures that always spawn are Balance, Embroidered Tippet and Turtleshell Choker.
Unlike in most areas, plenty of different equipment can be found in randomly spawning treasures in the Nam-Yensa region. Recovery items, such as Potions, Hi-Potions and Ethers are also common. With the Diamond Armlet equipped the common item treasure is Knot of Rust, and the rare item is Elixir or Holy Mote.
In the Augur Hill region the treasure that spawns nearest to the exit to Ogir-Yensa may contain the Iron Helm and the treasure a bit to the west and north from that can be the dagger Chopper. The treasure on the little "island" in the middle of the area can be the Leather Gorget.
In the Urutan Yensa Sea area, the Chopper can again be found in a treasure and the treasure in the section furthest to the east of the map may have the Lambent Hat. The westernmost treasure in the Yellow Sands area can have the Killer Bow. The dead-end bit at the Demesne of the Sand Queen may have the Iron Armor. In Simoon Bluff, there is an oil rig to the west of the entrance to the area.
At the very end there are two treasures that can spawn, and can have the Cypress Pole and Amber Armlet in them. Wizard's Staff may be found in the treasure on the ground next to the oil rig, and the treasure in the westernmost section can be the Windbreaker. The treasure in the northeastern section is always the gambit for Foe: flying, unless it is gil.
The Withering Shores is an area which can only be accessed from the Zertinan Caverns. The treasure that spawns randomly nearest to the entrance to the cave, is either Argyle Armlet or the Ancient Sword if the treasure is items rather than gil. The treasure on the stairs leading up is 90% gil, but if it is items, it can be an Elixir. The treasure at the very top can be Rose Corsage or Vega.
The Urutan-Yensa Sea
- Zodiac
| Chest | Spawns | Holds Gil% | Gil | Normal Treasure | Diamond Armlet Treasure | ||
|---|---|---|---|---|---|---|---|
| 1 | 80% | 50% | ≤ 250 gil | Item 1 | Item 2 | Common | Rare |
| Hi-Potion | Ether | Knot of Rust | Meteorite (A) | ||||
| 2 | 80% | 50% | ≤ 250 gil | Item 1 | Item 2 | Common | Rare |
| Hi-Potion | Chronos Tear | Knot of Rust | Meteorite (A) | ||||
| 3 | 80% | 50% | ≤ 250 gil | Item 1 | Item 2 | Common | Rare |
| Hi-Potion | Phoenix Down | Knot of Rust | Meteorite (A) | ||||
| 4 | 80% | 50% | ≤ 250 gil | Item 1 | Item 2 | Common | Rare |
| Potion | Phoenix Down | Knot of Rust | Meteorite (B) | ||||
| 5 | 20% | 60% | ≤ 1,500 gil | Item 1 | Item 2 | Common | Rare |
| Hi-Potion | Heavy Lance | Knot of Rust | Meteorite (A) | ||||
| 6 | 80% | 50% | ≤ 250 gil | Item 1 | Item 2 | Common | Rare |
| Potion | Ether | Knot of Rust | Meteorite (A) | ||||
| 7 | 80% | 50% | ≤ 250 gil | Item 1 | Item 2 | Common | Rare |
| Potion | Chronos Tear | Knot of Rust | Meteorite (A) | ||||
- Original
| Chest | Spawns | Holds Gil% | Normal Treasure | Diamond Armlet Treasure | ||||
|---|---|---|---|---|---|---|---|---|
| 1 | 75% | 50% | Gil | Item 1 | Item 2 | Gil | Common | Rare |
| ≤ 150 gil | Potion | Lambent Hat | ≤ 600 gil | Knot of Rust | Elixir | |||
| 2 | 75% | 50% | Gil | Item 1 | Item 2 | Gil | Common | Rare |
| ≤ 160 gil | Phoenix Down | Chopper | ≤ 800 gil | Knot of Rust | Elixir | |||
| 3 | 83% | 45% | Gil | Item 1 | Item 2 | Gil | Common | Rare |
| ≤ 300 gil | Potion | Ether | ≤ 900 gil | Knot of Rust | Holy Mote | |||
Withering Shores
- Zodiac
| Chest | Spawns | Holds Gil% | Gil | Normal Treasure | Diamond Armlet Treasure | ||
|---|---|---|---|---|---|---|---|
| 8 | 70% | 50% | ≤ 200 gil | Item 1 | Item 2 | Common | Rare |
| Potion | Phoenix Down | Knot of Rust | Meteorite (B) | ||||
| 9 | 70% | 50% | ≤ 230 gil | Item 1 | Item 2 | Common | Rare |
| Ether | Phoenix Down | Knot of Rust | Meteorite (A) | ||||
| 10 | 70% | 50% | ≤ 160 gil | Item 1 | Item 2 | Common | Rare |
| Ether | Phoenix Down | Knot of Rust | Meteorite (A) | ||||
| 11 | 70% | 55% | ≤ 500 gil | Item 1 | Item 2 | Common | Rare |
| Hi-Ether | Winged Helm | Knot of Rust | Meteorite (A) | ||||
| 12 | 70% | 55% | ≤ 600 gil | Item 1 | Item 2 | Common | Rare |
| Hi-Ether | Chainmail | Knot of Rust | Meteorite (A) | ||||
| 13[1] | 100% | 0% | N/A | Turtleshell Choker | |||
- 1 - Chest does not respawn.
- Original
| Chest | Spawns | Holds Gil% | Normal Treasure | Diamond Armlet Treasure | ||||
|---|---|---|---|---|---|---|---|---|
| 4 | 65% | 50% | Gil | Item 1 | Item 2 | Gil | Common | Rare |
| ≤ 100 gil | Argyle Armlet | Ancient Sword | ≤ 300 gil | Knot of Rust | Elixir | |||
| 5 | 77% | 90% | Gil | Item 1 | Item 2 | Gil | Common | Rare |
| ≤ 700 gil | Hi-Potion | Elixir | ≤ 2,200 gil | Knot of Rust | Holy Mote | |||
| 6 | 60% | 55% | Gil | Item 1 | Item 2 | Gil | Common | Rare |
| ≤ 100 gil | Rose Corsage | Vega | ≤ 300 gil | Knot of Rust | Elixir | |||
Augur Hill
- Zodiac
| Chest | Spawns | Holds Gil% | Gil | Normal Treasure | Diamond Armlet Treasure | ||
|---|---|---|---|---|---|---|---|
| 14 | 75% | 45% | ≤ 300 gil | Item 1 | Item 2 | Common | Rare |
| Ether | Potion | Knot of Rust | Meteorite (A) | ||||
| 15 | 75% | 45% | ≤ 300 gil | Item 1 | Item 2 | Common | Rare |
| Ether | Phoenix Down | Knot of Rust | Meteorite (A) | ||||
| 16 | 75% | 45% | ≤ 300 gil | Phoenix Down | Common | Rare | |
| Knot of Rust | Meteorite (A) | ||||||
| 17 | 75% | 45% | ≤ 300 gil | Item 1 | Item 2 | Common | Rare |
| Phoenix Down | Ether | Knot of Rust | Meteorite (A) | ||||
| 18 | 60% | 45% | ≤ 300 gil | Item 1 | Item 2 | Common | Rare |
| Ether | Cura Mote | Knot of Rust | Meteorite (A) | ||||
| 19 | 75% | 45% | ≤ 300 gil | Item 1 | Item 2 | Common | Rare |
| Potion | Phoenix Down | Knot of Rust | Meteorite (A) | ||||
| 20 | 75% | 45% | ≤ 300 gil | Ether | Common | Rare | |
| Knot of Rust | Meteorite (A) | ||||||
| 21 | 75% | 45% | ≤ 300 gil | Item 1 | Item 2 | Common | Rare |
| Phoenix Down | Potion | Knot of Rust | Meteorite (A) | ||||
| 22 | 75% | 45% | ≤ 300 gil | Item 1 | Item 2 | Common | Rare |
| Potion | Phoenix Down | Knot of Rust | Meteorite (B) | ||||
- Original
| Chest | Spawns | Holds Gil% | Normal Treasure | Diamond Armlet Treasure | ||||
|---|---|---|---|---|---|---|---|---|
| 7 | 65% | 40% | Gil | Item 1 | Item 2 | Gil | Common | Rare |
| ≤ 100 gil | Ether | Iron Helm | ≤ 300 gil | Knot of Rust | Elixir | |||
| 8 | 65% | 40% | Gil | Item 1 | Item 2 | Gil | Common | Rare |
| ≤ 100 gil | Potion | Chopper | ≤ 300 gil | Knot of Rust | Elixir | |||
| 9 | 80% | 35% | Gil | Item 1 | Item 2 | Gil | Common | Rare |
| ≤ 300 gil | Phoenix Down | Ether | ≤ 500 gil | Knot of Rust | Holy Mote | |||
| 10 | 80% | 30% | Gil | Item 1 | Item 2 | Gil | Common | Rare |
| ≤ 290 gil | Potion | G-Ally: status = SLE | ≤ 600 gil | Knot of Rust | Elixir | |||
| 11 | 80% | 35% | Gil | Item 1 | Item 2 | Gil | Common | Rare |
| ≤ 150 gil | Hi-Potion | Leather Gorget | ≤ 800 gil | Knot of Rust | Elixir | |||
| 12 | 80% | 60% | Gil | Item 1 | Item 2 | Gil | Common | Rare |
| ≤ 400 gil | Potion | Reflectga Mote | ≤ 1,000 gil | Knot of Rust | Holy Mote | |||
Yellow Sands
- Zodiac
| Chest | Spawns | Holds Gil% | Gil | Normal Treasure | Diamond Armlet Treasure | ||
|---|---|---|---|---|---|---|---|
| 23 | 70% | 60% | ≤ 290 gil | Item 1 | Item 2 | Common | Rare |
| Antidote | Hi-Potion | Knot of Rust | Meteorite (A) | ||||
| 24 | 70% | 60% | ≤ 290 gil | Item 1 | Item 2 | Common | Rare |
| Potion | Soleil Fang | Knot of Rust | Meteorite (A) | ||||
| 25 | 70% | 60% | ≤ 290 gil | Item 1 | Item 2 | Common | Rare |
| Potion | Ether | Knot of Rust | Meteorite (A) | ||||
| 26 | 70% | 60% | ≤ 290 gil | Item 1 | Item 2 | Common | Rare |
| Potion | Hi-Potion | Knot of Rust | Meteorite (A) | ||||
| 27 | 70% | 60% | ≤ 290 gil | Item 1 | Item 2 | Common | Rare |
| Hi-Potion | Ether | Knot of Rust | Meteorite (B) | ||||
| 28 | 70% | 60% | ≤ 290 gil | Item 1 | Item 2 | Common | Rare |
| Antidote | Hi-Potion | Knot of Rust | Meteorite (C) | ||||
| 29 | 70% | 60% | ≤ 290 gil | Item 1 | Item 2 | Common | Rare |
| Potion | Ether | Knot of Rust | Meteorite (A) | ||||
| 30 | 70% | 60% | ≤ 290 gil | Item 1 | Item 2 | Common | Rare |
| Antidote | Gold Needle | Knot of Rust | Meteorite (A) | ||||
| 31 | 70% | 60% | ≤ 290 gil | Hi-Potion | Common | Rare | |
| Knot of Rust | Meteorite (A) | ||||||
- Original
| Chest | Spawns | Holds Gil% | Normal Treasure | Diamond Armlet Treasure | ||||
|---|---|---|---|---|---|---|---|---|
| 13 | 60% | 40% | Gil | Item 1 | Item 2 | Gil | Common | Rare |
| ≤ 120 gil | Hi-Potion | Killer Bow | ≤ 480 gil | Knot of Rust | Elixir | |||
| 14 | 77% | 23% | Gil | Item 1 | Item 2 | Gil | Common | Rare |
| ≤ 100 gil | Potion | Balance Mote | ≤ 450 gil | Knot of Rust | Elixir | |||
| 15 | 77% | 23% | Gil | Item 1 | Item 2 | Gil | Common | Rare |
| ≤ 300 gil | G-Foe: flying | G-Foe: HP >= 1000 | ≤ 600 gil | Knot of Rust | Elixir | |||
| 16 | 77% | 23% | Gil | Item 1 | Item 2 | Gil | Common | Rare |
| ≤ 100 gil | Potion | Ether | ≤ 450 gil | Knot of Rust | Holy Mote | |||
| 17 | 77% | 23% | Gil | Item 1 | Item 2 | Gil | Common | Rare |
| ≤ 150 gil | Potion | Handkerchief | ≤ 500 gil | Knot of Rust | Hi-Ether | |||
| 18 | 77% | 23% | Gil | Item 1 | Item 2 | Gil | Common | Rare |
| ≤ 100 gil | Potion | Echo Herbs | ≤ 450 gil | Knot of Rust | Hi-Ether | |||
Demesne of the Sandqueen
- Zodiac
| Chest | Spawns | Holds Gil% | Gil | Normal Treasure | Diamond Armlet Treasure | ||
|---|---|---|---|---|---|---|---|
| 32 | 75% | 50% | ≤ 280 gil | Item 1 | Item 2 | Common | Rare |
| Potion | Hi-Potion | Knot of Rust | Meteorite (B) | ||||
| 33 | 75% | 50% | ≤ 180 gil | Item 1 | Item 2 | Common | Rare |
| Potion | Balaclava | Knot of Rust | Meteorite (A) | ||||
| 34 | 75% | 50% | ≤ 180 gil | Item 1 | Item 2 | Common | Rare |
| Potion | Hi-Potion | Knot of Rust | Meteorite (A) | ||||
| 35 | 75% | 50% | ≤ 180 gil | Item 1 | Item 2 | Common | Rare |
| Potion | Hi-Potion | Knot of Rust | Meteorite (A) | ||||
| 36 | 75% | 50% | ≤ 280 gil | Item 1 | Item 2 | Common | Rare |
| Potion | Gold Needle | Knot of Rust | Meteorite (A) | ||||
| 37 | 75% | 50% | ≤ 300 gil | Item 1 | Item 2 | Common | Rare |
| Potion | Hi-Potion | Knot of Rust | Meteorite (A) | ||||
| 38[1] | 100% | 0% | N/A | Balance | |||
| 39 | 75% | 50% | ≤ 280 gil | Item 1 | Item 2 | Common | Rare |
| Ether | Potion | Knot of Rust | Meteorite (A) | ||||
| 40 | 75% | 50% | ≤ 280 gil | Item 1 | Item 2 | Common | Rare |
| Gold Needle | Wizard's Hat | Knot of Rust | Meteorite (A) | ||||
- 1 - Chest does not respawn.
- Original
| Chest | Spawns | Holds Gil% | Normal Treasure | Diamond Armlet Treasure | ||||
|---|---|---|---|---|---|---|---|---|
| 19 | 77% | 23% | Gil | Item 1 | Item 2 | Gil | Common | Rare |
| ≤ 150 gil | Phoenix Down | Ether | ≤ 450 gil | Knot of Rust | Elixir | |||
| 20 | 77% | 23% | Gil | Item 1 | Item 2 | Gil | Common | Rare |
| ≤ 150 gil | Potion | Balance Mote | ≤ 450 gil | Knot of Rust | Elixir | |||
| 21 | 77% | 20% | Gil | Item 1 | Item 2 | Gil | Common | Rare |
| ≤ 150 gil | Potion | G-Foe: HP >= 500 | ≤ 450 gil | Knot of Rust | Elixir | |||
| 22 | 77% | 23% | Gil | Item 1 | Item 2 | Gil | Common | Rare |
| ≤ 250 gil | Potion | Antidote | ≤ 450 gil | Knot of Rust | Elixir | |||
| 23 | 60% | 50% | Gil | Item 1 | Item 2 | Gil | Common | Rare |
| ≤ 150 gil | Hi-Potion | Iron Armor | ≤ 450 gil | Knot of Rust | Holy Mote | |||
| 24 | 77% | 20% | Gil | Item 1 | Item 2 | Gil | Common | Rare |
| ≤ 150 gil | Hi-Potion | G-Foe: HP < 1000 | ≤ 450 gil | Knot of Rust | Elixir | |||
Trail of Fading Warmth
This chest only appears in the Zodiac versions.
| Chest | Spawns | Holds Gil% | Gil | Normal Treasure | Diamond Armlet Treasure | ||
|---|---|---|---|---|---|---|---|
| 41 | 10% | 10% | ≤ 11,000 gil | Knot of Rust | Common | Rare | |
| Knot of Rust | Meteorite (B) | ||||||
Simoon Bluff
- Zodiac
| Chest | Spawns | Holds Gil% | Gil | Normal Treasure | Diamond Armlet Treasure | ||
|---|---|---|---|---|---|---|---|
| 42 | 75% | 10% | ≤ 800 gil | Item 1 | Item 2 | Common | Rare |
| Potion | Ether | Knot of Rust | Meteorite (A) | ||||
| 43 | 75% | 10% | ≤ 900 gil | Item 1 | Item 2 | Common | Rare |
| Potion | Ether | Knot of Rust | Meteorite (A) | ||||
| 44 | 75% | 30% | ≤ 600 gil | Item 1 | Item 2 | Common | Rare |
| Remedy | Lohengrin | Knot of Rust | Meteorite (A) | ||||
| 45[1] | 100% | 0% | N/A | Embroidered Tippet | |||
| 46 | 75% | 30% | ≤ 600 gil | Item 1 | Item 2 | Common | Rare |
| Remedy | Chopper | Knot of Rust | Meteorite (A) | ||||
| 47 | 75% | 30% | ≤ 600 gil | Item 1 | Item 2 | Common | Rare |
| Gold Needle | Soldier's Cap | Knot of Rust | Meteorite (A) | ||||
| 48 | 75% | 30% | ≤ 600 gil | Item 1 | Item 2 | Common | Rare |
| Hi-Potion | Chanter's Djellaba | Knot of Rust | Meteorite (B) | ||||
| 49 | 75% | 50% | ≤ 250 gil | Item 1 | Item 2 | Common | Rare |
| Potion | Sirius | Knot of Rust | Meteorite (C) | ||||
| 50 | 75% | 30% | ≤ 300 gil | Item 1 | Item 2 | Common | Rare |
| Hi-Ether | Lambent Hat | Knot of Rust | Meteorite (A) | ||||
| 51 | 75% | 30% | ≤ 300 gil | Item 1 | Item 2 | Common | Rare |
| Ether | Heavy Coat | Knot of Rust | Meteorite (A) | ||||
| 52[1] | 100% | 100% | 2918 gil | N/A | |||
- 1 - Chest does not respawn.
- Original
| Chest | Spawns | Holds Gil% | Normal Treasure | Diamond Armlet Treasure | ||||
|---|---|---|---|---|---|---|---|---|
| 25 | 70% | 23% | Gil | Item 1 | Item 2 | Gil | Common | Rare |
| ≤ 200 gil | Potion | G-Foe: HP = 100% | ≤ 500 gil | Knot of Rust | Elixir | |||
| 26 | 60% | 50% | Gil | Item 1 | Item 2 | Gil | Common | Rare |
| ≤ 120 gil | Phoenix Down | Wizard's Staff | ≤ 500 gil | Knot of Rust | Elixir | |||
| 27 | 70% | 23% | Gil | Item 1 | Item 2 | Gil | Common | Rare |
| ≤ 180 gil | Antidote | Amber Armlet | ≤ 600 gil | Knot of Rust | Elixir | |||
| 28 | 60% | 50% | Gil | Item 1 | Item 2 | Gil | Common | Rare |
| ≤ 160 gil | Phoenix Down | Cypress Pole | ≤ 600 gil | Knot of Rust | Elixir | |||
| 29 | 77% | 20% | Gil | Item | Gil | Common | Rare | |
| ≤ 150 gil | G-Foe: flying | ≤ 500 gil | Knot of Rust | Holy Mote | ||||
| 30 | 60% | 50% | Gil | Item 1 | Item 2 | Gil | Common | Rare |
| ≤ 150 gil | Potion | Windbreaker | ≤ 500 gil | Knot of Rust | Elixir | |||
| 31 | 65% | 10% | Gil | Item 1 | Item 2 | Gil | Common | Rare |
| ≤ 800 gil | Ether | Reflectga Mote | ≤ 2,000 gil | Knot of Rust | Holy Mote | |||
| 32 | 70% | 23% | Gil | Item 1 | Item 2 | Gil | Common | Rare |
| ≤ 220 gil | Potion | Balance Mote | ≤ 450 gil | Knot of Rust | Elixir | |||
Quests
Hunts
The Wyvern Lord is a Rank II Mark that becomes available after the events of Dreadnought Leviathan when Ashe joins the party. A breed of Avion, Wyvern Lord is encountered in the Simoon Bluff area, petitioned by Sherral in Rabanastre's weapon shop.
The Belito is an Elite Mark petitioned by Montblanc in Rabanastre that becomes available after the events in Draklor Laboratory. It is said to be a sandstorm creating creature that lurks in the Nam-Yensa Sandsea, its bill depicting a red-skinned Mirrorknight. However, the truth of the Mark's nature becomes apparent when the party arrives at the site of the battle.
To find the mark, the player must begin in Ogir-Yensa Sandsea's Central Junction and follow a path through Zertinan Caverns. The northern exit will lead to a dead-end in Nam-Yensa Sandsea's Withering Shore, where Monid is found and a cutscene will initiate the battle.
Rare Game
The player must have spoken to the "Huntmaster" in Phon Coast and defeated Thalassinon to trigger the start of the Rare Game quest. Afterward there is a 40% chance Victanir will appear in the western portion of the Yellow Sands area (the area to the left of where the Urutan-Yensa spawn). Victanir will be almost invisible, so the player cannot see it until they are close. Once they run into Victanir, it will become visible.
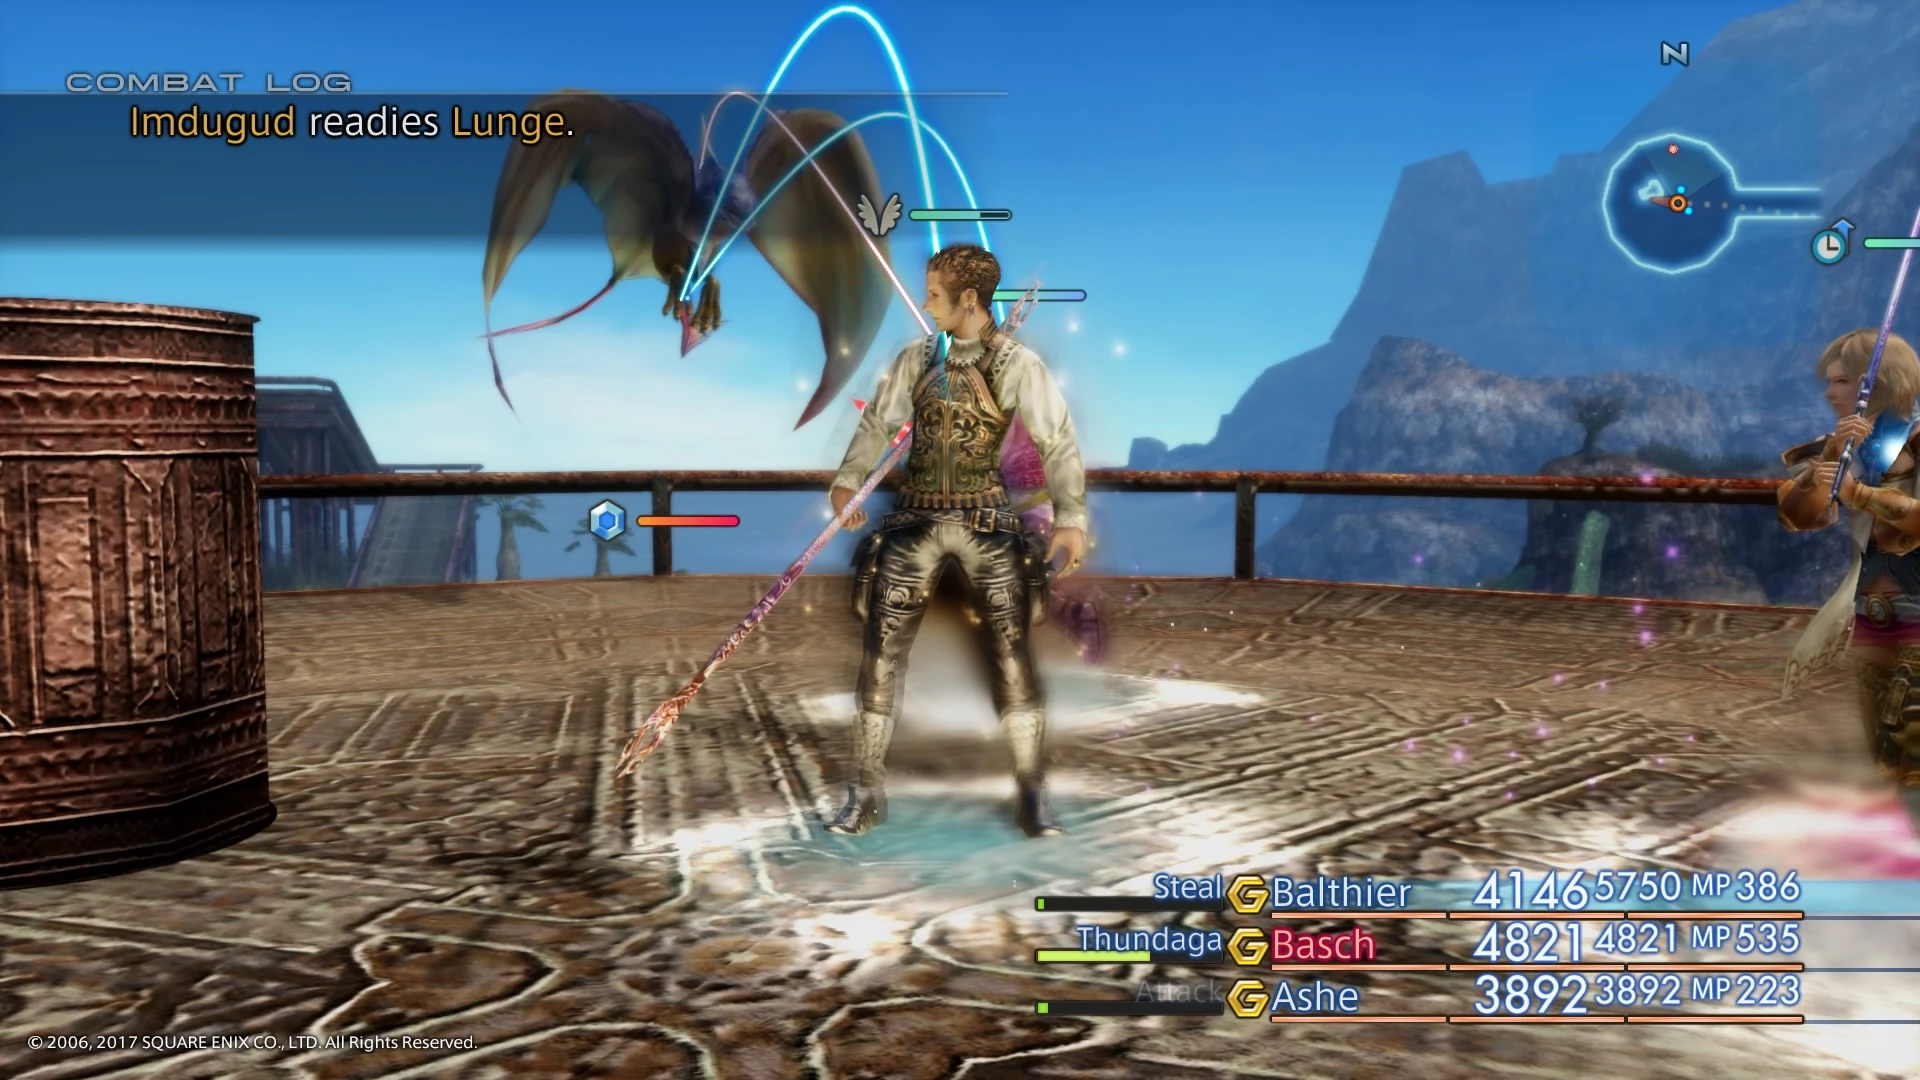
Imdugud.
Imdugud spawns in the Withering Shores zone in the portion of the zone accessible only through the Zertinan Caverns. After the player defeats every Bagoly in the area, the player must then position the party on the center of the circular platform and wait a few seconds (the platform where the party faces Ba'Gamnan for the second time). Imdugud will spawn near the shore on the opposite side of the zone and fly over towards the platform.
Exact positioning on the center of the platform is key to spawning this enemy. If the player isn't in the exact position, Imdugud can take a long time to appear. If the player takes too long to defeat it, it will fly away temporarily, though it will not heal itself.
Megabomb will appear in the Demesne of the Sandqueen area after chaining 21 or more foes.
Enemies
- Alraune
- Danbania (Docile)
- Urutan-Yensa
- Yensa
- Axebeak
- Bagoly
- Bull Danbania (Docile)
- Bull Yensa
- Wyvern
- Urutan Eater (Optional Event Boss)
- Megabomb (Rare)
- Imdugud (Rare)
- Victanir (Rare)
- Wyvern Lord (Mark)
- Belito (Elite Mark)
Shops
Dyce
Dyce appears in the Trail of Fading Warmth. After the player defeats Garuda, he moves to the entrance of the Tomb of Raithwall. After completing the Tomb of Raithwall, he relocates to the Balfonheim Port for the remainder of the game.
Weapons
- Original
| Name | Cost |
|---|---|
| Capella | 1,400 gil |
| Killer Bow | 2,000 gil |
- Zodiac
| Name | Cost |
|---|---|
| Lohengrin | 3,200 gil |
| Heavy Lance | 3,500 gil |
| Longbow | 4,600 gil |
| Sirius | 2,600 gil |
| Chopper | 3,200 gil |
| Paramina Crossbow | 3,300 gil |
| Healing Rod | 2,590 gil |
| Ancient Sword | 2,450 gil |
| Kogarasumaru | 2,500 gil |
| Musk Stick | 3,040 gil |
| Killer Bow | 2,500 gil |
| War Hammer | 2,500 gil |
| Bhuj | 2,200 gil |
| Wizard's Staff | 1,350 gil |
Armor
- Original
| Name | Cost |
|---|---|
| ― | ― |
- Zodiac
| Name | Cost |
|---|---|
| Soldier's Cap | 1,400 gil |
| Heavy Coat | 1,400 gil |
| Lambent Hat | 1,400 gil |
| Chanter's Djellaba | 1,400 gil |
| Winged Helm | 2,400 gil |
| Chainmail | 2,300 gil |
| Golden Shield | 2,000 gil |
| Balaclava | 1,000 gil |
| Windbreaker | 1,000 gil |
| Wizard's Hat | 1,000 gil |
| Wizard's Robes | 1,000 gil |
| Barbut | 1,800 gil |
| Linen Cuirass | 1,800 gil |
| Round Shield | 1,100 gil |
Accessories
- Original
| Name | Cost |
|---|---|
| Rose Corsage | 800 gil |
| Amber Armlet | 6,600 gil |
| Sash | 500 gil |
| Argyle Armlet | 800 gil |
- Zodiac
| Name | Cost |
|---|---|
| Nishijin Belt | 800 gil |
| Black Belt | 600 gil |
| Rose Corsage | 800 gil |
| Leather Gorget | 1,200 gil |
| Tourmaline Ring | 300 gil |
| Steel Gorget | 1,300 gil |
| Argyle Armlet | 600 gil |
| Bangle | 500 gil |
Magicks
Ammunition
- Original
| Name | Cost |
|---|---|
| Onion Arrows | 100 gil |
| Onion Bolts | 100 gil |
| Onion Shot | 100 gil |
| Onion Bombs | 100 gil |
- Zodiac
| Name | Cost |
|---|---|
| Onion Arrows | 100 gil |
| Onion Bolts | 100 gil |
| Onion Shot | 100 gil |
| Onion Bombs | 100 gil |
Technicks
- Original
| Name | Cost |
|---|---|
| ― | ― |
Items
- Original
| Name | Cost |
|---|---|
| Potion | 70 gil |
| Antidote | 50 gil |
| Eye Drops | 50 gil |
| Phoenix Down | 250 gil |
| Echo Herbs | 50 gil |
| Gold Needle | 100 gil |
| Alarm Clock | 50 gil |
| Handkerchief | 50 gil |
| Hi-Potion | 210 gil |
- Zodiac
| Name | Cost |
|---|---|
| Hi-Potion | 180 gil |
| Nu Khai Sand | 50 gil |
| Chronos Tear | 60 gil |
| Gold Needle | 80 gil |
| Prince's Kiss | 50 gil |
| Handkerchief | 50 gil |
| Phoenix Down | 200 gil |
| Echo Herbs | 50 gil |
| Antidote | 50 gil |
| Eye Drops | 50 gil |
| Potion | 60 gil |
Musical themes
The Nam-Yensa Sandsea has had three different background themes with each release of Final Fantasy XII. In the original version, both the Ogir-Yensa and the Nam-Yensa Sandseas shared "The Yensan Sandsea" (大砂海, Dai Sakai?) background theme. In the International release, the Nam-Yensa Sandsea instead uses the "Cerobi Steppe" theme. For the Zodiac Age release, a new background theme titled "The Nam-Yensa Sandsea" plays as the environment theme.
All three themes were composed by Hitoshi Sakimoto.
Map
In the original version, the map is found on a small island between two bridges in Augur Hill. In The Zodiac Age, the map was moved to Ogir-Yensa Sandsea Platform 1 - East Tanks area next to the Ogir-Yensa map.
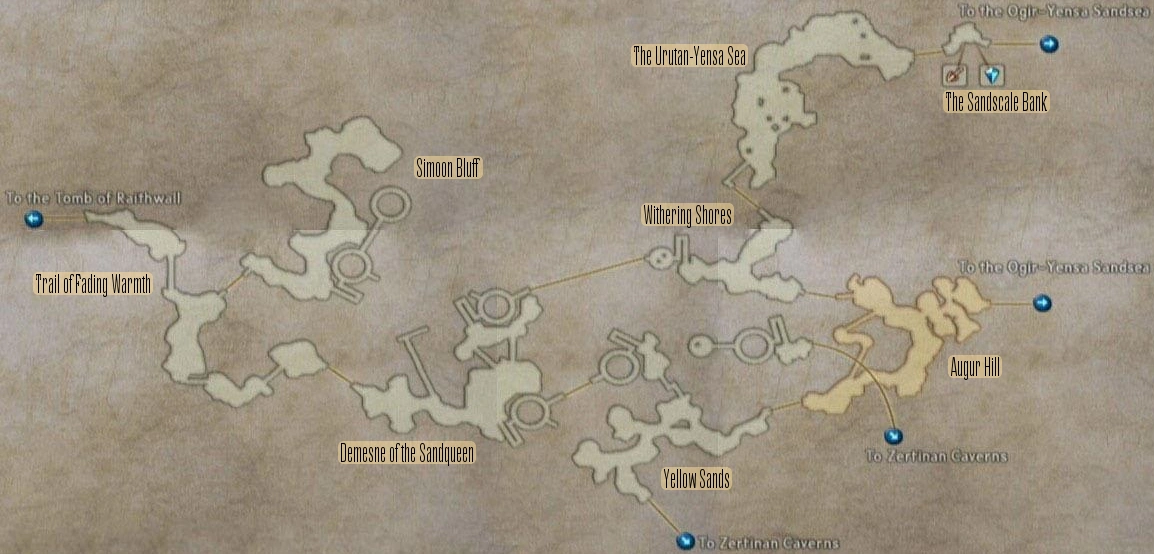
Map from the original Final Fantasy XII with all treasure information.
Other appearances
Final Fantasy Brave Exvius
Gallery
")
")
")
")