Twilight Man (talk | contribs) No edit summary |
|||
| (25 intermediate revisions by 5 users not shown) | |||
| Line 1: | Line 1: | ||
| − | {{expand|WoFF}} |
||
| − | {{images|WoFF}} |
||
{{sideicon|WoFF}} |
{{sideicon|WoFF}} |
||
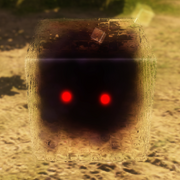
| + | [[File:WoFF Murkrift.png|right|thumb|Murkrift]] |
||
| − | {{ |
+ | {{Quote|Murkrifts are home to strange, rare, and usually very dangerous Mirages. If you want to explore one, make sure that you're fully prepared before diving in! Most murkrifts will be too tough for you to handle when you first find them. If you do end up getting whomped, come back later after you've gotten a bit stronger.|Murkrifts: Scary, but True}} |
| − | '''Murkrifts''' are pocket dimensions that host rare, powerful [[Mirage (World of Final Fantasy)|Mirages]] in ''[[World of Final Fantasy]]''. They are found throughout [[Grymoire]] and pose a challenge to [[Lann]] and [[Reynn]]. |
+ | '''Murkrifts''' are pocket dimensions that host rare, powerful [[Mirage (World of Final Fantasy)|Mirages]] in ''[[World of Final Fantasy]]''. They are found throughout [[Grymoire]] and pose a challenge to [[Lann]] and [[Reynn]]. |
| + | |||
| + | In [[Nine Wood Hills]], [[Serafie]] may occasionally have a Murkrift atop of her ahead and can be entered upon examination. |
||
| + | |||
| + | The ''Maxima'' version adds new Murkrifts containing exclusive Mirages. When defeated or imprismed, these Mirages can be fought again at [[Coliseum (World of Final Fantasy)|The Coliseum]]. |
||
==Story== |
==Story== |
||
{{spoiler}} |
{{spoiler}} |
||
| − | Lann and Reynn enter a murkrift in [[Wellspring Woods]] despite a warning from [[Tama]]. They are defeated by the powerful Mirage within and sent back to |
+ | Lann and Reynn enter a murkrift in [[Wellspring Woods]] despite a warning from [[Tama]]. They are defeated by the powerful Mirage within and sent back to Nine Wood Hills. There, [[Enna Kros]] reveals Tama has sacrificed a life to rewind time and save the twins from death. Tama requests Lann and Reynn let her rest before they enter any other murkrifts. |
{{endspoiler}} |
{{endspoiler}} |
||
==List of murkrifts== |
==List of murkrifts== |
||
| + | {{Section|World of Final Fantasy}} |
||
| − | {|class="full-width WoFF table" style="text-align:center" |
+ | {|class="full-width WoFF article-table" style="text-align:center" |
|-class="a" |
|-class="a" |
||
!style="width:25%"|Location |
!style="width:25%"|Location |
||
!style="width:15%"|Mirage(s) |
!style="width:15%"|Mirage(s) |
||
| − | !style="width:15%"| |
+ | !style="width:15%"|Level (Normal difficulty) |
| + | !style="width:15%"|Level (Nightmare difficulty) |
||
|- |
|- |
||
| − | !class="b"|Wellspring Woods |
+ | !class="b"|[[Wellspring Woods]] |
| − | |Behemoth ( |
+ | |[[Behemoth (World of Final Fantasy)|Behemoth]] x1 |
|26 |
|26 |
||
| + | |86 |
||
|- |
|- |
||
| − | !class="b"| |
+ | !class="b"|[[Pyreglow Forest]] - Branch 2 |
| − | |Sharqual |
+ | |[[Sharqual]] x4 |
| − | | |
+ | |13 |
| + | |71 |
||
|- |
|- |
||
| − | !class="b"| |
+ | !class="b"|[[Icicle Ridge]] - Slip 4 |
| − | |Mini Flan |
+ | |[[Mini Flan]] x6 |
|15 |
|15 |
||
| + | |65 |
||
|- |
|- |
||
| − | !class="b"| |
+ | !class="b"|[[Ice Region]] - near [[Saronia Harbor|Saronia]] |
| + | |[[Ponini]] x2 |
||
| ⚫ | |||
| + | |28 |
||
| + | |77 |
||
| + | |- |
||
| + | !class="b"|[[Saronia Docks]] - Station 2 |
||
| ⚫ | |||
|25 |
|25 |
||
| + | |73 |
||
| + | |- |
||
| + | !class="b"|[[Rainbow Shore|The Rainbow Shore]] |
||
| + | |[[Dramut]] x1 |
||
| + | |32 |
||
| + | |80 |
||
|- |
|- |
||
!class="b"|{{LA|Valley Seven}} - Cauldron 3 |
!class="b"|{{LA|Valley Seven}} - Cauldron 3 |
||
| − | |Memecoleous |
+ | |[[Memecoleous]] x3 |
|30 |
|30 |
||
| + | |74 |
||
| + | |- |
||
| + | !class="b"|[[Phantom Sands|The Phantom Sands]] - Secret Toil |
||
| + | |[[Moomba (World of Final Fantasy)|Moomba]] x3 |
||
| + | |32 |
||
| + | |79 |
||
|- |
|- |
||
| − | !class="b"| |
+ | !class="b"|[[Phantom Sands|The Phantom Sands]] - Toil 6 |
| − | |Chrome Giant |
+ | |[[Chrome Giant]] x3 |
|40 |
|40 |
||
| + | |78 |
||
|- |
|- |
||
| − | !class="b"| |
+ | !class="b"|[[Mako Reactor 0 (World of Final Fantasy)|Mako Reactor 0]] - Sector 4 |
| − | |Mythril Giant |
+ | |[[Mythril Giant]] x3 |
|35 |
|35 |
||
| + | |77 |
||
|- |
|- |
||
| + | !class="b"|[[Big Bridge (World of Final Fantasy)|Big Bridge]] - Segment 1 |
||
| ⚫ | |||
| + | |[[Devil Wolf (World of Final Fantasy)|Devil Wolf]] x1 |
||
| − | |Manticore (x4) |
||
| + | |40 |
||
| + | |80 |
||
| + | |- |
||
| + | !class="b"|[[Tometown of the Ancients|Library of the Ancients]] |
||
| + | |[[Carbuncle (World of Final Fantasy)|Carbuncle]] x2<br>[[Largebuncle]] x1 |
||
| + | |46 |
||
| + | |? |
||
| + | |- |
||
| ⚫ | |||
| + | |[[Manticore (World of Final Fantasy)|Manticore]] x5 |
||
|35 |
|35 |
||
| + | |78 |
||
|- |
|- |
||
| − | !class="b"|The Train Graveyard |
+ | !class="b"|The Train Graveyard - Secret Necropolis |
| − | |Korrigan ( |
+ | |[[Korrigan (World of Final Fantasy)|Korrigan]] x5 |
|37 |
|37 |
||
| + | |79 |
||
|- |
|- |
||
| − | !class="b"|The Train Graveyard |
+ | !class="b"|The Train Graveyard - Secret Necropolis |
| − | |Reaver Mu ( |
+ | |[[Reaver Mu (World of Final Fantasy)|Reaver Mu]] x5 |
|40 |
|40 |
||
| + | |80 |
||
|- |
|- |
||
| − | !class="b"|The Train Graveyard |
+ | !class="b"|The Train Graveyard - Secret Necropolis |
| − | |Red Cap ( |
+ | |[[Red Cap (World of Final Fantasy)|Red Cap]] x5 |
|43 |
|43 |
||
| + | |83 |
||
|- |
|- |
||
| − | !class="b"|The Train Graveyard |
+ | !class="b"|The Train Graveyard - Secret Necropolis |
| − | |Nightmare ( |
+ | |[[Nightmare (World of Final Fantasy)|Nightmare]] x1 |
|35 |
|35 |
||
| + | |82 |
||
|- |
|- |
||
| + | !class="b"|[[Sunken Temple|The Sunken Temple]] |
||
| + | |[[Squidraken (World of Final Fantasy)|Squidraken]] x3<br>[[Mindflayer (World of Final Fantasy)|Mindflayer]] x2 |
||
| + | |45 |
||
| + | |82 |
||
| + | |- |
||
| + | !class="b"|{{LA|Airship (term)|Airship}} - near Valley Seven |
||
| + | |[[Zapt]] x2<br>[[Sand Worm (World of Final Fantasy)|Sand Worm]] x2<br>[[Sylph (World of Final Fantasy)|Sylph]] x2 |
||
| + | |60 |
||
| + | |92 |
||
| + | |- |
||
| + | !class="b"|Airship - near bottom of map |
||
| + | |[[Bablizz]] x2<br>[[Sylph (World of Final Fantasy)|Sylph]] x2<br>[[Fritt]] x2 |
||
| + | |60 |
||
| + | |92 |
||
| + | |- |
||
| + | !class="b"|Airship - behind Ice Region |
||
| + | |[[Sea Serpent (World of Final Fantasy)|Sea Serpent]] x2<br>[[Fritt]] x2<br>[[Bablizz]] x2 |
||
| + | |60 |
||
| + | |92 |
||
| + | |- |
||
| + | !class="b"|Airship - above Balamb Garden |
||
| + | |[[Sand Worm (World of Final Fantasy)|Sand Worm]] x2<br>[[Sylph (World of Final Fantasy)|Sylph]] x2<br>[[Bablizz]] x2 |
||
| + | |60 |
||
| + | |92 |
||
| + | |- |
||
| + | !class="b"|Airship - behind The Dragon Scars |
||
| + | |[[Zapt]] x2<br>[[Sea Serpent (World of Final Fantasy)|Sea Serpent]] x2<br>[[Fritt]] x2 |
||
| + | |60 |
||
| + | |92 |
||
| + | |- |
||
| + | !class="b"|Airship - underneath Tometown |
||
| + | |[[Zapt]] x2<br>[[Sea Serpent (World of Final Fantasy)|Sea Serpent]] x2<br>[[Sand Worm (World of Final Fantasy)|Sand Worm]] x2 |
||
| + | |60 |
||
| + | |92 |
||
| + | |- |
||
| + | !class="b"|Airship - behind The Crystal Tower |
||
| + | |[[Chocobo (World of Final Fantasy)|Chocobo]] x2<br>{{foot|[[Mecha Chocobo (mirage)|Mecha Chocobo]] Stack|Mecha Choco, Mecha Chocobo}} x1 |
||
| + | |65 |
||
| + | |96 |
||
| + | |- |
||
| + | !class="b"|Nine Wood Hills - Plaza 99 - Serafie |
||
| + | |[[Cactrot (World of Final Fantasy)|Cactrot]] x1 |
||
| + | |? |
||
| + | |? |
||
| + | |- |
||
| + | !class="b"|Nine Wood Hills - Plaza 99 - Serafie |
||
| + | |[[Floating Eye (World of Final Fantasy)|Floating Eye]] x1<br>[[Copper Gnome]] x2<br>[[Mini Golem]] x1<br>[[Mandragora (World of Final Fantasy)|Mandragora]] x1 |
||
| + | |? |
||
| + | |? |
||
| + | |- |
||
| + | !class="b"|Nine Wood Hills - Plaza 99 - Serafie |
||
| + | |[[Magic Pot (World of Final Fantasy)|World of Final Fantasy]] x1 |
||
| + | |? |
||
| + | |? |
||
| + | |- |
||
| + | !class="b"|Nine Wood Hills - Plaza 99 - Serafie |
||
| + | |[[Mimic Jackpot]] x1 |
||
| + | |? |
||
| + | |? |
||
|} |
|} |
||
| Line 71: | Line 172: | ||
WoFF Murkrift SS.png|Murkrifts: Scary, but True (p. 1/2) |
WoFF Murkrift SS.png|Murkrifts: Scary, but True (p. 1/2) |
||
WoFF Murkrift SS2.png|Murkrifts: Scary, but True (p. 2/2) |
WoFF Murkrift SS2.png|Murkrifts: Scary, but True (p. 2/2) |
||
| + | WoFF Behemoth Murkrift.png|Fighting Behemoth in a murkrift. |
||
| + | WoFF Behemoth Murkrift location.png|Behemoth murkrift location. |
||
</gallery> |
</gallery> |
||
| + | ==Trivia== |
||
| − | {{WoFF}} |
||
| + | {{spoiler}} |
||
| + | *The battle background for the murkrifts is also used for most [[Intervention quest]] battles, enemies in the corrupted [[Agarthir]], and when Reynn sees [[Tamamohimé]] at the end of the false ending. |
||
| + | **In the ''Maxima'' version, this battle background is also used when fighting [[Mel (World of Final Fantasy)|Mel]], and [[Enna Kros (boss)|Enna Kros]]. |
||
| + | {{endspoiler}} |
||
| + | |||
| + | {{navbox setting WoFF}} |
||
[[Category:World of Final Fantasy]] |
[[Category:World of Final Fantasy]] |
||
Revision as of 17:31, 3 July 2020
Template:Sideicon

Murkrift
Murkrifts are home to strange, rare, and usually very dangerous Mirages. If you want to explore one, make sure that you're fully prepared before diving in! Most murkrifts will be too tough for you to handle when you first find them. If you do end up getting whomped, come back later after you've gotten a bit stronger.
Murkrifts: Scary, but True
Murkrifts are pocket dimensions that host rare, powerful Mirages in World of Final Fantasy. They are found throughout Grymoire and pose a challenge to Lann and Reynn.
In Nine Wood Hills, Serafie may occasionally have a Murkrift atop of her ahead and can be entered upon examination.
The Maxima version adds new Murkrifts containing exclusive Mirages. When defeated or imprismed, these Mirages can be fought again at The Coliseum.
Story
Lann and Reynn enter a murkrift in Wellspring Woods despite a warning from Tama. They are defeated by the powerful Mirage within and sent back to Nine Wood Hills. There, Enna Kros reveals Tama has sacrificed a life to rewind time and save the twins from death. Tama requests Lann and Reynn let her rest before they enter any other murkrifts.
List of murkrifts
| Location | Mirage(s) | Level (Normal difficulty) | Level (Nightmare difficulty) |
|---|---|---|---|
| Wellspring Woods | Behemoth x1 | 26 | 86 |
| Pyreglow Forest - Branch 2 | Sharqual x4 | 13 | 71 |
| Icicle Ridge - Slip 4 | Mini Flan x6 | 15 | 65 |
| Ice Region - near Saronia | Ponini x2 | 28 | 77 |
| Saronia Docks - Station 2 | Mega Sharqual x1 | 25 | 73 |
| The Rainbow Shore | Dramut x1 | 32 | 80 |
| Valley Seven - Cauldron 3 | Memecoleous x3 | 30 | 74 |
| The Phantom Sands - Secret Toil | Moomba x3 | 32 | 79 |
| The Phantom Sands - Toil 6 | Chrome Giant x3 | 40 | 78 |
| Mako Reactor 0 - Sector 4 | Mythril Giant x3 | 35 | 77 |
| Big Bridge - Segment 1 | Devil Wolf x1 | 40 | 80 |
| Library of the Ancients | Carbuncle x2 Largebuncle x1 |
46 | ? |
| The Train Graveyard - Secret Necropolis | Manticore x5 | 35 | 78 |
| The Train Graveyard - Secret Necropolis | Korrigan x5 | 37 | 79 |
| The Train Graveyard - Secret Necropolis | Reaver Mu x5 | 40 | 80 |
| The Train Graveyard - Secret Necropolis | Red Cap x5 | 43 | 83 |
| The Train Graveyard - Secret Necropolis | Nightmare x1 | 35 | 82 |
| The Sunken Temple | Squidraken x3 Mindflayer x2 |
45 | 82 |
| Airship - near Valley Seven | Zapt x2 Sand Worm x2 Sylph x2 |
60 | 92 |
| Airship - near bottom of map | Bablizz x2 Sylph x2 Fritt x2 |
60 | 92 |
| Airship - behind Ice Region | Sea Serpent x2 Fritt x2 Bablizz x2 |
60 | 92 |
| Airship - above Balamb Garden | Sand Worm x2 Sylph x2 Bablizz x2 |
60 | 92 |
| Airship - behind The Dragon Scars | Zapt x2 Sea Serpent x2 Fritt x2 |
60 | 92 |
| Airship - underneath Tometown | Zapt x2 Sea Serpent x2 Sand Worm x2 |
60 | 92 |
| Airship - behind The Crystal Tower | Chocobo x2 Mecha Chocobo StackMecha Choco, Mecha Chocobo x1 |
65 | 96 |
| Nine Wood Hills - Plaza 99 - Serafie | Cactrot x1 | ? | ? |
| Nine Wood Hills - Plaza 99 - Serafie | Floating Eye x1 Copper Gnome x2 Mini Golem x1 Mandragora x1 |
? | ? |
| Nine Wood Hills - Plaza 99 - Serafie | World of Final Fantasy x1 | ? | ? |
| Nine Wood Hills - Plaza 99 - Serafie | Mimic Jackpot x1 | ? | ? |
Gallery
")
")
")
")
Trivia
- The battle background for the murkrifts is also used for most Intervention quest battles, enemies in the corrupted Agarthir, and when Reynn sees Tamamohimé at the end of the false ending.