Intangir Bot (talk | contribs) m (→top: Decapitalising, replaced: [[World Map → [[world map) Tag: apiedit |
No edit summary Tag: Visual edit |
||
| (30 intermediate revisions by 8 users not shown) | |||
| Line 1: | Line 1: | ||
| ⚫ | |||
| ⚫ | |||
| + | {{DISPLAYTITLE:Midlight's Deep (''Tactics'')}} |
||
| − | {{Images|Maps}} |
||
| ⚫ | |||
| ⚫ | |||
| + | {{Image needed|FFT|PFF|Maps}} |
||
| ⚫ | |||
| + | |||
[[File:Deep Dungeon.png|right|200px|thumb|Deep Dungeon.]] |
[[File:Deep Dungeon.png|right|200px|thumb|Deep Dungeon.]] |
||
| ⚫ | |||
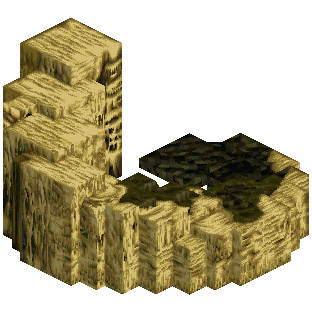
[[File:Deep Dungeon 3.png|right|thumb|200px|Midlight's Deep when 2 or more crystals are active.]] |
[[File:Deep Dungeon 3.png|right|thumb|200px|Midlight's Deep when 2 or more crystals are active.]] |
||
| − | '''Midlight's Deep |
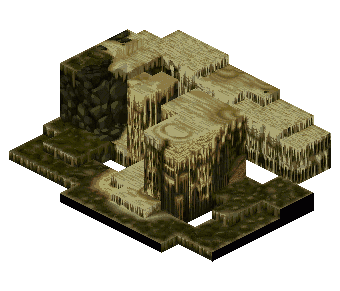
+ | '''Midlight's Deep''' {{J|ディープダンジョン|Dīpu Danjon|Deep Dungeon}}, also known as '''Deep Dungeon''', is an [[bonus dungeon|optional dungeon]] in ''[[Final Fantasy Tactics]]'' that serves as a [[sidequest]]. Located on an island east of the [[Port City of Warjilis]], it consists of ten levels of caves, each of which consist of an independent battlefield. It is home to the most difficult enemies in the game, and the best treasure through the [[Treasure Hunter (ability)|Treasure Hunter]] ability. This sidequest is needed to be passed in order to recruit the [[Byblos (Tactics)|Byblos]]. |
Midlight's Deep can be unlocked after completing the battles in [[Mullonde]]. When the player enters Warjilis again, a scene will play, and then Midlight's Deep appears on the [[world map]]. From the start, only one of the ten levels can be accessed. In order to get deeper, the player must fight a battle, all of which function like random battles with random enemies to face. Simply defeating every enemy on the screen will not work, instead, the player must find a passageway which leads to the next level. |
Midlight's Deep can be unlocked after completing the battles in [[Mullonde]]. When the player enters Warjilis again, a scene will play, and then Midlight's Deep appears on the [[world map]]. From the start, only one of the ten levels can be accessed. In order to get deeper, the player must fight a battle, all of which function like random battles with random enemies to face. Simply defeating every enemy on the screen will not work, instead, the player must find a passageway which leads to the next level. |
||
| Line 15: | Line 17: | ||
The tenth level is special in that it holds a regular storyline battle with the secret [[Lucavi]] demon [[Elidibus (Tactics)|Elidibus]]. Following that battle, it can be accessed as a normal level like all the others. |
The tenth level is special in that it holds a regular storyline battle with the secret [[Lucavi]] demon [[Elidibus (Tactics)|Elidibus]]. Following that battle, it can be accessed as a normal level like all the others. |
||
| − | ==Battle information== |
+ | == Battle information == |
| + | {{Battle information FFT |
||
| − | {{FFT BI |
||
|image = |
|image = |
||
|bno = ? |
|bno = ? |
||
| Line 31: | Line 33: | ||
|enemy lvl = ? |
|enemy lvl = ? |
||
|recommend = 40 - 50 |
|recommend = 40 - 50 |
||
| − | |item = [[Zodiark]] Summon |
+ | |item = [[Zodiark (summon)|Zodiark]] Summon |
|info = The Byblos joins the party after this battle, if it survives. |
|info = The Byblos joins the party after this battle, if it survives. |
||
|weather = None |
|weather = None |
||
| Line 38: | Line 40: | ||
|geomancy = Tremor, Sandstorm |
|geomancy = Tremor, Sandstorm |
||
}} |
}} |
||
| − | {{ |
+ | {{clear}} |
| − | ==Random Battle Enemies== |
+ | == Random Battle Enemies == |
| − | ===The Crevasse (NOGIAS)=== |
+ | === The Crevasse (NOGIAS) === |
[[File:Nogias.gif|right|180px]] |
[[File:Nogias.gif|right|180px]] |
||
| − | {{ |
+ | {{Quote|'Beginning' usually happens over trifles. Even if it's a coincidence.|PlayStation description}} |
| + | {{Quote|The light fades as one begins the descent into this great earthen rift.|''War of the Lions'' description}} |
||
| ⚫ | |||
| − | *[[Goblin (Tactics)| |
+ | * [[Goblin (Tactics)|Goblin]] |
| − | *[[Goblin (Tactics)| |
+ | * [[Goblin (Tactics)|Black Goblin]] |
| − | *[[ |
+ | * [[Goblin (Tactics)|Gobbledygook]] |
| − | *[[Panther (Tactics)| |
+ | * [[Panther (Tactics)|Red Panther]] |
| − | *[[ |
+ | * [[Panther (Tactics)|Coeurl]] |
| − | *[[Bomb (Tactics)| |
+ | * [[Bomb (Tactics)|Bomb]] |
| − | *[[Bomb (Tactics)| |
+ | * [[Bomb (Tactics)|Grenade]] |
| − | *[[ |
+ | * [[Bomb (Tactics)|Exploder]] |
| − | *[[ |
+ | * [[Minotaur (Tactics)|Wisenkin]] |
| − | *[[ |
+ | * [[Mindflayer (Tactics)|Piscodaemon]] |
| − | *[[ |
+ | * [[Squire (Tactics)|Squire]] |
| − | *[[ |
+ | * [[Knight (Tactics)|Knight]] |
| − | *[[ |
+ | * [[Archer (Tactics)|Archer]] |
| − | *[[ |
+ | * [[Thief (Tactics)|Thief]] |
| − | *[[ |
+ | * [[Monk (Tactics)|Monk]] |
| − | *[[ |
+ | * [[Black Mage (Tactics)|Black Mage]] |
| − | *[[ |
+ | * [[Time Mage (Tactics)|Time Mage]] ([[Dragqueen]]) |
| ⚫ | |||
| − | ===The Stair (TERMINATE)=== |
+ | === The Stair (TERMINATE) === |
[[File:Terminate.gif|right|180px|The Stair(TERMINATE)]] |
[[File:Terminate.gif|right|180px|The Stair(TERMINATE)]] |
||
| − | {{ |
+ | {{Quote|Let's assume the best solution is to forget your duty. But, that's only if you know the meaning of 'preparation'.|PlayStation description}} |
| + | {{Quote|An ancient stair leads deeper into the earth, but the footing is treacherous in the dark.|''War of the Lions'' description}} |
||
| ⚫ | |||
| − | *[[Goblin (Tactics)| |
+ | * [[Goblin (Tactics)|Goblin]] |
| − | *[[ |
+ | * [[Goblin (Tactics)|Black Goblin]] |
| − | *[[Skeleton (Tactics)| |
+ | * [[Skeleton (Tactics)|Skeleton]] |
| − | *[[ |
+ | * [[Skeleton (Tactics)|Bonesnatch]] |
| − | *[[Ghost (Tactics)| |
+ | * [[Ghost (Tactics)|Ghoul]] |
| − | *[[ |
+ | * [[Ghost (Tactics)|Ghast]] |
| − | *[[Ahriman (Tactics)| |
+ | * [[Ahriman (Tactics)|Floating Eye]] |
| − | *[[ |
+ | * [[Ahriman (Tactics)|Ahriman]] |
| − | *[[Dragon (Tactics)| |
+ | * [[Dragon (Tactics)|Dragon]] |
| − | *[[ |
+ | * [[Dragon (Tactics)|Blue Dragon]] |
| − | *[[ |
+ | * [[Knight (Tactics)|Knight]] |
| − | *[[ |
+ | * [[Archer (Tactics)|Archer]] |
| − | *[[ |
+ | * [[Monk (Tactics)|Monk]] |
| − | *[[ |
+ | * [[Ninja (Tactics)|Ninja]] |
| − | *[[ |
+ | * [[Black Mage (Tactics)|Black Mage]] |
| − | *[[ |
+ | * [[Time Mage (Tactics)|Time Mage]] |
| + | * [[Summoner (Tactics)|Summoner]] |
||
| − | ===The Hollow (DELTA)=== |
+ | === The Hollow (DELTA) === |
[[File:Delta.gif|right|180px|The Hollow(DELTA)]] |
[[File:Delta.gif|right|180px|The Hollow(DELTA)]] |
||
| − | {{ |
+ | {{Quote|When you lose your way in life, time may solve problems. What if you can't find your way? Laugh, but quietly.|PlayStation description}} |
| + | {{Quote|An expansive cavern opens in the inky blackness, deep within the bowels of the earth.|''War of the Lions'' description}} |
||
| ⚫ | |||
| − | *[[Panther (Tactics)| |
+ | * [[Panther (Tactics)|Red Panther]] |
| − | *[[ |
+ | * [[Panther (Tactics)|Coeurl]] |
| − | *[[Bomb (Tactics)| |
+ | * [[Bomb (Tactics)|Bomb]] |
| − | *[[ |
+ | * [[Bomb (Tactics)|Grenade]] |
| − | *[[ |
+ | * [[Skeleton (Tactics)|Skeletal Fiend]] |
| − | *[[Minotaur (Tactics)| |
+ | * [[Minotaur (Tactics)|Wisenkin]] |
| − | *[[ |
+ | * [[Minotaur (Tactics)|Minotaur]] |
| − | *[[Aevis (Tactics)| |
+ | * [[Aevis (Tactics)|Jura Aevis]] |
| − | *[[Aevis (Tactics)| |
+ | * [[Aevis (Tactics)|Steelhawk]] |
| − | *[[ |
+ | * [[Aevis (Tactics)|Cockatrice]] |
| − | *[[Mindflayer (Tactics)| |
+ | * [[Mindflayer (Tactics)|Piscodaemon]] |
| − | *[[Mindflayer (Tactics)| |
+ | * [[Mindflayer (Tactics)|Squidraken]] |
| − | *[[ |
+ | * [[Mindflayer (Tactics)|Mindflayer]] |
| − | *[[ |
+ | * [[Treant (Tactics)|Elder Treant]] |
| − | *[[Behemoth (Tactics)|Behemoth |
+ | * [[Behemoth (Tactics)|Behemoth]] |
| − | *[[ |
+ | * [[Behemoth (Tactics)|Behemoth King]] |
| − | *[[ |
+ | * [[Squire (Tactics)|Squire]] |
| − | *[[ |
+ | * [[Knight (Tactics)|Knight]] |
| − | *[[ |
+ | * [[Archer (Tactics)|Archer]] |
| − | *[[ |
+ | * [[Thief (Tactics)|Thief]] |
| − | *[[ |
+ | * [[Geomancer (Tactics)|Geomancer]] |
| − | *[[ |
+ | * [[Dragoon (Tactics)|Dragoon]] |
| − | *[[ |
+ | * [[Black Mage (Tactics)|Black Mage]] |
| − | *[[ |
+ | * [[Mystic (Tactics)|Mystic]] |
| ⚫ | |||
| − | ===The Catacombs (VALKYRIES)=== |
+ | === The Catacombs (VALKYRIES) === |
[[File:Valkyries.gif|right|180px|The Catacombs(VALKYRIES)]] |
[[File:Valkyries.gif|right|180px|The Catacombs(VALKYRIES)]] |
||
| − | {{ |
+ | {{Quote|Another person's life is saved in exchange for yours. In other words, yours is saved in exchange for another person's.|PlayStation description}} |
| + | {{Quote|The final resting place of many who once called Midlight's Deep their home.|''War of the Lions'' description}} |
||
| ⚫ | |||
| − | *[[ |
+ | * [[Goblin (Tactics)|Gobbledygook]] |
| − | *[[Minotaur (Tactics)| |
+ | * [[Minotaur (Tactics)|Minotaur]] |
| − | *[[ |
+ | * [[Minotaur (Tactics)|Sekhret]] |
| − | *[[Aevis (Tactics)| |
+ | * [[Aevis (Tactics)|Jura Aevis]] |
| − | *[[Aevis (Tactics)| |
+ | * [[Aevis (Tactics)|Steelhawk]] |
| − | *[[ |
+ | * [[Aevis (Tactics)|Cockatrice]] |
| − | *[[ |
+ | * [[Mindflayer (Tactics)|Mindflayer]] |
| − | *[[ |
+ | * [[Ahriman (Tactics)|Floating Eye]] |
| − | *[[Malboro (Tactics)| |
+ | * [[Malboro (Tactics)|Ochu]] |
| − | *[[Malboro (Tactics)| |
+ | * [[Malboro (Tactics)|Malboro]] |
| − | *[[ |
+ | * [[Malboro (Tactics)|Greater Malboro]] |
| − | *[[ |
+ | * [[Hydra (Tactics)|Hydra]] |
| − | *[[ |
+ | * [[Archer (Tactics)|Archer]] |
| − | *[[ |
+ | * [[Monk (Tactics)|Monk]] |
| − | *[[ |
+ | * [[Black Mage (Tactics)|Black Mage]] |
| − | *[[ |
+ | * [[Summoner (Tactics)|Summoner]] |
| ⚫ | |||
| − | ===The Oubliette (MLAPAN)=== |
+ | === The Oubliette (MLAPAN) === |
| − | {{ |
+ | {{Quote|The scent remains, even if everything is gone. It stays deeply in one's memory forever.|PlayStation description}} |
| + | {{Quote|Without a light to guide one's way, there could be no escape from the steep, sheer walls of this chasm.|''War of the Lions'' description}} |
||
| ⚫ | |||
| ⚫ | |||
| ⚫ | |||
| ⚫ | |||
| ⚫ | |||
| ⚫ | |||
| ⚫ | |||
| ⚫ | |||
| ⚫ | |||
| ⚫ | |||
| ⚫ | |||
| ⚫ | |||
| ⚫ | |||
| ⚫ | |||
| ⚫ | |||
| ⚫ | |||
| ⚫ | |||
| ⚫ | |||
| ⚫ | |||
| ⚫ | |||
| ⚫ | |||
| ⚫ | |||
| ⚫ | |||
| ⚫ | |||
| ⚫ | |||
| ⚫ | |||
| ⚫ | |||
| ⚫ | |||
| ⚫ | |||
| ⚫ | |||
| ⚫ | |||
| ⚫ | |||
| ⚫ | |||
| ⚫ | |||
| + | * [[Summoner (Tactics)|Summoner]] |
||
| ⚫ | |||
| ⚫ | |||
| + | |||
| ⚫ | |||
[[File:Tiger.gif|right|180px|The Palings(TIGER)]] |
[[File:Tiger.gif|right|180px|The Palings(TIGER)]] |
||
| − | {{ |
+ | {{Quote|Does man become wild if all rationality is taken away from him? The answer is NO. This is because he doesn't have grace.|PlayStation description}} |
| + | {{Quote|There are thresholds man was never meant to cross. These palings may quite possibly number among them.|''War of the Lions'' description}} |
||
| ⚫ | |||
| − | *[[Chocobo (Tactics)| |
+ | * [[Chocobo (Tactics)|Chocobo]] |
| − | *[[ |
+ | * [[Chocobo (Tactics)|Black Chocobo]] |
| − | *[[Goblin (Tactics)| |
+ | * [[Goblin (Tactics)|Goblin]] |
| − | *[[ |
+ | * [[Goblin (Tactics)|Black Goblin]] |
| − | *[[Panther (Tactics)| |
+ | * [[Panther (Tactics)|Red Panther]] |
| − | *[[Panther (Tactics)| |
+ | * [[Panther (Tactics)|Coeurl]] |
| − | *[[ |
+ | * [[Panther (Tactics)|Vampire Cat]] |
| − | *[[ |
+ | * [[Bomb (Tactics)|Exploder]] |
| − | *[[Minotaur (Tactics)| |
+ | * [[Minotaur (Tactics)|Wisenkin]] |
| − | *[[Minotaur (Tactics)| |
+ | * [[Minotaur (Tactics)|Minotaur]] |
| − | *[[ |
+ | * [[Minotaur (Tactics)|Sekhret]] |
| − | *[[Mindflayer (Tactics)| |
+ | * [[Mindflayer (Tactics)|Piscodaemon]] |
| − | *[[Mindflayer (Tactics)| |
+ | * [[Mindflayer (Tactics)|Squidraken]] |
| − | *[[ |
+ | * [[Mindflayer (Tactics)|Mindflayer]] |
| − | *[[Ahriman (Tactics)| |
+ | * [[Ahriman (Tactics)|Floating Eye]] |
| − | *[[Ahriman (Tactics)| |
+ | * [[Ahriman (Tactics)|Ahriman]] |
| − | *[[ |
+ | * [[Ahriman (Tactics)|Plague Horror]] |
| − | *[[Behemoth (Tactics)|Behemoth |
+ | * [[Behemoth (Tactics)|Behemoth]] |
| − | *[[Behemoth (Tactics)| |
+ | * [[Behemoth (Tactics)|Behemoth King]] |
| − | *[[ |
+ | * [[Behemoth (Tactics)|Dark Behemoth]] |
| − | *[[ |
+ | * [[Dragon (Tactics)|Dragon]] |
| − | *[[ |
+ | * [[Knight (Tactics)|Knight]] |
| − | *[[ |
+ | * [[Archer (Tactics)|Archer]] |
| − | *[[ |
+ | * [[Ninja (Tactics)|Ninja]] |
| − | *[[ |
+ | * [[Samurai (Tactics)|Samurai]] |
| + | * [[Black Mage (Tactics)|Black Mage]] |
||
| − | ===The Crossing (BRIDGE)=== |
+ | === The Crossing (BRIDGE) === |
[[File:Bridge.gif|right|180px|The Crossing(BRIDGE)]] |
[[File:Bridge.gif|right|180px|The Crossing(BRIDGE)]] |
||
| − | {{ |
+ | {{Quote|Though there are many possible ways, "Bridge" made it into one. This is a serious matter.|PlayStation description}} |
| + | {{Quote|This hazardous crossing is the only route forward, but a single misstep could send one spiraling into the void.|''War of the Lions'' description.}} |
||
| ⚫ | |||
| − | *[[Skeleton (Tactics)| |
+ | * [[Skeleton (Tactics)|Skeleton]] |
| − | *[[Skeleton (Tactics)| |
+ | * [[Skeleton (Tactics)|Bonesnatch]] |
| − | *[[ |
+ | * [[Skeleton (Tactics)|Skeletal Fiend]] |
| − | *[[Minotaur (Tactics)| |
+ | * [[Minotaur (Tactics)|Wisenkin]] |
| − | *[[Minotaur (Tactics)| |
+ | * [[Minotaur (Tactics)|Minotaur]] |
| − | *[[ |
+ | * [[Minotaur (Tactics)|Sekhret]] |
| − | *[[Ghost (Tactics)| |
+ | * [[Ghost (Tactics)|Ghast]] |
| − | *[[ |
+ | * [[Ghost (Tactics)|Revenant]] |
| − | *[[Mindflayer (Tactics)| |
+ | * [[Mindflayer (Tactics)|Piscodaemon]] |
| − | *[[Mindflayer (Tactics)| |
+ | * [[Mindflayer (Tactics)|Squidraken]] |
| − | *[[ |
+ | * [[Mindflayer (Tactics)|Mindflayer]] |
| − | *[[Behemoth (Tactics)|Behemoth |
+ | * [[Behemoth (Tactics)|Behemoth]] |
| − | *[[ |
+ | * [[Behemoth (Tactics)|Behemoth King]] |
| − | *[[ |
+ | * [[Dragon (Tactics)|Dragon]] |
| − | *[[ |
+ | * [[Hydra (Tactics)|Hydra]] |
| − | *[[ |
+ | * [[Archer (Tactics)|Archer]] |
| − | *[[ |
+ | * [[Thief (Tactics)|Thief]] |
| − | *[[ |
+ | * [[Monk (Tactics)|Monk]] |
| − | *[[ |
+ | * [[Dragoon (Tactics)|Dragoon]] |
| − | *[[ |
+ | * [[Black Mage (Tactics)|Black Mage]] |
| − | *[[ |
+ | * [[White Mage (Tactics)|White Mage]] |
| − | *[[ |
+ | * [[Summoner (Tactics)|Summoner]] |
| ⚫ | |||
| − | ===The Switchback (VOYAGE)=== |
+ | === The Switchback (VOYAGE) === |
[[File:Voyage.gif|right|180px|The Switchback(VOYAGE)]] |
[[File:Voyage.gif|right|180px|The Switchback(VOYAGE)]] |
||
| − | {{ |
+ | {{Quote|Other than finding an answer. [sic] Is anything else to be gained from a journey?|PlayStation description.}} |
| + | {{Quote|Those who would venture deeper into the abyss are funneled into this winding passageway.|''War of the Lions'' description}} |
||
| ⚫ | |||
| + | |||
| ⚫ | |||
| − | *[[ |
+ | * [[Panther (Tactics)|Red Panther]] |
| − | *[[ |
+ | * [[Panther (Tactics)|Coeurl]] |
| − | *[[Bomb (Tactics)| |
+ | * [[Bomb (Tactics)|Bomb]] |
| − | *[[ |
+ | * [[Bomb (Tactics)|Grenade]] |
| − | *[[ |
+ | * [[Bomb (Tactics)|Exploder]] |
| − | *[[Treant (Tactics)| |
+ | * [[Treant (Tactics)|Dryad]] |
| − | *[[ |
+ | * [[Treant (Tactics)|Treant]] |
| − | *[[ |
+ | * [[Treant (Tactics)|Elder Treant]] |
| − | *[[Malboro (Tactics)| |
+ | * [[Malboro (Tactics)|Ochu]] |
| − | *[[ |
+ | * [[Malboro (Tactics)|Malboro]] |
| − | *[[ |
+ | * [[Malboro (Tactics)|Greater Malboro]] |
| − | *[[Behemoth (Tactics)| |
+ | * [[Behemoth (Tactics)|Behemoth]] |
| − | *[[ |
+ | * [[Behemoth (Tactics)|Behemoth King]] |
| − | *[[ |
+ | * [[Behemoth (Tactics)|Dark Behemoth]] |
| − | *[[Dragon (Tactics)| |
+ | * [[Dragon (Tactics)|Dragon]] |
| − | *[[ |
+ | * [[Dragon (Tactics)|Blue Dragon]] |
| − | *[[ |
+ | * [[Dragon (Tactics)|Red Dragon]] |
| − | *[[ |
+ | * [[Hydra (Tactics)|Hydra]] |
| − | *[[ |
+ | * [[Hydra (Tactics)|Greater Hydra]] |
| − | *[[ |
+ | * [[Archer (Tactics)|Archer]] |
| + | * [[Black Mage (Tactics)|Black Mage]] |
||
| ⚫ | |||
| ⚫ | |||
| ⚫ | |||
| − | ===The Interstice (HORROR)=== |
+ | === The Interstice (HORROR) === |
[[File:Horror.gif|right|180px|The Interstice(HORROR)]] |
[[File:Horror.gif|right|180px|The Interstice(HORROR)]] |
||
| − | {{ |
+ | {{Quote|It's impossible to describe horror. But one may be able to know it if one tells quietly...|PlayStation description.}} |
| + | {{Quote|The stale air and stifling darkness make the walls of this narrow passage all the more oppressive.|''War of the Lions'' description.}} |
||
| ⚫ | |||
| − | *[[Chocobo (Tactics)| |
+ | * [[Chocobo (Tactics)|Chocobo]] |
| − | *[[Chocobo (Tactics)| |
+ | * [[Chocobo (Tactics)|Black Chocobo]] |
| − | *[[ |
+ | * [[Chocobo (Tactics)|Red Chocobo]] |
| − | *[[ |
+ | * [[Panther (Tactics)|Red Panther]] |
| − | *[[ |
+ | * [[Minotaur (Tactics)|Sekhret]] |
| − | *[[ |
+ | * [[Aevis (Tactics)|Cockatrice]] |
| − | *[[ |
+ | * [[Behemoth (Tactics)|Behemoth]] |
| − | *[[Dragon (Tactics)| |
+ | * [[Dragon (Tactics)|Dragon]] |
| − | *[[Dragon (Tactics)| |
+ | * [[Dragon (Tactics)|Blue Dragon]] |
| − | *[[ |
+ | * [[Dragon (Tactics)|Red Dragon]] |
| − | *[[ |
+ | * [[Hydra (Tactics)|Hydra]] |
| − | *[[ |
+ | * [[Knight (Tactics)|Knight]] |
| − | *[[ |
+ | * [[Archer (Tactics)|Archer]] |
| − | *[[ |
+ | * [[Dragoon (Tactics)|Dragoon]] |
| − | *[[ |
+ | * [[Ninja (Tactics)|Ninja]] |
| − | *[[ |
+ | * [[Samurai (Tactics)|Samurai]] |
| − | *[[ |
+ | * [[Black Mage (Tactics)|Black Mage]] |
| − | *[[ |
+ | * [[Time Mage (Tactics)|Time Mage]] |
| − | *[[ |
+ | * [[Summoner (Tactics)|Summoner]] |
| ⚫ | |||
| − | ===Terminus (END)=== |
+ | === Terminus (END) === |
[[File:END.gif|right|180px|Terminus(END)]] |
[[File:END.gif|right|180px|Terminus(END)]] |
||
| − | {{ |
+ | {{Quote|There is no reason why things end. Were it not so, all would be meaningless.|PlayStation description.}} |
| + | {{Quote|At depths unfathomable, the passage at last comes to an abrupt end.|''War of the Lions'' description.}} |
||
| ⚫ | |||
| − | *[[Chocobo (Tactics)| |
+ | * [[Chocobo (Tactics)|Chocobo]] |
| − | *[[ |
+ | * [[Chocobo (Tactics)|Black Chocobo]] |
| − | *[[ |
+ | * [[Dragon (Tactics)|Red Dragon]] |
| − | *[[Hydra (Tactics)| |
+ | * [[Hydra (Tactics)|Hydra]] |
| − | *[[Hydra (Tactics)| |
+ | * [[Hydra (Tactics)|Greater Hydra]] |
| − | *[[ |
+ | * [[Hydra (Tactics)|Tiamat]] |
| − | *[[Pig (Tactics)| |
+ | * [[Pig (Tactics)|Pig]] |
| − | *[[ |
+ | * [[Pig (Tactics)|Swine]] |
| − | *[[ |
+ | * [[Archer (Tactics)|Archer]] |
| − | *[[ |
+ | * [[Black Mage (Tactics)|Black Mage]] |
| − | *[[ |
+ | * [[White Mage (Tactics)|White Mage]] |
| − | *[[ |
+ | * [[Time Mage (Tactics)|Time Mage]] |
| − | *[[ |
+ | * [[Summoner (Tactics)|Summoner]] |
| ⚫ | |||
| − | ==Treasures== |
+ | == Treasures == |
| − | ===The Crevasse (NOGIAS)=== |
+ | === The Crevasse (NOGIAS) === |
| − | *[[Phoenix Down]]/[[Elixir (item)|Elixir]] (0,6 on a panel of height 20) |
+ | * [[Phoenix Down]]/[[Elixir (item)|Elixir]] (0,6 on a panel of height 20) |
| − | *Phoenix Down/[[ |
+ | * Phoenix Down/[[Final Fantasy Tactics weapons#Blaze Gun|Blaze Gun]] (0,9 on a panel of height 22) |
| − | *Phoenix Down/[[ |
+ | * Phoenix Down/[[Final Fantasy Tactics weapons#Kiyomori|Kiyomori]] (9,4 on a panel of height 17) |
| − | *Phoenix Down/[[ |
+ | * Phoenix Down/[[Final Fantasy Tactics weapons#Glacial Gun|Glacial Gun]] (2,2 on a panel of height 7) |
| + | The names of the Blaze and Glacial Guns are swapped in the PlayStation version. |
||
| − | ===The Stair (TERMINATE)=== |
||
| ⚫ | |||
| ⚫ | |||
| ⚫ | |||
| ⚫ | |||
| − | ===The |
+ | === The Stair (TERMINATE) === |
| − | *Phoenix Down/[[ |
+ | * Phoenix Down/[[Save the Queen]] (0,1 on a panel of height 1) |
| − | *Phoenix Down/Elixir (2, |
+ | * Phoenix Down/Elixir (2,10 on a panel of height 9) |
| − | *Phoenix Down/Elixir ( |
+ | * Phoenix Down/Elixir (4,0 on a panel of height 0) |
| − | *Phoenix Down/[[ |
+ | * Phoenix Down/[[Blood Sword (weapon)|Blood Sword]] (6,7 on a panel of height 6) |
| − | ===The |
+ | === The Hollow (DELTA) === |
| − | *Phoenix Down/ |
+ | * Phoenix Down/[[Zeus Mace]] (1,6 on a panel of height 0.5) |
| − | *Phoenix Down/ |
+ | * Phoenix Down/Elixir (2,15 on a panel of height 1.5) |
| − | *Phoenix Down/ |
+ | * Phoenix Down/Elixir (5,3 on a panel of height 1.5) |
| − | *Phoenix Down/[[ |
+ | * Phoenix Down/[[Yoichi Bow]] (7,9 on a panel of height 4.5) |
| − | ===The |
+ | === The Catacombs (VALKYRIES) === |
| − | *Phoenix Down/Elixir ( |
+ | * Phoenix Down/Elixir (2,12 on a panel of height 7) |
| − | *Phoenix Down/[[ |
+ | * Phoenix Down/[[Final Fantasy Tactics weapons#Rod of Faith|Rod of Faith]] (8,4 on a panel of height 4) |
| − | *Phoenix Down/[[ |
+ | * Phoenix Down/[[Fairie Harp]] (9,5 on a panel of height 4) |
| − | *Phoenix Down/ |
+ | * Phoenix Down/[[Kaiser Shield]] (10,5 on a panel of height 4) |
| − | ===The |
+ | === The Oubliette (MLAPAN) === |
| − | *Phoenix Down/ |
+ | * Phoenix Down/Elixir (0,0 on a panel of height 1) |
| − | *Phoenix Down/ |
+ | * Phoenix Down/[[Final Fantasy Tactics weapons#Iga Blade|Iga Blade]] (0,11 on a panel of height 7) |
| − | *Phoenix Down/[[ |
+ | * Phoenix Down/[[Excalibur (weapon)|Excalibur]] (2,8 on a panel of height 18) |
| − | *Phoenix Down/ |
+ | * Phoenix Down/Elixir (6,11 on a panel of height 11) |
| − | ===The |
+ | === The Palings (TIGER) === |
| − | *Phoenix Down/ |
+ | * Phoenix Down/[[Ninja Gear]] (0,9 on a panel of height 5) |
| − | *Phoenix Down/ |
+ | * Phoenix Down/Elixir (0,10 on a panel of height 5) |
| − | *Phoenix Down/[[ |
+ | * Phoenix Down/[[Cursed Ring]] (1,9 on a panel of height 5) |
| − | *Phoenix Down/ |
+ | * Phoenix Down/[[Final Fantasy Tactics weapons#Blaster|Blaster]] (1,10 on a panel of height 5) |
| − | ===The |
+ | === The Crossing (BRIDGE) === |
| − | *Phoenix Down/Elixir ( |
+ | * Phoenix Down/Elixir (4,4 on a panel of height 12) |
| − | *Phoenix Down/[[ |
+ | * Phoenix Down/[[Final Fantasy Tactics weapons#Staff of the Magi|Staff of the Magi]] (4,10 on a panel of height 13) |
| − | *Phoenix Down/[[ |
+ | * Phoenix Down/[[Final Fantasy Tactics weapons#Koga Blade|Koga Blade]] (4,12 on a panel of height 12) |
| − | *Phoenix Down/ |
+ | * Phoenix Down/Elixir (4,14 on a panel of height 10) |
| − | ===The |
+ | === The Switchback (VOYAGE) === |
| − | *Phoenix Down/ |
+ | * Phoenix Down/Elixir (2,10 on a panel of height 3) |
| − | *Phoenix Down/[[ |
+ | * Phoenix Down/[[Ragnarok (weapon)|Ragnarok]] (3,8 on a panel of height 3) |
| − | *Phoenix Down/ |
+ | * Phoenix Down/[[Lordly Robes|Lordly Robe]] (6,7 on a panel of height 3) |
| − | *Phoenix Down/[[ |
+ | * Phoenix Down/[[Perseus Bow]] (8,6 on a panel of height 3) |
| − | === |
+ | === The Interstice (HORROR) === |
| − | *Phoenix Down/ |
+ | * Phoenix Down/[[Final Fantasy Tactics armor#Venetian Shield|Venetian Shield]] (4,8 on a panel of height 2) |
| − | *Phoenix Down/[[ |
+ | * Phoenix Down/[[Grand Helm]] (5,8 on a panel of height 8) |
| − | *Phoenix Down/ |
+ | * Phoenix Down/Elixir (6,1 on a panel of height 2) |
| − | *Phoenix Down/ |
+ | * Phoenix Down/[[Maximillian]] (9,2 on a panel of height 4) |
| + | === Terminus (END) === |
||
| ⚫ | |||
| ⚫ | |||
| ⚫ | |||
| ⚫ | |||
| ⚫ | |||
| + | |||
| ⚫ | |||
Each map has upwards to 5 different locations for the possible exit to the next floor, barring the END floor which is the final floor. The locations for each of the exits are as follows: |
Each map has upwards to 5 different locations for the possible exit to the next floor, barring the END floor which is the final floor. The locations for each of the exits are as follows: |
||
| − | ===The Crevasse (NOGIAS)=== |
+ | === The Crevasse (NOGIAS) === |
(1,1), (3,1), (8,3), (9,0), (9,6) |
(1,1), (3,1), (8,3), (9,0), (9,6) |
||
| − | ===The Stair (TERMINATE)=== |
+ | === The Stair (TERMINATE) === |
(0,0), (0,9), (1,4), (6,1), (8,0) |
(0,0), (0,9), (1,4), (6,1), (8,0) |
||
| − | ===The Hollow (DELTA)=== |
+ | === The Hollow (DELTA) === |
(1,1), (3,11), (7,8), (8,2), (8,8) |
(1,1), (3,11), (7,8), (8,2), (8,8) |
||
| − | ===The Catacombs (VALKYRIES)=== |
+ | === The Catacombs (VALKYRIES) === |
(2,2), (3,4), (4,1), (6,0), (10,7) |
(2,2), (3,4), (4,1), (6,0), (10,7) |
||
| − | ===The Oubliette (MLAPAN)=== |
+ | === The Oubliette (MLAPAN) === |
(1,2), (3,4), (4,2), (6,0), (6,4) |
(1,2), (3,4), (4,2), (6,0), (6,4) |
||
| − | ===The Palings (TIGER)=== |
+ | === The Palings (TIGER) === |
(0,0), (2,1), (2,5), (7,2), (9,0) |
(0,0), (2,1), (2,5), (7,2), (9,0) |
||
| − | ===The Crossing (BRIDGE)=== |
+ | === The Crossing (BRIDGE) === |
(0,14), (2,8), (2,13), (4,2), (5,6) |
(0,14), (2,8), (2,13), (4,2), (5,6) |
||
| − | ===The Switchback (VOYAGE)=== |
+ | === The Switchback (VOYAGE) === |
(0,13), (1,10), (1,13), (8,5), (10,10) |
(0,13), (1,10), (1,13), (8,5), (10,10) |
||
| − | ===The Interstice (HORROR)=== |
+ | === The Interstice (HORROR) === |
(1,0), (2,10), (4,2), (6,0), (8,2) |
(1,0), (2,10), (4,2), (6,0), (8,2) |
||
| + | == Other appearances == |
||
| ⚫ | |||
| + | === ''[[Pictlogica Final Fantasy]]'' === |
||
| ⚫ | |||
| + | {{Location section|Pictlogica Final Fantasy}} |
||
| ⚫ | |||
| + | |||
| ⚫ | |||
| + | === ''[[War of the Visions: Final Fantasy Brave Exvius]]'' === |
||
| ⚫ | |||
| + | The Midlight's Deep is available during the second ''Final Fantasy Tactics'' collaboration. It is a 10-floor dungeon using the exact same floors as the original and replicating the darkness mechanics. It plays under the same rules as [[The Porcelain Tower]] event with the player's units HP/TP/AP values, remaining skill uses, and KO'd or petrified units carrying over floors, but with the player being able to switch party members before entering a floor, and also being able to restore all units to full capacity, once each 24 hours. |
||
| ⚫ | |||
| + | |||
| ⚫ | |||
| + | Unlike the original, the player is only required to defeat all enemies present to progress rather than find a secret exit. The enemies present in each floor are also vastly different than those in the original. The player earns rewards purely through clearing the floors rather than having to scavenge for them. |
||
| ⚫ | |||
| + | |||
| ⚫ | |||
| + | Player's can earn the Lesalia Royal Guard Standard-Issue Sword and the necessary materials to awaken it in full. |
||
| ⚫ | |||
| + | |||
| ⚫ | |||
| + | ==Behind the scenes== |
||
| ⚫ | |||
| ⚫ | |||
| + | |||
| ⚫ | |||
| + | |||
| ⚫ | |||
| + | {{Etym|Deep Dungeon}} |
||
| ⚫ | |||
| − | ==Trivia== |
||
| ⚫ | |||
| − | *''{{w|Deep Dungeon}}'' is a series of role-playing video games developed by HummingBirdSoft. The first two installments were released on the Family Computer Disk System by Square's label DOG; the third one was released on the regular Family Computer by Square directly and the final one by Asmik. |
||
| ⚫ | |||
| ⚫ | |||
| ⚫ | |||
| ⚫ | |||
| ⚫ | |||
| ⚫ | |||
| ⚫ | |||
| ⚫ | |||
| ⚫ | |||
| ⚫ | |||
| ⚫ | |||
| − | {{FFT}} |
+ | {{navbox setting FFT}} |
| + | {{navbox sidequests}} |
||
| − | {{Sidequests}} |
||
| − | [[Category:Final Fantasy Tactics |
+ | [[Category:Locations in Final Fantasy Tactics]] |
[[Category:Caves]] |
[[Category:Caves]] |
||
Revision as of 02:20, 3 September 2020
Template:Sideicon

Oh, shut up and help me remodel the Midlight's Deep (Tactics) page!
- Add the other 9 maps to this page.
This request can be discussed on the associated discussion page. Remove this notice upon completion.

I couldn't miss the chance to practice my drawing!
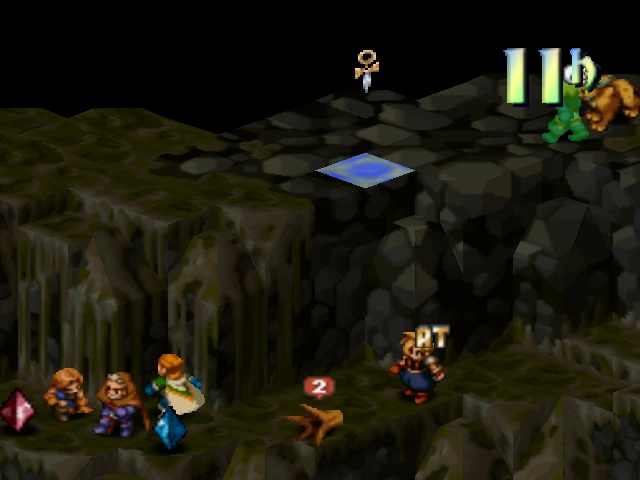
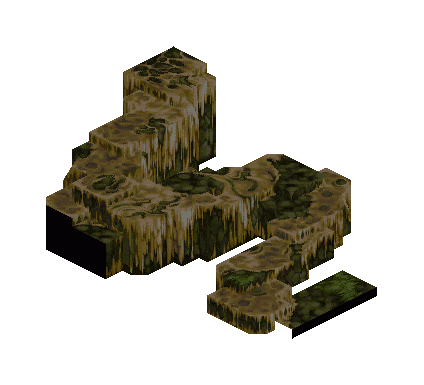
Deep Dungeon.
A lighthouse built to prevent ships sailing the Bugross Sea from running aground. It suffered damage during the Fifty Years' War.
Description

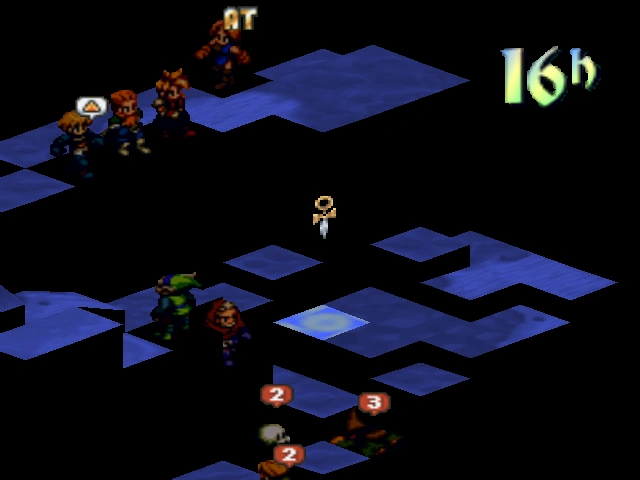
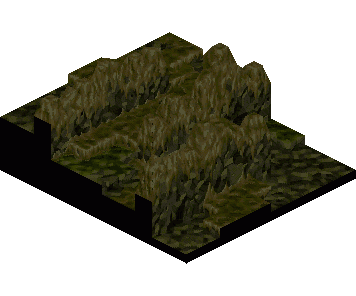
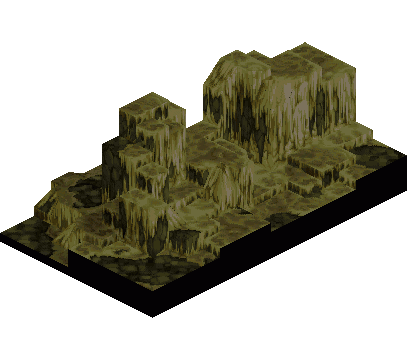
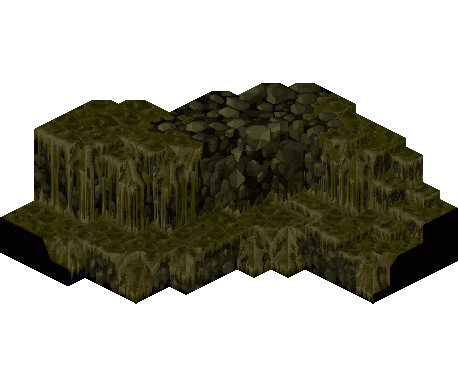
Midlight's Deep when 2 or more crystals are active.
Midlight's Deep (ディープダンジョン, Dīpu Danjon?, lit. Deep Dungeon), also known as Deep Dungeon, is an optional dungeon in Final Fantasy Tactics that serves as a sidequest. Located on an island east of the Port City of Warjilis, it consists of ten levels of caves, each of which consist of an independent battlefield. It is home to the most difficult enemies in the game, and the best treasure through the Treasure Hunter ability. This sidequest is needed to be passed in order to recruit the Byblos.
Midlight's Deep can be unlocked after completing the battles in Mullonde. When the player enters Warjilis again, a scene will play, and then Midlight's Deep appears on the world map. From the start, only one of the ten levels can be accessed. In order to get deeper, the player must fight a battle, all of which function like random battles with random enemies to face. Simply defeating every enemy on the screen will not work, instead, the player must find a passageway which leads to the next level.
This passage is always hidden in one of five different squares on each floor. To find the exit, a unit needs to step on that square. The Treasure Hunter ability is not required, but equipping it is highly recommended to find rare items. After finding the next passage, the heroes must defeat all enemies on the current level to complete the current battle and unlock the next one.
Every battlefield is completely dark, though the player can see the units and the movement squares. To light the areas, the player must kill enemies to create crystals, which light up the area slightly. When there are five crystals on the ground, the area is completely lit.
The tenth level is special in that it holds a regular storyline battle with the secret Lucavi demon Elidibus. Following that battle, it can be accessed as a normal level like all the others.
Battle information
| Midlight's Deep (Tactics) | |||
|---|---|---|---|
Front view:
[[File:{{{front img}}}|300px]]
Back view:
[[File:{{{back img}}}|300px]]
Side view:
[[File:{{{side img}}}|300px]]
Back side view:
[[File:{{{back side img}}}|300px]]
Overhead grid:
[[File:{{{grid img}}}|300px]]
| |||
| Units |
. . X X |
Additional info | The Byblos joins the party after this battle, if it survives. |
| Conditions | Defeat Elidibus. | ||
| Weather | None | ||
| Enemy level | ? | Recommended level | 40 - 50 |
| Team capacity | 4 + Ramza | Number of teams | 1 |
| Battle Trophies | None | Hidden items | Zodiark Summon |
| Terrain | Stone Outcropping, Stalactite, Darkness | Geomancy | Tremor, Sandstorm |
Random Battle Enemies
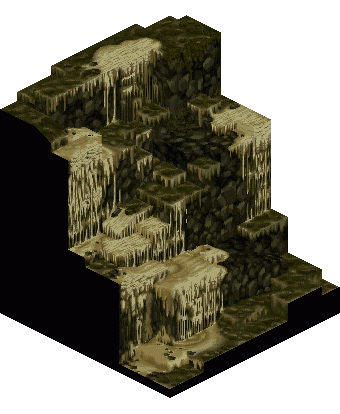
The Crevasse (NOGIAS)
'Beginning' usually happens over trifles. Even if it's a coincidence.
PlayStation description
The light fades as one begins the descent into this great earthen rift.
War of the Lions description
- Goblin
- Black Goblin
- Gobbledygook
- Red Panther
- Coeurl
- Bomb
- Grenade
- Exploder
- Wisenkin
- Piscodaemon
- Squire
- Knight
- Archer
- Thief
- Monk
- Black Mage
- Time Mage (Dragqueen)
- Summoner
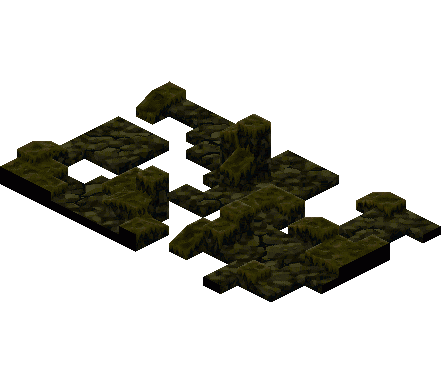
The Stair (TERMINATE)

Let's assume the best solution is to forget your duty. But, that's only if you know the meaning of 'preparation'.
PlayStation description
An ancient stair leads deeper into the earth, but the footing is treacherous in the dark.
War of the Lions description
- Goblin
- Black Goblin
- Skeleton
- Bonesnatch
- Ghoul
- Ghast
- Floating Eye
- Ahriman
- Dragon
- Blue Dragon
- Knight
- Archer
- Monk
- Ninja
- Black Mage
- Time Mage
- Summoner
The Hollow (DELTA)
When you lose your way in life, time may solve problems. What if you can't find your way? Laugh, but quietly.
PlayStation description
An expansive cavern opens in the inky blackness, deep within the bowels of the earth.
War of the Lions description
- Red Panther
- Coeurl
- Bomb
- Grenade
- Skeletal Fiend
- Wisenkin
- Minotaur
- Jura Aevis
- Steelhawk
- Cockatrice
- Piscodaemon
- Squidraken
- Mindflayer
- Elder Treant
- Behemoth
- Behemoth King
- Squire
- Knight
- Archer
- Thief
- Geomancer
- Dragoon
- Black Mage
- Mystic
- Orator
The Catacombs (VALKYRIES)
Another person's life is saved in exchange for yours. In other words, yours is saved in exchange for another person's.
PlayStation description
The final resting place of many who once called Midlight's Deep their home.
War of the Lions description
- Gobbledygook
- Minotaur
- Sekhret
- Jura Aevis
- Steelhawk
- Cockatrice
- Mindflayer
- Floating Eye
- Ochu
- Malboro
- Greater Malboro
- Hydra
- Archer
- Monk
- Black Mage
- Summoner
- Mystic
The Oubliette (MLAPAN)
The scent remains, even if everything is gone. It stays deeply in one's memory forever.
PlayStation description
Without a light to guide one's way, there could be no escape from the steep, sheer walls of this chasm.
War of the Lions description
- Gobbledygook
- Red Panther
- Ahriman
- Dryad
- Treant
- Elder Treant
- Squire
- Knight
- Archer
- Thief
- Monk
- Chemist
- Black Mage
- White Mage
- Time Mage
- Summoner
- Mystic
- Orator
The Palings (TIGER)
Does man become wild if all rationality is taken away from him? The answer is NO. This is because he doesn't have grace.
PlayStation description
There are thresholds man was never meant to cross. These palings may quite possibly number among them.
War of the Lions description
- Chocobo
- Black Chocobo
- Goblin
- Black Goblin
- Red Panther
- Coeurl
- Vampire Cat
- Exploder
- Wisenkin
- Minotaur
- Sekhret
- Piscodaemon
- Squidraken
- Mindflayer
- Floating Eye
- Ahriman
- Plague Horror
- Behemoth
- Behemoth King
- Dark Behemoth
- Dragon
- Knight
- Archer
- Ninja
- Samurai
- Black Mage
The Crossing (BRIDGE)
Though there are many possible ways, "Bridge" made it into one. This is a serious matter.
PlayStation description
This hazardous crossing is the only route forward, but a single misstep could send one spiraling into the void.
War of the Lions description.
- Skeleton
- Bonesnatch
- Skeletal Fiend
- Wisenkin
- Minotaur
- Sekhret
- Ghast
- Revenant
- Piscodaemon
- Squidraken
- Mindflayer
- Behemoth
- Behemoth King
- Dragon
- Hydra
- Archer
- Thief
- Monk
- Dragoon
- Black Mage
- White Mage
- Summoner
- Mystic
The Switchback (VOYAGE)
Other than finding an answer. [sic] Is anything else to be gained from a journey?
PlayStation description.
Those who would venture deeper into the abyss are funneled into this winding passageway.
War of the Lions description
- Red Panther
- Coeurl
- Bomb
- Grenade
- Exploder
- Dryad
- Treant
- Elder Treant
- Ochu
- Malboro
- Greater Malboro
- Behemoth
- Behemoth King
- Dark Behemoth
- Dragon
- Blue Dragon
- Red Dragon
- Hydra
- Greater Hydra
- Archer
- Black Mage
- Summoner
- Arithmetician
The Interstice (HORROR)
It's impossible to describe horror. But one may be able to know it if one tells quietly...
PlayStation description.
The stale air and stifling darkness make the walls of this narrow passage all the more oppressive.
War of the Lions description.
- Chocobo
- Black Chocobo
- Red Chocobo
- Red Panther
- Sekhret
- Cockatrice
- Behemoth
- Dragon
- Blue Dragon
- Red Dragon
- Hydra
- Knight
- Archer
- Dragoon
- Ninja
- Samurai
- Black Mage
- Time Mage
- Summoner
- Mystic
Terminus (END)
There is no reason why things end. Were it not so, all would be meaningless.
PlayStation description.
At depths unfathomable, the passage at last comes to an abrupt end.
War of the Lions description.
- Chocobo
- Black Chocobo
- Red Dragon
- Hydra
- Greater Hydra
- Tiamat
- Pig
- Swine
- Archer
- Black Mage
- White Mage
- Time Mage
- Summoner
- Mystic
Treasures
The Crevasse (NOGIAS)
- Phoenix Down/Elixir (0,6 on a panel of height 20)
- Phoenix Down/Blaze Gun (0,9 on a panel of height 22)
- Phoenix Down/Kiyomori (9,4 on a panel of height 17)
- Phoenix Down/Glacial Gun (2,2 on a panel of height 7)
The names of the Blaze and Glacial Guns are swapped in the PlayStation version.
The Stair (TERMINATE)
- Phoenix Down/Save the Queen (0,1 on a panel of height 1)
- Phoenix Down/Elixir (2,10 on a panel of height 9)
- Phoenix Down/Elixir (4,0 on a panel of height 0)
- Phoenix Down/Blood Sword (6,7 on a panel of height 6)
The Hollow (DELTA)
- Phoenix Down/Zeus Mace (1,6 on a panel of height 0.5)
- Phoenix Down/Elixir (2,15 on a panel of height 1.5)
- Phoenix Down/Elixir (5,3 on a panel of height 1.5)
- Phoenix Down/Yoichi Bow (7,9 on a panel of height 4.5)
The Catacombs (VALKYRIES)
- Phoenix Down/Elixir (2,12 on a panel of height 7)
- Phoenix Down/Rod of Faith (8,4 on a panel of height 4)
- Phoenix Down/Fairie Harp (9,5 on a panel of height 4)
- Phoenix Down/Kaiser Shield (10,5 on a panel of height 4)
The Oubliette (MLAPAN)
- Phoenix Down/Elixir (0,0 on a panel of height 1)
- Phoenix Down/Iga Blade (0,11 on a panel of height 7)
- Phoenix Down/Excalibur (2,8 on a panel of height 18)
- Phoenix Down/Elixir (6,11 on a panel of height 11)
The Palings (TIGER)
- Phoenix Down/Ninja Gear (0,9 on a panel of height 5)
- Phoenix Down/Elixir (0,10 on a panel of height 5)
- Phoenix Down/Cursed Ring (1,9 on a panel of height 5)
- Phoenix Down/Blaster (1,10 on a panel of height 5)
The Crossing (BRIDGE)
- Phoenix Down/Elixir (4,4 on a panel of height 12)
- Phoenix Down/Staff of the Magi (4,10 on a panel of height 13)
- Phoenix Down/Koga Blade (4,12 on a panel of height 12)
- Phoenix Down/Elixir (4,14 on a panel of height 10)
The Switchback (VOYAGE)
- Phoenix Down/Elixir (2,10 on a panel of height 3)
- Phoenix Down/Ragnarok (3,8 on a panel of height 3)
- Phoenix Down/Lordly Robe (6,7 on a panel of height 3)
- Phoenix Down/Perseus Bow (8,6 on a panel of height 3)
The Interstice (HORROR)
- Phoenix Down/Venetian Shield (4,8 on a panel of height 2)
- Phoenix Down/Grand Helm (5,8 on a panel of height 8)
- Phoenix Down/Elixir (6,1 on a panel of height 2)
- Phoenix Down/Maximillian (9,2 on a panel of height 4)
Terminus (END)
- Phoenix Down/Elixir (5,10 on a panel of height 15)
- Phoenix Down/Chirijiraden (5,12 on a panel of height 15)
- Phoenix Down/Chaos Blade (7,10 on a panel of height 15)
- Phoenix Down/Elixir (7,12 on a panel of height 15)
Exit Locations
Each map has upwards to 5 different locations for the possible exit to the next floor, barring the END floor which is the final floor. The locations for each of the exits are as follows:
The Crevasse (NOGIAS)
(1,1), (3,1), (8,3), (9,0), (9,6)
The Stair (TERMINATE)
(0,0), (0,9), (1,4), (6,1), (8,0)
The Hollow (DELTA)
(1,1), (3,11), (7,8), (8,2), (8,8)
The Catacombs (VALKYRIES)
(2,2), (3,4), (4,1), (6,0), (10,7)
The Oubliette (MLAPAN)
(1,2), (3,4), (4,2), (6,0), (6,4)
The Palings (TIGER)
(0,0), (2,1), (2,5), (7,2), (9,0)
The Crossing (BRIDGE)
(0,14), (2,8), (2,13), (4,2), (5,6)
The Switchback (VOYAGE)
(0,13), (1,10), (1,13), (8,5), (10,10)
The Interstice (HORROR)
(1,0), (2,10), (4,2), (6,0), (8,2)
Other appearances
Pictlogica Final Fantasy
War of the Visions: Final Fantasy Brave Exvius
The Midlight's Deep is available during the second Final Fantasy Tactics collaboration. It is a 10-floor dungeon using the exact same floors as the original and replicating the darkness mechanics. It plays under the same rules as The Porcelain Tower event with the player's units HP/TP/AP values, remaining skill uses, and KO'd or petrified units carrying over floors, but with the player being able to switch party members before entering a floor, and also being able to restore all units to full capacity, once each 24 hours.
Unlike the original, the player is only required to defeat all enemies present to progress rather than find a secret exit. The enemies present in each floor are also vastly different than those in the original. The player earns rewards purely through clearing the floors rather than having to scavenge for them.
Player's can earn the Lesalia Royal Guard Standard-Issue Sword and the necessary materials to awaken it in full.
Behind the scenes
The concept of the dungeon was inspired by the Palace of the Dead from the game's spiritual predecessor, Tactics Ogre.
The Deep Dungeon in Final Fantasy XIV alludes to the Midlight's Deep.
Etymology
Deep Dungeon is a series of role-playing video games developed by HummingBirdSoft. The first two installments were released on the Family Computer Disk System by Square's label DOG; the third one was released on the regular Family Computer by Square directly and the final one by Asmik.
The names for each level from the original Japanese version and the PlayStation translation pertain to the movie Apocalypse Now, with order to the plot:
- "NOGIAS" is "Saigon" spelled backwards, which happens to be the opening location for the movie.
- "TERMINATE" refers to the orders given to Captain Williard to "terminate" the rogue Colonel Kurtz.
- "DELTA" is the "Mekong Delta", the first step on Williard's journey.
- "VALKYRIES" is a reference to the song played during a helicopter attack on a VC village, Richard Wagner's "Ride of the Valkyries".
- "MLAPAN" is a "napalm" spelled backwards, a reference to the classic line "I love the smell of napalm in the morning" spoken by Lt. Colonel Bill Kilgore after the helicopter attack.
- "TIGER" refers to an event during Williard's journey up the river, in which one of his men leaves the PBR for mangoes, only to be attacked by a wild tiger.
- "BRIDGE" refers to the chaotic passage past the Do Long Bridge, which is under siege by North Vietnamese forces.
- "VOYAGE" refers to the last leg of the journey to Colonel Kurtz's jungle hideout.
- "HORROR" is a reference to Colonel Kurtz's famous last line: "The horror... the horror..."
- "END" is the end of the movie, as well as a reference to The Doors' song "The End", which is used prominently during the movie.