m (→Site 5) Tag: sourceedit |
Intangir Bot (talk | contribs) m (Bot: Changing template: Locat-stub) |
||
| (39 intermediate revisions by 9 users not shown) | |||
| Line 1: | Line 1: | ||
| − | {{sideicon|FFXII}} |
+ | {{sideicon|prime=FFXII|PFF|FFRK}} |
| − | {{Expand|Adding a Locations section, with images and brief descriptions of the areas within the location}} |
+ | {{Expand|PFF|FFXII|FFXII|Adding a Locations section, with images and brief descriptions of the areas within the location}} |
| + | {{infobox location |
||
| − | {{Location |
||
|name=Lhusu Mines |
|name=Lhusu Mines |
||
|release=FFXII |
|release=FFXII |
||
|japanese=ルース魔石鉱 |
|japanese=ルース魔石鉱 |
||
|romaji=Rūsu Maseki-kō |
|romaji=Rūsu Maseki-kō |
||
| − | |image=Lhusu- |
+ | |image=Lhusu-Mines-Magicite-Vein-FFXII-TZA.png |
|type=[[Cave (location)|Cave]] |
|type=[[Cave (location)|Cave]] |
||
|region=[[Purvama]] |
|region=[[Purvama]] |
||
| Line 34: | Line 34: | ||
*[[#Rare Game|Rare Game]]: [[Aerieel]], [[Disma]], [[Gemhorn]], [[Bombshell (Final Fantasy XII)|Bombshell]] |
*[[#Rare Game|Rare Game]]: [[Aerieel]], [[Disma]], [[Gemhorn]], [[Bombshell (Final Fantasy XII)|Bombshell]] |
||
}} |
}} |
||
| − | {{ |
+ | {{Quote|The Lhusu Mines: One of the richest veins in Ivalice.|Balthier}} |
| − | The '''Lhusu Mines''' is a location in [[Ivalice (Final Fantasy XII)|Ivalice]] in the world of ''[[Final Fantasy XII]]''. It is located in [[Bhujerba]], which resides on the sky continent of Dorstonis. Among the mines' interesting features is that, as it is located on a sky continent, the deeper one gets into the mines the lighter it gets. Normally the mines are protected by a [[Paling (term)|paling]], however, it has fallen and [[Monster (term)|monsters]] have invaded the site. It can be speculated the paling has been allowed to fall deliberately, as to prevent the [[Archadia|Empire]] from obtaining more [[magicite]]. |
+ | The '''Lhusu Mines''' is a location in [[Ivalice (Final Fantasy XII)|Ivalice]] in the world of ''[[Final Fantasy XII]]''. It is located in [[Bhujerba]], which resides on the sky continent of Dorstonis. Among the mines' interesting features is that, as it is located on a sky continent, the deeper one gets into the mines the lighter it gets. Normally the mines are protected by a [[Paling (term)|paling]], however, it has fallen and [[Monster (term)|monsters]] have invaded the site. It can be speculated the paling has been allowed to fall deliberately, as to prevent the [[Archadia|Empire]] from obtaining more [[magicite]]. Miners around town talk how the mines yield much less magicite and of lower quality than before, and when the party ventures inside, no mining appears to be taking place. |
| − | When the party |
+ | When the party enters the mines to rescue [[Penelo]], the enemies' [[level]]s are 7–13. As the player gets further and goes after the [[Hunt (Final Fantasy XII)#Marks|mark]], [[Antlion (Final Fantasy XII)|Antlion]], and receives the key, the enemies' levels are 38–43. If the player uses the Site 11 key to unlock the gate, they get the option to venture into the deepest part of the mines where the enemies' levels rise to 59–64. |
| − | ==[[Sage Knowledge]]== |
+ | == [[Sage Knowledge]] == |
| − | {{ |
+ | {{Quote|A crystal mine located on the sky continent of Dorstonis. Many years have passed since the ore veins were first discovered here, yet even today, high-quality ores are found and processed in these well-worked shafts. Many claim that the success of the mines is due to a project begun many centuries past by the Ondore family, whereby mining across their domains was closely regulated, never permitting too much to be drawn from one place, thereby allowing the magicite crystals to naturally recover. The Lhusu Mines are most famous for their high caliber of skystone, the material which enables airships to ply the skies, and memstone, a variety of magicite that can store sound and even images in its unique crystalline structure. Unfortunately, the dense concentrations of Mist in the mines lure all manner of beasts, and when mining expeditions are planned, palings must be erected to keep such creatures at bay.|Sage Knowledge 52, Lhusu Mines}} |
| − | ==Story== |
+ | == Story == |
{{spoiler}} |
{{spoiler}} |
||
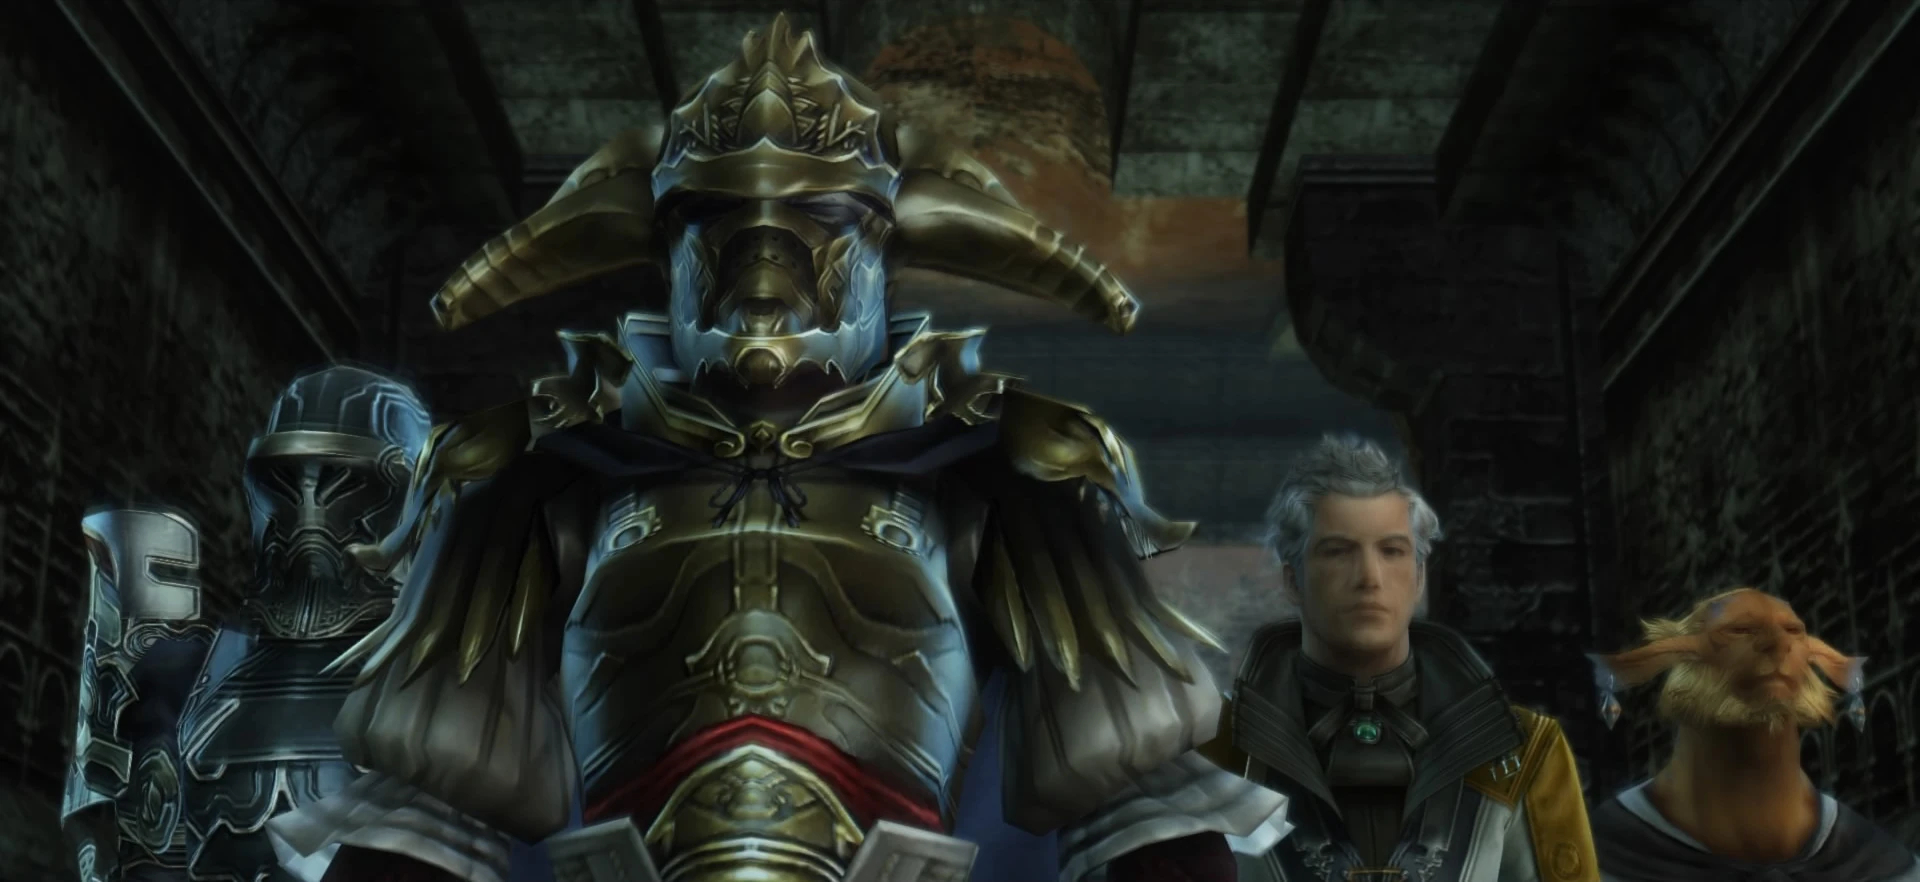
[[File:Ghis and Ondore2.jpg|left|thumb|Ghis and Ondore in Lhusu Mines.]] |
[[File:Ghis and Ondore2.jpg|left|thumb|Ghis and Ondore in Lhusu Mines.]] |
||
| − | Like the [[Henne Mines]], Lhusu Mines is a magicite mine. It is located near the city of Bhujerba, and previously was a major source of magicite for the Archadian Empire. Lhusu Mines is still providing the Empire's [[Draklor Laboratory]] with magicite, but it's done in secret in a venture led by [[Cidolfus Demen Bunansa|Dr. Cid]] and funded by [[Vayne Carudas Solidor|Vayne Solidor]]. [[Ghis|Judge Ghis]] has come to Bhujerba to talk to [[Halim Ondore IV|Marquis Ondore]] about the affairs, and the two |
+ | Like the [[Henne Mines]], Lhusu Mines is a magicite mine. It is located near the city of Bhujerba, and previously was a major source of magicite for the Archadian Empire. Lhusu Mines is still providing the Empire's [[Draklor Laboratory]] with magicite, but it's done in secret in a venture led by [[Cidolfus Demen Bunansa|Dr. Cid]] and funded by [[Vayne Carudas Solidor|Vayne Solidor]]. [[Ghis|Judge Ghis]] has come to Bhujerba to talk to [[Halim Ondore IV|Marquis Ondore]] about the affairs, and the two visit the mines. |
| − | [[Vaan]], [[Balthier]], [[Fran]], and [[Basch fon Ronsenburg|Basch]] also head into the mines to rescue Penelo, whom [[Ba'Gamnan]] is holding hostage. [[Larsa Ferrinas Solidor]], Vayne's younger brother, joins them as well |
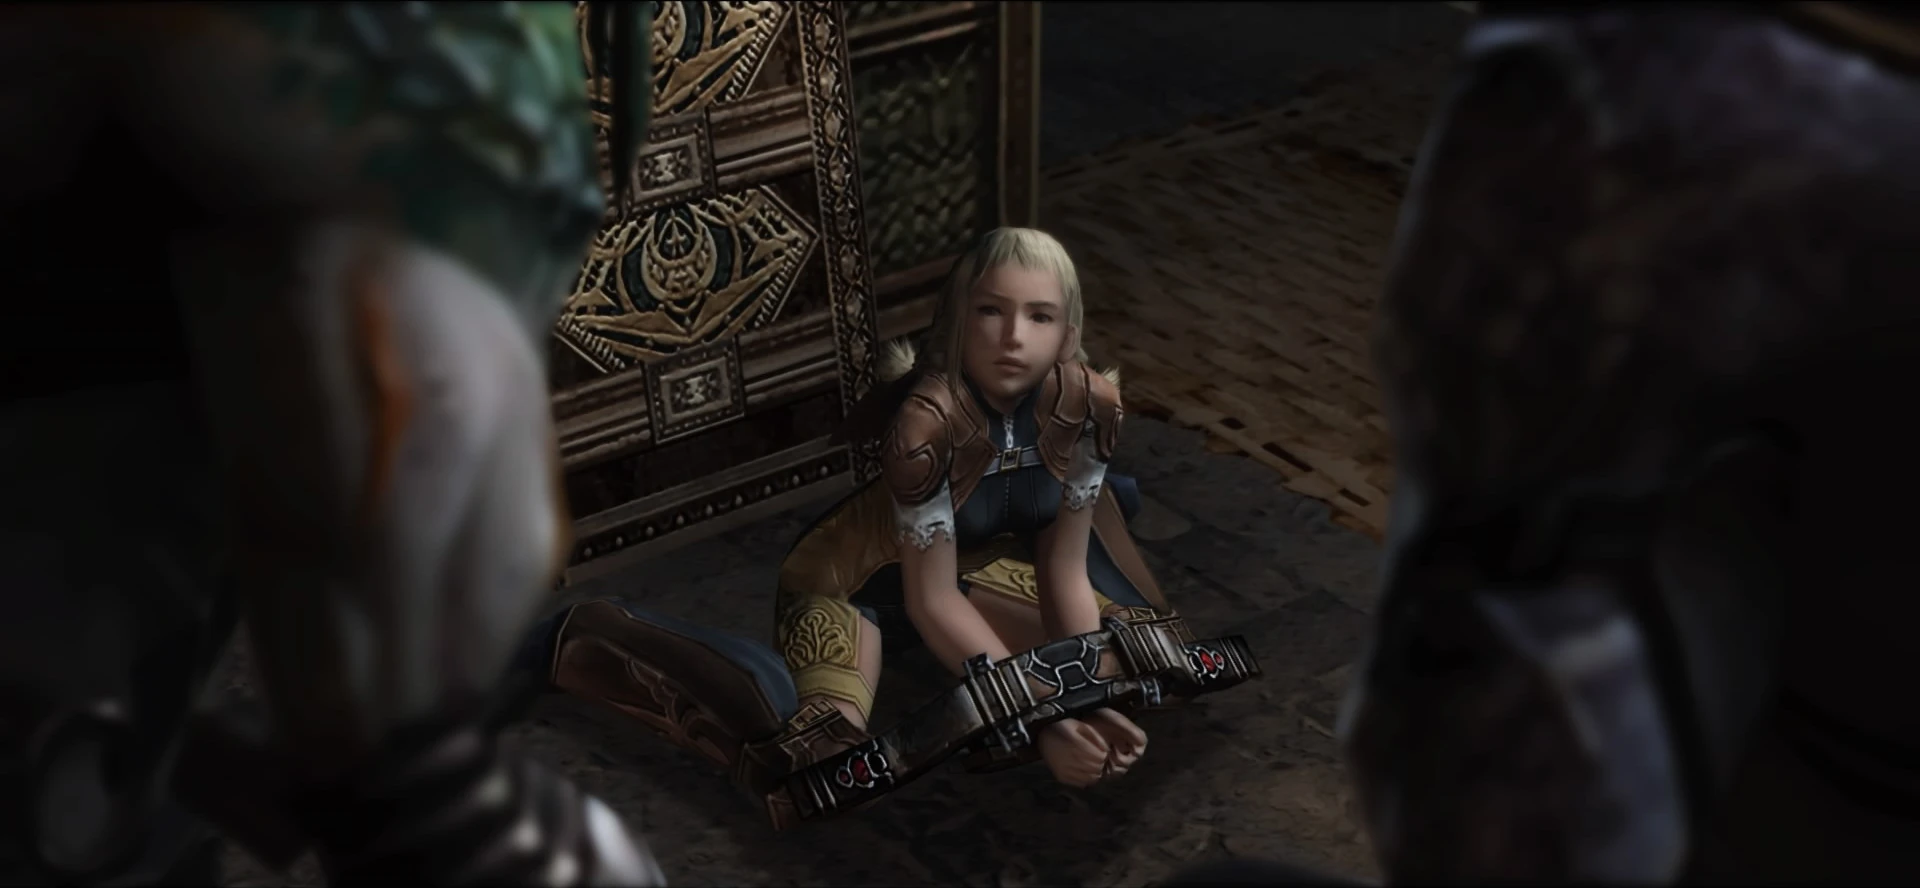
+ | [[Vaan]], [[Balthier]], [[Fran]], and [[Basch fon Ronsenburg|Basch]] also head into the mines to rescue Penelo, whom [[Ba'Gamnan]] is holding hostage there. [[Larsa Ferrinas Solidor]], Vayne's younger brother, joins them as well. He uses the alias "Lamont" to stay undercover, as he wants to find out if the rumors are true about Bhujerba providing Draklor with magicite to create manufacted [[nethicite]]. Penelo is being used as bait for a trap set by several [[bangaa]] to capture Balthier, but once Balthier and friends set foot in the mine, the bangaa deem her worthless and release her. |
[[File:Penelo captured.jpg|thumb|Penelo captured in Lhusu Mines.]] |
[[File:Penelo captured.jpg|thumb|Penelo captured in Lhusu Mines.]] |
||
| − | The party explores the depths of the mine without finding Penelo. "Lamont" finds |
+ | The party explores the depths of the mine without finding Penelo. "Lamont" finds a magicite vein and his suspicions are confirmed. Balthier questions him about this and realizes "Lamont's" true identity, but before he can squeeze answers out of him, Ba'Gamnan and his gang interrupt them. Larsa runs out of the mines telling the others to follow, and Balthier and his friends have the chance to either fight Ba'Gamnan or follow Larsa. |
The freed Penelo runs through the mines and bumps into Ghis and the Marquis. Ghis is furious having found a civilian in the mines that houses Empire's secrets, but Larsa steps on the scene and rescues her, taking her away with him. After Vaan and his friends find out where Penelo has gone they follow. |
The freed Penelo runs through the mines and bumps into Ghis and the Marquis. Ghis is furious having found a civilian in the mines that houses Empire's secrets, but Larsa steps on the scene and rescues her, taking her away with him. After Vaan and his friends find out where Penelo has gone they follow. |
||
| Line 57: | Line 57: | ||
{{endspoiler}} |
{{endspoiler}} |
||
| − | ==Locations== |
+ | == Locations == |
The Lhusu Mines can be ventured in from the Skycity of Bhujerba in Lhusu square. |
The Lhusu Mines can be ventured in from the Skycity of Bhujerba in Lhusu square. |
||
| − | *Shaft Entry (to Bhujerba) |
+ | * Shaft Entry (to Bhujerba) |
| − | *Oltam Span |
+ | * Oltam Span |
| − | *Transitway 1 |
+ | * Transitway 1 |
| − | *Shunia Twinspan |
+ | * Shunia Twinspan |
| − | *Site 2 |
+ | * Site 2 |
| − | *Site 3 |
+ | * Site 3 |
| − | *Transitway 2 |
+ | * Transitway 2 |
| − | *Tasche Span |
+ | * Tasche Span |
| − | *Site 9 |
+ | * Site 9 |
| − | *Site 11 |
+ | * Site 11 |
| − | *Lasche Span |
+ | * Lasche Span |
| − | *Site 5 |
+ | * Site 5 |
| − | *Site 6 South |
+ | * Site 6 South |
| − | *Site 6 North |
+ | * Site 6 North |
| − | *Staging Area |
+ | * Staging Area |
| − | *Site 7 |
+ | * Site 7 |
| − | {{ |
+ | {{Location section|Final Fantasy XII}} |
| − | ==Treasures== |
+ | == Treasures == |
| − | {{See |
+ | {{See|Treasure (Final Fantasy XII)}} |
| − | [[ |
+ | [[Final Fantasy XII items#Knot of Rust|Knot of Rust]] is the most common treasure in the mines, all treasures being able to give one. Motes are the other common treasures. With the [[Final Fantasy XII accessories#Diamond Armlet|Diamond Armlet]] equipped there is a small chance of obtaining an [[Final Fantasy XII items#Elixir|Elixir]] or [[Final Fantasy XII items#Hi-Ether|Hi-Ether]] from the treasures instead. |
| − | During the player's first visit, there can be a treasure in Transitway 1 that may contain a [[ |
+ | During the player's first visit, there can be a treasure in Transitway 1 that may contain a [[Killer Bow (Final Fantasy XII)|Killer Bow]]. In Site 2 area, before the spot where [[Rocktoise]] is fought, there can be a treasure that may have the [[Assassin's Dagger (Final Fantasy XII)|Assassin's Dagger]]. |
| − | Later, when the Antlion hunt becomes available, the player can venture deeper into the mines. In Site 9, behind the minecart, the player may find a [[ |
+ | Later, when the Antlion hunt becomes available, the player can venture deeper into the mines. In Site 9, behind the minecart, the player may find a [[Morning Star (Final Fantasy XII)|Morning Star]], a powerful weapon to obtain early. At the deepest end, in the cave where Antlion is fought, the player may find the original version's ultimate gun, [[Fomalhaut (Final Fantasy XII)|Fomalhaut]], and since the treasure respawns it is possible to to obtain multiple Fomalhauts. |
| − | Deeper into the mines still, with the Site 11 Key the player can go to the deepest reaches of the mines, where [[Gilgamesh (Final Fantasy XII)|Gilgamesh]] is fought. Treasures here are either Knots of Rust, Motes, or [[ |
+ | Deeper into the mines still, with the Site 11 Key the player can go to the deepest reaches of the mines, where [[Gilgamesh (Final Fantasy XII)|Gilgamesh]] is fought. Treasures here are either Knots of Rust, Motes, or [[Final Fantasy XII items#Ether|Ethers]]. The northernmost area where the player must cross through a [[hidden passage]] has a treasure that has 50% chance to spawn, but when it does, it will always be the [[Final Fantasy XII armor#Aegis Shield|Aegis Shield]]. Once the treasure has been claimed, it will never respawn. The dead-end on the northeast side of the Site 6 South area can have the armor [[Final Fantasy XII armor#Maximillian|Maximillian]], and this treasure also respawns. |
| − | ===Shaft Entry=== |
+ | === Shaft Entry === |
;Zodiac |
;Zodiac |
||
| − | {|class="full-width FFXII table" style="text-align:center" |
+ | {|class="full-width FFXII article-table" style="text-align:center" |
|-class="a" |
|-class="a" |
||
!style="width:20%"|Chest |
!style="width:20%"|Chest |
||
| Line 114: | Line 114: | ||
|class="a" width="12%"|Rare |
|class="a" width="12%"|Rare |
||
|- |
|- |
||
| − | | |
+ | |Aquara Mote |
| − | |[[ |
+ | |[[Bronze Mace (Final Fantasy XII)|Bronze Mace]] |
|Knot of Rust |
|Knot of Rust |
||
|Meteorite (A) |
|Meteorite (A) |
||
| Line 128: | Line 128: | ||
|class="a" width="12%"|Rare |
|class="a" width="12%"|Rare |
||
|- |
|- |
||
| − | | |
+ | |Aquara Mote |
|Hi-Potion |
|Hi-Potion |
||
|Knot of Rust |
|Knot of Rust |
||
| Line 142: | Line 142: | ||
|class="a" width="12%"|Rare |
|class="a" width="12%"|Rare |
||
|- |
|- |
||
| − | | |
+ | |Aquara Mote |
| − | |[[ |
+ | |[[Osafune (Final Fantasy XII)|Osafune]] |
|Knot of Rust |
|Knot of Rust |
||
|Meteorite (B) |
|Meteorite (B) |
||
| Line 175: | Line 175: | ||
|Meteorite (A) |
|Meteorite (A) |
||
|} |
|} |
||
| − | *'''''{{A|1}}''''' - Chest does not respawn. |
+ | * '''''{{A|1}}''''' - Chest does not respawn. |
| − | *'''''{{A|2}}''''' - Opening this chest causes Chest #19 in the [[Dalmasca Estersand]] to disappear forever. Inversely, if Dalmasca Estersand chest #19 has been opened, this chest will disappear forever as well. However, both chests contain the same treasure. |
+ | * '''''{{A|2}}''''' - Opening this chest causes Chest #19 in the [[Dalmasca Estersand]] to disappear forever. Inversely, if Dalmasca Estersand chest #19 has been opened, this chest will disappear forever as well. However, both chests contain the same treasure. |
| + | ;Original |
||
| − | ;FFXII |
||
| − | {|class="full-width FFXII table" style="text-align:center" |
+ | {|class="full-width FFXII article-table" style="text-align:center" |
|-class="a" |
|-class="a" |
||
!style="width:20%"|Chest |
!style="width:20%"|Chest |
||
| Line 215: | Line 215: | ||
|≤ 270 gil |
|≤ 270 gil |
||
|Knot of Rust |
|Knot of Rust |
||
| − | |[[ |
+ | |[[Final Fantasy XII ammunition#Onion Arrows|Onion Arrows]] |
|≤ 700 gil |
|≤ 700 gil |
||
|Knot of Rust |
|Knot of Rust |
||
|Hi-Ether |
|Hi-Ether |
||
|} |
|} |
||
| − | {{ |
+ | {{clear}} |
| + | |||
| − | ===Oltam Span=== |
+ | === Oltam Span === |
These chests only appear in the ''Zodiac'' versions. |
These chests only appear in the ''Zodiac'' versions. |
||
| − | {|class="full-width FFXII table" style="text-align:center" |
+ | {|class="full-width FFXII article-table" style="text-align:center" |
|-class="a" |
|-class="a" |
||
!style="width:20%"|Chest |
!style="width:20%"|Chest |
||
| Line 243: | Line 244: | ||
|- |
|- |
||
|Dark Mote |
|Dark Mote |
||
| − | |[[ |
+ | |[[Final Fantasy XII armor#Topkapi Hat|Topkapi Hat]] |
|Knot of Rust |
|Knot of Rust |
||
|Meteorite (B) |
|Meteorite (B) |
||
| Line 257: | Line 258: | ||
|- |
|- |
||
|Aero Mote |
|Aero Mote |
||
| − | |[[ |
+ | |[[Final Fantasy XII ammunition#Onion Bombs|Onion Bombs]] |
|Knot of Rust |
|Knot of Rust |
||
|Meteorite (A) |
|Meteorite (A) |
||
| Line 275: | Line 276: | ||
|Meteorite (A) |
|Meteorite (A) |
||
|} |
|} |
||
| − | {{ |
+ | {{clear}} |
| + | |||
| − | ===Transitway 1=== |
+ | === Transitway 1 === |
;Zodiac |
;Zodiac |
||
| − | {|class="full-width FFXII table" style="text-align:center" |
+ | {|class="full-width FFXII article-table" style="text-align:center" |
|-class="a" |
|-class="a" |
||
!style="width:20%"|Chest |
!style="width:20%"|Chest |
||
| Line 311: | Line 313: | ||
|- |
|- |
||
|Aero Mote |
|Aero Mote |
||
| − | |[[ |
+ | |[[Final Fantasy XII armor#Leather Headgear|Leather Headgear]] |
|Knot of Rust |
|Knot of Rust |
||
|Meteorite (B) |
|Meteorite (B) |
||
| Line 321: | Line 323: | ||
|colspan="4"|[[Numerology]] |
|colspan="4"|[[Numerology]] |
||
|} |
|} |
||
| + | ;Original |
||
| − | ;FFXII |
||
| − | {|class="full-width FFXII table" style="text-align:center" |
+ | {|class="full-width FFXII article-table" style="text-align:center" |
|-class="a" |
|-class="a" |
||
!style="width:20%"|Chest |
!style="width:20%"|Chest |
||
| Line 359: | Line 361: | ||
|≤ 220 gil |
|≤ 220 gil |
||
|Knot of Rust |
|Knot of Rust |
||
| − | |[[ |
+ | |[[Killer Bow (Final Fantasy XII)|Killer Bow]] |
|≤ 550 gil |
|≤ 550 gil |
||
|Knot of Rust |
|Knot of Rust |
||
|Elixir |
|Elixir |
||
|} |
|} |
||
| − | {{ |
+ | {{clear}} |
| + | |||
| − | ===Shunia Twinspan=== |
+ | === Shunia Twinspan === |
;Zodiac |
;Zodiac |
||
| − | {|class="full-width FFXII table" style="text-align:center" |
+ | {|class="full-width FFXII article-table" style="text-align:center" |
|-class="a" |
|-class="a" |
||
!style="width:20%"|Chest |
!style="width:20%"|Chest |
||
| Line 412: | Line 415: | ||
|Meteorite (B) |
|Meteorite (B) |
||
|} |
|} |
||
| + | ;Original |
||
| − | ;FFXII |
||
| − | {|class="full-width FFXII table" style="text-align:center" |
+ | {|class="full-width FFXII article-table" style="text-align:center" |
|-class="a" |
|-class="a" |
||
!style="width:20%"|Chest |
!style="width:20%"|Chest |
||
| Line 455: | Line 458: | ||
|Hi-Ether |
|Hi-Ether |
||
|} |
|} |
||
| − | {{ |
+ | {{clear}} |
| + | |||
| − | ===Site 2=== |
+ | === Site 2 === |
;Zodiac |
;Zodiac |
||
| + | The treasures in Site 2 will disappear and never respawn after Ba'Gamnan attacks the party. If the player defeats Ba'Gamnan immediately, the treasures are still there, but exiting Site 2 means the treasures will disappear for good. This is deemed to be a [[List of bugs and glitches|glitch]] as it doesn't happen in the original version. If the player wants a particular treasure from this area, they should get it before triggering the battle with Ba'Gamnan. |
||
| ⚫ | |||
| + | |||
| ⚫ | |||
|-class="a" |
|-class="a" |
||
!style="width:20%"|Chest |
!style="width:20%"|Chest |
||
| Line 477: | Line 483: | ||
|- |
|- |
||
|Aero Mote |
|Aero Mote |
||
| − | |[[ |
+ | |[[Final Fantasy XII accessories#Steel Gorget|Steel Gorget]] |
|Knot of Rust |
|Knot of Rust |
||
|Meteorite (A) |
|Meteorite (A) |
||
| Line 491: | Line 497: | ||
|- |
|- |
||
|Potion |
|Potion |
||
| − | |[[ |
+ | |[[Serpent Rod (Final Fantasy XII)|Serpent Rod]] |
|Knot of Rust |
|Knot of Rust |
||
|Meteorite (A) |
|Meteorite (A) |
||
| Line 533: | Line 539: | ||
|- |
|- |
||
|Gravity Mote |
|Gravity Mote |
||
| − | |[[ |
+ | |[[Assassin's Dagger (Final Fantasy XII)|Assassin's Dagger]] |
|Knot of Rust |
|Knot of Rust |
||
|Meteorite (A) |
|Meteorite (A) |
||
| Line 561: | Line 567: | ||
|- |
|- |
||
|Chronos Tear |
|Chronos Tear |
||
| − | |[[ |
+ | |[[Battle Bamboo (Final Fantasy XII)|Battle Bamboo]] |
|Knot of Rust |
|Knot of Rust |
||
|Meteorite (A) |
|Meteorite (A) |
||
| Line 579: | Line 585: | ||
|Meteorite (A) |
|Meteorite (A) |
||
|} |
|} |
||
| + | ;Original |
||
| − | ;FFXII |
||
| − | {|class="full-width FFXII table" style="text-align:center" |
+ | {|class="full-width FFXII article-table" style="text-align:center" |
|-class="a" |
|-class="a" |
||
!style="width:20%"|Chest |
!style="width:20%"|Chest |
||
| Line 636: | Line 642: | ||
|- |
|- |
||
|Knot of Rust |
|Knot of Rust |
||
| − | |[[ |
+ | |[[Assassin's Dagger (Final Fantasy XII)|Assassin's Dagger]] |
|} |
|} |
||
| − | {{ |
+ | {{clear}} |
| + | |||
| − | ===Site 3=== |
+ | === Site 3 === |
;Zodiac |
;Zodiac |
||
| − | {|class="full-width FFXII table" style="text-align:center" |
+ | {|class="full-width FFXII article-table" style="text-align:center" |
|-class="a" |
|-class="a" |
||
!style="width:20%"|Chest |
!style="width:20%"|Chest |
||
| Line 654: | Line 661: | ||
|0% |
|0% |
||
|N/A |
|N/A |
||
| − | |colspan="4"|[[ |
+ | |colspan="4"|[[Multiscale]] |
|- |
|- |
||
|class="b" rowspan="2"|25 |
|class="b" rowspan="2"|25 |
||
| Line 693: | Line 700: | ||
|class="a" width="12%"|Rare |
|class="a" width="12%"|Rare |
||
|- |
|- |
||
| − | | |
+ | |Aquara Mote |
|Hastega Mote |
|Hastega Mote |
||
|Knot of Rust |
|Knot of Rust |
||
| Line 716: | Line 723: | ||
|0% |
|0% |
||
|N/A |
|N/A |
||
| − | |colspan="4"|[[ |
+ | |colspan="4"|[[Koga Blade (Final Fantasy XII)|Koga Blade]] |
|- |
|- |
||
|class="b"|30<sup>[[#1|[1]]]</sup> |
|class="b"|30<sup>[[#1|[1]]]</sup> |
||
| Line 722: | Line 729: | ||
|0% |
|0% |
||
|N/A |
|N/A |
||
| − | |colspan="4"|[[ |
+ | |colspan="4"|[[Tumulus (Final Fantasy XII)|Tumulus]] |
|- |
|- |
||
|class="b" rowspan="2"|31 |
|class="b" rowspan="2"|31 |
||
| Line 738: | Line 745: | ||
|Meteorite (B) |
|Meteorite (B) |
||
|} |
|} |
||
| − | *'''''{{A|1}}''''' - Chest does not respawn. |
+ | * '''''{{A|1}}''''' - Chest does not respawn. |
| + | ;Original |
||
| − | ;FFXII |
||
| − | {|class="full-width FFXII table" style="text-align:center" |
+ | {|class="full-width FFXII article-table" style="text-align:center" |
|-class="a" |
|-class="a" |
||
!style="width:20%"|Chest |
!style="width:20%"|Chest |
||
| Line 831: | Line 838: | ||
|N/A |
|N/A |
||
|Knot of Rust |
|Knot of Rust |
||
| − | |[[ |
+ | |[[Caliper]] |
|} |
|} |
||
| − | {{ |
+ | {{clear}} |
| + | |||
| − | ===Site 9=== |
+ | === Site 9 === |
;Zodiac |
;Zodiac |
||
| − | {|class="full-width FFXII table" style="text-align:center" |
+ | {|class="full-width FFXII article-table" style="text-align:center" |
|-class="a" |
|-class="a" |
||
!style="width:20%"|Chest |
!style="width:20%"|Chest |
||
| Line 849: | Line 857: | ||
|0% |
|0% |
||
|N/A |
|N/A |
||
| − | |colspan="4"|[[ |
+ | |colspan="4"|[[Final Fantasy XII accessories#Indigo Pendant|Indigo Pendant]] |
|- |
|- |
||
|class="b" rowspan="2"|33 |
|class="b" rowspan="2"|33 |
||
| Line 860: | Line 868: | ||
|class="a" width="12%"|Rare |
|class="a" width="12%"|Rare |
||
|- |
|- |
||
| − | | |
+ | |Aquara Mote |
|Cura Mote |
|Cura Mote |
||
|Knot of Rust |
|Knot of Rust |
||
| Line 883: | Line 891: | ||
|0% |
|0% |
||
|N/A |
|N/A |
||
| − | |colspan="4"|[[ |
+ | |colspan="4"|[[Iga Blade (Final Fantasy XII)|Iga Blade]] |
|- |
|- |
||
|class="b" rowspan="2"|36 |
|class="b" rowspan="2"|36 |
||
| Line 919: | Line 927: | ||
|Meteorite (B) |
|Meteorite (B) |
||
|} |
|} |
||
| − | *'''''{{A|1}}''''' - Chest does not respawn. |
+ | * '''''{{A|1}}''''' - Chest does not respawn. |
| + | ;Original |
||
| − | ;FFXII |
||
| − | {|class="full-width FFXII table" style="text-align:center" |
+ | {|class="full-width FFXII article-table" style="text-align:center" |
|-class="a" |
|-class="a" |
||
!style="width:20%"|Chest |
!style="width:20%"|Chest |
||
| Line 941: | Line 949: | ||
|≤ 500 gil |
|≤ 500 gil |
||
|Knot of Rust |
|Knot of Rust |
||
| − | |[[ |
+ | |[[Morning Star (Final Fantasy XII)|Morning Star]] |
|≤ 1,500 gil |
|≤ 1,500 gil |
||
|Knot of Rust |
|Knot of Rust |
||
| Line 958: | Line 966: | ||
|N/A |
|N/A |
||
|Knot of Rust |
|Knot of Rust |
||
| − | |[[ |
+ | |[[Fomalhaut (Final Fantasy XII)|Fomalhaut]] |
|N/A |
|N/A |
||
|Knot of Rust |
|Knot of Rust |
||
|Elixir |
|Elixir |
||
|} |
|} |
||
| − | {{ |
+ | {{clear}} |
| + | |||
| − | ===Site 11=== |
+ | === Site 11 === |
| ⚫ | |||
| + | |||
;Zodiac |
;Zodiac |
||
| − | {|class="full-width FFXII table" style="text-align:center" |
+ | {|class="full-width FFXII article-table" style="text-align:center" |
|-class="a" |
|-class="a" |
||
!style="width:20%"|Chest |
!style="width:20%"|Chest |
||
| Line 990: | Line 1,001: | ||
|- |
|- |
||
|class="b"|40<sup>[[#1|[1]]]</sup> |
|class="b"|40<sup>[[#1|[1]]]</sup> |
||
| − | |100% |
+ | |<100% |
|0% |
|0% |
||
|N/A |
|N/A |
||
| − | |colspan="4"|[[ |
+ | |colspan="4"|[[Orochi (Final Fantasy XII)|Orochi]] |
|- |
|- |
||
|class="b" rowspan="2"|41 |
|class="b" rowspan="2"|41 |
||
| Line 1,005: | Line 1,016: | ||
|- |
|- |
||
|Bio Mote |
|Bio Mote |
||
| − | |[[ |
+ | |[[Final Fantasy XII ammunition#Oil Bombs|Oil Bombs]] |
|Knot of Rust |
|Knot of Rust |
||
|Meteorite (A) |
|Meteorite (A) |
||
| Line 1,013: | Line 1,024: | ||
|0% |
|0% |
||
|N/A |
|N/A |
||
| − | |colspan="4"|[[ |
+ | |colspan="4"|[[Zwill Crossblade (Final Fantasy XII)|Zwill Crossblade]] |
|- |
|- |
||
|class="b"|43<sup>[[#1|[1]]]</sup> |
|class="b"|43<sup>[[#1|[1]]]</sup> |
||
| Line 1,019: | Line 1,030: | ||
|0% |
|0% |
||
|N/A |
|N/A |
||
| − | |colspan="4"|[[ |
+ | |colspan="4"|[[Final Fantasy XII armor#Golden Skullcap|Golden Skullcap]] |
|- |
|- |
||
|class="b"|44<sup>[[#1|[1]]]</sup> |
|class="b"|44<sup>[[#1|[1]]]</sup> |
||
| Line 1,025: | Line 1,036: | ||
|0% |
|0% |
||
|N/A |
|N/A |
||
| − | |colspan="4"|[[ |
+ | |colspan="4"|[[Final Fantasy XII armor#Renewing Morion|Renewing Morion]] |
|- |
|- |
||
|class="b" rowspan="2"|45 |
|class="b" rowspan="2"|45 |
||
| Line 1,041: | Line 1,052: | ||
|Meteorite (B) |
|Meteorite (B) |
||
|} |
|} |
||
| − | *'''''{{A|1}}''''' - Chest does not respawn. |
+ | * '''''{{A|1}}''''' - Chest does not respawn. |
| + | ;Original |
||
| − | ;FFXII |
||
| − | {|class="full-width FFXII table" style="text-align:center" |
+ | {|class="full-width FFXII article-table" style="text-align:center" |
|-class="a" |
|-class="a" |
||
!style="width:20%"|Chest |
!style="width:20%"|Chest |
||
| Line 1,063: | Line 1,074: | ||
|≤ 5,000 gil |
|≤ 5,000 gil |
||
|Knot of Rust |
|Knot of Rust |
||
| − | |[[ |
+ | |[[Spica (Final Fantasy XII)|Spica]] |
|≤ 10,000 gil |
|≤ 10,000 gil |
||
|Knot of Rust |
|Knot of Rust |
||
| Line 1,085: | Line 1,096: | ||
|Elixir |
|Elixir |
||
|} |
|} |
||
| − | {{ |
+ | {{clear}} |
| + | |||
| − | ===Lasche Span=== |
+ | === Lasche Span === |
This chest only appears in the ''Zodiac'' versions. It does not respawn. |
This chest only appears in the ''Zodiac'' versions. It does not respawn. |
||
| − | {|class="full-width FFXII table" style="text-align:center" |
+ | {|class="full-width FFXII article-table" style="text-align:center" |
|-class="a" |
|-class="a" |
||
!style="width:20%"|Chest |
!style="width:20%"|Chest |
||
| Line 1,102: | Line 1,114: | ||
|0% |
|0% |
||
|N/A |
|N/A |
||
| − | |colspan="2"|[[ |
+ | |colspan="2"|[[Dragon Whisker (Final Fantasy XII)|Dragon Whisker]] |
|} |
|} |
||
| − | {{ |
+ | {{clear}} |
| + | |||
| − | ===Site 5=== |
+ | === Site 5 === |
;Zodiac |
;Zodiac |
||
| − | {|class="full-width FFXII table" style="text-align:center" |
+ | {|class="full-width FFXII article-table" style="text-align:center" |
|-class="a" |
|-class="a" |
||
!style="width:20%"|Chest |
!style="width:20%"|Chest |
||
| Line 1,176: | Line 1,189: | ||
|0% |
|0% |
||
|N/A |
|N/A |
||
| − | |colspan="4"|[[ |
+ | |colspan="4"|[[Bone of Byblos]] |
|- |
|- |
||
|class="b"|52<sup>[[#1|[1]]]</sup> |
|class="b"|52<sup>[[#1|[1]]]</sup> |
||
| Line 1,182: | Line 1,195: | ||
|0% |
|0% |
||
|N/A |
|N/A |
||
| − | |colspan="4"|[[ |
+ | |colspan="4"|[[Final Fantasy XII accessories#Quasimodo Boots|Quasimodo Boots]] |
|- |
|- |
||
|class="b" rowspan="2"|53 |
|class="b" rowspan="2"|53 |
||
| Line 1,216: | Line 1,229: | ||
|0% |
|0% |
||
|N/A |
|N/A |
||
| − | |colspan="4"|[[ |
+ | |colspan="4"|[[Final Fantasy XII armor#Glimmering Robes|Glimmering Robes]] |
|- |
|- |
||
|class="b" rowspan="2"|56 |
|class="b" rowspan="2"|56 |
||
| Line 1,242: | Line 1,255: | ||
|- |
|- |
||
|Warp Mote |
|Warp Mote |
||
| − | |[[ |
+ | |[[Final Fantasy XII ammunition#Lead Bolts|Lead Bolts]] |
|Knot of Rust |
|Knot of Rust |
||
|Meteorite (A) |
|Meteorite (A) |
||
| Line 1,250: | Line 1,263: | ||
|0% |
|0% |
||
|N/A |
|N/A |
||
| − | |colspan="4"|[[ |
+ | |colspan="4"|[[Arcturus (Final Fantasy XII)|Arcturus]] |
|} |
|} |
||
| − | *'''''{{A|1}}''''' - Chest does not respawn. |
+ | * '''''{{A|1}}''''' - Chest does not respawn. |
| + | ;Original |
||
| − | ;FFXII |
||
| − | {|class="full-width FFXII table" style="text-align:center" |
+ | {|class="full-width FFXII article-table" style="text-align:center" |
|-class="a" |
|-class="a" |
||
!style="width:20%"|Chest |
!style="width:20%"|Chest |
||
| Line 1,345: | Line 1,358: | ||
|N/A |
|N/A |
||
|Knot of Rust |
|Knot of Rust |
||
| − | |[[ |
+ | |[[Final Fantasy XII armor#Mirage Vest|Mirage Vest]] |
|- |
|- |
||
|class="b" rowspan="2"|26 |
|class="b" rowspan="2"|26 |
||
| Line 1,359: | Line 1,372: | ||
|N/A |
|N/A |
||
|Knot of Rust |
|Knot of Rust |
||
| − | |[[ |
+ | |[[Final Fantasy XII armor#Escutcheon|Escutcheon]] |
|N/A |
|N/A |
||
|Knot of Rust |
|Knot of Rust |
||
| Line 1,398: | Line 1,411: | ||
|Elixir |
|Elixir |
||
|} |
|} |
||
| − | {{ |
+ | {{clear}} |
| − | ===Site 6 South=== |
+ | === Site 6 South === |
;Zodiac |
;Zodiac |
||
| − | {|class="full-width FFXII table" style="text-align:center" |
+ | {|class="full-width FFXII article-table" style="text-align:center" |
|-class="a" |
|-class="a" |
||
!style="width:20%"|Chest |
!style="width:20%"|Chest |
||
| Line 1,415: | Line 1,428: | ||
|0% |
|0% |
||
|N/A |
|N/A |
||
| − | |colspan="4"|[[ |
+ | |colspan="4"|[[Final Fantasy XII armor#Magepower Shishak|Magepower Shishak]] |
|- |
|- |
||
|class="b" rowspan="2"|60 |
|class="b" rowspan="2"|60 |
||
| Line 1,426: | Line 1,439: | ||
|class="a" width="12%"|Rare |
|class="a" width="12%"|Rare |
||
|- |
|- |
||
| − | | |
+ | |Aquara Mote |
|Holy Mote |
|Holy Mote |
||
|Knot of Rust |
|Knot of Rust |
||
| Line 1,455: | Line 1,468: | ||
|- |
|- |
||
|Dark Mote |
|Dark Mote |
||
| − | |[[ |
+ | |[[Final Fantasy XII ammunition#Wyrmfire Shot|Wyrmfire Shot]] |
|Knot of Rust |
|Knot of Rust |
||
|Meteorite (A) |
|Meteorite (A) |
||
|- |
|- |
||
|class="b"|63<sup>[[#1|[1]]]</sup> |
|class="b"|63<sup>[[#1|[1]]]</sup> |
||
| − | | |
+ | |25% |
|0% |
|0% |
||
|N/A |
|N/A |
||
| − | |colspan="4"|[[ |
+ | |colspan="4"|[[Final Fantasy XII accessories#Germinas Boots|Germinas Boots]] |
|} |
|} |
||
| − | *'''''{{A|1}}''''' - Chest does not respawn. |
+ | * '''''{{A|1}}''''' - Chest does not respawn. |
| + | ;Original |
||
| − | ;FFXII |
||
| − | {|class="full-width FFXII table" style="text-align:center" |
+ | {|class="full-width FFXII article-table" style="text-align:center" |
|-class="a" |
|-class="a" |
||
!style="width:20%"|Chest |
!style="width:20%"|Chest |
||
| Line 1,487: | Line 1,500: | ||
|≤ 1,000 gil |
|≤ 1,000 gil |
||
|Knot of Rust |
|Knot of Rust |
||
| − | |[[ |
+ | |[[Final Fantasy XII armor#Maximillian|Maximillian]] |
|≤ 3,000 gil |
|≤ 3,000 gil |
||
|Knot of Rust |
|Knot of Rust |
||
| Line 1,509: | Line 1,522: | ||
|Scathe Mote |
|Scathe Mote |
||
|} |
|} |
||
| − | {{ |
+ | {{clear}} |
| + | |||
| − | ===Site 6 North=== |
+ | === Site 6 North === |
;Zodiac |
;Zodiac |
||
| − | {|class="full-width FFXII table" style="text-align:center" |
+ | {|class="full-width FFXII article-table" style="text-align:center" |
|-class="a" |
|-class="a" |
||
!style="width:20%"|Chest |
!style="width:20%"|Chest |
||
| Line 1,525: | Line 1,539: | ||
|0% |
|0% |
||
|N/A |
|N/A |
||
| − | |colspan="2"|[[ |
+ | |colspan="2"|[[Final Fantasy XII armor#Maximillian|Maximillian]] |
|- |
|- |
||
|class="b"|65<sup>[[#1|[1]]]</sup> |
|class="b"|65<sup>[[#1|[1]]]</sup> |
||
| Line 1,531: | Line 1,545: | ||
|0% |
|0% |
||
|N/A |
|N/A |
||
| − | |colspan="2"|[[ |
+ | |colspan="2"|[[Whale Whisker (Final Fantasy XII)|Whale Whisker]] |
|} |
|} |
||
| − | *'''''{{A|1}}''''' - Chest does not respawn. |
+ | * '''''{{A|1}}''''' - Chest does not respawn. |
| + | ;Original |
||
| − | ;FFXII |
||
| − | {|class="full-width FFXII table" style="text-align:center" |
+ | {|class="full-width FFXII article-table" style="text-align:center" |
|-class="a" |
|-class="a" |
||
!style="width:20%"|Chest |
!style="width:20%"|Chest |
||
| Line 1,563: | Line 1,577: | ||
|50% |
|50% |
||
|0% |
|0% |
||
| − | |colspan="6"|[[ |
+ | |colspan="6"|[[Final Fantasy XII armor#Aegis Shield|Aegis Shield]] |
|} |
|} |
||
| − | *'''''{{A|1}}''''' - Chest does not respawn. |
+ | * '''''{{A|1}}''''' - Chest does not respawn. |
| − | {{ |
+ | {{clear}} |
| + | |||
| − | ===Staging Area=== |
+ | === Staging Area === |
This chest only appears in the ''Zodiac'' versions. It does not respawn. |
This chest only appears in the ''Zodiac'' versions. It does not respawn. |
||
| − | {|class="full-width FFXII table" style="text-align:center" |
+ | {|class="full-width FFXII article-table" style="text-align:center" |
|-class="a" |
|-class="a" |
||
!style="width:20%"|Chest |
!style="width:20%"|Chest |
||
| Line 1,585: | Line 1,600: | ||
|colspan="2"|[[Scathe#Final Fantasy XII|Scathe]] |
|colspan="2"|[[Scathe#Final Fantasy XII|Scathe]] |
||
|} |
|} |
||
| − | {{ |
+ | {{clear}} |
| ⚫ | |||
| ⚫ | |||
| ⚫ | |||
| ⚫ | |||
| ⚫ | |||
| + | |||
| ⚫ | |||
|-class="a" |
|-class="a" |
||
!style="width:20%"|Chest |
!style="width:20%"|Chest |
||
| Line 1,602: | Line 1,618: | ||
|0% |
|0% |
||
|N/A |
|N/A |
||
| − | |colspan="2"|[[ |
+ | |colspan="2"|[[Masamune (Final Fantasy XII)|Masamune]] |
|} |
|} |
||
| − | == |
+ | == Quests == |
| ⚫ | |||
| ⚫ | |||
| − | |||
| − | ==Quests== |
||
| ⚫ | |||
To get deeper into the mines the player must complete the hunt for [[Antlion (Final Fantasy XII)|Antlion]], after which the Site 11 Key appears in the Hunters' Camp in [[Phon Coast]], on the ground next to a Fallen Bhujerban. |
To get deeper into the mines the player must complete the hunt for [[Antlion (Final Fantasy XII)|Antlion]], after which the Site 11 Key appears in the Hunters' Camp in [[Phon Coast]], on the ground next to a Fallen Bhujerban. |
||
| − | ===Hunts=== |
+ | === Hunts === |
[[File:XII nidhogg render.png|right|150px|Nidhogg.]] |
[[File:XII nidhogg render.png|right|150px|Nidhogg.]] |
||
| − | {{See |
+ | {{See|Hunt (Final Fantasy XII)}} |
The [[Nidhogg (Final Fantasy XII)|Nidhogg]] is the fifth mark to be listed in the [[Clan Primer]] and arguably the toughest Rank I Mark. The hunt becomes available after Vaan has masqueraded as Basch in Bhujerba, and the party has been given permission to enter Marquis Ondore's estate. Nidhogg is found in the Transitway 1 area of the Lhusu Mines, and the petitioner is conveniently located right at the mines' entrance. The player will receive a Great Serpentskin after the battle, which can be given to Dantro's wife in [[Dalmasca Estersand]] as part of the "[[Dalmasca Estersand#Patient in the desert / cactite family|patient in the desert]]" [[sidequest]]. |
The [[Nidhogg (Final Fantasy XII)|Nidhogg]] is the fifth mark to be listed in the [[Clan Primer]] and arguably the toughest Rank I Mark. The hunt becomes available after Vaan has masqueraded as Basch in Bhujerba, and the party has been given permission to enter Marquis Ondore's estate. Nidhogg is found in the Transitway 1 area of the Lhusu Mines, and the petitioner is conveniently located right at the mines' entrance. The player will receive a Great Serpentskin after the battle, which can be given to Dantro's wife in [[Dalmasca Estersand]] as part of the "[[Dalmasca Estersand#Patient in the desert / cactite family|patient in the desert]]" [[sidequest]]. |
||
[[Diabolos (Final Fantasy XII)|Diabolos]] is a Rank VII Mark found in the Site 11 area of the Lhusu Mines. The hunt becomes available after the events in [[Giruvegan]]. The hunt is petitioned by Miclio in [[Bhujerba]]. |
[[Diabolos (Final Fantasy XII)|Diabolos]] is a Rank VII Mark found in the Site 11 area of the Lhusu Mines. The hunt becomes available after the events in [[Giruvegan]]. The hunt is petitioned by Miclio in [[Bhujerba]]. |
||
| − | [[Rocktoise]] is an Elite Mark whose hunt can be undertaken after the player returns to Rabanastre after escaping from [[Barheim Passage]]. Rocktoise was originally a small pet named Carbo, owned by a [[Moogle (race)|moogle]] named [[Pilika]] who works in the moogle-operated Technick shop in Bhujerba. Pilika had also kept a snake named Bianca, which still lingers within the shop. |
+ | [[Rocktoise]] is an Elite Mark whose hunt can be undertaken after the player returns to Rabanastre after escaping from [[Barheim Passage]]. Rocktoise was originally a small pet named Carbo, owned by a [[Moogle (race)|moogle]] named [[Pilika]] who works in the moogle-operated Technick shop in Bhujerba. Pilika had also kept a snake named Bianca, which still lingers within the shop. |
| − | The [[Antlion (Final Fantasy XII)|Antlion]] is an Elite Mark whose hunt becomes available upon reaching [[Mt Bur-Omisace]], so if the player wishes to fight it with [[Larsa Ferrinas Solidor/Gameplay|Larsa]] in the party, they should return to Rabanastre upon reaching the mountain to accept the hunt, because Larsa will leave the party if the player proceeds further in the story. Antlion can be found in the Site 9 area of the Lhusu Mines and is petitioned by Niray in Bhujerba/Staras Residence. |
+ | The [[Antlion (Final Fantasy XII)|Antlion]] is an Elite Mark whose hunt becomes available upon reaching [[Mt Bur-Omisace]], so if the player wishes to fight it with [[Larsa Ferrinas Solidor/Gameplay|Larsa]] in the party, they should return to Rabanastre upon reaching the mountain to accept the hunt, because Larsa will leave the party if the player proceeds further in the story. Antlion can be found in the Site 9 area of the Lhusu Mines and is petitioned by Niray in Bhujerba/Staras Residence. |
[[Gilgamesh (Final Fantasy XII boss)|Gilgamesh]] is found in the Lhusu Mines and is fought twice. The first is on the bridge just to the west of the [[Save point#Final Fantasy XII|Gate Crystal]], in a homage to the "[[Battle at the Big Bridge|Clash on the Big Bridge]]" (which is also the name of the hunt) from ''[[Final Fantasy V]]''; a reworked version of the iconic theme plays during both fights. Gilgamesh escapes after defeat and the player must find the Site 11 Key and venture deep into the mine to Site 7. During the second fight Gilgamesh's [[HP (stat)|HP]] is triple what he previously had, and his [[stats]] are raised. |
[[Gilgamesh (Final Fantasy XII boss)|Gilgamesh]] is found in the Lhusu Mines and is fought twice. The first is on the bridge just to the west of the [[Save point#Final Fantasy XII|Gate Crystal]], in a homage to the "[[Battle at the Big Bridge|Clash on the Big Bridge]]" (which is also the name of the hunt) from ''[[Final Fantasy V]]''; a reworked version of the iconic theme plays during both fights. Gilgamesh escapes after defeat and the player must find the Site 11 Key and venture deep into the mine to Site 7. During the second fight Gilgamesh's [[HP (stat)|HP]] is triple what he previously had, and his [[stats]] are raised. |
||
| − | ===Rare Game=== |
+ | === Rare Game === |
[[File:Gemhorn-ffxii.png|right|150px|Gemhorn.]] |
[[File:Gemhorn-ffxii.png|right|150px|Gemhorn.]] |
||
| − | {{See |
+ | {{See|Rare Game}} |
| ⚫ | |||
| + | |||
[[Gemhorn]] shows up in the southwestern most part of Site 11 after the player has defeated all foes in the area, including the mimic "treasure chests." |
[[Gemhorn]] shows up in the southwestern most part of Site 11 after the player has defeated all foes in the area, including the mimic "treasure chests." |
||
| ⚫ | There is a 20% chance that [[Bombshell (Final Fantasy XII)|Bombshell]] will appear in the Lasche Span, so one may hunt the creature by exiting and reentering the area until it spawns. One of the items the Bombshell [[item drop#Final Fantasy XII|drops]] is the rare weapon [[Yagyu Darkblade (Final Fantasy XII)|Yagyu Darkblade]], the strongest (second in ''Zodiac'' versions) ninja sword with an attack of 80. |
||
| ⚫ | |||
| − | |||
| ⚫ | There is a 20% chance that [[Bombshell (Final Fantasy XII)|Bombshell]] will appear in the Lasche Span, so one may hunt the creature by exiting and reentering the area until it spawns. One of the items the Bombshell [[item drop#Final Fantasy XII|drops]] is the rare weapon [[Yagyu Darkblade]], the strongest ninja sword with an attack of 80. |
||
To find [[Disma]] the player must have spoken to the "Huntmaster" in [[Phon Coast]] and defeated [[Thalassinon (Final Fantasy XII)|Thalassinon]], which will trigger the start of the Rare Game quest. Disma is found in either Site 5 or Site 6 South. It has a 5% chance of replacing a [[Dark Lord (Final Fantasy XII)|Dark Lord]] in the area. Once it has been felled, it will never [[Spawning enemies|respawn]]. Disma is one of the toughest monsters. |
To find [[Disma]] the player must have spoken to the "Huntmaster" in [[Phon Coast]] and defeated [[Thalassinon (Final Fantasy XII)|Thalassinon]], which will trigger the start of the Rare Game quest. Disma is found in either Site 5 or Site 6 South. It has a 5% chance of replacing a [[Dark Lord (Final Fantasy XII)|Dark Lord]] in the area. Once it has been felled, it will never [[Spawning enemies|respawn]]. Disma is one of the toughest monsters. |
||
| − | ==Enemies== |
+ | == Enemies == |
| − | *[[Steeling]] |
+ | * [[Steeling]] |
| − | *[[Skeleton (Final Fantasy XII)|Skeleton]] |
+ | * [[Skeleton (Final Fantasy XII)|Skeleton]] |
| − | *[[Skull Defender]] |
+ | * [[Skull Defender]] |
| − | *[[Slaven]] |
+ | * [[Slaven]] |
| − | *[[Gazer (Final Fantasy XII)|Gazer]] |
+ | * [[Gazer (Final Fantasy XII)|Gazer]] |
| − | *[[Vampyr (Final Fantasy XII)|Vampyr]] |
+ | * [[Vampyr (Final Fantasy XII)|Vampyr]] |
| − | *[[Dullahan (Final Fantasy XII)|Dullahan]] |
+ | * [[Dullahan (Final Fantasy XII)|Dullahan]] |
| − | *[[Headless (Final Fantasy XII)|Headless]] |
+ | * [[Headless (Final Fantasy XII)|Headless]] |
| − | *[[Bug (Final Fantasy XII)|Bug]] |
+ | * [[Bug (Final Fantasy XII)|Bug]] |
| − | *[[Dark Lord (Final Fantasy XII)|Dark Lord]] |
+ | * [[Dark Lord (Final Fantasy XII)|Dark Lord]] |
| − | *[[Pandora (Final Fantasy XII)|Pandora]] |
+ | * [[Pandora (Final Fantasy XII)|Pandora]] |
| − | *[[Malboro (Final Fantasy XII)|Malboro]] |
+ | * [[Malboro (Final Fantasy XII)|Malboro]] |
| − | *[[Aeronite (Final Fantasy XII)|Aeronite]] |
+ | * [[Aeronite (Final Fantasy XII)|Aeronite]] |
| − | *[[Abysteel (Final Fantasy XII)|Abysteel]] |
+ | * [[Abysteel (Final Fantasy XII)|Abysteel]] |
| − | *[[Killer Mantis (Final Fantasy XII)|Killer Mantis]] |
+ | * [[Killer Mantis (Final Fantasy XII)|Killer Mantis]] |
| − | *[[Rocktoise]] (Elite Mark) |
+ | * [[Rocktoise]] (Elite Mark) |
| − | *[[Antlion (Final Fantasy XII)|Antlion]] (Elite Mark) |
+ | * [[Antlion (Final Fantasy XII)|Antlion]] (Elite Mark) |
| − | *[[Gilgamesh (Final Fantasy XII boss)|Gilgamesh]] (Elite Mark) |
+ | * [[Gilgamesh (Final Fantasy XII boss)|Gilgamesh]] (Elite Mark) |
| − | *[[Nidhogg (Final Fantasy XII)|Nidhogg]] (Mark) |
+ | * [[Nidhogg (Final Fantasy XII)|Nidhogg]] (Mark) |
| − | *[[Diabolos (Final Fantasy XII)|Diabolos]] (Mark) |
+ | * [[Diabolos (Final Fantasy XII)|Diabolos]] (Mark) |
| − | *[[Aerieel]] (Rare) |
+ | * [[Aerieel]] (Rare) |
| − | *[[Disma]] (Rare) |
+ | * [[Disma]] (Rare) |
| − | *[[Gemhorn]] (Rare) |
+ | * [[Gemhorn]] (Rare) |
| − | *[[Bombshell (Final Fantasy XII)|Bombshell]] (Rare) |
+ | * [[Bombshell (Final Fantasy XII)|Bombshell]] (Rare) |
| − | *[[Ba'Gamnan]] (Boss) |
+ | * [[Ba'Gamnan]] (Boss) |
| − | *[[Bwagi]] (Boss) |
+ | * [[Bwagi]] (Boss) |
| − | *[[Gijuk]] (Boss) |
+ | * [[Gijuk]] (Boss) |
| − | *[[Rinok]] (Boss) |
+ | * [[Rinok]] (Boss) |
| − | ===Monsters by area=== |
+ | === Monsters by area === |
| − | ====Shaft Entry==== |
+ | ==== Shaft Entry ==== |
| − | {|class="half-width table FFXII" style="text-align:center" |
+ | {|class="half-width article-table FFXII" style="text-align:center" |
| − | |+'''Before |
+ | |+'''Before Ba'Gamnan boss battle''' |
|-class="a" |
|-class="a" |
||
!Name |
!Name |
||
| Line 1,688: | Line 1,701: | ||
|} |
|} |
||
| − | {|class="half-width table FFXII" style="text-align:center" |
+ | {|class="half-width article-table FFXII" style="text-align:center" |
| − | |+''' |
+ | |+'''After Ba'Gamnan boss battle''' |
|-class="a" |
|-class="a" |
||
!Name |
!Name |
||
| Line 1,711: | Line 1,724: | ||
|10-11 |
|10-11 |
||
|} |
|} |
||
| − | {{ |
+ | {{Location section|Final Fantasy XII}} |
| − | ===Oltam Span=== |
+ | === Oltam Span === |
| − | {|class="half-width table FFXII" style="text-align:center" |
+ | {|class="half-width article-table FFXII" style="text-align:center" |
| − | |+'''Before |
+ | |+'''Before Ba'Gamnan boss battle''' |
|-class="a" |
|-class="a" |
||
!Name |
!Name |
||
| Line 1,734: | Line 1,747: | ||
|} |
|} |
||
| − | {|class="half-width table FFXII" style="text-align:center" |
+ | {|class="half-width article-table FFXII" style="text-align:center" |
| − | |+''' |
+ | |+'''After Ba'Gamnan boss battle''' |
|-class="a" |
|-class="a" |
||
!Name |
!Name |
||
| Line 1,758: | Line 1,771: | ||
|} |
|} |
||
| − | ===Transit Way 1=== |
+ | === Transit Way 1 === |
| − | {|class="half-width table FFXII" style="text-align:center" |
+ | {|class="half-width article-table FFXII" style="text-align:center" |
| − | |+''' |
+ | |+'''First visit''' |
|-class="a" |
|-class="a" |
||
!Name |
!Name |
||
| Line 1,779: | Line 1,792: | ||
|} |
|} |
||
| − | {|class="half-width table FFXII" style="text-align:center" |
+ | {|class="half-width article-table FFXII" style="text-align:center" |
|+'''Until Antlion Hunt''' |
|+'''Until Antlion Hunt''' |
||
|-class="a" |
|-class="a" |
||
| Line 1,803: | Line 1,816: | ||
|} |
|} |
||
| − | ===Shunia Twinspan=== |
+ | === Shunia Twinspan === |
| − | {|class="half-width table FFXII" style="text-align:center" |
+ | {|class="half-width article-table FFXII" style="text-align:center" |
| − | |+''' |
+ | |+'''First visit''' |
|-class="a" |
|-class="a" |
||
!Name |
!Name |
||
| Line 1,820: | Line 1,833: | ||
|} |
|} |
||
| − | {|class="half-width table FFXII" style="text-align:center" |
+ | {|class="half-width article-table FFXII" style="text-align:center" |
|+'''Until Antlion Hunt''' |
|+'''Until Antlion Hunt''' |
||
|-class="a" |
|-class="a" |
||
| Line 1,836: | Line 1,849: | ||
|} |
|} |
||
| − | ===Site 2=== |
+ | === Site 2 === |
| − | {|class="half-width table FFXII" style="text-align:center" |
+ | {|class="half-width article-table FFXII" style="text-align:center" |
| − | |+''' |
+ | |+'''First visit''' |
|-class="a" |
|-class="a" |
||
!Name |
!Name |
||
| Line 1,848: | Line 1,861: | ||
|8-9 |
|8-9 |
||
|- |
|- |
||
| − | !class="b"|[[Ba'Gamnan]] |
+ | !class="b"|[[Ba'Gamnan (Final Fantasy XII boss)|Ba'Gamnan]] |
|Boss (pursues) |
|Boss (pursues) |
||
|12 |
|12 |
||
| Line 1,865: | Line 1,878: | ||
|} |
|} |
||
| − | {|class="half-width table FFXII" style="text-align:center" |
+ | {|class="half-width article-table FFXII" style="text-align:center" |
|+'''Until Antlion Hunt''' |
|+'''Until Antlion Hunt''' |
||
|-class="a" |
|-class="a" |
||
| Line 1,880: | Line 1,893: | ||
|10-11 |
|10-11 |
||
|} |
|} |
||
| − | {{ |
+ | {{clear}} |
| + | |||
| ⚫ | |||
| + | The map can be bought from a Cartographer's Guild moogle in Lhusu Square for 650 gil. |
||
| + | |||
| + | The candle to reveal the rest of the map can be found in the southern most section of Site 5. |
||
| ⚫ | |||
:''Areas highlighted in red are hidden passages that do not appear on the map.'' |
:''Areas highlighted in red are hidden passages that do not appear on the map.'' |
||
<div style="overflow:auto; width: 100%; height:300px"> |
<div style="overflow:auto; width: 100%; height:300px"> |
||
[[File:FF12 Map - Lhusu Mines.png]]</div> |
[[File:FF12 Map - Lhusu Mines.png]]</div> |
||
| + | [[:File:Map_17_Lhusu_Mines.png|Map from the original ''Final Fantasy XII'' that includes all treasure information.]] |
||
| ⚫ | |||
| ⚫ | |||
| − | {{sideicon|PFF}} |
||
| ⚫ | |||
| ⚫ | |||
| ⚫ | |||
| ⚫ | |||
| − | {{sideicon|FFRK}} |
||
| ⚫ | |||
| ⚫ | |||
| + | |||
| ⚫ | |||
| ⚫ | |||
| ⚫ | |||
| + | |||
| ⚫ | |||
[[File:FFRK Lhusu Mines FFXII.png|right|150px]] |
[[File:FFRK Lhusu Mines FFXII.png|right|150px]] |
||
The party heads for the Lhusu Mines to rescue Penelo, who has been taken prisoner by Ba'Gamnan and his cronies. |
The party heads for the Lhusu Mines to rescue Penelo, who has been taken prisoner by Ba'Gamnan and his cronies. |
||
| − | {{ |
+ | {{Location section|Final Fantasy Record Keeper}} |
| − | |||
| ⚫ | |||
| ⚫ | |||
| ⚫ | |||
| ⚫ | |||
| − | ==Gallery== |
+ | == Gallery == |
<gallery> |
<gallery> |
||
| + | Lhusu-mines-entrance.png|Entrance. |
||
Lhusu mines.png|Near the entrance. |
Lhusu mines.png|Near the entrance. |
||
Lhusu-mines-ffxii.png|Party descending to the Lhusu Mines. |
Lhusu-mines-ffxii.png|Party descending to the Lhusu Mines. |
||
| Line 1,911: | Line 1,929: | ||
Lhusu-mines2-ffxii.png|The party running from Ba'Gamnan. |
Lhusu-mines2-ffxii.png|The party running from Ba'Gamnan. |
||
Lhusu-Mines-FFXII.jpg|Activating a switch. |
Lhusu-Mines-FFXII.jpg|Activating a switch. |
||
| + | The-Lhusu-Mines-FFXII-TZA.jpg |
||
Lhusu-Mines-Bridge.png|Big Bridge. |
Lhusu-Mines-Bridge.png|Big Bridge. |
||
FFXII Lhusu Mines.png|Deep in the mines. |
FFXII Lhusu Mines.png|Deep in the mines. |
||
| + | Gilgamesh-Appears-FFXII-TZA.png|Final chamber. |
||
</gallery> |
</gallery> |
||
| − | ==Trivia== |
+ | == Trivia == |
| − | *The scene where Penelo is held hostage by Ba'Gamnan in his hideout is [[Censorship|censored]] from the original Japanese version of ''Final Fantasy XII''. |
+ | * The scene where Penelo is held hostage by Ba'Gamnan in his hideout is [[Censorship|censored]] from the original Japanese version of ''Final Fantasy XII''. |
| − | {{FFXII}} |
+ | {{navbox setting FFXII}} |
| ⚫ | |||
| ⚫ | |||
[[de:Lhusu-Minen]] |
[[de:Lhusu-Minen]] |
||
| ⚫ | |||
| ⚫ | |||
Revision as of 18:45, 13 January 2020
Template:Sideicon

Oh, shut up and help me remodel the Lhusu Mines page!
- Adding a Locations section, with images and brief descriptions of the areas within the location.
This request can be discussed on the associated discussion page. Remove this notice upon completion.
The Lhusu Mines: One of the richest veins in Ivalice.
Balthier
The Lhusu Mines is a location in Ivalice in the world of Final Fantasy XII. It is located in Bhujerba, which resides on the sky continent of Dorstonis. Among the mines' interesting features is that, as it is located on a sky continent, the deeper one gets into the mines the lighter it gets. Normally the mines are protected by a paling, however, it has fallen and monsters have invaded the site. It can be speculated the paling has been allowed to fall deliberately, as to prevent the Empire from obtaining more magicite. Miners around town talk how the mines yield much less magicite and of lower quality than before, and when the party ventures inside, no mining appears to be taking place.
When the party enters the mines to rescue Penelo, the enemies' levels are 7–13. As the player gets further and goes after the mark, Antlion, and receives the key, the enemies' levels are 38–43. If the player uses the Site 11 key to unlock the gate, they get the option to venture into the deepest part of the mines where the enemies' levels rise to 59–64.
Sage Knowledge
A crystal mine located on the sky continent of Dorstonis. Many years have passed since the ore veins were first discovered here, yet even today, high-quality ores are found and processed in these well-worked shafts. Many claim that the success of the mines is due to a project begun many centuries past by the Ondore family, whereby mining across their domains was closely regulated, never permitting too much to be drawn from one place, thereby allowing the magicite crystals to naturally recover. The Lhusu Mines are most famous for their high caliber of skystone, the material which enables airships to ply the skies, and memstone, a variety of magicite that can store sound and even images in its unique crystalline structure. Unfortunately, the dense concentrations of Mist in the mines lure all manner of beasts, and when mining expeditions are planned, palings must be erected to keep such creatures at bay.
Sage Knowledge 52, Lhusu Mines
Story
Ghis and Ondore in Lhusu Mines.
Like the Henne Mines, Lhusu Mines is a magicite mine. It is located near the city of Bhujerba, and previously was a major source of magicite for the Archadian Empire. Lhusu Mines is still providing the Empire's Draklor Laboratory with magicite, but it's done in secret in a venture led by Dr. Cid and funded by Vayne Solidor. Judge Ghis has come to Bhujerba to talk to Marquis Ondore about the affairs, and the two visit the mines.
Vaan, Balthier, Fran, and Basch also head into the mines to rescue Penelo, whom Ba'Gamnan is holding hostage there. Larsa Ferrinas Solidor, Vayne's younger brother, joins them as well. He uses the alias "Lamont" to stay undercover, as he wants to find out if the rumors are true about Bhujerba providing Draklor with magicite to create manufacted nethicite. Penelo is being used as bait for a trap set by several bangaa to capture Balthier, but once Balthier and friends set foot in the mine, the bangaa deem her worthless and release her.
Penelo captured in Lhusu Mines.
The party explores the depths of the mine without finding Penelo. "Lamont" finds a magicite vein and his suspicions are confirmed. Balthier questions him about this and realizes "Lamont's" true identity, but before he can squeeze answers out of him, Ba'Gamnan and his gang interrupt them. Larsa runs out of the mines telling the others to follow, and Balthier and his friends have the chance to either fight Ba'Gamnan or follow Larsa.
The freed Penelo runs through the mines and bumps into Ghis and the Marquis. Ghis is furious having found a civilian in the mines that houses Empire's secrets, but Larsa steps on the scene and rescues her, taking her away with him. After Vaan and his friends find out where Penelo has gone they follow.
Later the party can return to the mines to fight several marks, including the legendary Gilgamesh.
Locations
The Lhusu Mines can be ventured in from the Skycity of Bhujerba in Lhusu square.
- Shaft Entry (to Bhujerba)
- Oltam Span
- Transitway 1
- Shunia Twinspan
- Site 2
- Site 3
- Transitway 2
- Tasche Span
- Site 9
- Site 11
- Lasche Span
- Site 5
- Site 6 South
- Site 6 North
- Staging Area
- Site 7
Treasures
Knot of Rust is the most common treasure in the mines, all treasures being able to give one. Motes are the other common treasures. With the Diamond Armlet equipped there is a small chance of obtaining an Elixir or Hi-Ether from the treasures instead.
During the player's first visit, there can be a treasure in Transitway 1 that may contain a Killer Bow. In Site 2 area, before the spot where Rocktoise is fought, there can be a treasure that may have the Assassin's Dagger.
Later, when the Antlion hunt becomes available, the player can venture deeper into the mines. In Site 9, behind the minecart, the player may find a Morning Star, a powerful weapon to obtain early. At the deepest end, in the cave where Antlion is fought, the player may find the original version's ultimate gun, Fomalhaut, and since the treasure respawns it is possible to to obtain multiple Fomalhauts.
Deeper into the mines still, with the Site 11 Key the player can go to the deepest reaches of the mines, where Gilgamesh is fought. Treasures here are either Knots of Rust, Motes, or Ethers. The northernmost area where the player must cross through a hidden passage has a treasure that has 50% chance to spawn, but when it does, it will always be the Aegis Shield. Once the treasure has been claimed, it will never respawn. The dead-end on the northeast side of the Site 6 South area can have the armor Maximillian, and this treasure also respawns.
Shaft Entry
- Zodiac
| Chest | Spawns | Holds Gil% | Gil | Normal Treasure | Diamond Armlet Treasure | ||
|---|---|---|---|---|---|---|---|
| 1[1][2] | 100% | 0% | N/A | Silence | |||
| 2 | 70% | 35% | ≤ 220 gil | Item 1 | Item 2 | Common | Rare |
| Aquara Mote | Bronze Mace | Knot of Rust | Meteorite (A) | ||||
| 3 | 70% | 35% | ≤ 220 gil | Item 1 | Item 2 | Common | Rare |
| Aquara Mote | Hi-Potion | Knot of Rust | Meteorite (A) | ||||
| 4 | 70% | 40% | ≤ 220 gil | Item 1 | Item 2 | Common | Rare |
| Aquara Mote | Osafune | Knot of Rust | Meteorite (B) | ||||
| 5 | 70% | 30% | ≤ 220 gil | Item 1 | Item 2 | Common | Rare |
| Dark Mote | Chronos Tear | Knot of Rust | Meteorite (A) | ||||
| 6 | 70% | 30% | ≤ 220 gil | Item 1 | Item 2 | Common | Rare |
| Aero Mote | Ether | Knot of Rust | Meteorite (A) | ||||
- 1 - Chest does not respawn.
- 2 - Opening this chest causes Chest #19 in the Dalmasca Estersand to disappear forever. Inversely, if Dalmasca Estersand chest #19 has been opened, this chest will disappear forever as well. However, both chests contain the same treasure.
- Original
| Chest | Spawns | Holds Gil% | Normal Treasure | Diamond Armlet Treasure | ||||
|---|---|---|---|---|---|---|---|---|
| 1 | 85% | 50% | Gil | Item 1 | Item 2 | Gil | Common | Rare |
| ≤ 260 gil | Knot of Rust | Dark Mote | ≤ 700 gil | Knot of Rust | Hi-Ether | |||
| 2 | 85% | 50% | Gil | Item 1 | Item 2 | Gil | Common | Rare |
| ≤ 270 gil | Knot of Rust | Onion Arrows | ≤ 700 gil | Knot of Rust | Hi-Ether | |||
Oltam Span
These chests only appear in the Zodiac versions.
| Chest | Spawns | Holds Gil% | Gil | Normal Treasure | Diamond Armlet Treasure | ||
|---|---|---|---|---|---|---|---|
| 7 | 75% | 40% | ≤ 240 gil | Item 1 | Item 2 | Common | Rare |
| Dark Mote | Topkapi Hat | Knot of Rust | Meteorite (B) | ||||
| 8 | 75% | 40% | ≤ 240 gil | Item 1 | Item 2 | Common | Rare |
| Aero Mote | Onion Bombs | Knot of Rust | Meteorite (A) | ||||
| 9 | 75% | 40% | ≤ 240 gil | Item 1 | Item 2 | Common | Rare |
| Dark Mote | Echo Herbs | Knot of Rust | Meteorite (A) | ||||
Transitway 1
- Zodiac
| Chest | Spawns | Holds Gil% | Gil | Normal Treasure | Diamond Armlet Treasure | ||
|---|---|---|---|---|---|---|---|
| 10 | 75% | 30% | ≤ 270 gil | Item 1 | Item 2 | Common | Rare |
| Balance Mote | Potion | Knot of Rust | Meteorite (A) | ||||
| 11 | 75% | 30% | ≤ 270 gil | Item 1 | Item 2 | Common | Rare |
| Aero Mote | Leather Headgear | Knot of Rust | Meteorite (B) | ||||
| 12[1] | 100% | 0% | N/A | Numerology | |||
- Original
| Chest | Spawns | Holds Gil% | Normal Treasure | Diamond Armlet Treasure | ||||
|---|---|---|---|---|---|---|---|---|
| 3 | 79% | 50% | Gil | Item 1 | Item 2 | Gil | Common | Rare |
| ≤ 280 gil | Knot of Rust | Dark Mote | ≤ 660 gil | Knot of Rust | Elixir | |||
| 4 | 81% | 70% | Gil | Item 1 | Item 2 | Gil | Common | Rare |
| ≤ 220 gil | Knot of Rust | Killer Bow | ≤ 550 gil | Knot of Rust | Elixir | |||
Shunia Twinspan
- Zodiac
| Chest | Spawns | Holds Gil% | Gil | Normal Treasure | Diamond Armlet Treasure | ||
|---|---|---|---|---|---|---|---|
| 13 | 80% | 30% | ≤ 270 gil | Potion | Common | Rare | |
| Knot of Rust | Meteorite (A) | ||||||
| 14 | 80% | 30% | ≤ 270 gil | Item 1 | Item 2 | Common | Rare |
| Potion | Aero Mote | Knot of Rust | Meteorite (A) | ||||
| 15 | 80% | 30% | ≤ 270 gil | Potion | Common | Rare | |
| Knot of Rust | Meteorite (B) | ||||||
- Original
| Chest | Spawns | Holds Gil% | Normal Treasure | Diamond Armlet Treasure | ||||
|---|---|---|---|---|---|---|---|---|
| 5 | 90% | 50% | Gil | Item 1 | Item 2 | Gil | Common | Rare |
| ≤ 150 gil | Knot of Rust | Water Mote | ≤ 420 gil | Knot of Rust | Hi-Ether | |||
| 6 | 75% | 50% | Gil | Item 1 | Item 2 | Gil | Common | Rare |
| ≤ 150 gil | Knot of Rust | Dark Mote | ≤ 420 gil | Knot of Rust | Hi-Ether | |||
Site 2
- Zodiac
The treasures in Site 2 will disappear and never respawn after Ba'Gamnan attacks the party. If the player defeats Ba'Gamnan immediately, the treasures are still there, but exiting Site 2 means the treasures will disappear for good. This is deemed to be a glitch as it doesn't happen in the original version. If the player wants a particular treasure from this area, they should get it before triggering the battle with Ba'Gamnan.
| Chest | Spawns | Holds Gil% | Gil | Normal Treasure | Diamond Armlet Treasure | ||
|---|---|---|---|---|---|---|---|
| 16 | 70% | 30% | ≤ 260 gil | Item 1 | Item 2 | Common | Rare |
| Aero Mote | Steel Gorget | Knot of Rust | Meteorite (A) | ||||
| 17 | 70% | 30% | ≤ 260 gil | Item 1 | Item 2 | Common | Rare |
| Potion | Serpent Rod | Knot of Rust | Meteorite (A) | ||||
| 18 | 70% | 30% | ≤ 260 gil | Item 1 | Item 2 | Common | Rare |
| Dispel Mote | Ether | Knot of Rust | Meteorite (C) | ||||
| 19 | 70% | 30% | ≤ 260 gil | Item 1 | Item 2 | Common | Rare |
| Cura Mote | Handkerchief | Knot of Rust | Meteorite (B) | ||||
| 20 | 70% | 30% | ≤ 260 gil | Item 1 | Item 2 | Common | Rare |
| Gravity Mote | Assassin's Dagger | Knot of Rust | Meteorite (A) | ||||
| 21 | 70% | 30% | ≤ 260 gil | Item 1 | Item 2 | Common | Rare |
| Hi-Potion | Gold Needle | Knot of Rust | Meteorite (A) | ||||
| 22 | 70% | 30% | ≤ 260 gil | Item 1 | Item 2 | Common | Rare |
| Chronos Tear | Battle Bamboo | Knot of Rust | Meteorite (A) | ||||
| 23 | 70% | 30% | ≤ 260 gil | Item 1 | Item 2 | Common | Rare |
| Aero Mote | Phoenix Down | Knot of Rust | Meteorite (A) | ||||
- Original
| Chest | Spawns | Holds Gil% | Gil | Normal Treasure | |
|---|---|---|---|---|---|
| 7 | 80% | 50% | ≤ 300 gil | Item 1 | Item 2 |
| Knot of Rust | Dark Mote | ||||
| 8 | 80% | 50% | ≤ 250 gil | Item 1 | Item 2 |
| Knot of Rust | Water Mote | ||||
| 9 | 80% | 50% | ≤ 250 gil | Item 1 | Item 2 |
| Knot of Rust | G-Self: status = REF | ||||
| 10 | 80% | 50% | ≤ 180 gil | Item 1 | Item 2 |
| Knot of Rust | G-Foe: HP >= 500 | ||||
| 11 | 80% | 70% | ≤ 150 gil | Item 1 | Item 2 |
| Knot of Rust | Assassin's Dagger | ||||
Site 3
- Zodiac
| Chest | Spawns | Holds Gil% | Gil | Normal Treasure | Diamond Armlet Treasure | ||
|---|---|---|---|---|---|---|---|
| 24[1] | 100% | 0% | N/A | Multiscale | |||
| 25 | 90% | 50% | ≤ 450 gil | Item 1 | Item 2 | Common | Rare |
| Dark Mote | Warp Mote | Knot of Rust | Meteorite (A) | ||||
| 26 | 90% | 50% | ≤ 450 gil | Item 1 | Item 2 | Common | Rare |
| Cura Mote | Float Mote | Knot of Rust | Meteorite (A) | ||||
| 27 | 90% | 50% | ≤ 450 gil | Item 1 | Item 2 | Common | Rare |
| Aquara Mote | Hastega Mote | Knot of Rust | Meteorite (A) | ||||
| 28 | 90% | 50% | ≤ 450 gil | Item 1 | Item 2 | Common | Rare |
| Dispel Mote | Balance Mote | Knot of Rust | Meteorite (B) | ||||
| 29[1] | 100% | 0% | N/A | Koga Blade | |||
| 30[1] | 100% | 0% | N/A | Tumulus | |||
| 31 | 90% | 50% | ≤ 450 gil | Item 1 | Item 2 | Common | Rare |
| Bio Mote | Reflectga Mote | Knot of Rust | Meteorite (B) | ||||
- 1 - Chest does not respawn.
- Original
| Chest | Spawns | Holds Gil% | Normal Treasure | Diamond Armlet Treasure | ||||
|---|---|---|---|---|---|---|---|---|
| 12 | 60% | 0% | Gil | Item 1 | Item 2 | Gil | Common | Rare |
| N/A | Knot of Rust | Ether | N/A | Knot of Rust | Elixir | |||
| 13 | 60% | 0% | Gil | Item 1 | Item 2 | Gil | Common | Rare |
| N/A | Knot of Rust | Balance Mote | N/A | Knot of Rust | Elixir | |||
| 14 | 60% | 0% | Gil | Item 1 | Item 2 | Gil | Common | Rare |
| N/A | Knot of Rust | Ether | N/A | Knot of Rust | Elixir | |||
| 15 | 60% | 0% | Gil | Item 1 | Item 2 | Gil | Common | Rare |
| N/A | Knot of Rust | Balance Mote | N/A | Knot of Rust | Elixir | |||
| 16 | 100% | 0% | Gil | Item 1 | Item 2 | Gil | Common | Rare |
| N/A | Knot of Rust | Potion | N/A | Knot of Rust | Caliper | |||
Site 9
- Zodiac
| Chest | Spawns | Holds Gil% | Gil | Normal Treasure | Diamond Armlet Treasure | ||
|---|---|---|---|---|---|---|---|
| 32[1] | 100% | 0% | N/A | Indigo Pendant | |||
| 33 | 90% | 50% | ≤ 500 gil | Item 1 | Item 2 | Common | Rare |
| Aquara Mote | Cura Mote | Knot of Rust | Meteorite (C) | ||||
| 34 | 90% | 50% | ≤ 500 gil | Item 1 | Item 2 | Common | Rare |
| Bio Mote | Dispel Mote | Knot of Rust | Meteorite (B) | ||||
| 35[1] | 100% | 0% | N/A | Iga Blade | |||
| 36 | 90% | 50% | ≤ 500 gil | Item 1 | Item 2 | Common | Rare |
| Dark Mote | Aeroga Mote | Knot of Rust | Meteorite (A) | ||||
| 37[1] | 100% | 0% | N/A | Expose | |||
| 38 | 90% | 50% | ≤ 500 gil | Item 1 | Item 2 | Common | Rare |
| Aero Mote | Gravity Mote | Knot of Rust | Meteorite (B) | ||||
- 1 - Chest does not respawn.
- Original
| Chest | Spawns | Holds Gil% | Normal Treasure | Diamond Armlet Treasure | ||||
|---|---|---|---|---|---|---|---|---|
| 17 | 60% | 60% | Gil | Item 1 | Item 2 | Gil | Common | Rare |
| ≤ 500 gil | Knot of Rust | Morning Star | ≤ 1,500 gil | Knot of Rust | Elixir | |||
| 18 | 60% | 0% | Gil | Item 1 | Item 2 | Gil | Common | Rare |
| N/A | Knot of Rust | Fomalhaut | N/A | Knot of Rust | Elixir | |||
Site 11
To obtain the key to open the gate to the deepest reaches of the mines, the player must first complete the hunt for Antlion. Afterward, the Site 11 Key can be found in Phon Coast Hunters' Camp, next to a fallen Bhujerban.
- Zodiac
| Chest | Spawns | Holds Gil% | Gil | Normal Treasure | Diamond Armlet Treasure | ||
|---|---|---|---|---|---|---|---|
| 39 | 90% | 50% | ≤ 600 gil | Item 1 | Item 2 | Common | Rare |
| Bubble Mote | Cura Mote | Knot of Rust | Meteorite (B) | ||||
| 40[1] | <100% | 0% | N/A | Orochi | |||
| 41 | 90% | 50% | ≤ 600 gil | Item 1 | Item 2 | Common | Rare |
| Bio Mote | Oil Bombs | Knot of Rust | Meteorite (A) | ||||
| 42[1] | 100% | 0% | N/A | Zwill Crossblade | |||
| 43[1] | 100% | 0% | N/A | Golden Skullcap | |||
| 44[1] | 100% | 0% | N/A | Renewing Morion | |||
| 45 | 90% | 50% | ≤ 600 gil | Item 1 | Item 2 | Common | Rare |
| Cura Mote | Holy Mote | Knot of Rust | Meteorite (B) | ||||
- 1 - Chest does not respawn.
- Original
| Chest | Spawns | Holds Gil% | Normal Treasure | Diamond Armlet Treasure | ||||
|---|---|---|---|---|---|---|---|---|
| 19 | 60% | 60% | Gil | Item 1 | Item 2 | Gil | Common | Rare |
| ≤ 5,000 gil | Knot of Rust | Spica | ≤ 10,000 gil | Knot of Rust | Elixir | |||
| 20 | 60% | 10% | Gil | Item 1 | Item 2 | Gil | Common | Rare |
| ≤ 200 gil | Knot of Rust | Ether | ≤ 300 gil | Knot of Rust | Elixir | |||
Lasche Span
This chest only appears in the Zodiac versions. It does not respawn.
| Chest | Spawns | Holds Gil% | Gil | Normal Treasure | Diamond Armlet Treasure |
|---|---|---|---|---|---|
| 44 | 100% | 0% | N/A | Dragon Whisker | |
Site 5
- Zodiac
| Chest | Spawns | Holds Gil% | Gil | Normal Treasure | Diamond Armlet Treasure | ||
|---|---|---|---|---|---|---|---|
| 47 | 90% | 50% | ≤ 600 gil | Item 1 | Item 2 | Common | Rare |
| Bio Mote | Vanishga Mote | Knot of Rust | Meteorite (A) | ||||
| 48 | 90% | 50% | ≤ 600 gil | Item 1 | Item 2 | Common | Rare |
| Bio Mote | Cura Mote | Knot of Rust | Meteorite (B) | ||||
| 49 | 90% | 50% | ≤ 600 gil | Item 1 | Item 2 | Common | Rare |
| Dark Mote | Dispel Mote | Knot of Rust | Meteorite (A) | ||||
| 50 | 90% | 50% | ≤ 600 gil | Item 1 | Item 2 | Common | Rare |
| Bio Mote | Aeroga Mote | Knot of Rust | Meteorite (C) | ||||
| 51[1] | 25% | 0% | N/A | Bone of Byblos | |||
| 52[1] | 25% | 0% | N/A | Quasimodo Boots | |||
| 53 | 90% | 50% | ≤ 600 gil | Item 1 | Item 2 | Common | Rare |
| Hastega Mote | Reverse Mote | Knot of Rust | Meteorite (B) | ||||
| 54 | 90% | 50% | ≤ 600 gil | Item 1 | Item 2 | Common | Rare |
| Dark Mote | Reflectga Mote | Knot of Rust | Meteorite (A) | ||||
| 55[1] | 100% | 0% | N/A | Glimmering Robes | |||
| 56 | 90% | 50% | ≤ 600 gil | Item 1 | Item 2 | Common | Rare |
| Bubble Mote | Float Mote | Knot of Rust | Meteorite (A) | ||||
| 57 | 90% | 50% | ≤ 600 gil | Item 1 | Item 2 | Common | Rare |
| Warp Mote | Lead Bolts | Knot of Rust | Meteorite (A) | ||||
| 58[1] | 100% | 0% | N/A | Arcturus | |||
- 1 - Chest does not respawn.
- Original
| Chest | Spawns | Holds Gil% | Normal Treasure | Diamond Armlet Treasure | ||||
|---|---|---|---|---|---|---|---|---|
| 21 | 60% | 0% | Gil | Item 1 | Item 2 | Gil | Common | Rare |
| N/A | Knot of Rust | Vanishga Mote | N/A | Knot of Rust | Elixir | |||
| 22 | 60% | 0% | Gil | Item 1 | Item 2 | Gil | Common | Rare |
| N/A | Knot of Rust | Ether | N/A | Knot of Rust | Elixir | |||
| 23 | 60% | 0% | Gil | Item 1 | Item 2 | Gil | Common | Rare |
| N/A | Knot of Rust | Ether | N/A | Knot of Rust | Elixir | |||
| 24 | 60% | 0% | Gil | Item 1 | Item 2 | Gil | Common | Rare |
| N/A | Knot of Rust | Balance Mote | N/A | Knot of Rust | Elixir | |||
| 25 | 100% | 0% | Gil | Item 1 | Item 2 | Gil | Common | Rare |
| N/A | Knot of Rust | Ether | N/A | Knot of Rust | Mirage Vest | |||
| 26 | 60% | 0% | Gil | Item 1 | Item 2 | Gil | Common | Rare |
| N/A | Knot of Rust | Escutcheon | N/A | Knot of Rust | Elixir | |||
| 27 | 60% | 0% | Gil | Item 1 | Item 2 | Gil | Common | Rare |
| N/A | Knot of Rust | Warp Mote | N/A | Knot of Rust | Elixir | |||
| 28 | 60% | 0% | Gil | Item 1 | Item 2 | Gil | Common | Rare |
| N/A | Knot of Rust | Float Mote | N/A | Knot of Rust | Elixir | |||
Site 6 South
- Zodiac
| Chest | Spawns | Holds Gil% | Gil | Normal Treasure | Diamond Armlet Treasure | ||
|---|---|---|---|---|---|---|---|
| 59[1] | 100% | 0% | N/A | Magepower Shishak | |||
| 60 | 90% | 50% | ≤ 600 gil | Item 1 | Item 2 | Common | Rare |
| Aquara Mote | Holy Mote | Knot of Rust | Meteorite (A) | ||||
| 61 | 90% | 50% | ≤ 600 gil | Item 1 | Item 2 | Common | Rare |
| Aero Mote | Aeroga Mote | Knot of Rust | Meteorite (A) | ||||
| 62 | 90% | 50% | ≤ 600 gil | Item 1 | Item 2 | Common | Rare |
| Dark Mote | Wyrmfire Shot | Knot of Rust | Meteorite (A) | ||||
| 63[1] | 25% | 0% | N/A | Germinas Boots | |||
- 1 - Chest does not respawn.
- Original
| Chest | Spawns | Holds Gil% | Normal Treasure | Diamond Armlet Treasure | ||||
|---|---|---|---|---|---|---|---|---|
| 29 | 50% | 65% | Gil | Item 1 | Item 2 | Gil | Common | Rare |
| ≤ 1,000 gil | Knot of Rust | Maximillian | ≤ 3,000 gil | Knot of Rust | Scathe Mote | |||
| 30 | 80% | 15% | Gil | Item 1 | Item 2 | Gil | Common | Rare |
| ≤ 100 gil | Knot of Rust | Ether | ≤ 10,000 gil | Knot of Rust | Scathe Mote | |||
Site 6 North
- Zodiac
| Chest | Spawns | Holds Gil% | Gil | Normal Treasure | Diamond Armlet Treasure |
|---|---|---|---|---|---|
| 64[1] | 100% | 0% | N/A | Maximillian | |
| 65[1] | 100% | 0% | N/A | Whale Whisker | |
- 1 - Chest does not respawn.
- Original
| Chest | Spawns | Holds Gil% | Normal Treasure | Diamond Armlet Treasure | ||||
|---|---|---|---|---|---|---|---|---|
| 31 | 50% | 10% | Gil | Item 1 | Item 2 | Gil | Common | Rare |
| ≤ 1,000 gil | Knot of Rust | Scathe Mote | ≤ 3,000 gil | Knot of Rust | Scathe Mote | |||
| 32[1] | 50% | 0% | Aegis Shield | |||||
- 1 - Chest does not respawn.
Staging Area
This chest only appears in the Zodiac versions. It does not respawn.
| Chest | Spawns | Holds Gil% | Gil | Normal Treasure | Diamond Armlet Treasure |
|---|---|---|---|---|---|
| 66 | 100% | 0% | N/A | Scathe | |
Site 7
This chest only appears in the Zodiac versions. It does not respawn.
| Chest | Spawns | Holds Gil% | Gil | Normal Treasure | Diamond Armlet Treasure |
|---|---|---|---|---|---|
| 67 | 100% | 0% | N/A | Masamune | |
Quests
Site 11 Key
To get deeper into the mines the player must complete the hunt for Antlion, after which the Site 11 Key appears in the Hunters' Camp in Phon Coast, on the ground next to a Fallen Bhujerban.
Hunts
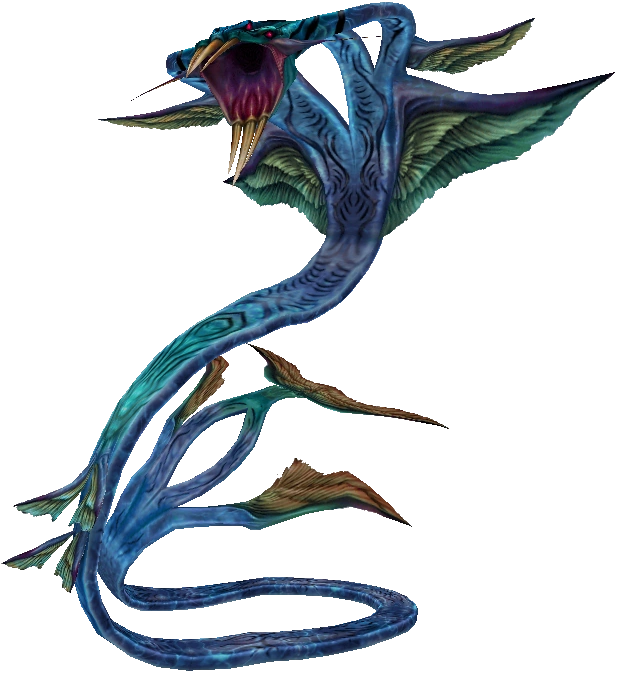
The Nidhogg is the fifth mark to be listed in the Clan Primer and arguably the toughest Rank I Mark. The hunt becomes available after Vaan has masqueraded as Basch in Bhujerba, and the party has been given permission to enter Marquis Ondore's estate. Nidhogg is found in the Transitway 1 area of the Lhusu Mines, and the petitioner is conveniently located right at the mines' entrance. The player will receive a Great Serpentskin after the battle, which can be given to Dantro's wife in Dalmasca Estersand as part of the "patient in the desert" sidequest.
Diabolos is a Rank VII Mark found in the Site 11 area of the Lhusu Mines. The hunt becomes available after the events in Giruvegan. The hunt is petitioned by Miclio in Bhujerba.
Rocktoise is an Elite Mark whose hunt can be undertaken after the player returns to Rabanastre after escaping from Barheim Passage. Rocktoise was originally a small pet named Carbo, owned by a moogle named Pilika who works in the moogle-operated Technick shop in Bhujerba. Pilika had also kept a snake named Bianca, which still lingers within the shop.
The Antlion is an Elite Mark whose hunt becomes available upon reaching Mt Bur-Omisace, so if the player wishes to fight it with Larsa in the party, they should return to Rabanastre upon reaching the mountain to accept the hunt, because Larsa will leave the party if the player proceeds further in the story. Antlion can be found in the Site 9 area of the Lhusu Mines and is petitioned by Niray in Bhujerba/Staras Residence.
Gilgamesh is found in the Lhusu Mines and is fought twice. The first is on the bridge just to the west of the Gate Crystal, in a homage to the "Clash on the Big Bridge" (which is also the name of the hunt) from Final Fantasy V; a reworked version of the iconic theme plays during both fights. Gilgamesh escapes after defeat and the player must find the Site 11 Key and venture deep into the mine to Site 7. During the second fight Gilgamesh's HP is triple what he previously had, and his stats are raised.
Rare Game
There is a 20% chance Aerieel will spawn in the Oltam Span.
Gemhorn shows up in the southwestern most part of Site 11 after the player has defeated all foes in the area, including the mimic "treasure chests."
There is a 20% chance that Bombshell will appear in the Lasche Span, so one may hunt the creature by exiting and reentering the area until it spawns. One of the items the Bombshell drops is the rare weapon Yagyu Darkblade, the strongest (second in Zodiac versions) ninja sword with an attack of 80.
To find Disma the player must have spoken to the "Huntmaster" in Phon Coast and defeated Thalassinon, which will trigger the start of the Rare Game quest. Disma is found in either Site 5 or Site 6 South. It has a 5% chance of replacing a Dark Lord in the area. Once it has been felled, it will never respawn. Disma is one of the toughest monsters.
Enemies
- Steeling
- Skeleton
- Skull Defender
- Slaven
- Gazer
- Vampyr
- Dullahan
- Headless
- Bug
- Dark Lord
- Pandora
- Malboro
- Aeronite
- Abysteel
- Killer Mantis
- Rocktoise (Elite Mark)
- Antlion (Elite Mark)
- Gilgamesh (Elite Mark)
- Nidhogg (Mark)
- Diabolos (Mark)
- Aerieel (Rare)
- Disma (Rare)
- Gemhorn (Rare)
- Bombshell (Rare)
- Ba'Gamnan (Boss)
- Bwagi (Boss)
- Gijuk (Boss)
- Rinok (Boss)
Monsters by area
Shaft Entry
| Name | Status | Level |
|---|---|---|
| Steeling | Normal | 7-8 |
| Skull Defender | Normal | 8-9 |
| Skeleton | Normal | 8-9 |
| Name | Status | Level |
|---|---|---|
| Steeling | Normal | 7-8 |
| Skull Defender | Normal | 8-9 |
| Skeleton | Normal | 8-9 |
| Slaven | Normal | 10-11 |
Oltam Span
| Name | Status | Level |
|---|---|---|
| Aerieel | Rare | 12-13 |
| Skull Defender | Normal | 8-9 |
| Steeling | Normal | 7-8 |
| Name | Status | Level |
|---|---|---|
| Aerieel | Rare | 12-13 |
| Skull Defender | Normal | 8-9 |
| Steeling | Normal | 7-8 |
| Slaven | Normal | 10-11 |
Transit Way 1
| Name | Status | Level |
|---|---|---|
| Skeleton | Normal | 8-9 |
| Skull Defender | Normal | 8-9 |
| Steeling | Normal | 7-8 |
| Name | Status | Level |
|---|---|---|
| Nidhogg | Mark | 10 |
| Skeleton | Normal | 8-9 |
| Skull Defender | Normal | 8-9 |
| Steeling | Normal | 7-8 |
Shunia Twinspan
| Name | Status | Level |
|---|---|---|
| Skeleton | Normal | 10-11 |
| Skull Defender | Normal | 10-11 |
| Name | Status | Level |
|---|---|---|
| Skeleton | Normal | 10-11 |
| Skull Defender | Normal | 10-11 |
Site 2
| Name | Status | Level |
|---|---|---|
| Skull Defender | Normal | 8-9 |
| Ba'Gamnan | Boss (pursues) | 12 |
| Bwagi | Boss (pursues) | 11 |
| Gijuk | Boss (pursues) | 12 |
| Rinok | Boss (pursues) | 11 |
| Name | Status | Level |
|---|---|---|
| Rocktoise | Mark | 16 |
| Skull Defender | Normal | 10-11 |
Map
The map can be bought from a Cartographer's Guild moogle in Lhusu Square for 650 gil.
The candle to reveal the rest of the map can be found in the southern most section of Site 5.
- Areas highlighted in red are hidden passages that do not appear on the map.
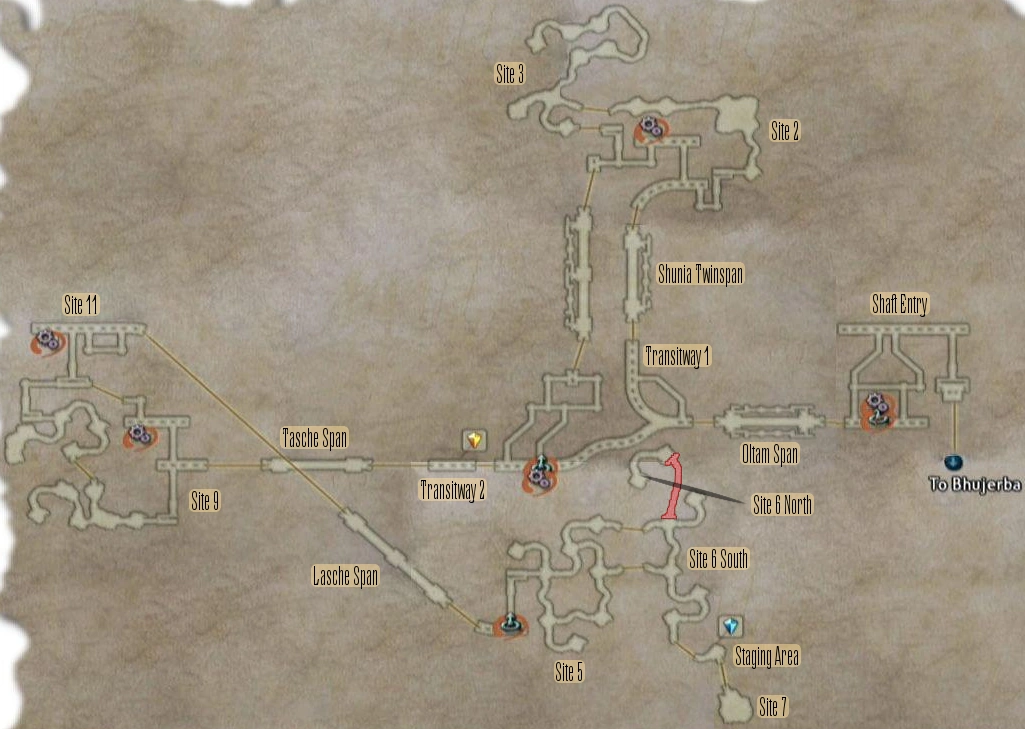
Map from the original Final Fantasy XII that includes all treasure information.
Musical themes
The background music for the entirety of the Lhusu Mines is "The Stone's Secret" (魔石の秘密, Maseki no himitsu?).
Other appearances
Pictlogica Final Fantasy
Final Fantasy Record Keeper
The party heads for the Lhusu Mines to rescue Penelo, who has been taken prisoner by Ba'Gamnan and his cronies.
Gallery
")
")
")
")
")
")
")
")
")
")
")
Trivia
- The scene where Penelo is held hostage by Ba'Gamnan in his hideout is censored from the original Japanese version of Final Fantasy XII.