The Labyrinth.
The Labyrinth is a gameplay mode in Dissidia 012 Final Fantasy. It is unlocked by completing the Main Scenario 012 in Story Mode. The Labyrinth is a modified version of the Duel Colosseum from the previous game, as it reuses the system of cards and medals. However, unlike the Colosseum the items the player can win in the Labyrinth are limited, and the emphasis is more on the challenge of progressing through the Labyrinth and exploring its various floors. A handful of rare equipment pieces can only be found here.
Floors
The Labyrinth.
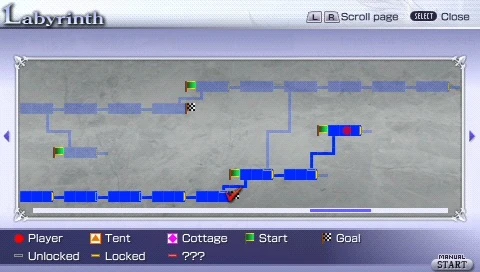
The Labyrinth is split in many floors, grouped in various Cloisters. These cloisters have a name usually implying what kind of cards can be found inside. Once Labyrinth mode is chosen, the player has to choose a character with whom to start the run in the Labyrinth. The player is then shown a map of the area in the Labyrinth that was already uncovered; on the map, a few starting points are marked by green flags. The player can select any unlocked starting points and begin their run through the Labyrinth. The map can be brought up again at any moment outside of battle by pressing Select. Any corridor with a placed tent will be marked by an orange triangle, while a cottage is represented by a purple diamond.
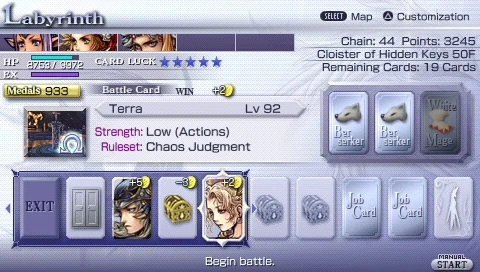
Labyrinth Screen
While in a Floor, the screen displays these data:
- Wins, Points, and Match - Displayed in the upper-right corner. Wins refers to how many opponents the player has defeated during their current Labyrinth run, while Points refers to the score the player has earned fighting - points only applies to certain Accomplishments and otherwise is just a high score function. More points are given for defeating stronger opponents. The Match # displays the total number of opponents fought.
- Current floor and remaining cards - Displayed right below the previous. This shows which floor the player is currently in, and how many cards remain in this floor
- Character Stats - Displays in the upper-left corner. Shows the player's party, and the party's first character's EX Gauge, HP, and level.
- Card Luck - Card Luck is displayed next to the stats for the character. Card luck can increase up to five stars, with higher luck generally increasing the chances of better cards appearing - rarer Treasure Cards, Enemy Cards worth more medals, and Secret Cards, are more likely to appear with higher card luck. Card luck increases by fighting enemies or with certain Job Cards.
- Card Data - shown above the hand. When an Enemy Card is highlighted, displays the enemy's name, level, the arena they are fought in, their strength level, Rules, and how many medals will be won or lost depending on if the player defeats them or not. When a Treasure Card is highlighted, displays the item's name, its description, how many of the item the player has, and its cost. When a Job Card is highlighted, displays the card's name and effects.
- Hand - Shown along in the lower-left. The current cards in the player's hand are displayed on a blue background. When a card is used normally, all other cards currently in the hand are discarded and new cards replace them from the right. The player can only see the back of the cards not in their hand, which only identify them as a Treasure, Enemy or Job card - the exact stats of cards coming up are not shown until the cards are in the hand. How many cards are in the hand depends on the current floor and whether or not any Knight or Petrify Job Cards are in play.
- Job Cards - Shown on the right side of the screen. The three Job Cards the player currently has. Highlighted Job Cards are those with ongoing effects, shaded Job Cards are those that only function when first used.
Equipment
The player initially enters the Labyrinth with no equipment, accessories or summons. However, enemies inside the Labyrinth will drop equipment for them to use, and equipment can be found in Treasure Cards. The player also has access to the shop, where the cost of items are drastically reduced. In particular, many items that require trade accessories and Battlegen items require them in smaller quantities. The player is free to sell and purchase new equipment at the shop as during normal gameplay. All equipment pieces have a Level requirement of 1 within the Labyrinth. Summonstones can also be found in Treasure Cards.
Some equipment pieces may be taken out of the Labyrinth, and these items are marked with a ![]() icon. If the player exits the Labyrinth with a Geomancer card active, or finds an Exit Card, they may use these equipment pieces in other game modes, and when they enter the Labyrinth next will be able to equip them to their character before entering, at which point they retain these items during the rest of their run. However, to trade for them in the shop requires rare trade accessories found only in the deepest floors of the Labyrinth, and while they may appear in Treasure Cards, this too usually occurs only in the deeper areas, and they are expensive to claim.
icon. If the player exits the Labyrinth with a Geomancer card active, or finds an Exit Card, they may use these equipment pieces in other game modes, and when they enter the Labyrinth next will be able to equip them to their character before entering, at which point they retain these items during the rest of their run. However, to trade for them in the shop requires rare trade accessories found only in the deepest floors of the Labyrinth, and while they may appear in Treasure Cards, this too usually occurs only in the deeper areas, and they are expensive to claim.
Cards
Cards are chosen from the hand and have various effects. Cards are divided into Enemy Cards, Treasure Cards, Job Cards, Party Cards, Gate cards and Goals. When the player chooses to fight an Enemy Card, they battle that enemy in the shown arena. If the player is victorious, they win an amount of medals, the other cards in the hand are discarded, and new cards cycle into the hand. The player may choose to spend medals on Treasure Cards in-between fights, or to select any Job Cards in the hand. When the player loses a battle, their Card Luck decreases and the current party member is KO'ed until revived through the Bard Job Card. If all party members are KO'ed, the game is over.
Enemy Cards
Selecting an Enemy Card will pit the player against the shown enemy. The amount of medals won increases according to the strength of the Enemy Card. There are three subsets of Enemy Card: Boss Cards, Secret Cards, and Party Battle Cards.
The level of all Enemy cards is always based on the player's: a card actually only has a modifier (ranging apparently from -20 and +30) applied to the player's own level. If a player switches for a character that has a low level and the modifier is a negative above the level, the enemy will be level one and the award in medals will usually raise. In the case of party battles, the level also change accordingly to which character fights which enemy. Each card has a difficulty level similar to Quick Battle, ranging from "Minimum" to "Maximum" strength. It's important to check both level and difficulty before challenging an enemy card.
Secret Cards
Secret Cards are enemy cards with usually higher strength, and do not award a predetermined number of medals - defeating them will double the player's medals.
Boss Cards
Boss cards are gold in color, with a "Nemesis" strength and reward many medals. However, Boss Cards are not discarded from the hand when another card is played and will remain in the hand until fought. In general, Boss cards only show up on floors that require the player to defeat one to unlock a door. Some cloisters use these cards as their gimmick.
Party Battle
Party battle cards are indicated by a symbol of two crossed swords. They are formed of a party of enemies that the player must defeat. If the player has a party as large or larger than the enemies', they can choose to fight using Round-Robin or Tournament rules; otherwise, they will be forced to use Tournament rules. Party battle cards are not discarded, just like Boss battles cards.
Be advised that if the character fighting them in tournament mode is defeated, the opponent's level will not be adjusted for the next party members in line. Thus it can be very dangerous to lead with your highest-level characters in a tournament match.
Party Cards will sometimes have unfilled spaces when first drawn. Using other cards while the party card is in your hand will make it increase in difficulty, filling the slots and raising the level adjustment of the entire card until reaching a built-in maximum. This makes them substantially more dangerous, but the amount of medals earned increases as well.
Treasure Cards
Treasure cards offer players items or equipment at the cost of some of their medals. The items offered vary on which cloister the player is currently in. When the player enters the Labyrinth, he cannot use his own equipment, thus treasures give them an opportunity at gaining equipment for their characters. Most items found in treasures are not kept; trade accessories can be used in the shop, however, and since the player only gains 1 gil per battle no matter what, items gained multiple times should be sold to claim better items in the shop.
Job Cards
Job Cards give special effects that affect what cards appear in the hand. Some are one-time uses, others remain in effect until discarded. Job Cards automatically cycle out of play when the player already has three in play - the Job Card on the left will be removed to make way for the next card. A subset of Job Cards are the Status Cards, which negatively affect the player as long as they remain in play. Like normal Job Cards they can also be cycled out of play to negate their effects. Some Job Cards have their effects stack, while others do not.
| Card Name | Type | Type | Effect |
|---|---|---|---|
| Knight | Job | Increases card selection area by one. Can be stacked. Ongoing. | |
| Thief | Job | Increases the chances of Treasure Cards appearing. Can be stacked. Ongoing. | |
| Monk | Job | Causes the next Enemy Cards that arrive in the selection area to become weaker. One use. | |
| White Mage | Job | Fully heals party's first character's HP. One use. | |
| Black Mage | Job | Increases the chances of Secret Cards appearing. Can be stacked. Ongoing. | |
| Red Mage | Job | Halves the cost of Treasure cards. Ongoing. | |
| Blue Mage | Job | Increases the chances of Job Cards appearing. Can be stacked. Ongoing. | |
| Mystic Knight | Job | Increases the chances of Party Cards appearing. Can be stacked. Ongoing. | |
| Ninja | Job | Prevents the loss of Card Luck upon losing a battle. Ongoing. | |
| Ranger | Job | Causes Enemy Cards to hold more medals as a reward for defeating them. Can be stacked. Ongoing. | |
| Samurai | Job | Discards all Boss Cards and Party battle Cards in the hand. One use. | |
| Dragoon | Job | Discards all cards (except Doors and Goals) from the selection area and draws a new card. The first card in the new hand becomes a Dragoon Card regardless of its type. One use. | |
| Time Mage | Job | Increases Card Luck from one star. Can be stacked. Ongoing. | |
| Chemist | Job | Nullifies Status Card effects and prevents Status Cards from appearing in the hand. Ongoing | |
| Summoner | Job | Causes the next cards drawn to contain only Treasure and Job Cards. One use. | |
| Mime | Job | Transforms into a random Job Card once chosen. One use. | |
| Berserker | Job | Fills part of the EX Gauge after each battle. Ongoing | |
| Beastmaster | Job | Change all cards in the next selection into Enemy Cards with Maximal strength | |
| Dancer | Job | Unlocks all non-gold locked Doors. | |
| Bard | Job | Revives all KO'ed character with a fraction of their maximal HP. | |
| Freelancer | Job | Discards all card on the screen (except Boss, Party battles, Doors and Goals) | |
| Geomancer | Job | Allows "pits" (items marked with a cave icon) to be taken outside the Labyrinth when the player exits. Ongoing. | |
| Toad | Status | Prevents Treasure Cards from appearing. Ongoing. | |
| Mini | Status | Prevents the character's HP from restoring after battle. Ongoing. | |
| Imp | Status | Cancels the effects of all Job Cards. Ongoing. | |
| Pig | Status | Reduces the player's medals by half. One use. | |
| Petrify | Status | Decreases card selection area by one. Ongoing. |
Party Cards
Party Cards are marked by a distinct light blue color. Party cards show a character: if the card is played, the character can be either added to the party (if it is not full yet) or be added as an available Assist character; note, however, that they must still be selected in the customization menu to be used in battle. If the party is full, the character is automatically added as an Assist. In general, there's at least one Party card offered for each cloister, however the Mystic Knight card will make them show up more frequently.
Doors
Doors, if picked, lead the player to another Floor in the Labyrinth. The player sees which floor the door leads to. Some doors are locked; usually, the condition for unlocking it is also shown in the card description. On the left to the card description, keys are displayed; the number of keys shows how many times the player has to fulfill the condition to effectively unlock the door. Golden doors may also appear, generally leading to special corridors; their condition to open is sometimes hidden from the player. Selecting the Dancer job card will unlock any door cards in hand, excluding golden doors.
Goals
At the end of each cloister is a Goal card, marked with a chequered flag on the map. This card allows the player to exit the Labyrinth, and enables any special equipment marked with a cave icon to be used in other game modes without requiring a Geomancer card. Upon selecting the Goal card, the results are tallied and remaining medals are converted into PP. The player is given the option of storing accumulated items in a Cottage, which can be retrieved on a later session when they re-enter this room. The associated corridor will also be marked with a check mark on the map. Since only one cottage can be placed at a time, it is best for the player to retrieve their items before building another cottage at a goal line.
Exit
At the far left of the hand is the Exit card. By selecting this card, the player can pitch a tent and store all items in the corridor. This ends the session with the results are tallied and remaining medals are converted into PP.However, any equipment marked with a cave icon will not be usable in other modes unless a Geomancer card is active. As with a cottage, only one tent can be pitched at a time, but the player can pitch both a cottage and a tent. During their next journey through the Labyrinth, if the player enters the room they pitched their tent in they can claim it and receive back all the equipment and summons they had last time. However, party members and Assists are not retained.
Labyrinth Map

Cloister of Beginnings (BEG)
| BEG | Cloister of Beginnings |
|---|---|
| Background Music | ""Dungeon -arrange-" from Final Fantasy II" |
| Floors | 5 |
| Cards (Party Cards) | 88 (2-3) |
| Gen. Enemy Strength | Minimal - Low |
| Treasure Cards | Lv.1/30 Weapons, Lv.1 Armor, (Bronze Equipment, Leather Equipment) |
| Goal Floor Cards | Armor of Final Strike Equipment (x2) |
| branching to | Cloister of Encounters (BEG 3F), Cloister of Affection (BEG 4F) |
Template:D012 Storyline Piece Template:D012 Storyline Piece Template:D012 Storyline Piece Template:D012 Storyline Piece Template:D012 Storyline Piece
Cloister of Encounters (ENC)
| ENC | Cloister of Encounters |
|---|---|
| Background Music | ""Ronfaure -original-" from Final Fantasy XI" |
| Floors | 10 |
| Cards (Party Cards) | 227 (25-26) |
| Gen. Enemy Strength | Low - High |
| Treasure Cards | Lv.1/30 Weap. Lv.1/30 Armor (Iron/Flame/Mythril/Ice/Flavor of Life Equipment) |
| Goal Floor Cards | Joy of Conflict (x2) |
| branching from | Cloister of Beginnings (BEG 3F), Galleria of Repose (RE1 11F) |
| branching to | Galleria of Repose (RE1 9F), Cloister of Agony (AGO 15F) |
| Typical Attributes | many party cards and party battle cards -> many of the locked doors require defeating those party battle cards |
Template:D012 Storyline Piece Template:D012 Storyline Piece Template:D012 Storyline Piece Template:D012 Storyline Piece Template:D012 Storyline Piece Template:D012 Storyline Piece Template:D012 Storyline Piece Template:D012 Storyline Piece Template:D012 Storyline Piece Template:D012 Storyline Piece
Cloister of Affection (AFF)
| AFF | Cloister of Affection |
|---|---|
| Background Music | ""Into the Darkness -arrange-" from Final Fantasy IV" |
| Floors | 10 |
| Cards (Party Cards) | 245 (3) |
| Gen. Enemy Strength | ? |
| Treasure Cards | Basic Accessories (Damage/Defense Increase), Booster Accessories, Special Accessories (Drops/Gems, Incense/Resin/Soul of, Growth Egg, Dangerously Lucky, Iifa Leaf), Qu'Bia Equipment |
| Goal Floor Cards | Qu'Bia Equipment |
| branching from | Cloister of Beginnings (BEG 4F), Galleria of Repose (RE1 11F) |
| branching to | Galleria of Repose (RE1 9F), Cloister of Duels (DU1 16F) |
| Typical Attributes | many accessories (particularly booster) Treasure Cards -> many of the locked doors require achieving a certain booster multiplier to unlock |
Template:D012 Storyline Piece Template:D012 Storyline Piece Template:D012 Storyline Piece Template:D012 Storyline Piece Template:D012 Storyline Piece Template:D012 Storyline Piece Template:D012 Storyline Piece Template:D012 Storyline Piece Template:D012 Storyline Piece Template:D012 Storyline Piece
Galleria of Repose (RE1-3)
These detours are accessed via golden doors, and provide a break by supplying job cards, party cards, and treasure cards containing summonstones. Special battle cards at Minimum strength are also available, but more rarely.
Cloister of Agony (AGO)
In this cloister, HP recovery after battle is disabled, so characters will need to rely on White Mage cards, EX Mode regen, or equip the EXP -> HP ability to recover HP lost. Some floors require the player to avoid getting hit by HP attacks altogether to unlock doors. This cloister notably splits into branching paths twice, which converge after a few floors. At the goal are chests containing Qu'Bia accessories, very powerful items that break after use. The music in this cloister is ""Forested Temple -arrange-" from Final Fantasy VII".
Door Conditions
Template:D012 Storyline Piece Template:D012 Storyline Piece Template:D012 Storyline Piece Template:D012 Storyline Piece Template:D012 Storyline Piece
Cloister of Duels (DU1-4)
For the risk of a lot of opponents of elevated strength (average and higher), the several Cloisters of Duels offer the opportunity to obtain summons through treasure cards.
Door Conditions
Template:D012 Storyline Piece Template:D012 Storyline Piece Template:D012 Storyline Piece Template:D012 Storyline Piece Template:D012 Storyline Piece Template:D012 Storyline Piece Template:D012 Storyline Piece
Template:D012 Storyline Piece Template:D012 Storyline Piece Template:D012 Storyline Piece Template:D012 Storyline Piece Template:D012 Storyline Piece Template:D012 Storyline Piece Template:D012 Storyline Piece Template:D012 Storyline Piece Template:D012 Storyline Piece Template:D012 Storyline Piece
Cloister of Jobs (JOB)
As the name implies, this cloister contains many job cards. Caution is advised in the floors 25-27 which are filled with negative status cards. It is also very long, and at several points may branch into other cloisters. The music in this cloister is ""A Place to Call Home -arrange-" from Final Fantasy IX".
Door Conditions
Template:D012 Storyline Piece Template:D012 Storyline Piece Template:D012 Storyline Piece Template:D012 Storyline Piece Template:D012 Storyline Piece Template:D012 Storyline Piece Template:D012 Storyline Piece
Cloister of Rivals (RV1-3)
These cloisters are very simple: it contains a series of three Boss card fights against Warriors of Chaos, and defeating each is needed to open the locked door to the next floor. There's also an open door exiting to another cloister. There are three Cloisters of Rivals, with a different selection of opponents to face. The goal floor of RV3 offers equipment pieces of the "King of Tragedy", "Succubus's Soul" and "Ancient Weapon" set to take out of the labyrinth.
- Rivals 1: Garland, Emperor, and Cloud of Darkness
- Rivals 2: Golbez, Exdeath, and Feral Chaos
- Rivals 3: Kefka, Sephiroth, and Ultimecia
Door Conditions
Template:D012 Storyline Piece Template:D012 Storyline Piece Template:D012 Storyline Piece Template:D012 Storyline Piece Template:D012 Storyline Piece Template:D012 Storyline Piece Template:D012 Storyline Piece Template:D012 Storyline Piece Template:D012 Storyline Piece
Cloister of Greed (GRE)
This cloister provides a large quantity of medals, and most floors require winning a certain amount of medals per battle. Since nearly every floor has at least one Special card, it is very easy to reach the maximum of 999 medals progressing through this cloister. On some floors, there are nothing but accessories to be obtained. The music in this cloister is ""Dungeon -arrange-" from Final Fantasy V".
Door Conditions
Template:D012 Storyline Piece Template:D012 Storyline Piece Template:D012 Storyline Piece Template:D012 Storyline Piece Template:D012 Storyline Piece Template:D012 Storyline Piece Template:D012 Storyline Piece Template:D012 Storyline Piece
Pinhole Galleria (PIN)
As implied by "Pinhole", the hand is usually (but not always) smaller than usual in this cloister. Some floors have only one card in the hand, which prevents any card after a door card from being selectable. The treasure cards (34, mostly hold materials for forging weapons in the shop, at the goal are several containing Rages of Conflict, used to create more powerful Labyrinth gear; and a door leading to the Cloister of Mirages.
Door Conditions
Template:D012 Storyline Piece Template:D012 Storyline Piece Template:D012 Storyline Piece Template:D012 Storyline Piece Template:D012 Storyline Piece Template:D012 Storyline Piece
Galleria of Speed (SPE)
This cloister consists of only one corridor, allowing a rapid conclusion to the player's exploration of the Labyrinth. tfgjhfyfyhxr
Cloister of Mirages (MIR)
The rooms in this cloister usually contain multiple door cards, but only the last encountered door in each room will allow the player to advance; the other doors force the player to repeat the room. The goal chamber of this cloister contains Sorrows of conflict, which are used as components in conjunction with battlegen components to create fairly powerful labyrinth gear, and a door leading to the third Cloister of Duels.
Door Conditions
Template:D012 Storyline Piece Template:D012 Storyline Piece Template:D012 Storyline Piece Template:D012 Storyline Piece Template:D012 Storyline Piece Template:D012 Storyline Piece
Cloister of Hidden Keys (HDK)
Like the name indicates the Cloister of Hidden Keys consists mostly of floors with conditioned doors (in some cases even the objective isn't visible, so the player must try to find it out while fighting). The opponents are mostly of "high" difficulty and higher, later on many boss and party battles are mixed in too. In the beginning advanced equipment and materials can be found in treasure chests, but the more chambers the player clears the higher the value rises; until the best equipment and materials becomes available, ending with the Genji Equipment in the latest chambers. The material Delight of Conflict awaits at the end of this long Cloister. The music in this cloister is "Find Your Way -arrange-" from Final Fantasy VIII.
Door Conditions
Template:D012 Storyline Piece Template:D012 Storyline Piece Template:D012 Storyline Piece Template:D012 Storyline Piece Template:D012 Storyline Piece Template:D012 Storyline Piece Template:D012 Storyline Piece Template:D012 Storyline Piece Template:D012 Storyline Piece Template:D012 Storyline Piece Template:D012 Storyline Piece Template:D012 Storyline Piece Template:D012 Storyline Piece Template:D012 Storyline Piece Template:D012 Storyline Piece Template:D012 Storyline Piece
Cloister of Adventure (ADV)
Though having no direct starting point, the Cloister of Adventures is accessible through the Cloister of Rivals 2 (51F). The opponent difficulty knows a wide range (also Boss Battles) but the majority consists of "high" and higher. A welcomed compensation for the hard trials are several floors solely filled with advanced equipment, in the later (mixed) floors even Lufenian Equipment.
Cloister of Inquiry (INQ)
This Cloister shares similarities with the Cloister of Adventures as it doesn't possess a fixed starting point, features the same opponent strength variety (though it's a little harder due to being deeper within the labyrinth) and bears no door conditions. It can be accessed through several floors but can't be left again until the exit. The treasure chests feature the whole set of 100% breakable Qu'Bia accessories (Booster & Special).
Cloister of Demise (DEM)
As suggested by the name, the Cloister of Demise contains many powerful enemies. This is also one of the few places to get the "Succubus's Soul", the "Ancient Weapons" and "King of Tragedy" equipment sets. Once you reach the 98th floor, you will have to fight Feral Chaos, with the CPU Strength set as "Lawless", opening the door to Cloister of Heroes on the 99th floor.
Door Conditions
Template:D012 Storyline Piece Template:D012 Storyline Piece Template:D012 Storyline Piece Template:D012 Storyline Piece Template:D012 Storyline Piece Template:D012 Storyline Piece Template:D012 Storyline Piece Template:D012 Storyline Piece Template:D012 Storyline Piece Template:D012 Storyline Piece Template:D012 Storyline Piece Template:D012 Storyline Piece Template:D012 Storyline Piece Template:D012 Storyline Piece Template:D012 Storyline Piece
Cloister of Heroes (HER)
This very last Cloister also represents the deepest floor of the Labyrinth (99th). It is only accessible by the most difficult Cloister of Demise, with the condition that the player beats "Lawless" Feral Chaos at the end. The Death Blade, the last piece of the "Final Strike" set available in the Cloister of Beginnings, is the only card for taking before leaving through this last exit.
Trivia
- The Job Cards (sans Status cards) consist of every single Job Class from Final Fantasy V, aside from the additional ones added for the Advance version.
- In addition, the name of the effect on each Job Card is based on an ability one could learn from that job in Final Fantasy V, and the images of most of the Job Cards are based on the look of the class in the game (e.g. the Blue Mage's domino mask, the Chemist hat, the Mime cape, etc.) The Freelancer card has the image of the shirt worn by Bartz.
- The Petrify Job Card features an image of the petrified Palom and Porom, a reference to their sacrifice in Final Fantasy IV.
- The four Archfiends from Final Fantasy IV make a cameo appearance as tutors in the Labyrinth manual.
- The cards used to represent characters are the same cards used in the chapter selection screen of the thirteenth cycle. Characters from the same game are all represented by a single card (Example: Tidus, Jecht, and Yuna are all represented by Tidus's card) except for Lightning, who has a unique card: her l'Cie brand.
- This is the only game mode where opponents and their assists use random available outfits not determined by those selected by the player in battles.
Template:D012