Leonhart51 (talk | contribs) No edit summary |
Lawrence Benedict Nelmida (talk | contribs) (added differences in loot between NES version and other versions) Tag: Visual edit |
||
| (32 intermediate revisions by 11 users not shown) | |||
| Line 1: | Line 1: | ||
| − | {{ |
+ | {{sideicon|prime=FFII|FFRK}} |
| + | {{infobox location |
||
| ⚫ | |||
| + | |name=Jade Passage |
||
| ⚫ | |||
| + | |release=FFII |
||
| ⚫ | |||
| + | |japanese=ジェイド入り口 |
||
| ⚫ | |||
| + | |romaji=Jeido Iriguchi |
||
| + | |lit=Jade Entrance |
||
| + | |image=<gallery> |
||
| ⚫ | |||
| + | Descent.png|Descent |
||
| + | </gallery> |
||
| + | |type=Passage |
||
| + | |region=Connects to [[Pandaemonium (Final Fantasy II)|Pandaemonium]] |
||
| + | |items=*[[Final Fantasy II weapons#Diamond Mace|Diamond Mace]] |
||
| + | *[[Final Fantasy II items#Hellfire|Hellfire]] |
||
| + | *[[Final Fantasy II items#Hellfire|Hellfire]] |
||
| + | *[[Final Fantasy II items#Antarctic Wind|Antarctic Wind]] |
||
| + | *[[Final Fantasy II weapons#Cat Claws|Cat Claws]] |
||
| + | *[[Final Fantasy II weapons#Rune Axe|Rune Axe]] |
||
| + | *[[Final Fantasy II items#Betrayal Fang|Betrayal Fang]] |
||
| + | *[[Final Fantasy II armor#Dragon Armor|Dragon Armor]] |
||
| + | *[[Final Fantasy II armor#Aegis Shield|Aegis Shield]] |
||
| + | *[[Final Fantasy II weapons#Holy Lance|Holy Lance]] |
||
| + | *[[Final Fantasy II weapons#Yoichi's Bow|Yoichi's Bow]] |
||
| + | *[[Final Fantasy II items#Hi-Potion|Hi-Potion]] |
||
| + | *[[Final Fantasy II armor#Protect Ring|Protect Ring]] |
||
| + | *[[Final Fantasy II items#Elixir|Elixir]] (other versions) / [[Final Fantasy II items#Hi-Potion|Hi-Potion]] (NES) |
||
| + | *Many found in [[#Shops|shops]] |
||
| + | |enemies=*Many depending on area |
||
| + | |quests=*Traversing to reach Pandaemonium |
||
| ⚫ | |||
| ⚫ | |||
| ⚫ | '''Jade Passage''' is a location in ''[[Final Fantasy II]]'' that connects the world to [[Pandaemonium (Final Fantasy II)|Pandaemonium]], the Castle of Hell. Jade Passage is located on a peninsula to the east of [[Mysidia (Final Fantasy II)|Mysidia]], and only reveals itself after Pandaemonium emerges. The sea strait located on the top of the peninsula is called the Jade Sea. |
||
| ⚫ | [[Firion]] is forced to traverse the passage when the [[Emperor Mateus|Emperor]] summons the Pandaemonium to replace the [[Palamecia (Final Fantasy II)|Palamecia]], since Pandaemonium does not have the same vulnerability to an aerial infiltration as Palamecia had. The entrance to the Jade Passage is a subterranean lake only revealed after the destruction of Castle Palamecia and the alliance of [[Leon (Final Fantasy II)|Leon]]. |
||
| − | ==Story== |
||
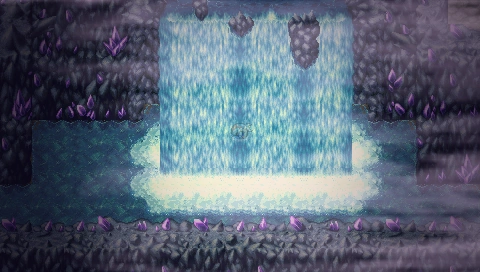
| − | [[File:Descent.png|thumb|right|200px|The descent into the Jade Passage.]] |
||
| ⚫ | [[Firion]] is forced to traverse the passage when the [[Emperor Mateus|Emperor]] |
||
| − | It is located on the long peninsula in the center of the |
+ | It is located on the long peninsula in the center of the [[world map]]. The player can reach it by flying east of Mysidia or southeast of [[Altair (Final Fantasy II)|Altair]]. Jade's exit leads directly into Pandaemonium, and it is a long and winding dungeon that is only bested in terms of difficulty by the Castle of Hell itself. |
| − | {{-}} |
||
| − | ==Shops== |
+ | == Shops == |
[[File:Jade Passage Shop.PNG|right|thumb|200px|The Waterfall Shop.]] |
[[File:Jade Passage Shop.PNG|right|thumb|200px|The Waterfall Shop.]] |
||
| − | ===Hidden Waterfall Shop=== |
+ | === Hidden Waterfall Shop === |
Located on B3, behind the waterfall at the bottom of the floor. |
Located on B3, behind the waterfall at the bottom of the floor. |
||
| + | |||
| − | {|class="half-width table" style="text-align:center" |
+ | {|class="half-width FFII article-table" style="text-align:center" |
| − | |-class=" |
+ | |-class="a" |
!width="50%"|Item |
!width="50%"|Item |
||
!width="50%"|Cost |
!width="50%"|Cost |
||
|- |
|- |
||
| − | !class=" |
+ | !class="b"|[[Death (ability)|Death Tome]] |
| − | | |
+ | |10,000 gil |
|- |
|- |
||
| − | !class=" |
+ | !class="b"|[[Berserk (ability)|Berserk Tome]] |
|10,000 gil |
|10,000 gil |
||
|- |
|- |
||
| − | !class=" |
+ | !class="b"|[[Haste (ability)|Haste Tome]] |
|20,000 gil |
|20,000 gil |
||
|- |
|- |
||
| − | !class=" |
+ | !class="b"|[[Flare (ability)|Flare Tome]] |
|40,000 gil |
|40,000 gil |
||
|} |
|} |
||
| − | == |
+ | == Items == |
| − | {|class="half-width table" style="text-align:center" |
+ | {|class="half-width FFII article-table" style="text-align:center" |
| − | |-class=" |
+ | |-class="a" |
!width="50%"|Item |
!width="50%"|Item |
||
!width="50%"|Location |
!width="50%"|Location |
||
|- |
|- |
||
| − | !class=" |
+ | !class="b"|[[Final Fantasy II weapons#Diamond Mace|Diamond Mace]] |
|B1 |
|B1 |
||
|- |
|- |
||
| − | !class=" |
+ | !class="b"|[[Final Fantasy II items#Hellfire|Hellfire]] |
|B1 |
|B1 |
||
|- |
|- |
||
| − | !class=" |
+ | !class="b"|[[Final Fantasy II items#Hellfire|Hellfire]] |
| + | |B2 |
||
| − | |align="center"|B2 |
||
|- |
|- |
||
| − | !class=" |
+ | !class="b"|[[Final Fantasy II items#Antarctic Wind|Antarctic Wind]] |
|B2 |
|B2 |
||
|- |
|- |
||
| − | !class=" |
+ | !class="b"|[[Final Fantasy II weapons#Cat Claws|Cat Claws]] |
|B2, guarded by [[Blue Dragon (Final Fantasy II)|Blue Dragon]] |
|B2, guarded by [[Blue Dragon (Final Fantasy II)|Blue Dragon]] |
||
|- |
|- |
||
| − | !class=" |
+ | !class="b"|[[Final Fantasy II weapons#Rune Axe|Rune Axe]] |
|B3, guarded by [[King Behemoth (Final Fantasy II)|King Behemoth]] |
|B3, guarded by [[King Behemoth (Final Fantasy II)|King Behemoth]] |
||
|- |
|- |
||
| − | !class=" |
+ | !class="b"|[[Final Fantasy II items#Betrayal Fang|Betrayal Fang]] |
|B4 |
|B4 |
||
|- |
|- |
||
| − | !class=" |
+ | !class="b"|[[Final Fantasy II armor#Dragon Armor|Dragon Armor]] |
|B4 |
|B4 |
||
|- |
|- |
||
| − | !class=" |
+ | !class="b"|[[Final Fantasy II armor#Aegis Shield|Aegis Shield]] |
|B4 |
|B4 |
||
|- |
|- |
||
| − | !class=" |
+ | !class="b"|[[Final Fantasy II weapons#Holy Lance|Holy Lance]] |
|B4 |
|B4 |
||
|- |
|- |
||
| − | !class=" |
+ | !class="b"|[[Final Fantasy II weapons#Yoichi's Bow|Yoichi's Bow]] |
|B4, guarded by [[Red Dragon (Final Fantasy II)|Red Dragon]] |
|B4, guarded by [[Red Dragon (Final Fantasy II)|Red Dragon]] |
||
|- |
|- |
||
| − | !class=" |
+ | !class="b"|[[Final Fantasy II items#Hi-Potion|Hi-Potion]] |
|B5 |
|B5 |
||
|- |
|- |
||
| − | !class=" |
+ | !class="b"|[[Final Fantasy II armor#Protect Ring|Protect Ring]] |
|B5 |
|B5 |
||
|- |
|- |
||
| + | !class="b"|[[Final Fantasy II items#Elixir|Elixir]] (other versions) / [[Final Fantasy II items#Hi-Potion|Hi-Potion]] (NES) |
||
| − | !class="FFIIb"|[[Elixir (Item)|Elixir]] |
||
|B5 |
|B5 |
||
|} |
|} |
||
| − | ==Enemies== |
+ | == Enemies == |
| + | {{multicol-begin}} |
||
| − | [[File:FFII Background Jade Passage.PNG|thumb| |
+ | [[File:FFII Background Jade Passage.PNG|thumb|Battle background.]] |
| − | ===B1=== |
||
| + | {{multicol-separator}} |
||
| ⚫ | |||
| + | ;B1 |
||
| ⚫ | |||
| − | *[18.8%] [[ |
+ | * [18.8%] [[Hecteyes (Final Fantasy II)|Hecteyes]] x1-5 |
| − | *[18.8%] [[ |
+ | * [18.8%] [[White Dragon (Final Fantasy II)|White Dragon]] |
| − | *[ |
+ | * [18.8%] [[Salamander (Final Fantasy II)|Salamander]] x1-4 |
| − | *[ |
+ | * [18.8%] [[Great Malboro (Final Fantasy II)|Great Malboro]] x1-5 |
| ⚫ | |||
| ⚫ | |||
| − | *[ |
+ | * [9.4%] [[Abyss Worm (Final Fantasy II)|Abyss Worm]] x1-5 |
| ⚫ | |||
| ⚫ | |||
| + | {{multicol-separator}} |
||
| + | ;B2 |
||
| ⚫ | |||
| ⚫ | |||
| ⚫ | |||
| ⚫ | |||
| ⚫ | |||
| ⚫ | |||
| ⚫ | |||
| ⚫ | |||
| ⚫ | |||
| + | {{multicol-separator}} |
||
| + | ;B3 |
||
| + | * [18.8%] [[Salamander (Final Fantasy II)|Salamander]] x1-4 |
||
| ⚫ | |||
| ⚫ | |||
| ⚫ | |||
| ⚫ | |||
| ⚫ | |||
| ⚫ | |||
| ⚫ | |||
| ⚫ | |||
| + | {{multicol-separator}} |
||
| + | ;B4 |
||
| ⚫ | |||
| ⚫ | |||
| ⚫ | |||
| ⚫ | |||
| ⚫ | |||
| ⚫ | |||
| ⚫ | |||
| ⚫ | |||
| ⚫ | |||
| + | {{multicol-separator}} |
||
| + | ;B5 |
||
| ⚫ | |||
| ⚫ | |||
| ⚫ | |||
| ⚫ | |||
| ⚫ | |||
| ⚫ | |||
| ⚫ | |||
| ⚫ | |||
| + | {{multicol-separator}} |
||
| + | ;B6 |
||
| ⚫ | |||
| ⚫ | |||
| ⚫ | |||
| + | * [18.8%] [[Great Malboro (Final Fantasy II)|Great Malboro]] x1-2, [[Ice Lizard (Final Fantasy II)|Ice Lizard]] x0-1, [[Pit Fiend (Final Fantasy II)|Pit Fiend]] x0-2 |
||
| ⚫ | |||
| ⚫ | |||
| ⚫ | |||
| + | * [1.6%] [[Hecteyes (Final Fantasy II)|Hecteyes]], [[Abyss Worm (Final Fantasy II)|Abyss Worm]] x0-2 |
||
| + | {{multicol-end}} |
||
| + | == Musical themes == |
||
| − | ===B2=== |
||
| + | The background music inside the Jade Passage is simply called "[[dungeon theme#Final Fantasy II|Dungeon]]". |
||
| − | *[18.8%] [[White Dragon (Final Fantasy II)|White Dragon]] |
||
| ⚫ | |||
| ⚫ | |||
| ⚫ | |||
| ⚫ | |||
| ⚫ | |||
| ⚫ | |||
| ⚫ | |||
| ⚫ | |||
| + | == Other appearances == |
||
| − | ===B3=== |
||
| − | + | === ''[[Final Fantasy Record Keeper]]'' === |
|
| ⚫ | |||
| ⚫ | |||
| ⚫ | |||
| ⚫ | |||
| ⚫ | |||
| ⚫ | |||
| ⚫ | |||
| ⚫ | |||
| ⚫ | |||
| − | ===B4=== |
||
| − | + | {{Location section|Final Fantasy Record Keeper}} |
|
| ⚫ | |||
| ⚫ | |||
| ⚫ | |||
| ⚫ | |||
| ⚫ | |||
| ⚫ | |||
| ⚫ | |||
| ⚫ | |||
| − | == |
+ | == Gallery == |
| + | <gallery> |
||
| ⚫ | |||
| ⚫ | |||
| ⚫ | |||
| ⚫ | |||
| ⚫ | |||
| ⚫ | |||
| ⚫ | |||
| ⚫ | |||
| ⚫ | |||
| ⚫ | |||
| ⚫ | |||
| ⚫ | |||
| ⚫ | |||
| ⚫ | |||
| ⚫ | |||
| ⚫ | |||
| ⚫ | |||
| ⚫ | |||
| ⚫ | |||
| ⚫ | |||
| ⚫ | |||
| + | FFII Jade Passage GBA.png|Jade Passage (GBA). |
||
| ⚫ | |||
| + | FFRK Jade Passage JP FFII.png|The Japanese dungeon image for ''Jade Passage'' in ''[[Final Fantasy Record Keeper]]''. |
||
| + | </gallery> |
||
| − | == |
+ | == Trivia == |
| ⚫ | |||
| ⚫ | |||
| ⚫ | * The Unknown Cave is a mirror image of Jade Passage, and it is assumed by the four player characters in the [[Soul of Rebirth]] story mode that they are walking through the path to Hell. After meeting the [[Emperor (Soul of Rebirth)|Light Emperor]], they learn the cavern they found themselves in after their deaths was not Jade, but the passage to Heaven, [[Raqia]]. |
||
| ⚫ | |||
| ⚫ | * The Jade Passage is alluded to as a myth in the world of [[Ivalice (Final Fantasy XII)|Ivalice]]. The [[Pit Fiend (Final Fantasy XII)|Pit Fiend's]] [[Bestiary (Final Fantasy XII)|bestiary]] entry in ''[[Final Fantasy XII]]'' mentions that "A myth counts this being as one of the warriors set to defend the Jade Passage to the Devil's Palace." Pit Fiends can be encountered in the Jade Passage. In addition, Pandaemonium is one of the [[Wonder (Tactics)#Pandaemonium|Wonders]] in ''[[Final Fantasy Tactics]]''. While its description does not mention the Jade Passage by name, it does mention that a warping device was the only means of entering Pandaemonium, which can be found at the end of the Jade Passage in ''Final Fantasy II''. |
||
| ⚫ | |||
| ⚫ | |||
| ⚫ | |||
| ⚫ | |||
| ⚫ | |||
| ⚫ | |||
| + | {{navbox setting FFII}} |
||
| − | ==Music== |
||
| − | The Background Music that plays inside the Jade Passage is called simply "Dungeon". |
||
| ⚫ | |||
| − | ==Gallery== |
||
| ⚫ | |||
| − | {{Gallery|class=FFIIa|title=Gallery|collapse=hide |
||
| ⚫ | |||
| ⚫ | |||
| ⚫ | |||
| ⚫ | |||
| ⚫ | |||
| ⚫ | |||
| ⚫ | |||
| ⚫ | |||
| ⚫ | |||
| ⚫ | |||
| ⚫ | |||
| ⚫ | |||
| ⚫ | |||
| ⚫ | |||
| ⚫ | |||
| − | |||
| − | ==Trivia== |
||
| ⚫ | * |
||
| ⚫ | *The Unknown Cave is a mirror image of Jade, and it is assumed by the four player characters in the [[Soul of Rebirth]] story mode that they are walking through the path to Hell. After meeting the [[Emperor (Soul of Rebirth)|Light Emperor]], they learn |
||
| ⚫ | *The Jade Passage is alluded to as a myth in the world of [[Ivalice]]. The [[Pit Fiend (Final Fantasy XII)|Pit Fiend |
||
| − | |||
| − | {{FFII}} |
||
[[es:Pasaje Jade]] |
[[es:Pasaje Jade]] |
||
| ⚫ | |||
| ⚫ | |||
Revision as of 17:20, 16 August 2020
Template:Sideicon
The Jade Passage is the path joining this world with Hell. The passage leads to Pandaemonium, the castle of Hell
Bookshelf at Mysidia
Jade Passage is a location in Final Fantasy II that connects the world to Pandaemonium, the Castle of Hell. Jade Passage is located on a peninsula to the east of Mysidia, and only reveals itself after Pandaemonium emerges. The sea strait located on the top of the peninsula is called the Jade Sea.
Firion is forced to traverse the passage when the Emperor summons the Pandaemonium to replace the Palamecia, since Pandaemonium does not have the same vulnerability to an aerial infiltration as Palamecia had. The entrance to the Jade Passage is a subterranean lake only revealed after the destruction of Castle Palamecia and the alliance of Leon.
It is located on the long peninsula in the center of the world map. The player can reach it by flying east of Mysidia or southeast of Altair. Jade's exit leads directly into Pandaemonium, and it is a long and winding dungeon that is only bested in terms of difficulty by the Castle of Hell itself.
Shops

The Waterfall Shop.
Hidden Waterfall Shop
Located on B3, behind the waterfall at the bottom of the floor.
| Item | Cost |
|---|---|
| Death Tome | 10,000 gil |
| Berserk Tome | 10,000 gil |
| Haste Tome | 20,000 gil |
| Flare Tome | 40,000 gil |
Items
| Item | Location |
|---|---|
| Diamond Mace | B1 |
| Hellfire | B1 |
| Hellfire | B2 |
| Antarctic Wind | B2 |
| Cat Claws | B2, guarded by Blue Dragon |
| Rune Axe | B3, guarded by King Behemoth |
| Betrayal Fang | B4 |
| Dragon Armor | B4 |
| Aegis Shield | B4 |
| Holy Lance | B4 |
| Yoichi's Bow | B4, guarded by Red Dragon |
| Hi-Potion | B5 |
| Protect Ring | B5 |
| Elixir (other versions) / Hi-Potion (NES) | B5 |
Enemies

- B1
- [18.8%] Hecteyes x1-5
- [18.8%] White Dragon
- [18.8%] Salamander x1-4
- [18.8%] Great Malboro x1-5
- [9.4%] Abyss Worm x1-2, Great Malboro x0-2
- [9.4%] Abyss Worm x1-5
- [4.7%] Chimera Sphinx x1-4
- [1.6%] Mega Parasite x1-4, Ice Lizard x0-2
- B2
- [18.8%] White Dragon
- [18.8%] Salamander x1-4
- [18.8%] Great Malboro x1-5
- [18.8%] Abyss Worm x1-2, Great Malboro x0-2
- [9.4%] Abyss Worm x1-5
- [9.4%] Chimera Sphinx x1-4
- [4.7%] Mega Parasite x1-4, Ice Lizard x0-2
- [1.6%] Great Malboro x1-2, Ice Lizard x0-1, Pit Fiend x0-2
- Blue Dragon (Monster-in-a-box)
- B3
- [18.8%] Salamander x1-4
- [18.8%] Great Malboro x1-5
- [18.8%] Abyss Worm x1-2, Great Malboro x0-2
- [18.8%] Abyss Worm x1-5
- [9.4%] Chimera Sphinx x1-4
- [9.4%] Mega Parasite x1-4, Ice Lizard x0-2
- [4.7%] Great Malboro x1-2, Ice Lizard x0-1, Pit Fiend x0-2
- [1.6%] Killer Mantis x1-4, Vampire Lady x1-2
- King Behemoth (Monster-in-a-box)
- B4
- [18.8%] Great Malboro x1-5
- [18.8%] Abyss Worm x1-2, Great Malboro x0-2
- [18.8%] Abyss Worm x1-5
- [18.8%] Chimera Sphinx x1-4
- [9.4%] Mega Parasite x1-4, Ice Lizard x0-2
- [9.4%] Great Malboro x1-2, Ice Lizard x0-1, Pit Fiend x0-2
- [4.7%] Killer Mantis x1-4, Vampire Lady x1-2
- [1.6%] Green Dragon
- Red Dragon (Monster-in-a-box)
- B5
- [18.8%] Abyss Worm x1-2, Great Malboro x0-2
- [18.8%] Abyss Worm x1-5
- [18.8%] Chimera Sphinx x1-4
- [18.8%] Mega Parasite x1-4, Ice Lizard x0-2
- [9.4%] Great Malboro x1-2, Ice Lizard x0-1, Pit Fiend x0-2
- [9.4%] Killer Mantis x1-4, Vampire Lady x1-2
- [4.7%] Green Dragon
- [1.6%] Chimera Sphinx x1-3, Scissorjaws x0-2
- B6
- [18.8%] Abyss Worm x1-5
- [18.8%] Chimera Sphinx x1-4
- [18.8%] Mega Parasite x1-4, Ice Lizard x0-2
- [18.8%] Great Malboro x1-2, Ice Lizard x0-1, Pit Fiend x0-2
- [9.4%] Killer Mantis x1-4, Vampire Lady x1-2
- [9.4%] Green Dragon
- [4.7%] Chimera Sphinx x1-3, Scissorjaws x0-2
- [1.6%] Hecteyes, Abyss Worm x0-2
Musical themes
The background music inside the Jade Passage is simply called "Dungeon".
Other appearances
Final Fantasy Record Keeper
Gallery
")
")
")
")
")
")
")
")
")
")
")
")
")
")
")
")
Trivia
- In the NES version of Final Fantasy II, the battle background used is the same as the one used in Snow Cave even if Jade Passage has no ice in any version of the game; in the NES version the area is green and brown.
- The Unknown Cave is a mirror image of Jade Passage, and it is assumed by the four player characters in the Soul of Rebirth story mode that they are walking through the path to Hell. After meeting the Light Emperor, they learn the cavern they found themselves in after their deaths was not Jade, but the passage to Heaven, Raqia.
- The Jade Passage is alluded to as a myth in the world of Ivalice. The Pit Fiend's bestiary entry in Final Fantasy XII mentions that "A myth counts this being as one of the warriors set to defend the Jade Passage to the Devil's Palace." Pit Fiends can be encountered in the Jade Passage. In addition, Pandaemonium is one of the Wonders in Final Fantasy Tactics. While its description does not mention the Jade Passage by name, it does mention that a warping device was the only means of entering Pandaemonium, which can be found at the end of the Jade Passage in Final Fantasy II.