mNo edit summary Tag: sourceedit |
Tag: Source edit |
||
| (46 intermediate revisions by 13 users not shown) | |||
| Line 1: | Line 1: | ||
| − | {{sideicon|FFXII}} |
+ | {{sideicon|prime=FFXII|FFRK}} |
| − | {{Expand|Adding a Locations section, with images and brief descriptions of the areas within the location}} |
+ | {{Expand|FFXII|FFXII|Adding a Locations section, with images and brief descriptions of the areas within the location}} |
| + | {{infobox location |
||
| − | [[File:Elder Wyrm.jpg|250px|thumb|The Elder Wyrm uses Sporefall.]] |
||
| + | |name=Golmore Jungle |
||
| + | |release=FFXII |
||
| + | |japanese=ゴルモア大森林 |
||
| + | |romaji=Gorumoa Daishinrin |
||
| + | |lit= |
||
| + | |image=Golmore-Jungle-FFXII-TZA.jpg |
||
| + | |type=[[Forest]] |
||
| + | |region=[[Jagd Difohr]] |
||
| + | |items=*[[#Treasures|Treasures]] |
||
| + | |enemies=*[[Panther (Final Fantasy XII)|Panther]] |
||
| + | *[[Hellhound (Final Fantasy XII)|Hellhound]] |
||
| + | *[[Coeurl (Final Fantasy XII)|Coeurl]] |
||
| + | *[[Gargoyle (Final Fantasy XII)|Gargoyle]] |
||
| + | *[[Treant (Final Fantasy XII)|Treant]] |
||
| + | *[[Malboro (Final Fantasy XII)|Malboro]] |
||
| + | *[[Great Malboro (Final Fantasy XII)|Great Malboro]] |
||
| + | *[[Diresaur (Final Fantasy XII)|Diresaur]] |
||
| + | *[[Dark Skeleton (Final Fantasy XII)|Dark Skeleton]] |
||
| + | *Hunts and Rares |
||
| + | *[[Elder Wyrm (Final Fantasy XII)|Elder Wyrm]] (Optional Boss) |
||
| + | |quests=*[[Hunts]]: [[Vorpal Bunny (Final Fantasy XII)|Vorpal Bunny]] |
||
| + | *[[#Rare Game|Rare Game]]: [[Midgardsormr (Final Fantasy XII)|Midgardsormr]], [[Phyllo]], [[Biding Mantis]], [[Grave Lord]] |
||
| + | }} |
||
{{Dialogue|Fran|The Jungle denies us our passage.|Ashe|What have we done?|Fran|We? No. I.|context=Fran and Ashe}} |
{{Dialogue|Fran|The Jungle denies us our passage.|Ashe|What have we done?|Fran|We? No. I.|context=Fran and Ashe}} |
||
| − | The '''Golmore Jungle''' |
+ | The '''Golmore Jungle''' is a location in the land of [[Ivalice (Final Fantasy XII)|Ivalice]] in ''[[Final Fantasy XII]]''. It is a vast jungle east of the [[Ozmone Plain]]. Within the Jungle is [[Eruyt Village]], the home of the [[viera]] for whom the Golmore Jungle is a sacred home and a living being which can speak to them directly. The viera refer to it as "the Wood" and personify her as a female. |
| − | Golmore Jungle can prove to be a daunting place on the first visit. The status-inducing [[Malboro (Final Fantasy XII)|Malboros]] run wild through the jungle and also rampant are the [[Hellhound (Final Fantasy XII)|Hellhounds]] and the [[Diresaur]], which can be dangerous early on. The boss battle against [[Elder Wyrm (Final Fantasy XII)|Elder Wyrm]] can be skipped by heading south to the [[Feywood]] and running through |
+ | Golmore Jungle can prove to be a daunting place on the first visit. The status-inducing [[Malboro (Final Fantasy XII)|Malboros]] run wild through the jungle and also rampant are the [[Hellhound (Final Fantasy XII)|Hellhounds]] and the [[Diresaur (Final Fantasy XII)|Diresaur]], which can be dangerous early on. The boss battle against [[Elder Wyrm (Final Fantasy XII)|Elder Wyrm]] can be skipped by heading south to the [[Feywood]] and running through lv. 38+ enemies to get to the [[Paramina Rift]]. The hard monsters encountered can be taken care of using the [[Immobilize glitch]]. |
| − | ==[[Sage Knowledge]]== |
+ | == [[Sage Knowledge]] == |
| − | {{ |
+ | {{Quote|A sprawling jungle in the Jagd Difohr, it remains much as it always has been, untouched by the hand of Man. Though the viera make their villages within this jungle, the ways to their enclaves are tangled and hidden. Barriers throughout the jungle, too, prevent easy passage. These were erected by the viera to prevent outsiders from intruding, the blessing of their people needed before one may pass.|Sage Knowledge 72, Golmore Jungle}} |
| − | == |
+ | == Locations == |
| − | The Golmore Jungle is located to the east of the Ozmone Plain on [[Jagd Difohr]]. [[Paramina Rift]] lies to the east and the [[Feywood]] in the south. |
+ | The Golmore Jungle is located to the east of the Ozmone Plain on [[Jagd Difohr]]. [[Paramina Rift]] lies to the east and the [[Feywood]] in the south. The player can ride a chocobo along a hidden path between the Parting Glade and the Rustling Chapel. |
| − | *Paths of Chained Light (to Ozmone Plain) |
+ | * Paths of Chained Light (to Ozmone Plain) |
| − | *The Needlebrake (to Eruyt Village) |
+ | * The Needlebrake (to Eruyt Village) |
| − | *Whisperleaf Way |
+ | * Whisperleaf Way |
| − | *The Parting Glade |
+ | * The Parting Glade |
| − | *Dell of the Dreamer |
+ | * Dell of the Dreamer |
| − | *The Branchway |
+ | * The Branchway |
| − | *The Greenswathe (to the Paramina Rift) |
+ | * The Greenswathe (to the Paramina Rift) |
| − | *The Rustling Chapel (to the Feywood) |
+ | * The Rustling Chapel (to the Feywood) |
| − | {{ |
+ | {{Location section|Final Fantasy XII}} |
| − | == |
+ | == Treasures == |
| − | {{See |
+ | {{See|Treasure (Final Fantasy XII)}} |
| − | Most treasures in the Golmore Jungle contain [[ |
+ | Most treasures in the Golmore Jungle contain [[Final Fantasy XII items#Potion|Potions]]. When the [[Final Fantasy XII accessories#Diamond Armlet|Diamond Armlet]] is equipped the common item treasure is Knot of Rust and the rare item is an [[Final Fantasy XII items#X-Potion|X-Potion]]. The player may sometimes find [[Final Fantasy XII accessories#Jackboots|Jackboots]] in a treasure in the southwestern bit of the Paths of Chained Light area. |
| − | The gun [[ |
+ | The gun [[Final Fantasy XII weapons#Sirius|Sirius]] can sometimes be found in the northern edge of the Rustling Chapel area, and [[Final Fantasy XII weapons#Battle Bamboo|Battle Bamboo]] can sometimes be found in the Greenswathe. |
| − | === |
+ | === Paths of Chained Light === |
| + | ;Zodiac |
||
| − | <div class="tabber"> |
||
| + | {|class="full-width FFXII article-table" style="text-align:center" |
||
| − | <div class="tabbertab" title="FFXII"> |
||
| − | {|class="full-width FFXII table" style="text-align:center" |
||
| − | |-class="a" |
||
| − | !style="width:20%"|Chest |
||
| − | !style="width:10%"|Spawns |
||
| − | !style="width:10%"|Holds Gil% |
||
| − | !style="width:30%" colspan="3"|Normal Treasure |
||
| − | !style="width:30%" colspan="3"|Diamond Armlet Treasure |
||
| − | |- |
||
| − | |class="b" rowspan="2"|1 |
||
| − | |rowspan="2"|75% |
||
| − | |rowspan="2"|20% |
||
| − | |class="a" width="10%"|Gil |
||
| − | |class="a" width="10%"|Item 1 |
||
| − | |class="a" width="10%"|Item 2 |
||
| − | |class="a" width="10%"|Gil |
||
| − | |class="a" width="10%"|Common |
||
| − | |class="a" width="10%"|Rare |
||
| − | |- |
||
| − | |≤ 200 gil |
||
| − | |Potion |
||
| − | |Antidote |
||
| − | |≤ 500 gil |
||
| − | |Knot of Rust |
||
| − | |X-Potion |
||
| − | |- |
||
| − | |class="b" rowspan="2"|2 |
||
| − | |rowspan="2"|55% |
||
| − | |rowspan="2"|40% |
||
| − | |class="a" width="10%"|Gil |
||
| − | |class="a" width="10%"|Item 1 |
||
| − | |class="a" width="10%"|Item 2 |
||
| − | |class="a" width="10%"|Gil |
||
| − | |class="a" width="10%"|Common |
||
| − | |class="a" width="10%"|Rare |
||
| − | |- |
||
| − | |≤ 200 gil |
||
| − | |Potion |
||
| − | |[[List of Final Fantasy XII Accessories#Jackboots|Jackboots]] |
||
| − | |≤ 500 gil |
||
| − | |Knot of Rust |
||
| − | |X-Potion |
||
| − | |- |
||
| − | |class="b" rowspan="2"|3 |
||
| − | |rowspan="2"|75% |
||
| − | |rowspan="2"|20% |
||
| − | |class="a" width="10%"|Gil |
||
| − | |class="a" width="10%"|Item 1 |
||
| − | |class="a" width="10%"|Item 2 |
||
| − | |class="a" width="10%"|Gil |
||
| − | |class="a" width="10%"|Common |
||
| − | |class="a" width="10%"|Rare |
||
| − | |- |
||
| − | |≤ 200 gil |
||
| − | |Potion |
||
| − | |Ether |
||
| − | |≤ 500 gil |
||
| − | |Knot of Rust |
||
| − | |X-Potion |
||
| − | |}</div> |
||
| − | <div class="tabbertab" title="IZJS"> |
||
| − | {|class="full-width FFXII table" style="text-align:center" |
||
|-class="a" |
|-class="a" |
||
!style="width:20%"|Chest |
!style="width:20%"|Chest |
||
| Line 111: | Line 73: | ||
|- |
|- |
||
|Ether |
|Ether |
||
| − | |[[ |
+ | |[[Final Fantasy XII armor#Burgonet|Burgonet]] |
|Knot of Rust |
|Knot of Rust |
||
|Meteorite (B) |
|Meteorite (B) |
||
| Line 147: | Line 109: | ||
|Knot of Rust |
|Knot of Rust |
||
|Meteorite (A) |
|Meteorite (A) |
||
| + | |} |
||
| − | |}</div></div> |
||
| + | ;Original |
||
| − | |||
| + | {|class="full-width FFXII article-table" style="text-align:center" |
||
| − | ====The Needlebreak==== |
||
| − | <div class="tabber"> |
||
| − | <div class="tabbertab" title="FFXII"> |
||
| − | {|class="full-width FFXII table" style="text-align:center" |
||
|-class="a" |
|-class="a" |
||
!style="width:20%"|Chest |
!style="width:20%"|Chest |
||
| Line 160: | Line 119: | ||
!style="width:30%" colspan="3"|Diamond Armlet Treasure |
!style="width:30%" colspan="3"|Diamond Armlet Treasure |
||
|- |
|- |
||
| − | |class="b" rowspan="2"| |
+ | |class="b" rowspan="2"|1 |
|rowspan="2"|75% |
|rowspan="2"|75% |
||
|rowspan="2"|20% |
|rowspan="2"|20% |
||
| Line 177: | Line 136: | ||
|X-Potion |
|X-Potion |
||
|- |
|- |
||
| − | |class="b" rowspan="2"| |
+ | |class="b" rowspan="2"|2 |
| − | |rowspan="2"| |
+ | |rowspan="2"|55% |
| − | |rowspan="2"| |
+ | |rowspan="2"|40% |
|class="a" width="10%"|Gil |
|class="a" width="10%"|Gil |
||
|class="a" width="10%"|Item 1 |
|class="a" width="10%"|Item 1 |
||
| Line 189: | Line 148: | ||
|≤ 200 gil |
|≤ 200 gil |
||
|Potion |
|Potion |
||
| + | |[[Final Fantasy XII accessories#Jackboots|Jackboots]] |
||
| − | |Eye Drops |
||
|≤ 500 gil |
|≤ 500 gil |
||
|Knot of Rust |
|Knot of Rust |
||
|X-Potion |
|X-Potion |
||
|- |
|- |
||
| − | |class="b" rowspan="2"| |
+ | |class="b" rowspan="2"|3 |
|rowspan="2"|75% |
|rowspan="2"|75% |
||
| − | |rowspan="2"| |
+ | |rowspan="2"|20% |
|class="a" width="10%"|Gil |
|class="a" width="10%"|Gil |
||
|class="a" width="10%"|Item 1 |
|class="a" width="10%"|Item 1 |
||
| Line 206: | Line 165: | ||
|≤ 200 gil |
|≤ 200 gil |
||
|Potion |
|Potion |
||
| + | |Ether |
||
| − | |G-Foe: item AMT >= 10 |
||
|≤ 500 gil |
|≤ 500 gil |
||
|Knot of Rust |
|Knot of Rust |
||
|X-Potion |
|X-Potion |
||
| − | | |
+ | |} |
| + | {{clear}} |
||
| − | |class="b" rowspan="2"|7 |
||
| + | === The Needlebreak === |
||
| − | |rowspan="2"|75% |
||
| + | ;Zodiac |
||
| − | |rowspan="2"|30% |
||
| + | {|class="full-width FFXII article-table" style="text-align:center" |
||
| − | |class="a" width="10%"|Gil |
||
| − | |class="a" width="10%"|Item 1 |
||
| − | |class="a" width="10%"|Item 2 |
||
| − | |class="a" width="10%"|Gil |
||
| − | |class="a" width="10%"|Common |
||
| − | |class="a" width="10%"|Rare |
||
| − | |- |
||
| − | |≤ 200 gil |
||
| − | |Potion |
||
| − | |G-Foe: furthest |
||
| − | |≤ 500 gil |
||
| − | |Knot of Rust |
||
| − | |X-Potion |
||
| − | |}</div> |
||
| − | <div class="tabbertab" title="IZJS"> |
||
| − | {|class="full-width FFXII table" style="text-align:center" |
||
|-class="a" |
|-class="a" |
||
!style="width:20%"|Chest |
!style="width:20%"|Chest |
||
| Line 270: | Line 214: | ||
|- |
|- |
||
|Ether |
|Ether |
||
| − | |[[ |
+ | |[[Final Fantasy XII armor#Mage's Hat|Mage's Hat]] |
|Knot of Rust |
|Knot of Rust |
||
|Meteorite (C) |
|Meteorite (C) |
||
| Line 284: | Line 228: | ||
|- |
|- |
||
|Ether |
|Ether |
||
| − | |[[ |
+ | |[[Final Fantasy XII armor#Red Cap|Red Cap]] |
|Knot of Rust |
|Knot of Rust |
||
|Meteorite (B) |
|Meteorite (B) |
||
| Line 301: | Line 245: | ||
|Knot of Rust |
|Knot of Rust |
||
|Meteorite (A) |
|Meteorite (A) |
||
| + | |} |
||
| − | |}</div></div> |
||
| + | ;Original |
||
| − | |||
| + | {|class="full-width FFXII article-table" style="text-align:center" |
||
| − | ====The Parting Glade==== |
||
| + | |-class="a" |
||
| − | This chest only appears in the ''International Zodiac Job System'' version of the game. It does not respawn. |
||
| + | !style="width:20%"|Chest |
||
| + | !style="width:10%"|Spawns |
||
| + | !style="width:10%"|Holds Gil% |
||
| + | !style="width:30%" colspan="3"|Normal Treasure |
||
| + | !style="width:30%" colspan="3"|Diamond Armlet Treasure |
||
| + | |- |
||
| + | |class="b" rowspan="2"|4 |
||
| + | |rowspan="2"|75% |
||
| + | |rowspan="2"|20% |
||
| + | |class="a" width="10%"|Gil |
||
| + | |class="a" width="10%"|Item 1 |
||
| + | |class="a" width="10%"|Item 2 |
||
| + | |class="a" width="10%"|Gil |
||
| + | |class="a" width="10%"|Common |
||
| + | |class="a" width="10%"|Rare |
||
| + | |- |
||
| + | |≤ 200 gil |
||
| + | |Potion |
||
| + | |Antidote |
||
| + | |≤ 500 gil |
||
| + | |Knot of Rust |
||
| + | |X-Potion |
||
| + | |- |
||
| + | |class="b" rowspan="2"|5 |
||
| + | |rowspan="2"|75% |
||
| + | |rowspan="2"|20% |
||
| + | |class="a" width="10%"|Gil |
||
| + | |class="a" width="10%"|Item 1 |
||
| + | |class="a" width="10%"|Item 2 |
||
| + | |class="a" width="10%"|Gil |
||
| + | |class="a" width="10%"|Common |
||
| + | |class="a" width="10%"|Rare |
||
| + | |- |
||
| + | |≤ 200 gil |
||
| + | |Potion |
||
| + | |Eye Drops |
||
| + | |≤ 500 gil |
||
| + | |Knot of Rust |
||
| + | |X-Potion |
||
| + | |- |
||
| + | |class="b" rowspan="2"|6 |
||
| + | |rowspan="2"|75% |
||
| + | |rowspan="2"|30% |
||
| + | |class="a" width="10%"|Gil |
||
| + | |class="a" width="10%"|Item 1 |
||
| + | |class="a" width="10%"|Item 2 |
||
| + | |class="a" width="10%"|Gil |
||
| + | |class="a" width="10%"|Common |
||
| + | |class="a" width="10%"|Rare |
||
| + | |- |
||
| + | |≤ 200 gil |
||
| + | |Potion |
||
| + | |G-Foe: item AMT >= 10 |
||
| + | |≤ 500 gil |
||
| + | |Knot of Rust |
||
| + | |X-Potion |
||
| + | |- |
||
| + | |class="b" rowspan="2"|7 |
||
| + | |rowspan="2"|75% |
||
| + | |rowspan="2"|30% |
||
| + | |class="a" width="10%"|Gil |
||
| + | |class="a" width="10%"|Item 1 |
||
| + | |class="a" width="10%"|Item 2 |
||
| + | |class="a" width="10%"|Gil |
||
| + | |class="a" width="10%"|Common |
||
| + | |class="a" width="10%"|Rare |
||
| + | |- |
||
| + | |≤ 200 gil |
||
| + | |Potion |
||
| + | |G-Foe: furthest |
||
| + | |≤ 500 gil |
||
| + | |Knot of Rust |
||
| + | |X-Potion |
||
| + | |} |
||
| + | {{clear}} |
||
| + | === The Parting Glade === |
||
| + | This chest only appears in the ''Zodiac'' versions. It does not respawn. |
||
| − | {|class="full-width FFXII table" style="text-align:center" |
+ | {|class="full-width FFXII article-table" style="text-align:center" |
|-class="a" |
|-class="a" |
||
!style="width:20%"|Chest |
!style="width:20%"|Chest |
||
| Line 319: | Line 340: | ||
|0% |
|0% |
||
|N/A |
|N/A |
||
| − | |colspan="2"|[[ |
+ | |colspan="2"|[[Final Fantasy XII accessories#Amber Armlet|Amber Armlet]] |
|} |
|} |
||
| + | {{clear}} |
||
| − | === |
+ | === Dell of the Dreamer === |
| − | This chest only appears in the '' |
+ | This chest only appears in the ''Zodiac'' versions. It does not respawn. |
| − | {|class="full-width FFXII table" style="text-align:center" |
+ | {|class="full-width FFXII article-table" style="text-align:center" |
|-class="a" |
|-class="a" |
||
!style="width:20%"|Chest |
!style="width:20%"|Chest |
||
| Line 340: | Line 362: | ||
|colspan="2"|N/A |
|colspan="2"|N/A |
||
|} |
|} |
||
| + | {{clear}} |
||
| + | === The Branchway === |
||
| + | These chests only appear in the ''Zodiac'' versions. |
||
| + | {|class="full-width FFXII article-table" style="text-align:center" |
||
| − | ====The Branchway==== |
||
| − | These chests only appear in the ''International Zodiac Job System'' version of the game. |
||
| − | |||
| − | {|class="full-width FFXII table" style="text-align:center" |
||
|-class="a" |
|-class="a" |
||
!style="width:20%"|Chest |
!style="width:20%"|Chest |
||
| Line 388: | Line 410: | ||
|- |
|- |
||
|Ether |
|Ether |
||
| − | |[[ |
+ | |[[Final Fantasy XII accessories#Black Belt|Black Belt]] |
|Knot of Rust |
|Knot of Rust |
||
|Meteorite (B) |
|Meteorite (B) |
||
|} |
|} |
||
| + | {{clear}} |
||
| − | |||
| − | === |
+ | === The Greenswathe === |
| + | ;Zodiac |
||
| − | <div class="tabber"> |
||
| + | {|class="full-width FFXII article-table" style="text-align:center" |
||
| − | <div class="tabbertab" title="FFXII"> |
||
| − | {|class="full-width FFXII table" style="text-align:center" |
||
| − | |-class="a" |
||
| − | !style="width:20%"|Chest |
||
| − | !style="width:10%"|Spawns |
||
| − | !style="width:10%"|Holds Gil% |
||
| − | !style="width:30%" colspan="3"|Normal Treasure |
||
| − | !style="width:30%" colspan="3"|Diamond Armlet Treasure |
||
| − | |- |
||
| − | |class="b" rowspan="2"|8 |
||
| − | |rowspan="2"|75% |
||
| − | |rowspan="2"|20% |
||
| − | |class="a" width="10%"|Gil |
||
| − | |class="a" width="10%"|Item 1 |
||
| − | |class="a" width="10%"|Item 2 |
||
| − | |class="a" width="10%"|Gil |
||
| − | |class="a" width="10%"|Common |
||
| − | |class="a" width="10%"|Rare |
||
| − | |- |
||
| − | |≤ 200 gil |
||
| − | |Potion |
||
| − | |Eye Drops |
||
| − | |≤ 500 gil |
||
| − | |Knot of Rust |
||
| − | |X-Potion |
||
| − | |- |
||
| − | |class="b" rowspan="2"|9 |
||
| − | |rowspan="2"|75% |
||
| − | |rowspan="2"|20% |
||
| − | |class="a" width="10%"|Gil |
||
| − | |class="a" width="10%"|Item 1 |
||
| − | |class="a" width="10%"|Item 2 |
||
| − | |class="a" width="10%"|Gil |
||
| − | |class="a" width="10%"|Common |
||
| − | |class="a" width="10%"|Rare |
||
| − | |- |
||
| − | |≤ 200 gil |
||
| − | |Potion |
||
| − | |[[List of Final Fantasy XII Weapons#Battle Bamboo|Battle Bamboo]] |
||
| − | |≤ 500 gil |
||
| − | |Knot of Rust |
||
| − | |X-Potion |
||
| − | |}</div> |
||
| − | <div class="tabbertab" title="IZJS"> |
||
| − | {|class="full-width FFXII table" style="text-align:center" |
||
|-class="a" |
|-class="a" |
||
!style="width:20%"|Chest |
!style="width:20%"|Chest |
||
| Line 483: | Line 461: | ||
|- |
|- |
||
|Ether |
|Ether |
||
| − | |[[ |
+ | |[[Final Fantasy XII accessories#Argyle Armlet|Argyle Armlet]] |
|Knot of Rust |
|Knot of Rust |
||
|Meteorite (B) |
|Meteorite (B) |
||
| + | |} |
||
| − | |}</div></div> |
||
| + | ;Original |
||
| − | |||
| + | {|class="full-width FFXII article-table" style="text-align:center" |
||
| − | ====The Rustling Chaple==== |
||
| − | <div class="tabber"> |
||
| − | <div class="tabbertab" title="FFXII"> |
||
| − | {|class="full-width FFXII table" style="text-align:center" |
||
|-class="a" |
|-class="a" |
||
!style="width:20%"|Chest |
!style="width:20%"|Chest |
||
| Line 499: | Line 474: | ||
!style="width:30%" colspan="3"|Diamond Armlet Treasure |
!style="width:30%" colspan="3"|Diamond Armlet Treasure |
||
|- |
|- |
||
| − | |class="b" rowspan="2"| |
+ | |class="b" rowspan="2"|8 |
|rowspan="2"|75% |
|rowspan="2"|75% |
||
|rowspan="2"|20% |
|rowspan="2"|20% |
||
| Line 511: | Line 486: | ||
|≤ 200 gil |
|≤ 200 gil |
||
|Potion |
|Potion |
||
| + | |Eye Drops |
||
| − | |[[List of Final Fantasy XII Weapons#Sirius|Sirius]] |
||
|≤ 500 gil |
|≤ 500 gil |
||
|Knot of Rust |
|Knot of Rust |
||
|X-Potion |
|X-Potion |
||
|- |
|- |
||
| − | |class="b" rowspan="2"| |
+ | |class="b" rowspan="2"|9 |
|rowspan="2"|75% |
|rowspan="2"|75% |
||
|rowspan="2"|20% |
|rowspan="2"|20% |
||
| Line 528: | Line 503: | ||
|≤ 200 gil |
|≤ 200 gil |
||
|Potion |
|Potion |
||
| + | |[[Final Fantasy XII weapons#Battle Bamboo|Battle Bamboo]] |
||
| − | |Eye Drops |
||
|≤ 500 gil |
|≤ 500 gil |
||
|Knot of Rust |
|Knot of Rust |
||
|X-Potion |
|X-Potion |
||
| − | |} |
+ | |} |
| + | {{clear}} |
||
| − | <div class="tabbertab" title="IZJS"> |
||
| + | === The Rustling Chaple === |
||
| − | {|class="full-width FFXII table" style="text-align:center" |
||
| + | ;Zodiac |
||
| + | {|class="full-width FFXII article-table" style="text-align:center" |
||
|-class="a" |
|-class="a" |
||
!style="width:20%"|Chest |
!style="width:20%"|Chest |
||
| Line 592: | Line 569: | ||
|Knot of Rust |
|Knot of Rust |
||
|Meteorite (A) |
|Meteorite (A) |
||
| + | |} |
||
| − | |}</div></div> |
||
| + | ;Original |
||
| + | {|class="full-width FFXII article-table" style="text-align:center" |
||
| + | |-class="a" |
||
| + | !style="width:20%"|Chest |
||
| + | !style="width:10%"|Spawns |
||
| + | !style="width:10%"|Holds Gil% |
||
| + | !style="width:30%" colspan="3"|Normal Treasure |
||
| + | !style="width:30%" colspan="3"|Diamond Armlet Treasure |
||
| + | |- |
||
| + | |class="b" rowspan="2"|10 |
||
| + | |rowspan="2"|75% |
||
| + | |rowspan="2"|20% |
||
| + | |class="a" width="10%"|Gil |
||
| + | |class="a" width="10%"|Item 1 |
||
| + | |class="a" width="10%"|Item 2 |
||
| + | |class="a" width="10%"|Gil |
||
| + | |class="a" width="10%"|Common |
||
| + | |class="a" width="10%"|Rare |
||
| + | |- |
||
| + | |≤ 200 gil |
||
| + | |Potion |
||
| + | |[[Final Fantasy XII weapons#Sirius|Sirius]] |
||
| + | |≤ 500 gil |
||
| + | |Knot of Rust |
||
| + | |X-Potion |
||
| + | |- |
||
| + | |class="b" rowspan="2"|11 |
||
| + | |rowspan="2"|75% |
||
| + | |rowspan="2"|20% |
||
| + | |class="a" width="10%"|Gil |
||
| + | |class="a" width="10%"|Item 1 |
||
| + | |class="a" width="10%"|Item 2 |
||
| + | |class="a" width="10%"|Gil |
||
| + | |class="a" width="10%"|Common |
||
| + | |class="a" width="10%"|Rare |
||
| + | |- |
||
| + | |≤ 200 gil |
||
| + | |Potion |
||
| + | |Eye Drops |
||
| + | |≤ 500 gil |
||
| + | |Knot of Rust |
||
| + | |X-Potion |
||
| + | |} |
||
| − | ==Story== |
+ | == Story == |
{{spoiler}} |
{{spoiler}} |
||
[[File:Magicbarrier.jpg|thumb|Magickal barriers deny entry.]] |
[[File:Magicbarrier.jpg|thumb|Magickal barriers deny entry.]] |
||
Upon entering the jungle, the party will come across several magickal barriers blocking the paths. [[Fran]] explains the viera have placed them and will lead the party to the entrance of Eruyt Village where they speak with the Elder and request passage through the jungle by being given [[Lente's Tear]] after saving [[Mjrn]]. |
Upon entering the jungle, the party will come across several magickal barriers blocking the paths. [[Fran]] explains the viera have placed them and will lead the party to the entrance of Eruyt Village where they speak with the Elder and request passage through the jungle by being given [[Lente's Tear]] after saving [[Mjrn]]. |
||
| − | Once the party reaches the Dell of the Dreamer, the [[Elder Wyrm (Final Fantasy XII)|Elder Wyrm]] rises and blocks both the exit and entrance, forcing them to fight. |
+ | Once the party reaches the Dell of the Dreamer, the [[Elder Wyrm (Final Fantasy XII)|Elder Wyrm]] rises and blocks both the exit and entrance, forcing them to fight. Later, the party passes by the jungle when they head to the Feywood. |
| − | {{ |
+ | {{clear}} |
{{endspoiler}} |
{{endspoiler}} |
||
| − | == |
+ | == Quests == |
| + | === Hunts === |
||
| − | *[[Panther (Final Fantasy XII)|Panther]] |
||
| − | + | {{See|Hunt (Final Fantasy XII)}} |
|
| + | The [[Vorpal Bunny (Final Fantasy XII)|Vorpal Bunny]] is a Rank III Mark whose hunt becomes available after defeating [[Judge Bergan (boss)|Judge Bergan]] in [[Mt Bur-Omisace]]. Vorpal Bunny can be found in the Rustling Chapel area of Golmore Jungle, petitioned by Nera in Eruyt Village (The Spiritwood). The Vorpal Bunny is a scarce creature, and will keep running away rather than fight. The player should try and keep it in their sight, as it may go underground and fully recover all damage the player had inflicted. |
||
| − | *[[Coeurl (Final Fantasy XII)|Coeurl]] |
||
| − | *[[Gargoyle (Final Fantasy XII)|Gargoyle]] |
||
| − | *[[Treant (Final Fantasy XII)|Treant]] |
||
| − | *[[Malboro (Final Fantasy XII)|Malboro]] |
||
| − | *[[Great Malboro (Final Fantasy XII)|Great Malboro]] |
||
| − | *[[Diresaur]] |
||
| − | *[[Dark Skeleton (Final Fantasy XII)|Dark Skeleton]] |
||
| − | *[[Midgardsormr (Final Fantasy XII)|Midgardsormr]] (Rare) |
||
| − | *[[Phyllo]] (Rare) |
||
| − | *[[Elder Wyrm (Final Fantasy XII)|Elder Wyrm]] (Optional Boss) |
||
| − | *[[Biding Mantis]] (Rare) |
||
| − | *[[Grave Lord]] (Rare) |
||
| − | *[[Vorpal Bunny (Final Fantasy XII)|Vorpal Bunny]] (Mark) |
||
| − | == |
+ | === Rare Game === |
| + | {{See|Rare Game}} |
||
| − | {{Listen|filename=FFXII The Golmore Jungle.ogg|songname="The Golmore Jungle"}} |
||
| + | To find the [[Biding Mantis]] the player must have spoken to the "Huntmaster" in [[Phon Coast]] and defeated [[Thalassinon (Final Fantasy XII)|Thalassinon]], which will trigger the start of the Rare Game quest. The mantis will then appear in the southern portion of The Needlebrake area when the game clock is between 30 and 59 minutes. |
||
| − | The theme of Golmore Jungle is "The Golmore Jungle" {{J|ゴルモア大森林|Gorumoa Dai Shinrin}}. It is heavy mainly on strings, woodwinds, and percussion, but also contains some brass. |
||
| + | [[Midgardsormr (Final Fantasy XII)|Midgardsormr]] has a 20% chance of appearing in the Paths of Chained Light area. |
||
| − | The theme also appears in ''[[Dissidia 012 Final Fantasy]]'' as [[Vaan/Dissidia|Vaan's]] [[Dungeon Theme|dungeon theme]]. |
||
| + | |||
| − | {{-}} |
||
| + | [[Phyllo]] has a 20% chance of appearing in the dead end towards the left side of The Branchway area, or the small dead end on the right after taking the lower pathway. |
||
| + | |||
| + | [[Grave Lord]] spawns on the central platform in The Rustling Chapel area after the player [[Chain (term)#Final Fantasy XII|chains]] at least 21 foes of the same type. Initially, the zone does not have enough enemies of the same type to sustain a long enough chain. After clearing the zone of its 18 enemies, [[Dark Skeleton (Final Fantasy XII)|Dark Skeletons]] will emerge from the ground as the player walks around in an endless supply, so meeting the chain requirement becomes quick work. |
||
| + | |||
| + | When the player moves near enough to the center where Grave Lord is after reaching a chain of 21, Dark Skeletons stop spawning. Exiting and reentering The Rustling Chapel allows more Dark Skeletons to spawn, and if the player has not defeated the Grave Lord after doing this, it will still be there. |
||
| + | |||
| + | If the player does this during the [[Vorpal Bunny (Final Fantasy XII)|Vorpal Bunny]] [[Hunt (Final Fantasy XII)|Hunt]], the Dark Skeletons still spawn without the need to defeat the Vorpal Bunny, but the Grave Lord will not spawn when the player chains 21. Dark Skeletons stop spawning when the player has reached a chain of 50. Defeating the Vorpal Bunny resets the chain, allowing more Dark Skeletons to spawn, and the Grave Lord will then spawn after the 21 chain. |
||
| + | |||
| + | == Enemies == |
||
| + | * [[Panther (Final Fantasy XII)|Panther]] |
||
| + | * [[Hellhound (Final Fantasy XII)|Hellhound]] |
||
| + | * [[Coeurl (Final Fantasy XII)|Coeurl]] |
||
| + | * [[Gargoyle (Final Fantasy XII)|Gargoyle]] |
||
| + | * [[Treant (Final Fantasy XII)|Treant]] |
||
| + | * [[Malboro (Final Fantasy XII)|Malboro]] |
||
| + | * [[Great Malboro (Final Fantasy XII)|Great Malboro]] |
||
| + | * [[Diresaur (Final Fantasy XII)|Diresaur]] |
||
| + | * [[Dark Skeleton (Final Fantasy XII)|Dark Skeleton]] |
||
| + | * [[Midgardsormr (Final Fantasy XII)|Midgardsormr]] (Rare) |
||
| + | * [[Phyllo]] (Rare) |
||
| + | * [[Elder Wyrm (Final Fantasy XII)|Elder Wyrm]] (Optional Boss) |
||
| + | * [[Biding Mantis]] (Rare) |
||
| + | * [[Grave Lord]] (Rare) |
||
| + | * [[Vorpal Bunny (Final Fantasy XII)|Vorpal Bunny]] (Mark) |
||
| + | |||
| + | == Musical themes == |
||
| + | {{audio|filename=FFXII The Golmore Jungle.ogg|title="The Golmore Jungle"}} |
||
| + | The theme of Golmore Jungle is "The Golmore Jungle" {{J|ゴルモア大森林|Gorumoa Dai Shinrin}}. It is heavy mainly on strings, woodwinds, and percussion, but also contains some brass. |
||
| + | |||
| + | The theme also appears in ''[[Dissidia 012 Final Fantasy]]'' as [[Vaan/Dissidia (PSP)|Vaan]]'s [[dungeon theme]]. |
||
| + | {{clear}} |
||
| + | |||
| + | == Map == |
||
| + | The map can be found in the Paths of Chained Light. The yellow path indicates a path only able to be taken on a [[Chocobo (Final Fantasy XII)|chocobo]] (one can be hired from Jahara or Mt Bur-Omisace). |
||
| − | ==Map== |
||
<div style="overflow:auto; width: 100%; height:300px"> |
<div style="overflow:auto; width: 100%; height:300px"> |
||
[[File:FF12 Map - Golmore Jungle.png]]</div> |
[[File:FF12 Map - Golmore Jungle.png]]</div> |
||
| + | [[:File:Map_14_Golmore_Jungle.png|Map for the original ''Final Fantasy XII'' that includes all treasure information.]] |
||
| − | ==Trivia== |
||
| + | |||
| − | *In ''[[Dissidia 012 Final Fantasy]]'', there is a trade material called "Golmore Timber". |
||
| + | == Other appearances == |
||
| − | *"Golmore Jungle" is an answer to an [[Academia]] quiz question in ''[[Final Fantasy XIII-2]]''. |
||
| + | === ''[[Final Fantasy Record Keeper]]'' === |
||
| + | [[File:FFRK Golmore Jungle FFXII.png|right|150px]] |
||
| + | {{Location section|Final Fantasy Record Keeper}} |
||
| + | {{clear}} |
||
| + | |||
| + | ===Other media=== |
||
| + | ''[[Dissidia 012 Final Fantasy]]'' has a trade material called "Golmore Timber". "Golmore Jungle" is also an answer to an [[Academia]] quiz question in ''[[Final Fantasy XIII-2]]''. |
||
| + | |||
| + | == Gallery == |
||
| + | <gallery> |
||
| + | Golmore-Jungle-Secret-Path-FFXII-TZA.png|A secret path to Eruyt Village. |
||
| + | FFXII-HD-Transparent-Map.png|Overlay map in ''The Zodiac Age''. |
||
| + | Chocobo tracks in Golmore Jungle from FFXII TZA.png|Chocobo tracks on the floor. |
||
| + | Golmore Jungle chocobo path from FFXII TZA.png|Chocobo path. |
||
| + | </gallery> |
||
| + | |||
| + | {{navbox setting FFXII}} |
||
| − | {{FFXII}} |
||
[[de:Golmore-Dschungel]] |
[[de:Golmore-Dschungel]] |
||
[[it:Giungla di Golmore]] |
[[it:Giungla di Golmore]] |
||
| + | [[pt-br:Golmore Jungle]] |
||
| − | [[Category:Final Fantasy XII Locations]] |
||
| + | [[Category:Locations in Final Fantasy XII]] |
||
[[Category:Forests]] |
[[Category:Forests]] |
||
Revision as of 01:38, 11 August 2020
Template:Sideicon

Oh, shut up and help me remodel the Golmore Jungle (Final Fantasy XII) page!
- Adding a Locations section, with images and brief descriptions of the areas within the location.
This request can be discussed on the associated discussion page. Remove this notice upon completion.
Fran: The Jungle denies us our passage.Ashe: What have we done?Fran: We? No. I.Fran and Ashe
The Golmore Jungle is a location in the land of Ivalice in Final Fantasy XII. It is a vast jungle east of the Ozmone Plain. Within the Jungle is Eruyt Village, the home of the viera for whom the Golmore Jungle is a sacred home and a living being which can speak to them directly. The viera refer to it as "the Wood" and personify her as a female.
Golmore Jungle can prove to be a daunting place on the first visit. The status-inducing Malboros run wild through the jungle and also rampant are the Hellhounds and the Diresaur, which can be dangerous early on. The boss battle against Elder Wyrm can be skipped by heading south to the Feywood and running through lv. 38+ enemies to get to the Paramina Rift. The hard monsters encountered can be taken care of using the Immobilize glitch.
Sage Knowledge
A sprawling jungle in the Jagd Difohr, it remains much as it always has been, untouched by the hand of Man. Though the viera make their villages within this jungle, the ways to their enclaves are tangled and hidden. Barriers throughout the jungle, too, prevent easy passage. These were erected by the viera to prevent outsiders from intruding, the blessing of their people needed before one may pass.
Sage Knowledge 72, Golmore Jungle
Locations
The Golmore Jungle is located to the east of the Ozmone Plain on Jagd Difohr. Paramina Rift lies to the east and the Feywood in the south. The player can ride a chocobo along a hidden path between the Parting Glade and the Rustling Chapel.
- Paths of Chained Light (to Ozmone Plain)
- The Needlebrake (to Eruyt Village)
- Whisperleaf Way
- The Parting Glade
- Dell of the Dreamer
- The Branchway
- The Greenswathe (to the Paramina Rift)
- The Rustling Chapel (to the Feywood)
Treasures
Most treasures in the Golmore Jungle contain Potions. When the Diamond Armlet is equipped the common item treasure is Knot of Rust and the rare item is an X-Potion. The player may sometimes find Jackboots in a treasure in the southwestern bit of the Paths of Chained Light area.
The gun Sirius can sometimes be found in the northern edge of the Rustling Chapel area, and Battle Bamboo can sometimes be found in the Greenswathe.
Paths of Chained Light
- Zodiac
| Chest | Spawns | Holds Gil% | Gil | Normal Treasure | Diamond Armlet Treasure | ||
|---|---|---|---|---|---|---|---|
| 1 | 75% | 40% | ≤ 240 gil | Item 1 | Item 2 | Common | Rare |
| Ether | Burgonet | Knot of Rust | Meteorite (B) | ||||
| 2 | 80% | 30% | ≤ 240 gil | Ether | Common | Rare | |
| Knot of Rust | Meteorite (A) | ||||||
| 3 | 80% | 30% | ≤ 240 gil | Ether | Common | Rare | |
| Knot of Rust | Meteorite (A) | ||||||
| 4 | 80% | 30% | ≤ 240 gil | Ether | Common | Rare | |
| Knot of Rust | Meteorite (A) | ||||||
- Original
| Chest | Spawns | Holds Gil% | Normal Treasure | Diamond Armlet Treasure | ||||
|---|---|---|---|---|---|---|---|---|
| 1 | 75% | 20% | Gil | Item 1 | Item 2 | Gil | Common | Rare |
| ≤ 200 gil | Potion | Antidote | ≤ 500 gil | Knot of Rust | X-Potion | |||
| 2 | 55% | 40% | Gil | Item 1 | Item 2 | Gil | Common | Rare |
| ≤ 200 gil | Potion | Jackboots | ≤ 500 gil | Knot of Rust | X-Potion | |||
| 3 | 75% | 20% | Gil | Item 1 | Item 2 | Gil | Common | Rare |
| ≤ 200 gil | Potion | Ether | ≤ 500 gil | Knot of Rust | X-Potion | |||
The Needlebreak
- Zodiac
| Chest | Spawns | Holds Gil% | Gil | Normal Treasure | Diamond Armlet Treasure | ||
|---|---|---|---|---|---|---|---|
| 5 | 80% | 30% | ≤ 250 gil | Ether | Common | Rare | |
| Knot of Rust | Meteorite (A) | ||||||
| 6 | 80% | 30% | ≤ 250 gil | Ether | Common | Rare | |
| Knot of Rust | Meteorite (A) | ||||||
| 7 | 75% | 45% | ≤ 300 gil | Item 1 | Item 2 | Common | Rare |
| Ether | Mage's Hat | Knot of Rust | Meteorite (C) | ||||
| 8 | 75% | 45% | ≤ 300 gil | Item 1 | Item 2 | Common | Rare |
| Ether | Red Cap | Knot of Rust | Meteorite (B) | ||||
| 9 | 80% | 30% | ≤ 250 gil | Item 1 | Item 2 | Common | Rare |
| Ether | Hi-Ether | Knot of Rust | Meteorite (A) | ||||
- Original
| Chest | Spawns | Holds Gil% | Normal Treasure | Diamond Armlet Treasure | ||||
|---|---|---|---|---|---|---|---|---|
| 4 | 75% | 20% | Gil | Item 1 | Item 2 | Gil | Common | Rare |
| ≤ 200 gil | Potion | Antidote | ≤ 500 gil | Knot of Rust | X-Potion | |||
| 5 | 75% | 20% | Gil | Item 1 | Item 2 | Gil | Common | Rare |
| ≤ 200 gil | Potion | Eye Drops | ≤ 500 gil | Knot of Rust | X-Potion | |||
| 6 | 75% | 30% | Gil | Item 1 | Item 2 | Gil | Common | Rare |
| ≤ 200 gil | Potion | G-Foe: item AMT >= 10 | ≤ 500 gil | Knot of Rust | X-Potion | |||
| 7 | 75% | 30% | Gil | Item 1 | Item 2 | Gil | Common | Rare |
| ≤ 200 gil | Potion | G-Foe: furthest | ≤ 500 gil | Knot of Rust | X-Potion | |||
The Parting Glade
This chest only appears in the Zodiac versions. It does not respawn.
| Chest | Spawns | Holds Gil% | Gil | Normal Treasure | Diamond Armlet Treasure |
|---|---|---|---|---|---|
| 10 | 100% | 0% | N/A | Amber Armlet | |
Dell of the Dreamer
This chest only appears in the Zodiac versions. It does not respawn.
| Chest | Spawns | Holds Gil% | Gil | Normal Treasure | Diamond Armlet Treasure |
|---|---|---|---|---|---|
| 11 | 100% | 100% | 9,872 gil | N/A | |
The Branchway
These chests only appear in the Zodiac versions.
| Chest | Spawns | Holds Gil% | Gil | Normal Treasure | Diamond Armlet Treasure | ||
|---|---|---|---|---|---|---|---|
| 12 | 80% | 30% | ≤ 250 gil | Ether | Common | Rare | |
| Knot of Rust | Meteorite (A) | ||||||
| 13 | 80% | 30% | ≤ 250 gil | Item 1 | Item 2 | Common | Rare |
| Ether | Hi-Ether | Knot of Rust | Meteorite (A) | ||||
| 14 | 80% | 40% | ≤ 300 gil | Item 1 | Item 2 | Common | Rare |
| Ether | Black Belt | Knot of Rust | Meteorite (B) | ||||
The Greenswathe
- Zodiac
| Chest | Spawns | Holds Gil% | Gil | Normal Treasure | Diamond Armlet Treasure | ||
|---|---|---|---|---|---|---|---|
| 15 | 80% | 30% | ≤ 250 gil | Item 1 | Item 2 | Common | Rare |
| Ether | Hi-Ether | Knot of Rust | Meteorite (A) | ||||
| 16 | 80% | 30% | ≤ 250 gil | Ether | Common | Rare | |
| Knot of Rust | Meteorite (A) | ||||||
| 17 | 80% | 35% | ≤ 270 gil | Item 1 | Item 2 | Common | Rare |
| Ether | Argyle Armlet | Knot of Rust | Meteorite (B) | ||||
- Original
| Chest | Spawns | Holds Gil% | Normal Treasure | Diamond Armlet Treasure | ||||
|---|---|---|---|---|---|---|---|---|
| 8 | 75% | 20% | Gil | Item 1 | Item 2 | Gil | Common | Rare |
| ≤ 200 gil | Potion | Eye Drops | ≤ 500 gil | Knot of Rust | X-Potion | |||
| 9 | 75% | 20% | Gil | Item 1 | Item 2 | Gil | Common | Rare |
| ≤ 200 gil | Potion | Battle Bamboo | ≤ 500 gil | Knot of Rust | X-Potion | |||
The Rustling Chaple
- Zodiac
| Chest | Spawns | Holds Gil% | Gil | Normal Treasure | Diamond Armlet Treasure | ||
|---|---|---|---|---|---|---|---|
| 18 | 80% | 30% | ≤ 250 gil | Ether | Common | Rare | |
| Knot of Rust | Meteorite (A) | ||||||
| 19 | 80% | 30% | ≤ 250 gil | Ether | Common | Rare | |
| Knot of Rust | Meteorite (B) | ||||||
| 20 | 80% | 30% | ≤ 250 gil | Item 1 | Item 2 | Common | Rare |
| Ether | Hi-Ether | Knot of Rust | Meteorite (A) | ||||
| 21 | 80% | 30% | ≤ 250 gil | Item 1 | Item 2 | Common | Rare |
| Ether | Hi-Ether | Knot of Rust | Meteorite (A) | ||||
- Original
| Chest | Spawns | Holds Gil% | Normal Treasure | Diamond Armlet Treasure | ||||
|---|---|---|---|---|---|---|---|---|
| 10 | 75% | 20% | Gil | Item 1 | Item 2 | Gil | Common | Rare |
| ≤ 200 gil | Potion | Sirius | ≤ 500 gil | Knot of Rust | X-Potion | |||
| 11 | 75% | 20% | Gil | Item 1 | Item 2 | Gil | Common | Rare |
| ≤ 200 gil | Potion | Eye Drops | ≤ 500 gil | Knot of Rust | X-Potion | |||
Story
Magickal barriers deny entry.
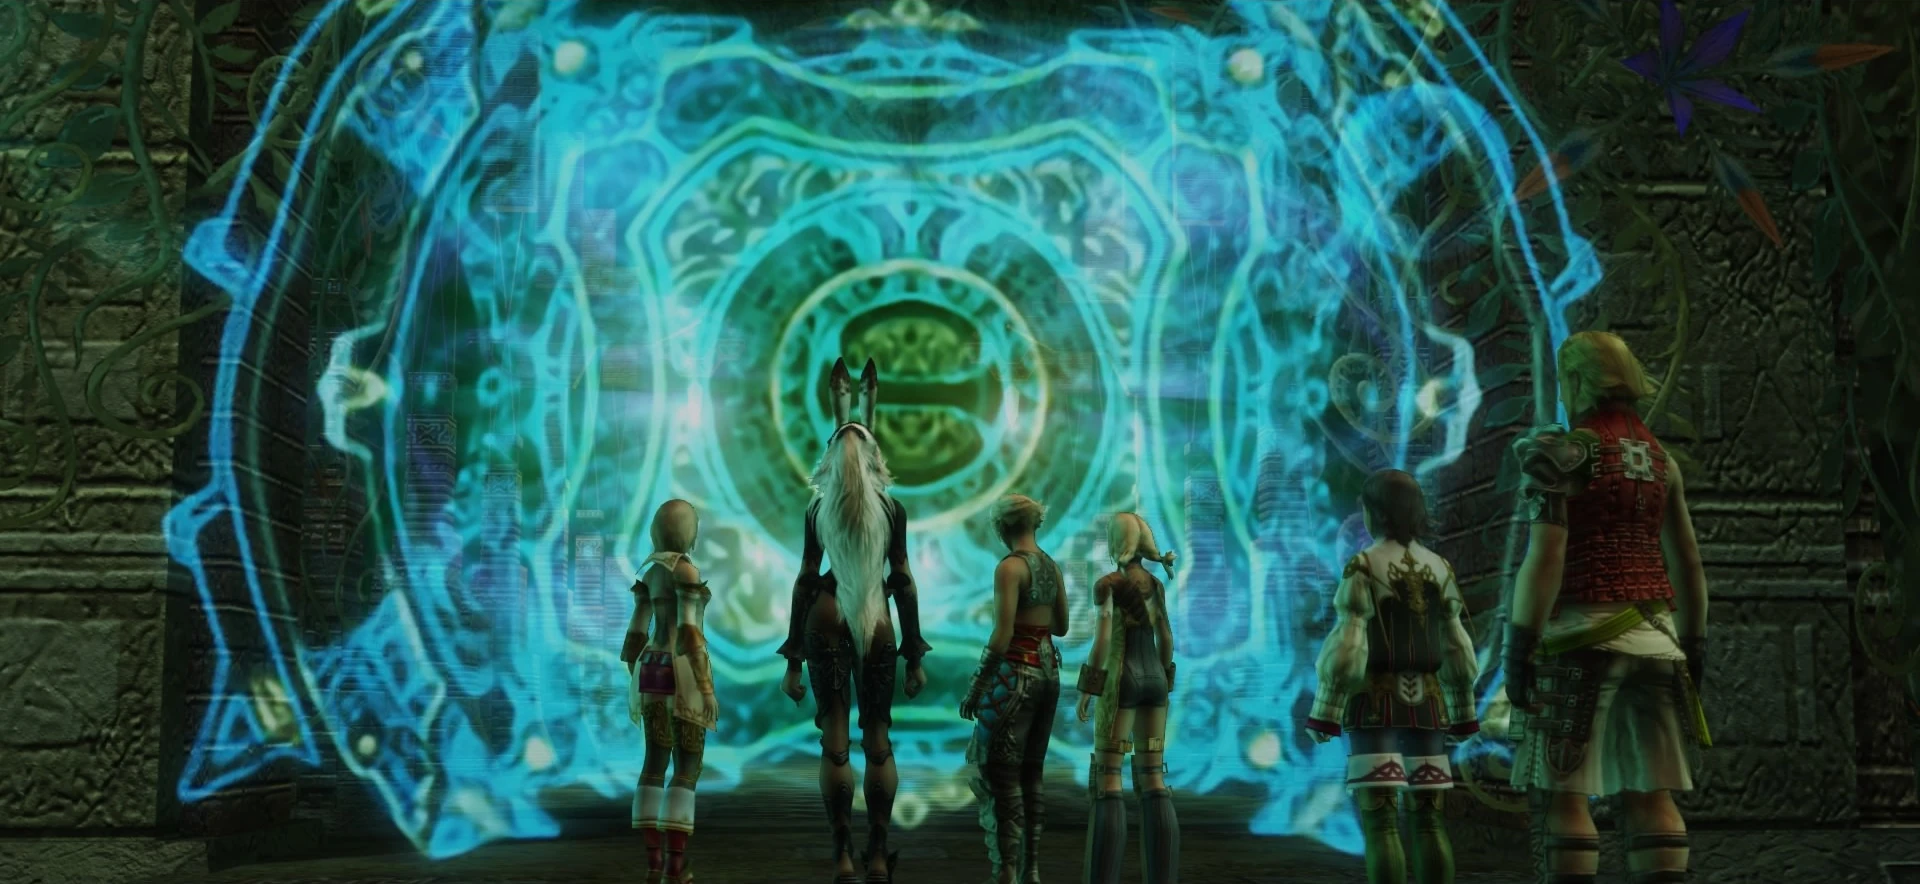
Upon entering the jungle, the party will come across several magickal barriers blocking the paths. Fran explains the viera have placed them and will lead the party to the entrance of Eruyt Village where they speak with the Elder and request passage through the jungle by being given Lente's Tear after saving Mjrn.
Once the party reaches the Dell of the Dreamer, the Elder Wyrm rises and blocks both the exit and entrance, forcing them to fight. Later, the party passes by the jungle when they head to the Feywood.
Quests
Hunts
The Vorpal Bunny is a Rank III Mark whose hunt becomes available after defeating Judge Bergan in Mt Bur-Omisace. Vorpal Bunny can be found in the Rustling Chapel area of Golmore Jungle, petitioned by Nera in Eruyt Village (The Spiritwood). The Vorpal Bunny is a scarce creature, and will keep running away rather than fight. The player should try and keep it in their sight, as it may go underground and fully recover all damage the player had inflicted.
Rare Game
To find the Biding Mantis the player must have spoken to the "Huntmaster" in Phon Coast and defeated Thalassinon, which will trigger the start of the Rare Game quest. The mantis will then appear in the southern portion of The Needlebrake area when the game clock is between 30 and 59 minutes.
Midgardsormr has a 20% chance of appearing in the Paths of Chained Light area.
Phyllo has a 20% chance of appearing in the dead end towards the left side of The Branchway area, or the small dead end on the right after taking the lower pathway.
Grave Lord spawns on the central platform in The Rustling Chapel area after the player chains at least 21 foes of the same type. Initially, the zone does not have enough enemies of the same type to sustain a long enough chain. After clearing the zone of its 18 enemies, Dark Skeletons will emerge from the ground as the player walks around in an endless supply, so meeting the chain requirement becomes quick work.
When the player moves near enough to the center where Grave Lord is after reaching a chain of 21, Dark Skeletons stop spawning. Exiting and reentering The Rustling Chapel allows more Dark Skeletons to spawn, and if the player has not defeated the Grave Lord after doing this, it will still be there.
If the player does this during the Vorpal Bunny Hunt, the Dark Skeletons still spawn without the need to defeat the Vorpal Bunny, but the Grave Lord will not spawn when the player chains 21. Dark Skeletons stop spawning when the player has reached a chain of 50. Defeating the Vorpal Bunny resets the chain, allowing more Dark Skeletons to spawn, and the Grave Lord will then spawn after the 21 chain.
Enemies
- Panther
- Hellhound
- Coeurl
- Gargoyle
- Treant
- Malboro
- Great Malboro
- Diresaur
- Dark Skeleton
- Midgardsormr (Rare)
- Phyllo (Rare)
- Elder Wyrm (Optional Boss)
- Biding Mantis (Rare)
- Grave Lord (Rare)
- Vorpal Bunny (Mark)
Musical themes
The theme of Golmore Jungle is "The Golmore Jungle" (ゴルモア大森林, Gorumoa Dai Shinrin?). It is heavy mainly on strings, woodwinds, and percussion, but also contains some brass.
The theme also appears in Dissidia 012 Final Fantasy as Vaan's dungeon theme.
Map
The map can be found in the Paths of Chained Light. The yellow path indicates a path only able to be taken on a chocobo (one can be hired from Jahara or Mt Bur-Omisace).

Map for the original Final Fantasy XII that includes all treasure information.
Other appearances
Final Fantasy Record Keeper
Other media
Dissidia 012 Final Fantasy has a trade material called "Golmore Timber". "Golmore Jungle" is also an answer to an Academia quiz question in Final Fantasy XIII-2.
Gallery
")
")
")
")