No edit summary |
Intangir Bot (talk | contribs) m (Bot: Changing template: Q) |
||
| (15 intermediate revisions by 3 users not shown) | |||
| Line 1: | Line 1: | ||
| − | {{sideicon|FFT}} |
+ | {{sideicon|prime=FFT}} |
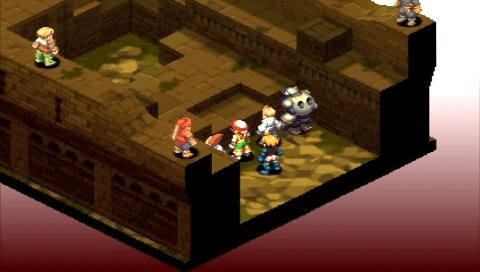
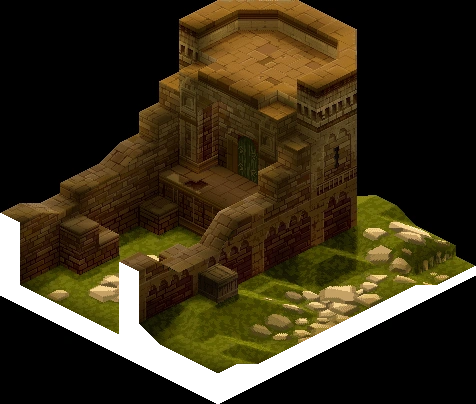
[[File:FFT Fort Besselat South.png|thumb|250px|The battle in the South Wall of Fort Besselat.]] |
[[File:FFT Fort Besselat South.png|thumb|250px|The battle in the South Wall of Fort Besselat.]] |
||
| − | {{ |
+ | {{Quote|A natural fortress surrounded on three sides by sheer cliffs. Served as a first line of defense during the Fifty Years' War.|Description}} |
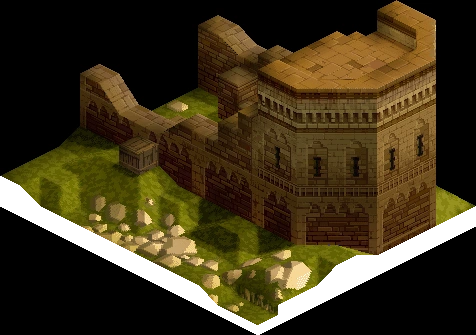
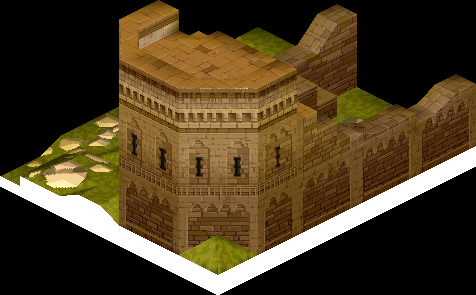
'''Fort Besselat''', also known as '''Bethla Garrison''' {{j|ベスラ要塞|Besura-yousai}}, is a location in ''[[Final Fantasy Tactics]]''. It is the stronghold of [[Druksmald Goltanna|Duke Goltanna]] and the [[Order of the Southern Sky]]. |
'''Fort Besselat''', also known as '''Bethla Garrison''' {{j|ベスラ要塞|Besura-yousai}}, is a location in ''[[Final Fantasy Tactics]]''. It is the stronghold of [[Druksmald Goltanna|Duke Goltanna]] and the [[Order of the Southern Sky]]. |
||
Upon entering the fortress, the player has to choose between making a frontal assault on the North Wall or sneaking in through the South Wall. The six guards at the North Wall have a height advantage, but there are less of them than the seven at the South Wall; furthermore, one of the South Wall guards is a [[Ninja (Tactics)|Ninja]]. Either way, the party will have to fight one battle and then continue to the sluice gates inside the fort. |
Upon entering the fortress, the player has to choose between making a frontal assault on the North Wall or sneaking in through the South Wall. The six guards at the North Wall have a height advantage, but there are less of them than the seven at the South Wall; furthermore, one of the South Wall guards is a [[Ninja (Tactics)|Ninja]]. Either way, the party will have to fight one battle and then continue to the sluice gates inside the fort. |
||
| − | ==Story== |
+ | == Story == |
{{spoiler}} |
{{spoiler}} |
||
| − | A natural fortress surrounded on three sides by sheer cliffs and the Burgross Sea to the south, Besselat served as a first line of defense against [[Ordallia]] during the [[Fifty Years' War]]. During the [[War of the Lions ( |
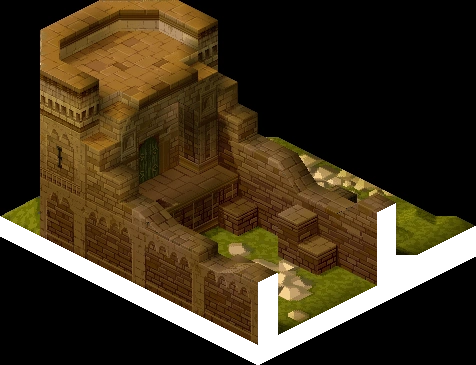
+ | A natural fortress surrounded on three sides by sheer cliffs and the Burgross Sea to the south, Besselat served as a first line of defense against [[Ordallia]] during the [[Fifty Years' War]]. During the [[War of the Lions (event)|War of the Lions]] it is besieged by the [[Order of the Northern Sky]] in the [[Battle of Fort Besselat]]. During the battle, [[Knights Templar]] under [[Barich Fendsor]] unleash [[mossfungus]] poison on the Northern Sky as part of the [[Lucavi]] plot to destroy both Orders. [[Ramza Beoulve]] opens the fortress's sluice gate, flooding the nearby plains, and bringing the battle to a halt. Duke Goltanna orders his troops to press on, but [[Delita Heiral]] assassinates him, halting the War of the Lions. [[Dycedarg Beoulve]] puts his plan to kill [[Bestrald Larg|Duke Larg]] into effect, and seizes control of the Northern Sky to fulfill his ambition to become the regent of [[Ivalice (Tactics)|Ivalice]]. |
{{endspoiler}} |
{{endspoiler}} |
||
| − | ==Battle |
+ | == Battle information == |
| − | ===Fort Besselat - North Wall=== |
+ | === Fort Besselat - North Wall === |
| + | {{Battle information FFT |
||
| − | {{FFT BI |
||
|front img = North Wall of Bethla Garrison 1.png |
|front img = North Wall of Bethla Garrison 1.png |
||
|side img = North Wall of Bethla Garrison 2.png |
|side img = North Wall of Bethla Garrison 2.png |
||
| Line 32: | Line 32: | ||
|recommend = 35 - 37 |
|recommend = 35 - 37 |
||
|item = <br/> |
|item = <br/> |
||
| − | *(0, |
+ | *(0,11): X-Potion/[[Kikuichimonji]] |
*(3,3): Phoenix Down/[[Air Knife]] |
*(3,3): Phoenix Down/[[Air Knife]] |
||
*(7,10): Hi-Potion/[[Runeblade]] |
*(7,10): Hi-Potion/[[Runeblade]] |
||
| − | *(10,0): [[Remedy ( |
+ | *(10,0): [[Remedy (item)|Remedy]]/[[Angel Ring]] |
|info = -Only fought if choosing to attack the North Wall.<br/>-One-time battle.<br/>-Can't leave until sluice battle is complete. |
|info = -Only fought if choosing to attack the North Wall.<br/>-One-time battle.<br/>-Can't leave until sluice battle is complete. |
||
|trophies= [[Carabineer Mail]] |
|trophies= [[Carabineer Mail]] |
||
| Line 42: | Line 42: | ||
|geomancy = Sinkhole, Tanglevine, Wind Slash, Will-o'-the-Wisp |
|geomancy = Sinkhole, Tanglevine, Wind Slash, Will-o'-the-Wisp |
||
}} |
}} |
||
| − | {{ |
+ | {{clear}} |
| − | ===Fort Besselat - South Wall=== |
+ | === Fort Besselat - South Wall === |
| + | {{Battle information FFT |
||
| − | {{FFT BI |
||
|front img = South Wall of Bethla Garrison 1.png |
|front img = South Wall of Bethla Garrison 1.png |
||
|side img = South Wall of Bethla Garrison 2.png |
|side img = South Wall of Bethla Garrison 2.png |
||
| Line 64: | Line 64: | ||
|recommend = 34 - 36 |
|recommend = 34 - 36 |
||
|item = <br/> |
|item = <br/> |
||
| − | *(1,11): [[Phoenix Down]]/[[ |
+ | *(1,11): [[Phoenix Down]]/[[Final Fantasy Tactics items#Yagyu Darkrood|Yagyu Darkrood]] |
| − | *(2,4): [[Hi-Potion]]/[[ |
+ | *(2,4): [[Hi-Potion]]/[[Final Fantasy Tactics armor#Platinum Shield|Platinum Shield]] |
*(4,7): [[X-Potion]]/[[Gold Hairpin]] |
*(4,7): [[X-Potion]]/[[Gold Hairpin]] |
||
*(7,2): [[Hi-Ether]]/[[Carabineer Mail]] |
*(7,2): [[Hi-Ether]]/[[Carabineer Mail]] |
||
| Line 74: | Line 74: | ||
|geomancy = Sinkhole, Tanglevine, Wind Slash, Will-o'-the-Wisp |
|geomancy = Sinkhole, Tanglevine, Wind Slash, Will-o'-the-Wisp |
||
}} |
}} |
||
| − | {{ |
+ | {{clear}} |
| − | ===Fort Besselat Sluice=== |
+ | === Fort Besselat Sluice === |
| + | {{Battle information FFT |
||
| − | {{FFT BI |
||
|front img = In Front of Bethla Garrison's Sluice 1.png |
|front img = In Front of Bethla Garrison's Sluice 1.png |
||
|side img = In Front of Bethla Garrison's Sluice 2.png |
|side img = In Front of Bethla Garrison's Sluice 2.png |
||
| Line 96: | Line 96: | ||
|recommend = 38 - 40 |
|recommend = 38 - 40 |
||
|item = <br/> |
|item = <br/> |
||
| − | *(9,11): Hi-Potion/[[ |
+ | *(9,11): Hi-Potion/[[Final Fantasy Tactics armor#Crystal Armor|Crystal Armor]] |
| − | *(4,1): Hi-Ether/[[ |
+ | *(4,1): Hi-Ether/[[Final Fantasy Tactics armor#Crystal Shield|Crystal Shield]] |
| − | *(5,8): Phoenix Down/[[ |
+ | *(5,8): Phoenix Down/[[Final Fantasy Tactics armor#Lambent Hat|Lambent Hat]] |
| − | *(7,5): Remedy/[[ |
+ | *(7,5): Remedy/[[Final Fantasy Tactics armor#Crystal Helm|Crystal Helm]] |
| − | |info = -It's possible to knock the two knights on the sluice gates out of their position and have Ramza stand on where they were to win the battle.<br/>-One-time battle. |
+ | |info = -It's possible to knock the two knights on the sluice gates out of their position and have Ramza stand on where they were to win the battle.<br/>-One-time battle. |
|trophies= None |
|trophies= None |
||
|weather= Clear day |
|weather= Clear day |
||
| Line 107: | Line 107: | ||
}} |
}} |
||
| − | ==Gallery== |
+ | == Gallery == |
| + | <gallery> |
||
| − | {{Gallery |
||
| − | + | Granary of Bethla Garrison.png|The fort's grain storage.<!--When is this used?--> |
|
| − | + | Banished Fort - Spoilers, Larg Dies Here.gif|A Northern Sky-held fort known as the Banished Fort, where Larg is killed. |
|
| − | + | Besseletnorth-battlefield.jpg|The battle at the North Wall, if Ramza chooses to attack head-on. |
|
| − | + | Besseletsouth-battlefield.jpg|The battle at the South Wall, if Ramza chooses to sneak in. |
|
| − | + | Besseletdam-battlefield.jpg|The battle at the sluice. |
|
| − | + | Sluice Gates Open.png|Destruction of the Sluice Gates. |
|
| + | </gallery> |
||
| − | }} |
||
| + | |||
| + | {{navbox setting FFT}} |
||
| ⚫ | |||
| − | {{FFT}} |
||
| ⚫ | |||
[[Category:Castles|Besselat]] |
[[Category:Castles|Besselat]] |
||
Revision as of 19:31, 9 January 2020
Template:Sideicon

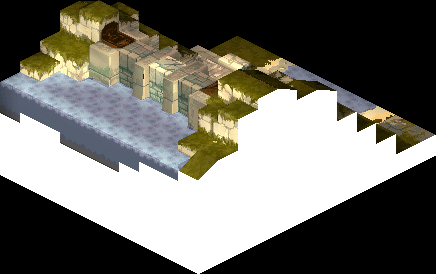
The battle in the South Wall of Fort Besselat.
A natural fortress surrounded on three sides by sheer cliffs. Served as a first line of defense during the Fifty Years' War.
Description
Fort Besselat, also known as Bethla Garrison (ベスラ要塞, Besura-yousai?), is a location in Final Fantasy Tactics. It is the stronghold of Duke Goltanna and the Order of the Southern Sky.
Upon entering the fortress, the player has to choose between making a frontal assault on the North Wall or sneaking in through the South Wall. The six guards at the North Wall have a height advantage, but there are less of them than the seven at the South Wall; furthermore, one of the South Wall guards is a Ninja. Either way, the party will have to fight one battle and then continue to the sluice gates inside the fort.
Story
A natural fortress surrounded on three sides by sheer cliffs and the Burgross Sea to the south, Besselat served as a first line of defense against Ordallia during the Fifty Years' War. During the War of the Lions it is besieged by the Order of the Northern Sky in the Battle of Fort Besselat. During the battle, Knights Templar under Barich Fendsor unleash mossfungus poison on the Northern Sky as part of the Lucavi plot to destroy both Orders. Ramza Beoulve opens the fortress's sluice gate, flooding the nearby plains, and bringing the battle to a halt. Duke Goltanna orders his troops to press on, but Delita Heiral assassinates him, halting the War of the Lions. Dycedarg Beoulve puts his plan to kill Duke Larg into effect, and seizes control of the Northern Sky to fulfill his ambition to become the regent of Ivalice.
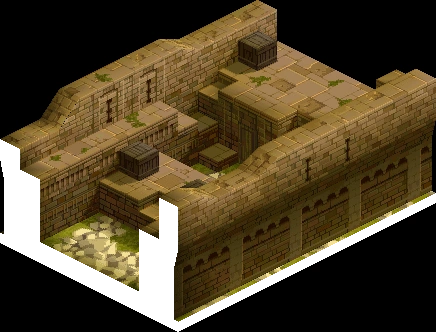
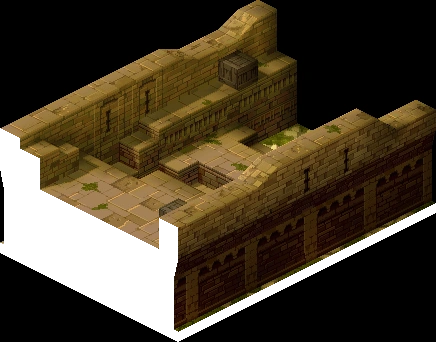
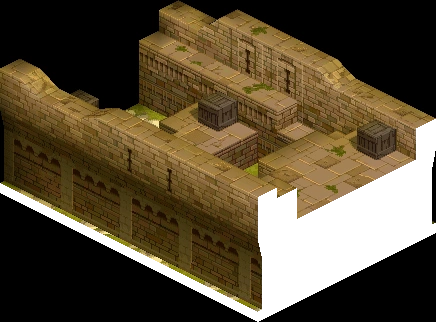
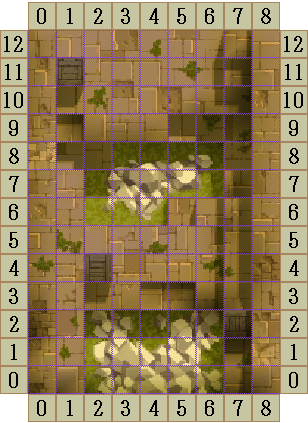
Battle information
Fort Besselat - North Wall
| Fort Besselat | |||
|---|---|---|---|
Front view:
Back view:
Side view:
Back side view:
Overhead grid:

| |||
| Units | Additional info | -Only fought if choosing to attack the North Wall. -One-time battle. -Can't leave until sluice battle is complete. | |
| Conditions | Defeat all enemies. | ||
| Weather | Clear day | ||
| Enemy level | Average: 35 | Recommended level | 35 - 37 |
| Team capacity | 4 + Ramza |
Number of teams | 1 |
| Battle Trophies | Carabineer Mail | Hidden items |
|
| Terrain | Wasteland, Grassland, Brick, Coffer | Geomancy | Sinkhole, Tanglevine, Wind Slash, Will-o'-the-Wisp |
Fort Besselat - South Wall
| Fort Besselat | |||
|---|---|---|---|
Front view:
Back view:
Side view:
Back side view:

Overhead grid:
| |||
| Units | Additional info | -Only fought if choosing to attack the South Wall. -One-time battle. -Can't leave until sluice battle is complete. | |
| Conditions | Defeat all enemies. | ||
| Weather | Clear day | ||
| Enemy level | Average: 35 | Recommended level | 34 - 36 |
| Team capacity | 4 + Ramza |
Number of teams | 1 |
| Battle Trophies | Circlet | Hidden items |
|
| Terrain | Wasteland, Grassland, Brick, Coffer | Geomancy | Sinkhole, Tanglevine, Wind Slash, Will-o'-the-Wisp |
Fort Besselat Sluice
| Fort Besselat | |||
|---|---|---|---|
Front view:

Back view:

Side view:
Back side view:

Overhead grid:

| |||
| Units |
|
Additional info | -It's possible to knock the two knights on the sluice gates out of their position and have Ramza stand on where they were to win the battle. -One-time battle. |
| Conditions | Open the sluice. | ||
| Weather | Clear day | ||
| Enemy level | Average: 37 | Recommended level | 38 - 40 |
| Team capacity | Team 1: 2 + Ramza Team 2: 2 |
Number of teams | 2 |
| Battle Trophies | None | Hidden items |
|
| Terrain | River, Lake, Grassland, Flagstone, Bridge, Iron Plate, Wooden Floor, Sand | Geomancy | Torrent, Tanglevine, Contortion, Wind Slash, Will-o'-the-Wisp, Sandstorm |
Gallery
")
")
")
")
")
")