
I couldn't miss the chance to practice my drawing!
Vrtra, great wyrm of the first brood and the hidden satrap of Radz-at-Han, has bid the Scions cross to Narunnair and mount a foray into the tiny island's unnatural spire—a Telophoroi structure known by the locals as the Tower of Zot.
Your companions join you on the journey, protective talismans in hand, prepared to face whatever unnamed horrors await you within. Come what may, you cannot allow Nidhana and her kin to perish in the grip of dark magicks and darker designs...Duty finder description
The Tower of Zot is the first main scenario ![]() Dungeon in Final Fantasy XIV: Endwalker, added in patch 6.0.
Dungeon in Final Fantasy XIV: Endwalker, added in patch 6.0.
Objectives[]
- Arrive at Ingenuity's Ingress
- Clear Ingenuity's Ingress
- Arrive at Propsperity's Promise
- Clear Propsperity's Promise
- Arrive at Wisdom's Ward
- Defeat the Magus Sisters
Progression[]
Arrive at Ingenuity's Ingress[]
The Tower of Zot is an entirely linear dungeon with the occassional gate barring progress until the preceding enemies are defeated. The first section, Aetherial Manipulation, features four packs of enemies, with a gate after every second pack. The armored fiends and sky armors have some area of effect (AoE) abilities to dodge, but there is nothing too threatening in this section.
A group of friendly NPCs will accompany the party for the first two groups of enemies before disappearing for the rest of the dungeon.
Clear Ingenuity's Ingress[]
Minduruva relies mostly on bombarding the party with overlapping AoE attacks. After demonstrating her level III Manusya spells normally, she will begin casting level III Transmute spells. These will create a glowing rune in a separate part of the arena as well as an orb at her location. The orb will then slowly travel towards the rune, and when it arrives the rune will cast the corresponding level III Manusya spell (eg. the rune created by Transmute Fire III will cast Manusya Fire III). Shortly before the orb arrives at the rune she will also cast her own level III Manusya spell, causing their effects to overlap. As the battle wears on, Minduruva will begin creating two runes at a time. Getting hit by any of these level III spells will inflict a stack of ![]() Vulnerability Up.
Vulnerability Up.
Which spells have been transmuted can be tracked by looking at Minduruva's buffs, as she will gain an elemental Alchemy buff corresponding to the transmuted spell (eg. ![]() Thunder Alchemy for Transmute Thunder III). The timers on these buffs can also be used to gauge when the corresponding spell is executed.
Thunder Alchemy for Transmute Thunder III). The timers on these buffs can also be used to gauge when the corresponding spell is executed.
Between cycles of level III spells she will use Dhrupad and the tankbuster Manusya Bio to inflict damage over time (DoT) effects on the party, the latter of which can be removed with ![]() Esuna. She will continue this pattern until defeated.
Esuna. She will continue this pattern until defeated.
| Action details | |||||||
|---|---|---|---|---|---|---|---|
| Action | Effect | Range | Cast | ||||
| Dhrupad | Casts Manusya Fire, Manusya Blizzard, and Manusya Thunder in succession, each targetting a different non-tank player. | — | 4s | — | — | — | |
| Manusya Bio | Tankbuster; deals heavy magic damage to primary target; inflicts |
40y | 4s | — | |||
| Manusya Bio III | Deals magic damage in a 40y 180° arc facing a random player; inflicts a stacking |
— | 4s | — | |||
| Manusya Blizzard (Dhrupad) |
Deals magic |
40y | Instant | — | — | ||
| Manusya Blizzard III | Deals magic |
— | 4s | — | |||
| Manusya Fire | Deals magic |
40y | 2s | — | — | ||
| Manusya Fire (Dhrupad) |
Deals magic |
40y | Instant | — | — | ||
| Manusya Fire III | Deals magic |
— | 4s | — | |||
| Manusya Thunder (Dhrupad) |
Deals magic |
40y | Instant | — | — | ||
| Manusya Thunder III | Deals magic |
— | 4s | — | |||
| Transmute Bio III | Grants Minduruva |
— | 2.7s | — | — | — | |
| Transmute Blizzard III | Grants Minduruva |
— | 2.7s | — | — | — | |
| Transmute Fire III | Grants Minduruva |
— | 2.7s | — | — | — | |
| Transmute Thunder III | Grants Minduruva |
— | 2.7s | — | — | — | |
Arrive at Prosperity's Promise[]
The second section, the Inculcation Channel, features 5 packs and 3 gates, slowing progress down slightly. The death claws and hypertuned both use AoE abilities that need to be dodged, but none of the other enemies use any abilities beyond auto-attacking. Treasure coffers can be found in the second and third rooms with the hypertuned enemies.
Clear Prosperity's Promise[]
Sanduruva relies on inflicting various status effects to confuse her foes, namely ![]() Manusya Berserk,
Manusya Berserk, ![]() Manusya Stop, and
Manusya Stop, and ![]() Manusya Confuse.
Manusya Confuse.
- Manusya Berserk summons five berserker spheres, which Sanduruva will then prompt to explode with Explosive Force. The exploding spheres inflict berserk and force the afflicted to move uncontrollably within melee range to auto-attack Sanduruva. This is always immediately followed by the Prakamya Siddhi radial AoE, which cannot be avoided while berserked and inflicts a stack of
 Vulnerability Up. The safe area to avoid Explosive Force is extremely small, so the party should try to hug the wall as much as possible once they find it.
 - Manusya Stop is unavoidable and has a varying duration on each party member. When it expires, it will inflict Temporal Displacement, preventing all movement or actions. Due to Stop's staggered durations, each party member will be stunned one by one, and each time Sanduruva will use the Prapti Siddhi line AoE on the stunned party member. There is no way to avoid these for the stunned player, and it must simply be healed through.
- Manusya Confuse replaces Manusya Berserk once used. It masks enemy HP from the enemy list and summons a group of berserker spheres disguised as Sanduruva. Players must glean which Sanduruva is the real one without relying on the enemy list before she casts Explosive Force again. The easiest way to deduce this is to find the Sanduruva that isn't emoting; the fake Sanduruvas will all be using various emotes. Other methods include finding the Sanduruva with debuffs that were applied prior to this phase, or to watch their HP bar—the fake Sanduruvas' HP will not drop despite seemingly taking damage.
| Action details | |||||||
|---|---|---|---|---|---|---|---|
| Action | Effect | Range | Cast | ||||
| Explosive Force (Manusya Berserk) |
Prompts all summoned berserker spheres to cast Sphere Shatter. | — | 3s | — | — | — | |
| Explosive Force (Manusya Confuse) |
Prompts all summoned berserker spheres to cast Sphere Shatter. | — | 2s | — | — | — | |
| Isitva Siddhi | Tankbuster; deals heavy piercing damage to primary target. | 8y | 4s | — | — | ||
| Manusya Berserk | Summons five berserker spheres throughout the arena. | — | 3s | — | — | — | |
| Manusya Confuse | Inflicts |
— | 3s | — | — | ||
| Manusya Stop | Inflicts |
— | 3s | — | — | ||
| Prakamya Siddhi | Deals piercing damage in a 5y radius; inflicts a stacking |
— | 4s | — | |||
| Prapti Siddhi | Deals piercing damage in a 40y by 4y line; executed four times in a row, targeting a different party member each time. | — | 4s | — | — | ||
| Sphere Shatter (Manusya Berserk) |
Inflicts |
— | 2s | — | — | ||
| Sphere Shatter (Manusya Confuse) |
Inflicts |
— | 1.5s | — | — | ||
Arrive at Wisdom's Ward[]
The third section, Fervor Enhancement, features four platforms connected by bridges that circle around to the final boss area. The biggest threats here are the two Zot roaders patrolling the southeast and northwest bridges. These roaders will use Wheel, an untelegraphed tankbuster that can unexpectedly leave the tank reeling. Attempting to chainpull with the roaders can be very dangerous, and their large aggro radius can see them joining an ongoing battle uninvited even while single-pulling. All enemies in this area also boast AoE abilities that need to be avoided. Treasure coffers can be found on the southeast and northeast bridges.
Defeat the Magus Sisters[]
While the party initially faces off against only Cinduruva, this encounter quickly sees the other two Magus Sisters join the fray, with Cinduruva and Sanduruva augmenting Minduruva's ability to bombard the party with their signature Delta Attack. Delta Attack executes of one three level III Delta spells; which version is being cast can be preemptively identified and prepared for by watching the encounter's text pop-ups (eg. "Glacial ice, entomb our foe!" precedes Delta Blizzard III). Each Delta spell fills the arena with a variety of AoE effects for several seconds, both avoidable and unavoidable. The avoidable effects inflict a stack of ![]() Vulnerability Up.
Vulnerability Up.
The Sisters can only execute Delta Attack while all three are standing. Minduruva and Sanduruva have significantly less health, but Cinduruva will always revive her fallen Sisters to half health shortly before they use Delta Attack. As such the party should focus down Cinduruva as much as they can; unfortunately both Cinduruva and Minduruva do not move from their positions, making it impossible to AoE all three Sisters. Should a Sister fall while a Delta spell is executing, the spell is unaffected.
In between Delta Attacks is the safest time to burn down the bosses, as their abilities are otherwise unthreatening. Minduruva's Dhrupad DoTs and single target elemental spells return, as do Sanduruva's Isitva Siddhi tankbuster and Prapti Siddhi line AoE; Cinduruva's only other ability is the Samsara room-wide AoE. Once Cinduruva is brought down, she cannot be revived and the remaining sisters can no longer use Delta Attack, making the remainder of the battle trivial.
| Action details | |||||||
|---|---|---|---|---|---|---|---|
| Action | Effect | Range | Cast | ||||
| Delta Attack | Casts one of the following, indicated by the associated broadcast text:
|
— | 5s | — | — | — | |
| Delta Blizzard III | Deals magic
|
100y | 3s (cones/lines) 5s (proximities) |
— | |||
| Delta Fire III | Deals magic
|
100y | 4s (spread) 3s (lines) 5s (donuts) |
— | |||
| Delta Thunder III | Deals magic
|
100y | 3s (circles/lines) 5 (stack) |
— | |||
| Dhrupad | Casts Manusya Fire, Manusya Blizzard, and Manusya Thunder in succession, each targetting a different non-tank player. | — | 4s | — | — | — | |
| Isitva Siddhi | Tankbuster; deals heavy piercing damage to primary target. | 8y | 4s | — | — | ||
| Manusya Blizzard | Deals magic |
40y | 2s | — | — | ||
| Manusya Blizzard (Dhrupad) |
Deals magic |
40y | Instant | — | — | ||
| Manusya Faith | No discernable effect; aesthetically part of Delta Attack. | 100y | 4s | — | — | — | |
| Manusya Fire | Deals magic |
40y | 2s | — | — | ||
| Manusya Fire (Dhrupad) |
Deals magic |
40y | Instant | — | — | ||
| Manusya Glare | Auto-attack; deals magic damage to primary target. | 127y | Instant | — | — | — | |
| Manusya Reflect | No discernable effect; aesthetically part of Delta Attack. | — | 4.2s | — | — | — | |
| Manusya Thunder | Deals magic |
40y | 2s | — | — | ||
| Manusya Thunder (Dhrupad) |
Deals magic |
40y | Instant | — | — | ||
| Prapti Siddhi | Deals piercing damage in a 40y by 4y line; executed two times in a row, targeting a different party member each time. | — | 4s | — | — | ||
| Samsara | Deals magic damage in a 40y radius around the user. | — | 3s | — | — | ||
Encounters[]
Enemies[]
| Enemy | Pic | HP | Abilities | Areas |
|---|---|---|---|---|
| Berserker Sphere | — | Sphere Shatter | Tower Climb - Prosperity's Promise | |
| See above | Tower Top - Wisdom's Ward | |||
| Exhaust | Tower Top - Fervor Enhancement | |||
| See above | Tower Base - Ingenuity's Ingress | |||
| See above | Tower Top - Wisdom's Ward | |||
| See above | Tower Climb - Prosperity's Promise | |||
| See above | Tower Top - Wisdom's ward | |||
| Fast Blade | Tower Base - Aetherial Manipulation | |||
| True Thrust | Tower Base - Aetherial Manipulation | |||
| Tower Climb - Inculcation Channel | ||||
| Soporific Gas | Tower Base - Aetherial Manipulation | |||
| Diffractive Laser | Tower Top - Fervor Enhancement | |||
| Shred | Tower Climb - Inculcation Channel | |||
| Garlean Fire | Tower Top - Fervor Enhancement | |||
| Left-arm Slash | Tower Climb - Inculcation Channel | |||
| Magitek Ray | Tower Top - Fervor Enhancement | |||
| Haywire, Wheel | Tower Top - Fervor Enhancement | |||
| Garlean Fire | Tower Base - Aetherial Manipulation | |||
| Tower Climb - Inculcation Channel |
Formations[]
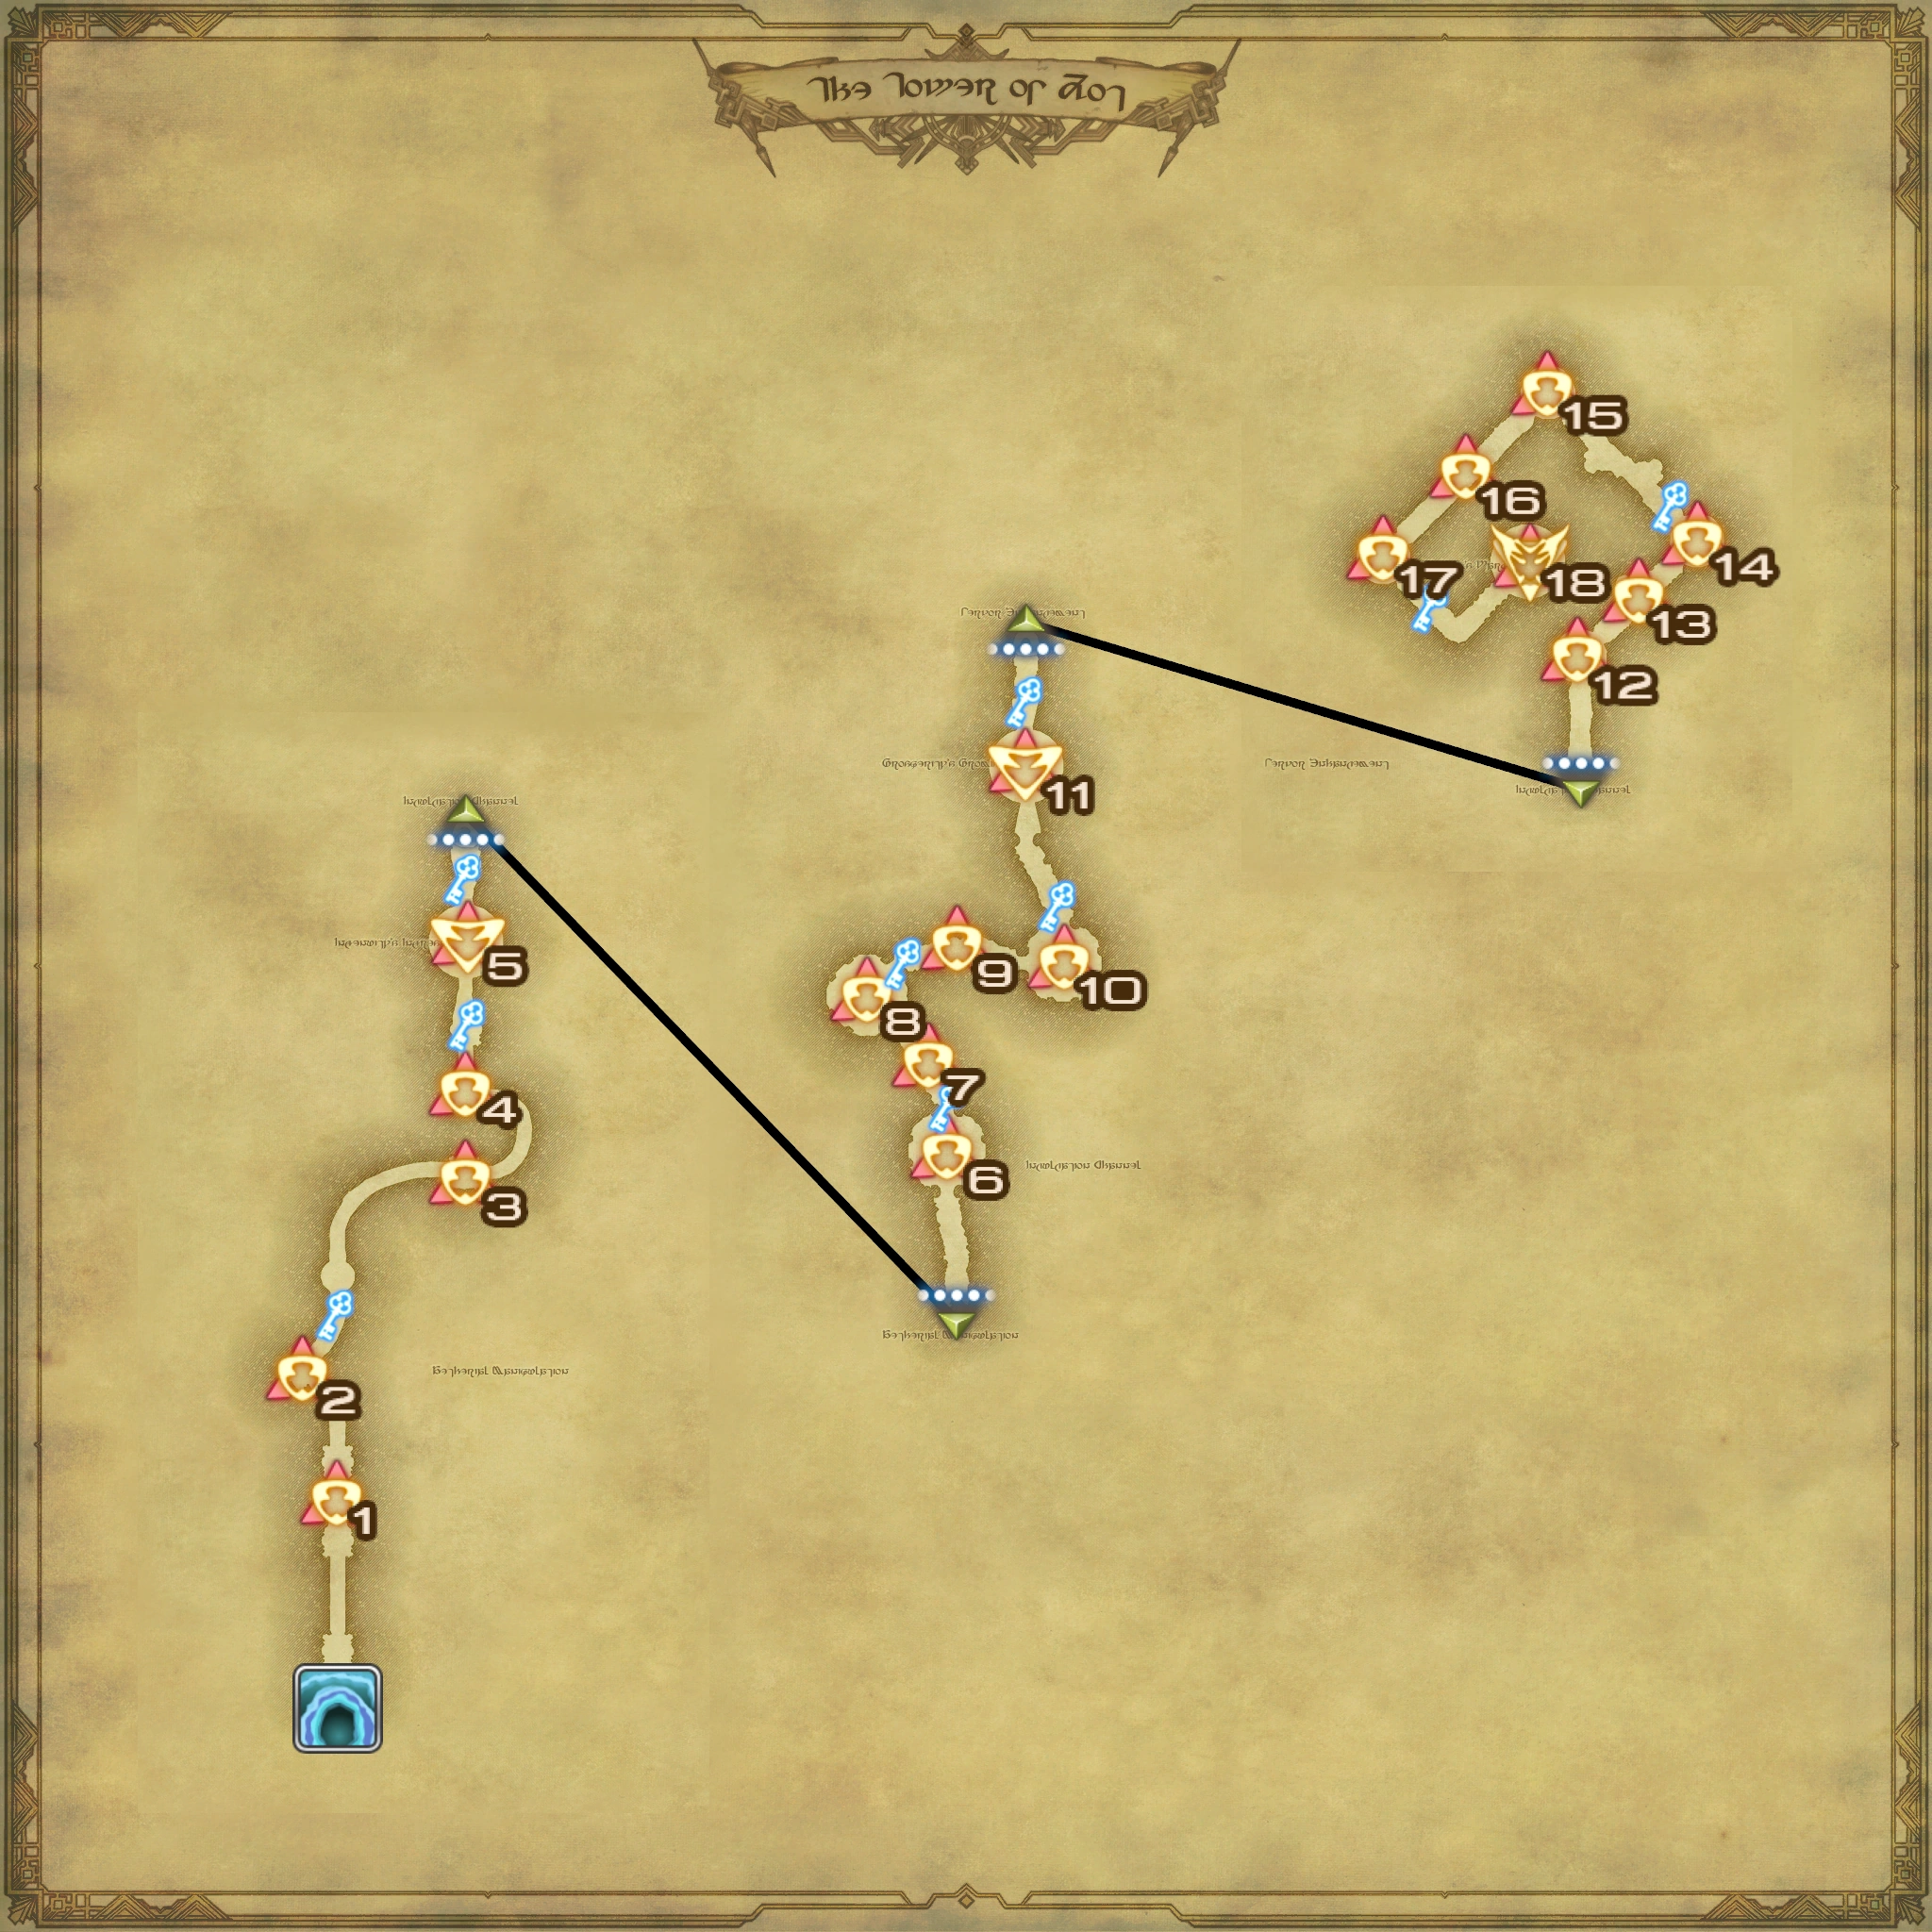
Encounter locations.
| # | Formation | Notes |
|---|---|---|
| Tower Base - Aetherial Manipulation | ||
| 1 | Tempered Imperial (lancer) x2 Tempered Imperial (gladiator) |
Assisted by G'raha Tia, Krile, Urianger, and Y'shtola |
| 2 | Zot Armored Fiend | Progress barred until all enemies are defeated Assisted by G'raha, Krile, Urianger, and Y'shtola |
| 3 | Zot Sky Armor x2 Tempered Imperial (gladiator) |
|
| 4 | Zot Armored Fiend | Progress barred until all enemies are defeated |
| Tower Base - Ingenuity's Ingress | ||
| 5 | Minduruva | Boss |
| Tower Climb - Inculcation Channel | ||
| 6 | Tempered Imperial (mutated) x4 | Progress barred until all enemies are defeated |
| 7 | Zot Umbril x2 | |
| 8 | Zot Death Claw x2 Zot Hypertuned |
Progress barred until all enemies are defeated Treasure coffer 1 found here |
| 9 | Zot Umbril x3 | |
| 10 | Tempered Imperial (mutated) x3 Zot Hypertuned |
Progress barred until all enemies are defeated Treasure coffer 2 found here |
| Tower Climb - Prosperity's Promise | ||
| 11 | Sanduruva | Boss |
| Tower Top - Fervor Enhancement | ||
| 12 | Zot Predator x3 | |
| 13 | Zot Roader | Patrols between encounters 12 and 14 Treasure coffer 3 found here |
| 14 | Zot Gunship x2 | Progress barred until all enemies are defeated Treasure coffer 4 found between encounters 14 and 15 |
| 15 | Mark II Zot Colossus x2 | |
| 16 | Zot Roader | Patrols between encounters 15 and 17 |
| 17 | Mark II Zot Colossus x2 Zot Armored Weapon |
Progress barred until all enemies are defeated |
| Tower Top - Wisdom's Ward | ||
| 18 | Cinduruva Minduruva Sanduruva |
Boss |
Treasure[]
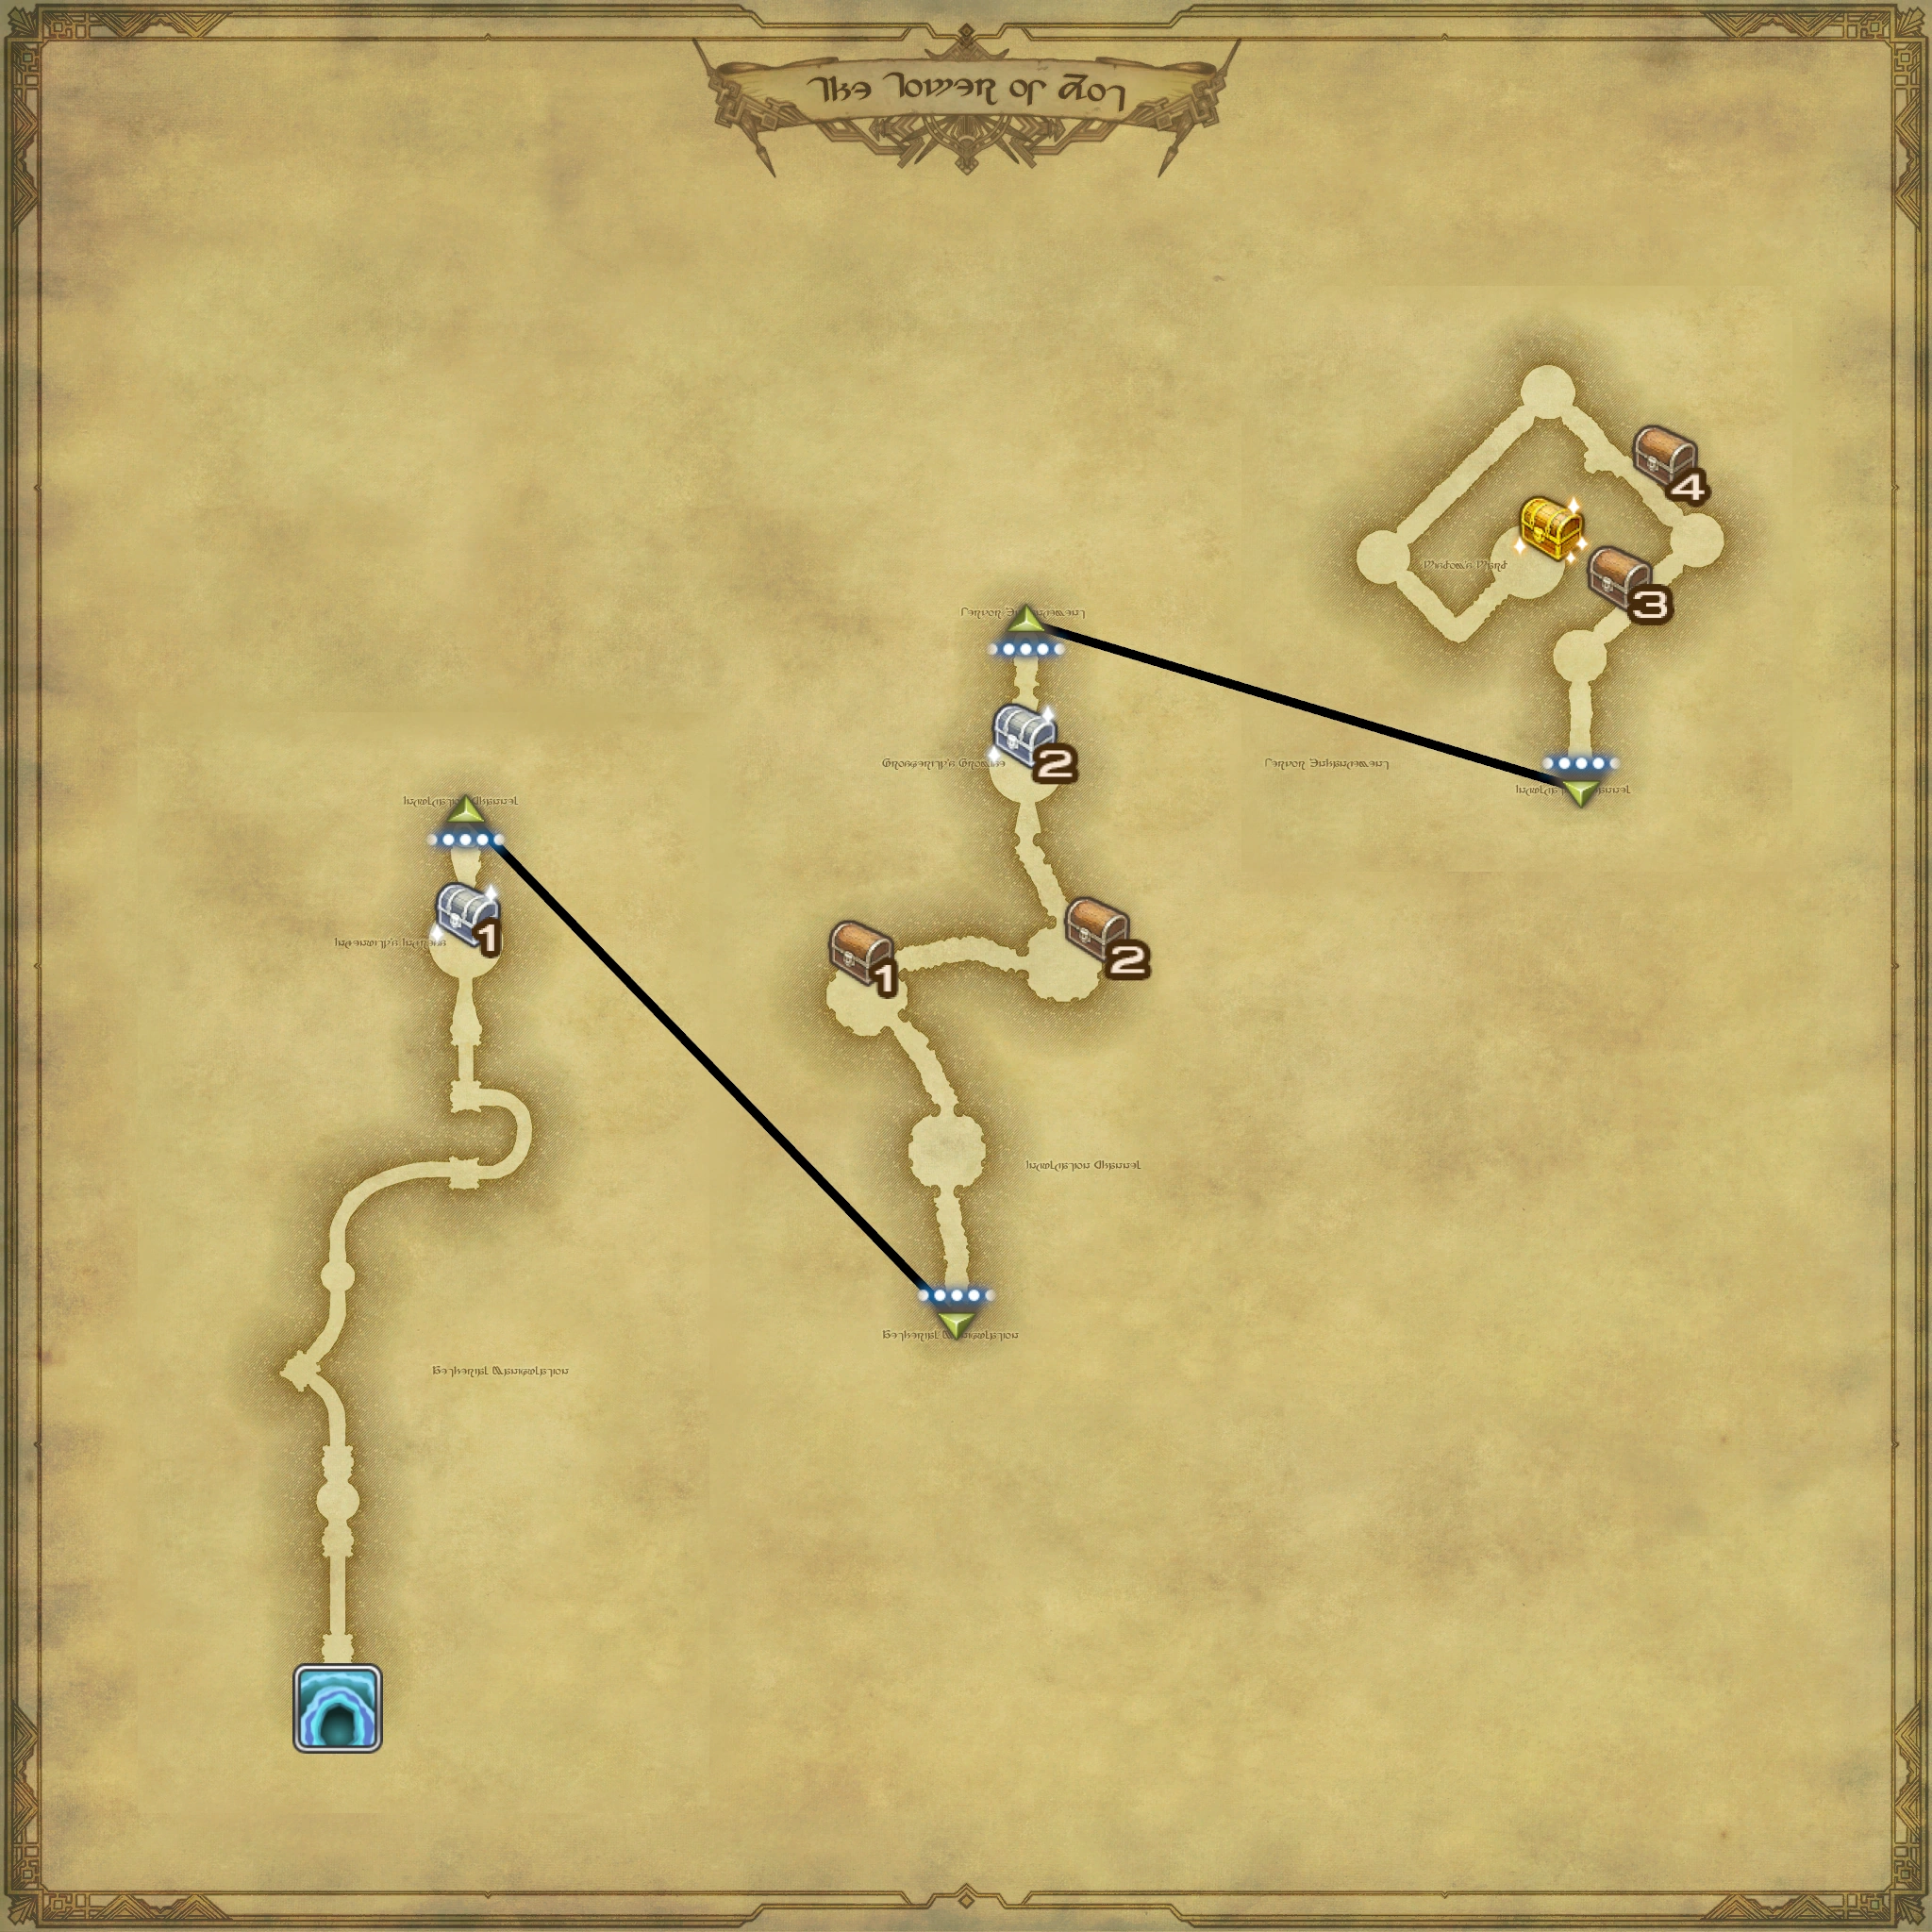

Treasure coffer locations.
Each party member is guaranteed to receive one of the below weapons or pieces of armor useable by their current discipline upon completion of the duty, in addition to any other items received. Coffers will only drop one piece of equipment when using the Trust System.
| Source | Item | |
|---|---|---|
Tower Base - Ingenuity's Ingress |
Guaranteed one armor from the following:
Guaranteed one accessory from the following:
| |
Tower Climb - Inculcation channel |
Chance for one armor from the following:
Guaranteed one accessory from the following:
| |
Tower Climb - Inculcation channel |
Chance for one armor from the following:
Guaranteed one accessory from the following:
| |
Tower Climb - Prosperity's Promise |
Guaranteed one armor from the following:
Guaranteed one accessory from the following:
| |
Tower Top - Fervor Enhancement |
Chance for one armor from the following:
Guaranteed one accessory from the following:
| |
Tower Top - Fervor Enhancement |
Chance for one weapon or shield from the following:
Guaranteed one accessory from the following:
| |
Tower Top - Wisdom's Ward |
Guaranteed one weapon or shield from the following:
Guaranteed one armor from the following:
Chance for each of the following: | |
Musical themes[]
"Tower of Zot (Endwalker)", a rearrangement of the theme from Final Fantasy IV, plays at all times in the dungeon except for boss battles, with its orchestrion roll a potential drop from the final battle. "On Blade's Edge" plays for the first two battles against Minduruva and Sanduruva, while "Finality" plays during the final battle against all three Magus Sisters.
Behind the scenes[]
The Tower of Zot is based on the location of the same name from Final Fantasy IV, though as an unrevisitable location in its original game, it was never shown on the world map and the nature of its origin and construction went unexplained. Matsya explains that the name "Zot" means "house of divinities" in the old tongue, and the tower was named as such due to its fiends resembling Thavnairian divinities.[1]
The Magus Sisters originated in Final Fantasy IV as a boss fight in the Tower of Zot, and reprise their role as the tower's guardians using their Delta Attack stratagem when all three sisters are present.
Gallery[]
")
")
")
Notes[]
- ↑ Chance to drop for each individual party member that has completed the quest Triple Triad Trial.