Eorzea was destroyed by a force of unimaginable power raining down from the sky. It is the dawn of a new age!

A botanist choosing the depth.
Gathering is a gameplay element in original Final Fantasy XIV which allows the player to acquire items to be used in Synthesis. It is the primary activity related to the Disciples of the Land.
Overview[]
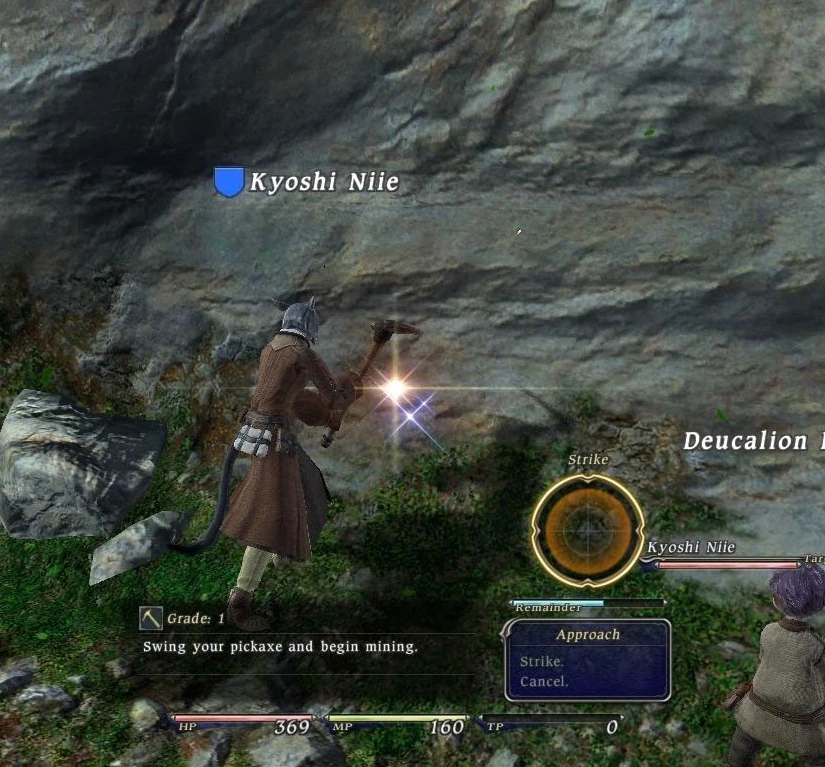 Each discipline has two resource types they can explore, requiring the use of a main hand tool for one type and an off-hand, secondary tool for the other. Once an appropriate node is found, players can either click on it, or select the option from the micro menu or the main menu.
When gathering from their main resource type, each discipline has to choose their desired depth and complete a hot-and-cold minigame to determine success or failure. While the window layout is slightly different, the minigame is nearly the same for all of them; a small selection moves around the window and the player must press confirm on the point he wants to hit, and a message will say if the attempt hit something or not. If not, the message will say if the attempt was closer/farther to the item than the previous one. Players can try as many times as they want until their "remainder" bar is depleted, and the rate of depletion is based on player stats, level, node grade and item rarity.
Once a gathering attempt ends, players are given the chance to try again on the same node for a certain number of times based on their level and stats, or until the node is depleted, in which case the character ceases gathering and can move around again. Secondary resource nodes work in the same way but skip the minigame entirely, instead relying in random chance to determine success or failure.
Each discipline learns certain abilities that affect gathering, ranging from increasing the number of shards obtained to granting bonus experience on successful attempts. Those abilities only need to be set, and may activate at random during main hand gathering with no cost or cooldown. Once an ability is activated, it remains active until the player uses all remaining tries on the node. Each discipline also learns abilities that can be used to track nodes around the zone and sneaking around enemies, which are placed on the regular action palette.
Gathering is cancelled if the player is hit by an enemy. Players cannot trade, teleport, join or leave parties while gathering. Gathering is the only way to obtain dyes and materia catalysts, as well as some rare materials and most types of fish.
Each possible gathering material has a certain depth sweet spot that vastly increase the chance of obtaining the desired material.
Resource Types[]
| Class | Main | Sub |
|---|---|---|
| Miner | Mineral Deposits (mining) | Rocky Outcrops (quarrying) |
| Fisher | Schools of Fish (fishing) | Shallow Waters (spearfishing) |
| Botanist | Mature Trees (logging) | Lush Vegetation (harvesting) |
Fishing[]


The Fishing minigame. The blue dot represents the previous attempt.
Fishing works slightly different from the other gathering activities, as it can be done on any body of water instead of specific places, and can be done even inside towns or the boat between Limsa Lominsa and Ul'dah. However, certain fish types can only be found on appropriated areas identified by a shiny glow similar to the other resource nodes, known as schools of fish. When fishing outside of a school of fish, players can fish indefinitely at the same location.
Items obtained when fishing vary not only by chosen depth, but also by the lure used, and lures can be lost.
Gathering Node Grades[]
There are 5 different node grades, distributed amongst all areas of Eorzea. Within one area, all resource nodes and bodies of water are of the same grade and provide the same loot, with the exception of guildleves nodes, that have a slightly different loot table than the rest of the area. Mor Dhona has no gathering nodes.
Grade 1 Areas[]
- Bentbranch (The Black Shroud)
- Bearded Rock (La Noscea)
- Black Brush (Thanalan)
Grade 2 Areas[]
- Emerald Moss (The Black Shroud)
- Skull Valley (La Noscea)
- Drybone (Thanalan)
Grade 3 Areas[]
- Tranquil Paths (The Black Shroud)
- Bloodshore (La Noscea)
- Horizon's Edge (Thanalan)
Grade 4 Areas[]
- Humblehearth (The Black Shroud)
- Cedarwood (La Noscea)
- Nophica's Wells (Thanalan)
- Camp Glory (Coerthas)
Grade 5 Areas[]
- Nine Ivies (The Black Shroud)
- Treespeak (The Black Shroud)
- Bald Knoll (La Noscea)
- Iron Lake (La Noscea)
- Nanawa Mines (Thanalan)
- Broken Water (Thanalan)
- Halatali (Thanalan)
- Camp Dragonhead (Coerthas)
Gathering Stats[]
| Stat | Effect |
|---|---|
| Gathering | Reduces the depletion rate of the Remainder gauge. |
| Perception | Increases a player's chance to find higher-quality items. |
| Output | Reduces the amount of time a fisher must wait for a bite. |
Additionally, each class receives a bonus from two main stats that increase the ease of gathering and finding items:
| Class | Stat bonus |
|---|---|
| Fisher | Dexterity and Piety |
| Miner | Vitality and Mind |
| Botanist | Strength and Intelligence |