(Added music sample) Tag: Visual edit |
|||
| (11 intermediate revisions by 2 users not shown) | |||
| Line 7: | Line 7: | ||
| ver 1 = Normal |
| ver 1 = Normal |
||
| ver 2 = Savage |
| ver 2 = Savage |
||
| − | | image =FFXIV Iconoclasm.png |
+ | | image =FFXIV Iconoclasm Duty Finder.png |
| + | | image 2 =FFXIV Iconoclasm Savage Duty Finder.png |
||
| location = |
| location = |
||
| level = 80 |
| level = 80 |
||
| Line 23: | Line 24: | ||
==Story== |
==Story== |
||
| − | {{Quote|As you and your comrades prepare to restore the last of the six elements, Gaia's mind is suddenly seized in the grip of an unknown and malevolent force. Dark aether swirls around her, and slowly coalesces into an ominous glyph, hovering high above Eden. From nowhere, a vast swarm of sin eaters circles around it, as moths to a flame, and a voice that emanates from within the core claims to hold dominion over these creatures of Light. While its true purpose remains unknown, one thing is abundantly clear: it must be vanquished before it is allowed to place your mission in jeopardy.}} |
+ | {{Quote|As you and your comrades prepare to restore the last of the six elements, Gaia's mind is suddenly seized in the grip of an unknown and malevolent force. Dark aether swirls around her, and slowly coalesces into an ominous glyph, hovering high above Eden. From nowhere, a vast swarm of sin eaters circles around it, as moths to a flame, and a voice that emanates from within the core claims to hold dominion over these creatures of Light. While its true purpose remains unknown, one thing is abundantly clear: it must be vanquished before it is allowed to place your mission in jeopardy.|In-game description}} |
==Progression== |
==Progression== |
||
===Normal=== |
===Normal=== |
||
{{infobox duty boss FFXIV |
{{infobox duty boss FFXIV |
||
| − | |name=Idol of Darkness |
+ | |name=The Idol of Darkness |
| japanese= |
| japanese= |
||
| romaji = |
| romaji = |
||
| Line 45: | Line 46: | ||
|hp= |
|hp= |
||
|enrage= |
|enrage= |
||
| − | |abilities=Empty Wave, Unshadowed |
+ | |abilities=Empty Wave, Unshadowed Stake, Silver Stake, Words of Motion, Betwixt Worlds, Away with Thee, Silver Sledge, False Moonlight, False Midnight, Silver Scourge, Empty Flood, Unjoined Aspect, Words of Unity, Words of Night, False Dawn, Silver Spear, Crusade, Words of Fervor, Threefold Grace}} |
The battle against the Idol of Darkness takes place on a square platform, which it is possible to fall off of. At the start of the fight, the Idol of Darkness is a cloud of sin eaters at the north end of the platform, which is omnidirectional in the sense that positionals automatically succeed. The platform is divided into four rows and four columns, forming 16 tiles in total. In what follows, we will always refer to the tiles with the following scheme: |
The battle against the Idol of Darkness takes place on a square platform, which it is possible to fall off of. At the start of the fight, the Idol of Darkness is a cloud of sin eaters at the north end of the platform, which is omnidirectional in the sense that positionals automatically succeed. The platform is divided into four rows and four columns, forming 16 tiles in total. In what follows, we will always refer to the tiles with the following scheme: |
||
*The area where the Idol of Darkness is will always be referred to as "north". |
*The area where the Idol of Darkness is will always be referred to as "north". |
||
| Line 51: | Line 52: | ||
*The rows will be indexed, north to south, as 1, 2, 3, and 4. |
*The rows will be indexed, north to south, as 1, 2, 3, and 4. |
||
*The tiles will be referred to by their column index and then their row index. For example, the northwest-most tile will be referred to as A1. |
*The tiles will be referred to by their column index and then their row index. For example, the northwest-most tile will be referred to as A1. |
||
| + | |||
| + | Throughout the fight, it will be useful to assume that the group has been divided up into two light parties, "west" and "east". Each light party should have one tank, one healer, and two DPS. |
||
A mechanic which is used throughout the fight, and is worth mentioning right at the beginning of the discussion, is '''Away with Thee'''. Away with Thee inflicts each party member with one randomly selected debuff: '''Forward with Thee''', '''Back with Thee''', '''Left with Thee''', or '''Right with Thee'''. This debuff places a portal under the party member's feet and another in front of, behind, to the left of, or to the right of, the party member respectively. As the party member moves, their portals will move to preserve this relation. When the debuff expires, they will be teleported through the portal. To avoid being teleported off the platform, or into certain death, the party member must be positioned correctly and facing a certain direction whenever Away with Thee is about to expire. A good practice is to stop moving and attacking one or two GCDs (2.5-5 seconds) before Away with Thee expires. Another trick is to use the setting which causes the player character to face their target when using a GCD ability and use this to turn in the desired direction, though as the boss always remains at the north end of the platform, this will not always be helpful. |
A mechanic which is used throughout the fight, and is worth mentioning right at the beginning of the discussion, is '''Away with Thee'''. Away with Thee inflicts each party member with one randomly selected debuff: '''Forward with Thee''', '''Back with Thee''', '''Left with Thee''', or '''Right with Thee'''. This debuff places a portal under the party member's feet and another in front of, behind, to the left of, or to the right of, the party member respectively. As the party member moves, their portals will move to preserve this relation. When the debuff expires, they will be teleported through the portal. To avoid being teleported off the platform, or into certain death, the party member must be positioned correctly and facing a certain direction whenever Away with Thee is about to expire. A good practice is to stop moving and attacking one or two GCDs (2.5-5 seconds) before Away with Thee expires. Another trick is to use the setting which causes the player character to face their target when using a GCD ability and use this to turn in the desired direction, though as the boss always remains at the north end of the platform, this will not always be helpful. |
||
====Introduction==== |
====Introduction==== |
||
| + | [[File:Iconoclasm from FFXIV prebattle screenshot.png|thumb|left|The Idol of Darkness before battle. Notice the waymark positions: the numerical waymarks are used for Idolatry, and the alphabetical waymarks are used for Words of Entrapment.]] |
||
| − | The boss begins by casting '''Empty Wave''', dealing heavy raid-wide damage. It follows by '''Unshadowed |
+ | The boss begins by casting '''Empty Wave''', dealing heavy raid-wide damage. It follows by '''Unshadowed Stake''', a tank buster which targets a random tank, regardless of who is top enmity. The first hit of Unshadowed Stake is a linear area-of-effect which inflicts Magic Vulnerability Up; the second hit, known as '''Silver Stake''', will instantly kill anyone with Magic Vulnerability Up, but can be shared with the other tank or the party; the person in the stack closest to the boss will take the most damage. |
| + | [[File:Iconoclasm from FFXIV Unshadowed Stake screenshot.png|thumb|The paladin uses Hallowed Ground to survive Unshadowed Stake.]] |
||
| − | Therefore, the tank who gets a marker for Unshadowed |
+ | Therefore, the tank who gets a marker for Unshadowed Stake must get away from the party, and then either go invulnerable to avoid both hits, or, if invulnerabilities are not available, the untargeted tank must stand in front of the targeted tank for the second hit. If the latter strategy is used, then either the tanks need to use heavy mitigation abilities or stack with the party for the second hit. However, Unshadowed Stake is only used three times throughout the fight, so it may be possible to use invulnerabilities on all three uses, depending on luck. |
====Words of Motion==== |
====Words of Motion==== |
||
| Line 63: | Line 68: | ||
The first more involved mechanic of the fight begins when the boss casts '''Words of Motion''', spawning red and blue portals in tiles B4 and C4, and two untargetable clouds of sin eaters at the north edge of platform, either in columns A and C, B and D, A and B, or C and D. In particular, exactly two of columns B and C and will have sin eaters. Clouds of sin eaters then spawn in the other two columns, before the first two clouds dash through their columns, and the last two clouds dash through their columns. Being hit with a dashing cloud of sin eaters deals heavy damage and inflicts a stack of Vulnerability Up, and must be avoided. So the party must move to the columns where the last two clouds spawn, and then to the columns where the first two spawned as soon as the first two are done dashing. The player should whether the first clouds ended up in the red portal or in the blue portal. We will refer to these portals as "initial" portals. |
The first more involved mechanic of the fight begins when the boss casts '''Words of Motion''', spawning red and blue portals in tiles B4 and C4, and two untargetable clouds of sin eaters at the north edge of platform, either in columns A and C, B and D, A and B, or C and D. In particular, exactly two of columns B and C and will have sin eaters. Clouds of sin eaters then spawn in the other two columns, before the first two clouds dash through their columns, and the last two clouds dash through their columns. Being hit with a dashing cloud of sin eaters deals heavy damage and inflicts a stack of Vulnerability Up, and must be avoided. So the party must move to the columns where the last two clouds spawn, and then to the columns where the first two spawned as soon as the first two are done dashing. The player should whether the first clouds ended up in the red portal or in the blue portal. We will refer to these portals as "initial" portals. |
||
| + | [[File:Iconoclasm from FFXIV Words of Motion reposition screenshot.png|thumb|left|The party positions to survive Words of Motion. They know that the blue portals are about to unleash sin eaters, so they stand in front of only red portals.]] |
||
| + | [[File:Iconoclasm from FFXIV Words of Motion screenshot.png|thumb|The red portal unleashes sin eaters.]] |
||
For example, if sin eaters spawned first in A and C, and the red portal was at B4, then the blue portal will be at C4, and the player should start in either B or D, and then move to A or C as soon as the first clouds are done dashing. The player should note that the first cloud went into the blue portal (so the second cloud went into the red portal). |
For example, if sin eaters spawned first in A and C, and the red portal was at B4, then the blue portal will be at C4, and the player should start in either B or D, and then move to A or C as soon as the first clouds are done dashing. The player should note that the first cloud went into the blue portal (so the second cloud went into the red portal). |
||
| Line 82: | Line 89: | ||
====Betwixt Worlds==== |
====Betwixt Worlds==== |
||
| + | [[File:Iconoclasm from FFXIV Betwixt Worlds screenshot.png|thumb|The Idol of Darkness casts Betwixt Worlds, splitting the platform in three.]] |
||
The Idol of Darkness casts '''Betwixt Worlds''', targeting the lines between columns A and B, and between columns C and D, for an area-of-effect spell that is fatal and must be avoided. The spell also places walls on those lines that can only be crossed using Away with Thee, and causes a knockback that randomly moves players left or right, cannot be mitigated, and will possibly kill anyone not in between the two walls. So the player must be in the center area of the platform, so they are knocked into one of the walls. (If someone is teleported into a wall by Away with Thee, they will immediately die.) |
The Idol of Darkness casts '''Betwixt Worlds''', targeting the lines between columns A and B, and between columns C and D, for an area-of-effect spell that is fatal and must be avoided. The spell also places walls on those lines that can only be crossed using Away with Thee, and causes a knockback that randomly moves players left or right, cannot be mitigated, and will possibly kill anyone not in between the two walls. So the player must be in the center area of the platform, so they are knocked into one of the walls. (If someone is teleported into a wall by Away with Thee, they will immediately die.) |
||
| Line 91: | Line 99: | ||
*The DPS tethered to the clouds at A1 and D1 should use Away with Thee to teleport to their respective square, and then run to the corner of that square, so that their cloud just barely clips the platform as it dashes. |
*The DPS tethered to the clouds at A1 and D1 should use Away with Thee to teleport to their respective square, and then run to the corner of that square, so that their cloud just barely clips the platform as it dashes. |
||
*The DPS tethered to the clouds at B1 and C1 should use Away with Thee to teleport to a tile in their respective column, so that their clouds dash in a straight line along that column. |
*The DPS tethered to the clouds at B1 and C1 should use Away with Thee to teleport to a tile in their respective column, so that their clouds dash in a straight line along that column. |
||
| + | *The tank and healer in the west light party should teleport to A3. |
||
| ⚫ | |||
| + | *The tank and healer in the east light party should teleport to D3. |
||
| ⚫ | |||
Care must be taken to avoid being teleported off the platform or into the wall. If a healer or DPS dies during teleportation, their marker will be transferred to a random party member, which will very likely wipe the group. |
Care must be taken to avoid being teleported off the platform or into the wall. If a healer or DPS dies during teleportation, their marker will be transferred to a random party member, which will very likely wipe the group. |
||
| + | |||
| + | The boss casts Empty Wave and Unshadowed Stake. At this point the party should again stack in the center of the platform in preparation for the next mechanic. |
||
| + | |||
| + | ====False Moonlight==== |
||
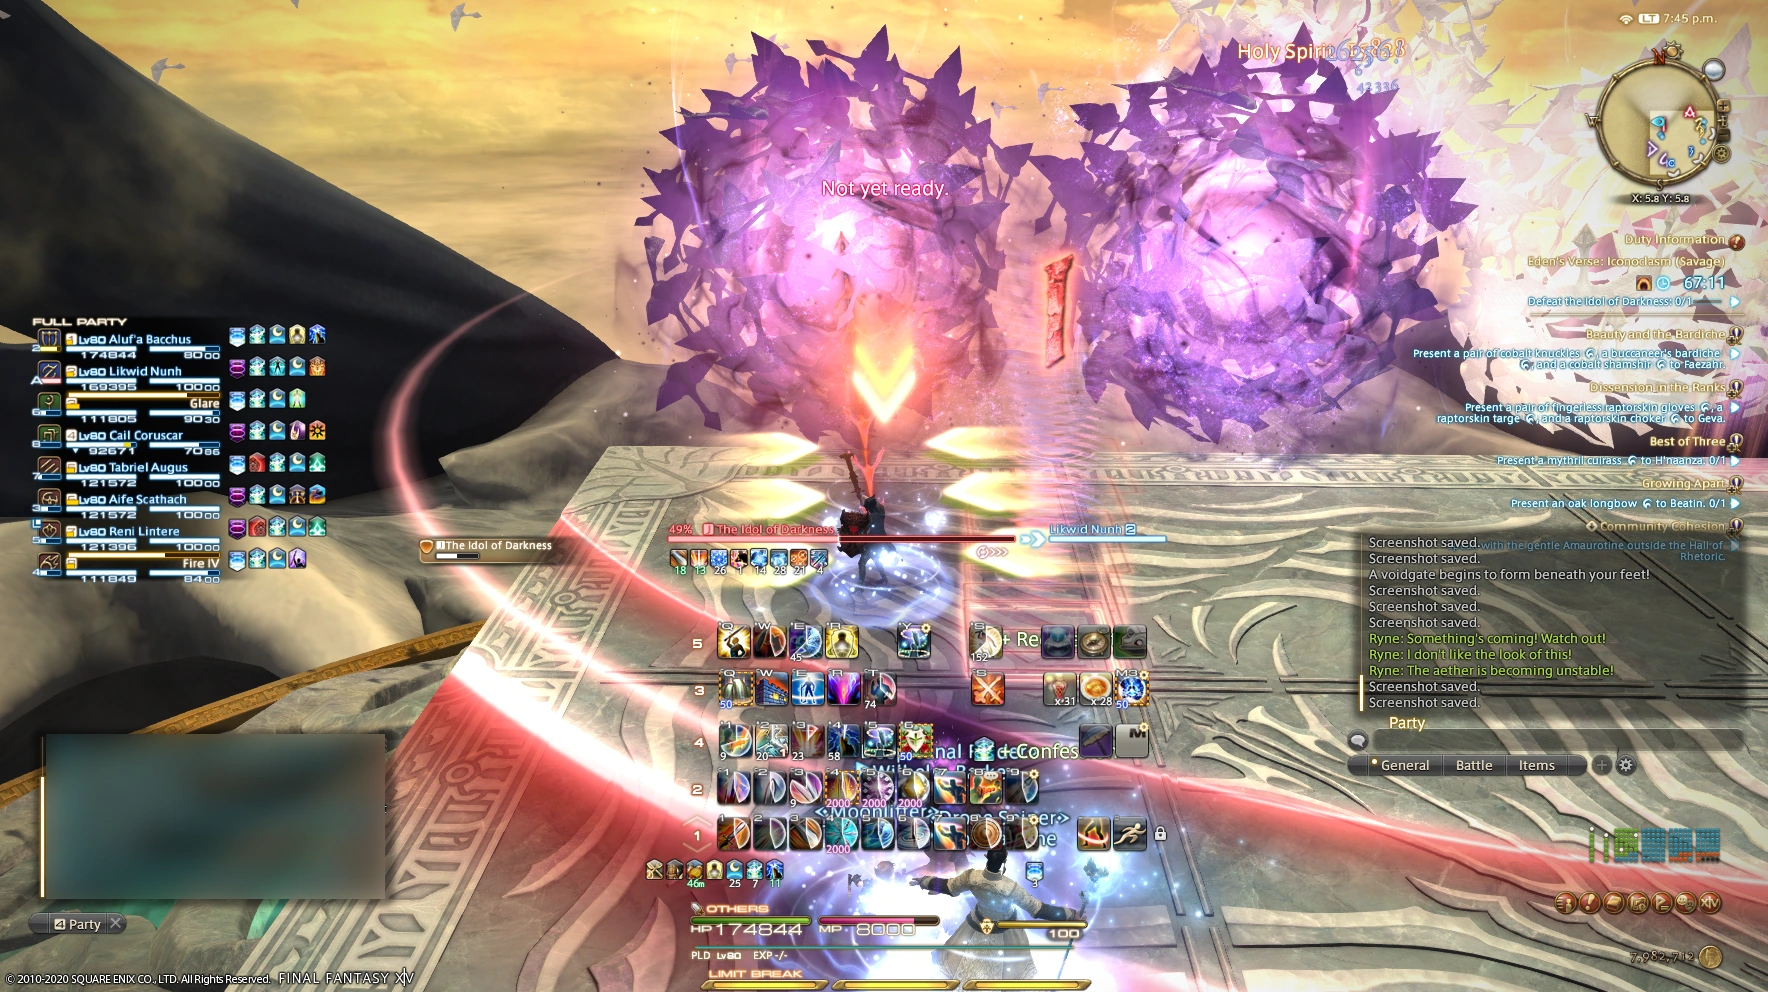
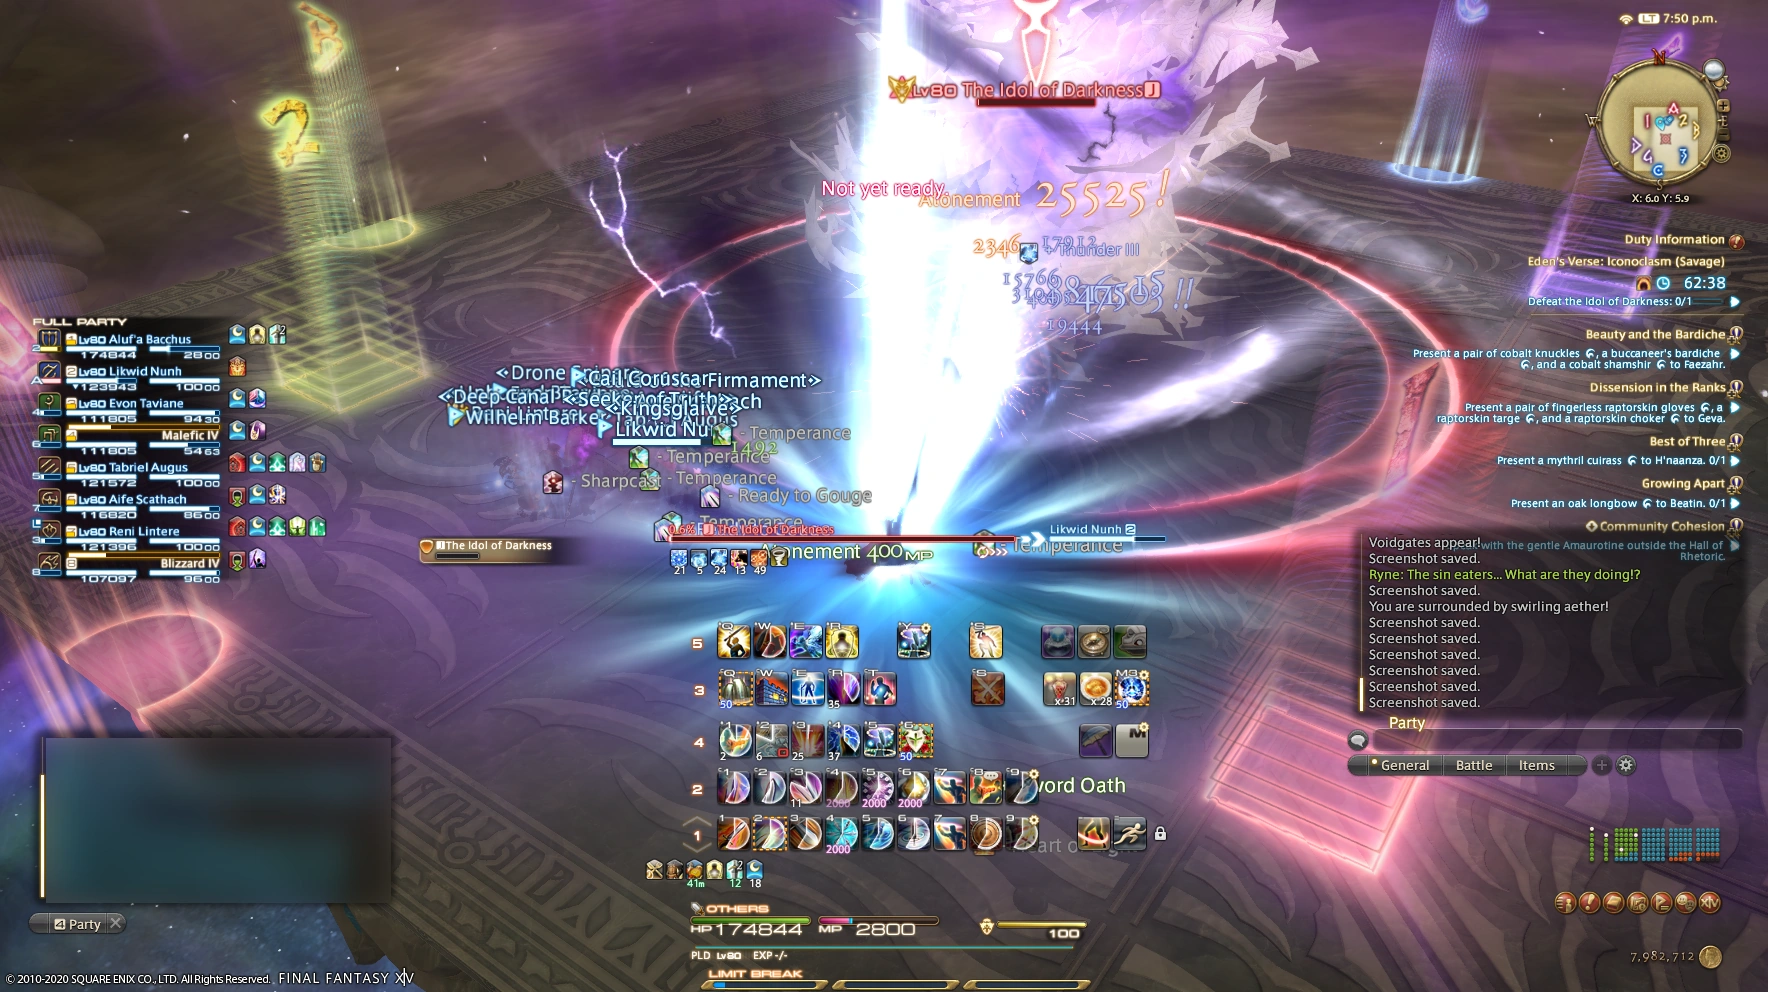
| + | The Idol of Darkness then casts '''False Moonlight''', targeting each party member for a telegraphed area-of-effect spell and spawning sin eaters at the north edge (A1, B1, C1, and D1). The sin eaters dash through columns A and D first, and then through columns B and C. At the same time, the boss casts '''Silver Scourge''', targeting each party member for splash damage that also leaves behind a circular white puddle which inflicts Vulnerability Up to anyone who stands in it. The Silver Scourges go out right before the first wave of sin eaters dash. The boss then casts '''Away with Thee''', which takes effect before the second waves of sin eaters dash. Just before Away with Thee resolves, the boss casts '''False Midnight''', which targets each of the healers and tanks for Silver Scourge and one of the DPS for a Silver Sledge that must be shared with three other players. |
||
| + | |||
| + | To survive this, the party should stack up to bait the False Moonlights all in the same place, and then spread into their light parties (so the west party moves to column B, and the east party to column C) and spread throughout their column, then move to the edge (so the west party moves to column A, and the east to column D) to avoid the first wave of sin eaters. Then the players should all teleport into columns B or C to avoid the second wave using Away with Thee, so that the DPS end up in the same place and the tanks and healers are all spread out. One standard way to deal with this mechanic is to have the DPS all end up in the center of the platform, the tanks in the north of B/C, and the healers in the south of B/C. |
||
| + | |||
| + | After False Midnight resolves, the party should again split into their west/east light parties in preparation for the add phase. The boss goes untargetable at this point. |
||
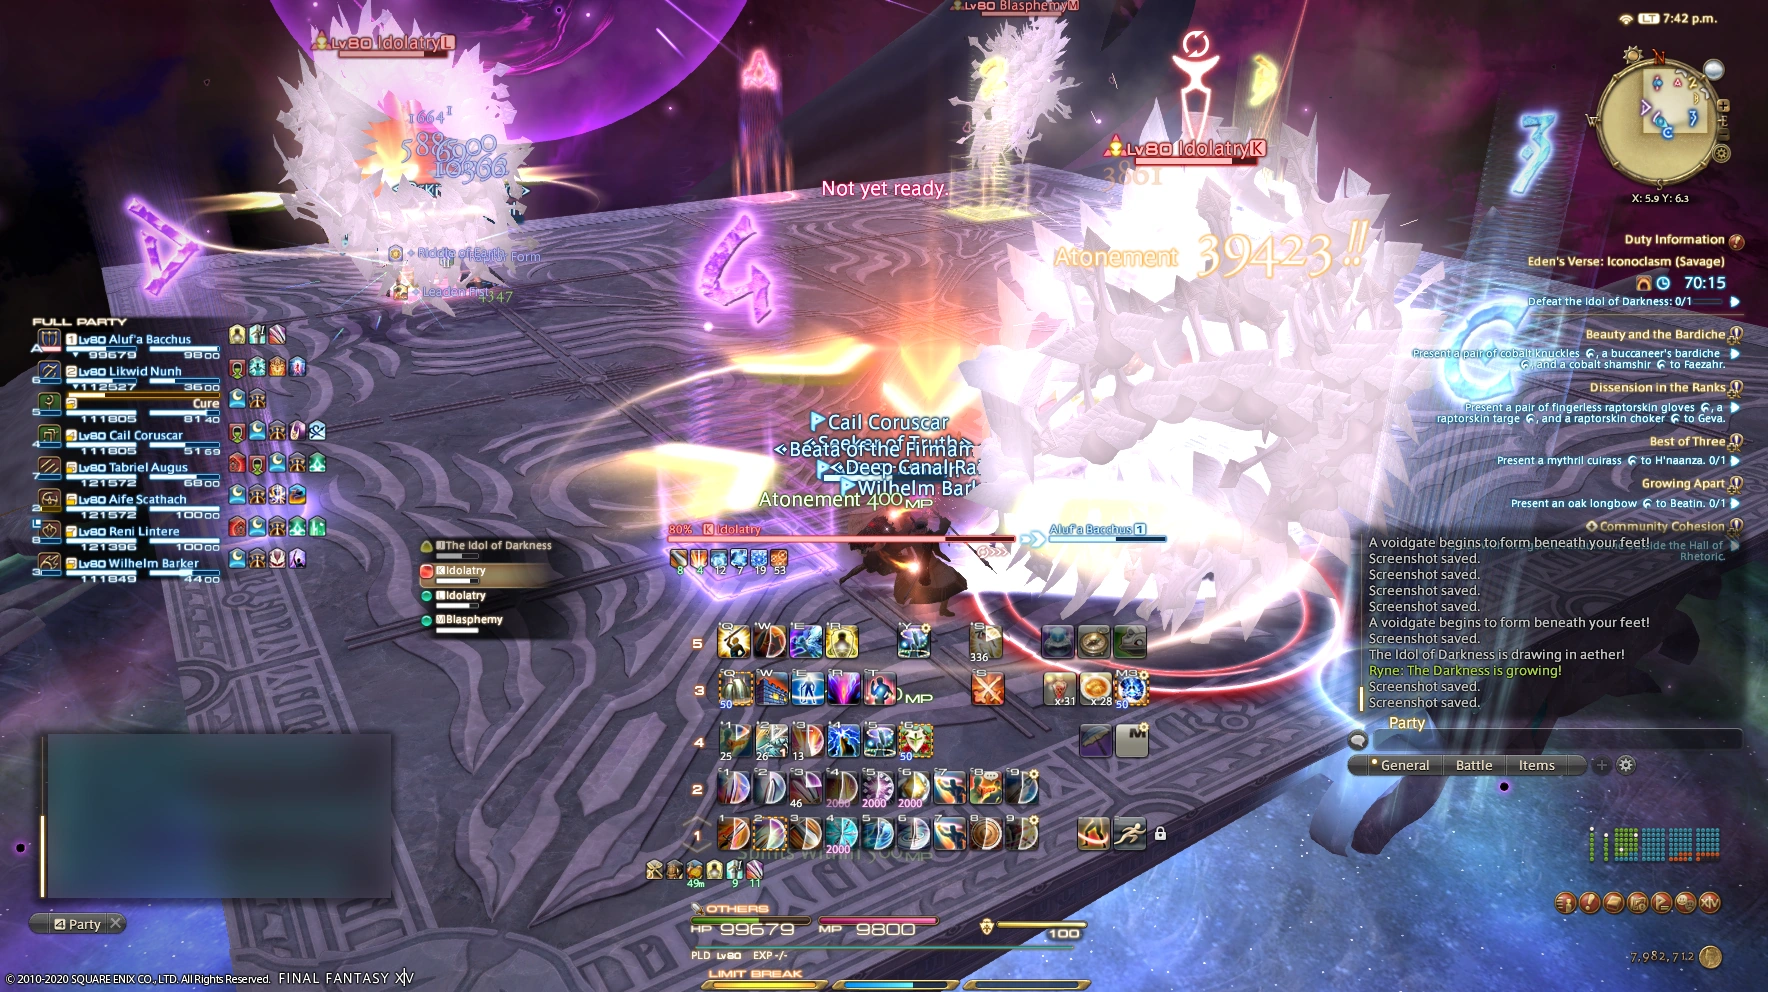
====Idolatry and Blasphemy==== |
====Idolatry and Blasphemy==== |
||
| + | [[File:Iconoclasm from FFXIV Idolatry and Blasphemy screenshot.png|thumb|The paladin pulls the Idolatry away from the Blasphemy by taking it from D2 to D4.]] |
||
| + | {{q|The Darkness is growing!|Ryne, signaling the start of this phase}} |
||
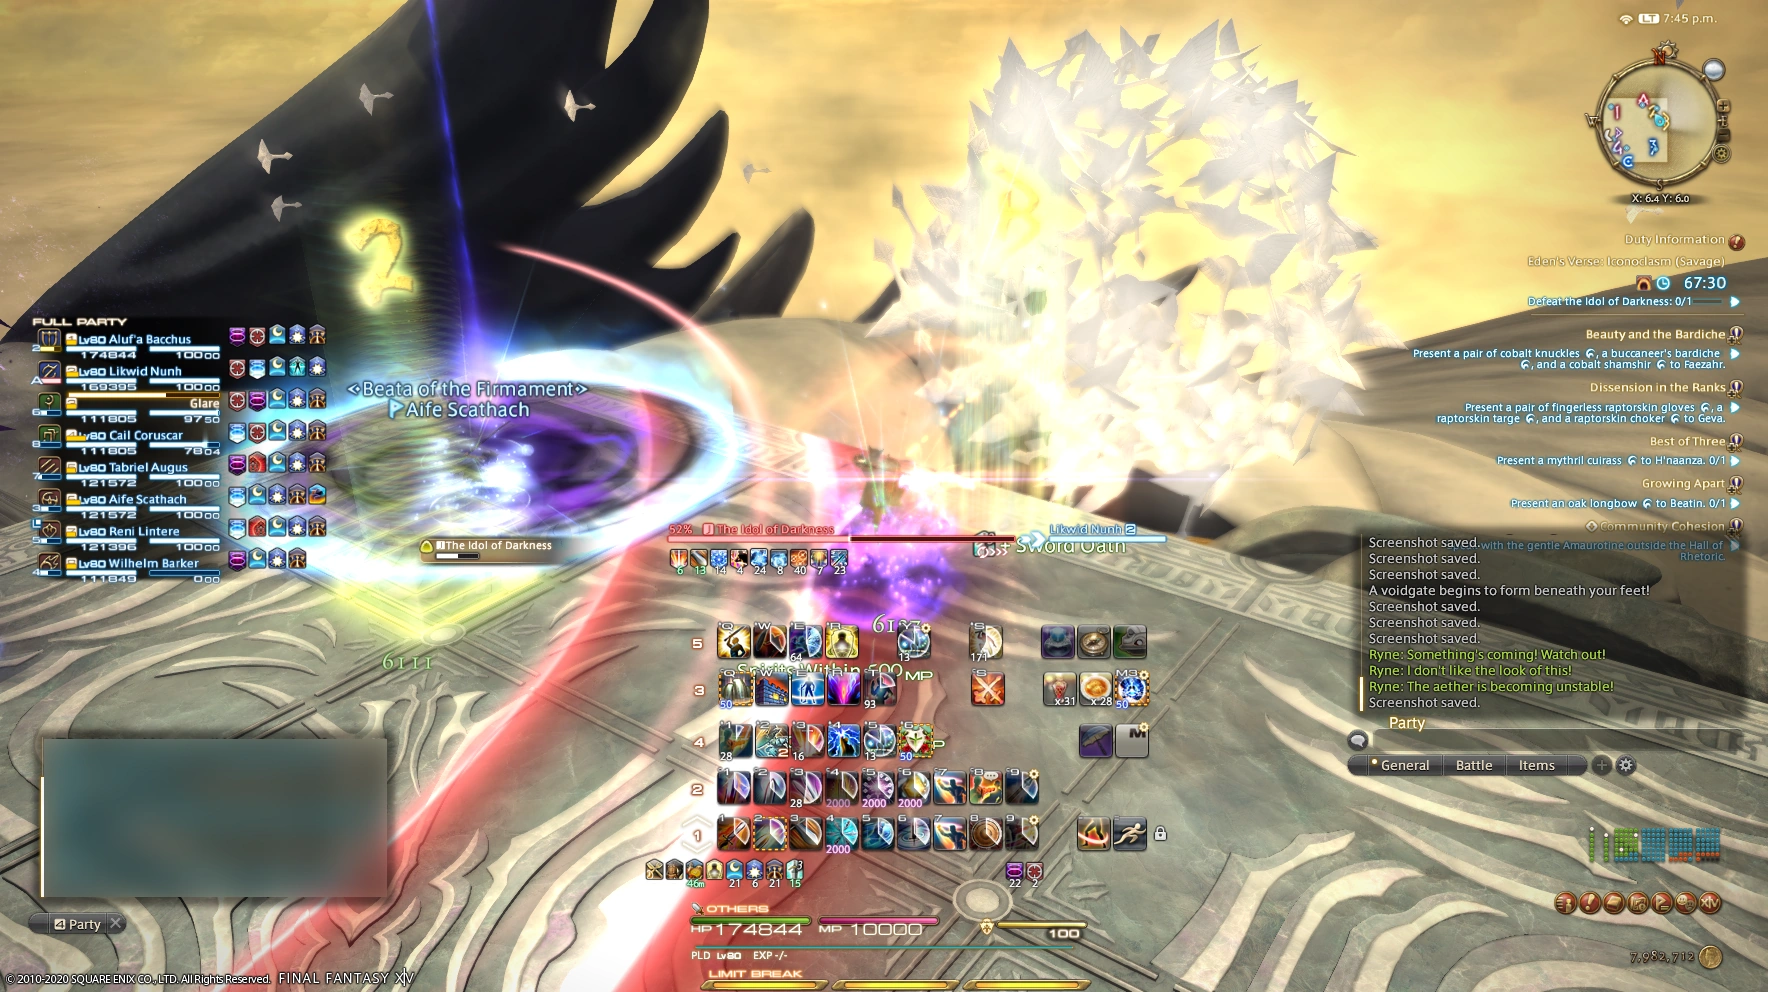
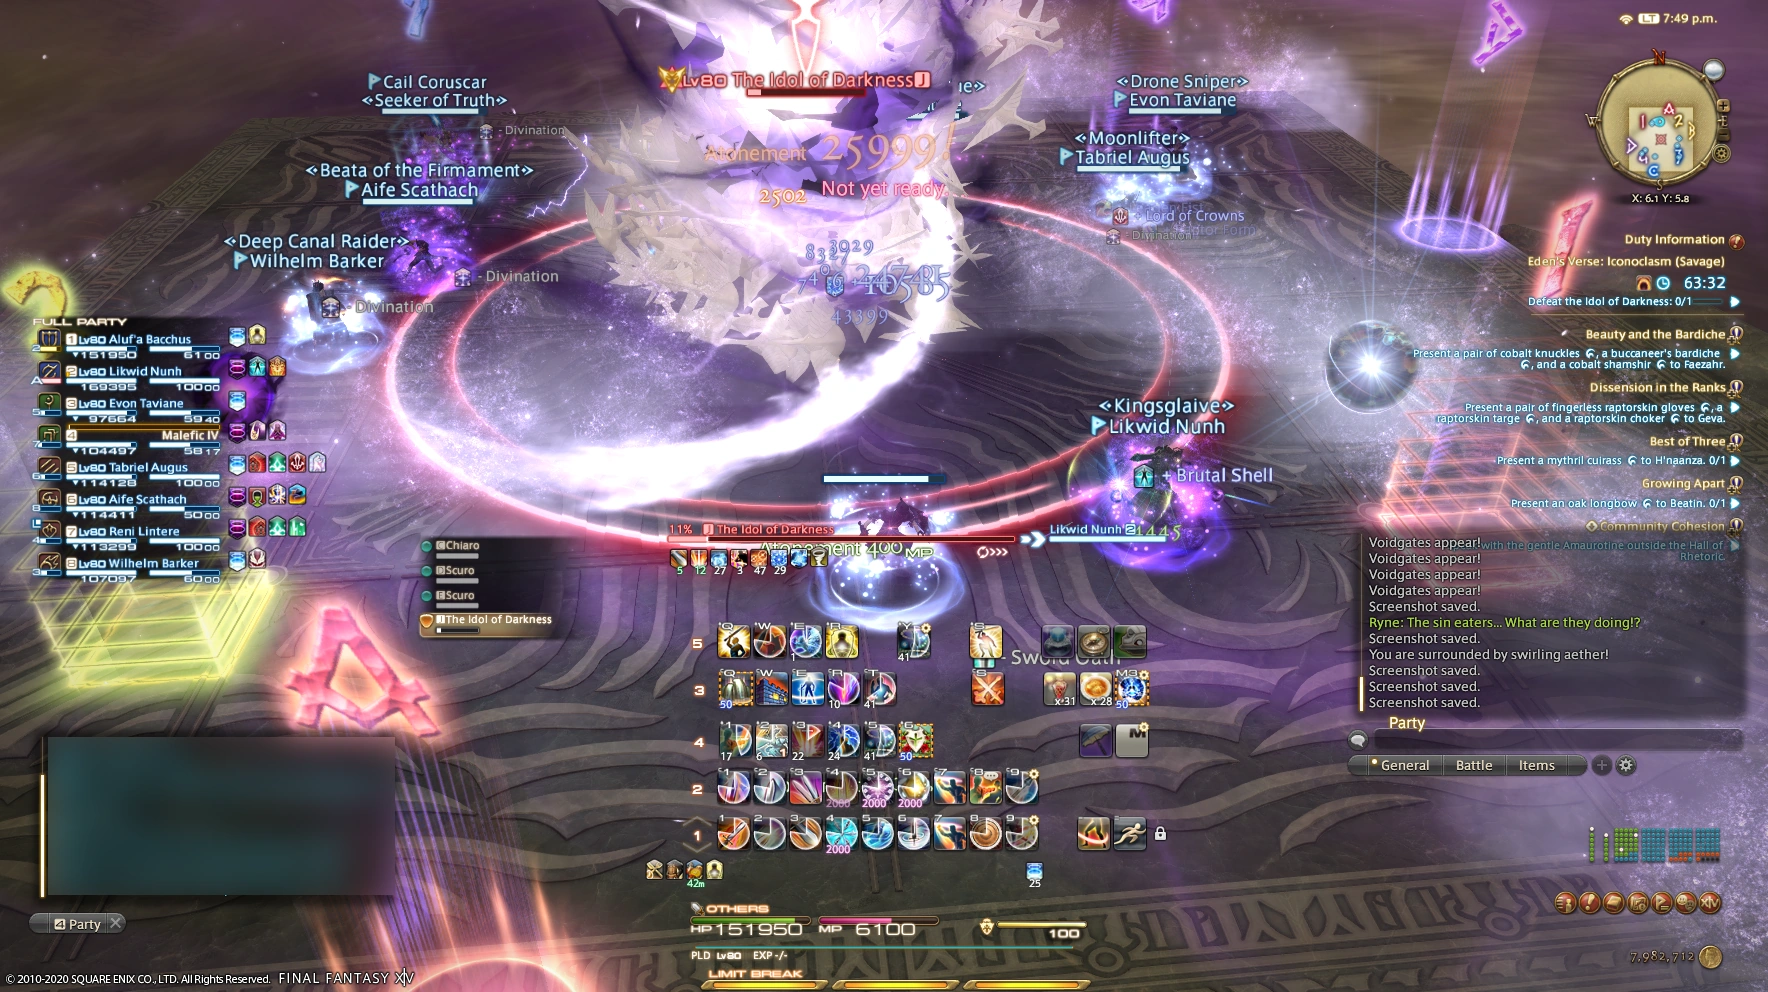
| + | At the beginning of this page, three clouds of sin eaters, which are targetable, spawn: a '''Blasphemy''' spawns between B1 and C1, and '''Idolatries''' spawn at A2 and D2. The Blasphemy ignores hatred, does not autoattack, and randomly either moves clockwise (i.e. to D1, then to D4, then to A4, then to A1, then back to D1) or counterclockwise. The Idolatries do respond to hatred and autoattack, so each should be picked up by the west or east tank. If two adds come within a tile of each other, they will tether and both gain Vulnerability Up. The DPS check in this phase is very tight, so even though this buff can be removed by separating the adds, this must be avoided even if only for a few GCDs. So, the party must identify the direction that the Blasphemy is rotating, and then the tanks must pull their Idolatries in that direction as well. |
||
| + | |||
| + | [[File:Iconoclasm from FFXIV Idolatry stack screenshot.png|thumb|The light parties each stack for Overwhelming Light. Notice the use of waymarks to help them plan for the stack, and the distance of two tiles separating the two Idolatries.]] |
||
| + | After some time rotating, the Blasphemy will cast '''Overwhelming Light''', targeting four random party members for linear area-of-effect telegraphs that must be dodged. At the same time, each Idolatry will target a healer for '''Insatiable Light''', a stack marker that must be shared with at least two other party members. So each light party must move in unison, so that they they dodge the Overwhelming Lights in the same direction and end up stacked for Insatiable Light. |
||
| + | |||
| + | The Blasphemy again casts Overwhelming Light, and the Idolatries cast '''Advent of Light''', a spell which does massive raid-wide damage, but which can and must be [[Interrupt]]ed. The adds then repeat their Overwhelming and Insatiable Light combination. |
||
| + | |||
| + | The Idol of Darkness then casts Away with Thee, while the Idolatries cast '''Strength in Numbers'''. When this happens, the sin eaters in the Idolatry will make a wheel shape, either rotating vertically or spinning in a circle on the ground. In fact, in this first cast, the Idolatry will always rotate vertically. If the Idolatry rotates vertically, then it will deal heavy damage and inflict a Vulnerability Up stack on anyone who is standing in a doughnut-shaped region around the Idolatry, but leave people standing far away or inside the hitbox untouched. If it rotates horizontally, then it will instead attack players close to its hitbox. |
||
| + | |||
| + | After dodging Strength in Numbers, the healers will again be targeted for Insatiable Light, so each light party must choose a spot that the Away with Thee cast will all teleport them to. |
||
| + | |||
| + | Some time after this, the adds will do their Overwhelming and Insatiable Light combination, but cast Strength in Numbers at the same time, so this must also be dodged. At this point, the Idolatries will begin to cast '''Explode''', which will instantly kill the party if they are not destroyed before this. |
||
| + | |||
| + | The Idolatries also cast Explode if one is destroyed before the other, so they must be killed at the same time. In particular, the ranged DPS should be prepared to attack the other light party's Idolatry if necessary. |
||
| + | |||
| + | As the Idolatries are destroyed, the Blasphemy casts '''Unearned Envy''', heavy raid-wide damage that hits six times and so must be healed through heavily. After the sixth hit, the Blasphemy will Explode; this must be avoided. |
||
| + | |||
| + | The boss will the cast '''Empty Flood''', which does massive raid-wide damage. After some time, the boss becomes targetable, beginning the next phase. |
||
====Words of Unity==== |
====Words of Unity==== |
||
| + | {{q|I don't like the look of this!|Ryne, signaling the start of the phase}} |
||
| + | [[File:Iconoclasm from FFXIV Unjoined Aspect tethers screenshot.png|thumb|The astral light party moves to avoid Boundless Light, with the astral paladin moving to the front to soak the brunt of the umbral attack.]] |
||
| + | As soon as the Idol of Darkness becomes targetable, it casts '''Unjoined Aspect''', giving each party member either '''Astral Effect''' or '''Umbral Effect''' debuffs. In this case, one tank, one healer, and two DPS will get each debuff. Astral Effect reduces the damage taken by Dark-elemental attacks, increases damage taken from Light-elemental attacks, and will be replaced by Umbral Effect if the player is hit with certain Light-elemental attacks. However, the change in Effect does not reset the countdown until the debuff wears off, which is 45 seconds. Umbral Effect has the opposite effect. |
||
| + | |||
| + | The boss will then cast '''Words of Unity''', spawning clouds of sin eaters at the north row (A1, B1, C1, and D1). Two of the clouds will be black instead of white, however, and the clouds at A1 and D1 will always have opposite colors. The clouds at A1 and D1 will tether to the tank of the opposite color for an attack called '''Boundless Light'''. This attack must be shared with the three other players of the same Effect, but the player standing closest to the clouds will take the most damage, so the tank must take this hit with a cooldown, with the other players standing to the south of the tank. This will swap the Effects of all players as well. |
||
| + | |||
| + | If this mechanic is executed correctly, the players will end the phase with one tank, one healer, and two DPS assigned each to each debuff. |
||
| + | |||
| + | ====Words of Entrapment==== |
||
| + | [[File:Iconoclasm from FFXIV Words of Entrapment screenshot.png|thumb|The party moves to survive Words of Entrapment. The umbral paladin takes the astral sin eaters at D2 while the astral samurai takes the umbral tower at D1. Just offscreen, the astral gunbreaker takes the umbral sin eaters at C1.]] |
||
| + | The Idol of Darkness then casts '''Words of Entrapment'''. This spawns four "towers", at the corner tiles (A1, A4, D1, and D4); two will be white and two will be black. It also spawns four clouds of sin eaters, two white and two black, at each of the cardinal points (between A2 and A3, between D2 and D3, between B1 and C1, and between B4 and C4). A cloud of sin eaters will always be the same color as the one directly opposite it (so, for example, if a white cloud of sin eaters is at north, then a white cloud will be at south, and black clouds will be at east and west). |
||
| + | |||
| + | The towers will explode if nobody stands in them, but will instantly kill a player standing in them of the same color; so one player, of the opposite color of the tower, must stand in the tower before it explodes. |
||
| + | |||
| + | The clouds of sin eaters will tether to the closest player and then dash in a straight line through that player, instantly killing anyone of the opposite color. So a player of the opposite color must be closest to the cloud and drag it into a column or row with no other players before it dashes. |
||
| + | |||
| + | To survive Words of Entrapment, the players should take the following actions depending on their role: |
||
| + | *The melee should stand in the north tower opposite their color. |
||
| + | *The ranged should stand in the south tower opposite their color. |
||
| + | *The tanks should stand closest to the north or east cloud opposite their color, and then rotate counterclockwise (so the east tank drags their cloud to D2, and the north tank to B1). |
||
| + | *The healers should stand closest to the south or west cloud opposite their color, and then rotate counterclockwise (so the west healer drags their cloud to A3, and the south healer to C4). |
||
| + | If all this is executed correctly, the following will happen: |
||
| + | *Each DPS will soak the tower opposite their color, so no towers explode. |
||
| + | *Clouds of sin eaters will dash through columns B and C, and rows 2 and 3, where there are no towers and only one player, of the opposite color. |
||
| + | We assume that two DPS are melee, but in reality one just needs to designate two DPS, ideally those with the least mobility, to be "melee", and the other two DPS to be "ranged". One can swap the roles of the DPS and non-DPS in the above discussion, if necessary. (In doing so, one would have to replace the tanks with the melee and the healers with the ranged.) One could also replace "counterclockwise" with "clockwise" if desired. However, the strategy proposed is essentially canonical to Party Finder on the Aether data center. |
||
| + | |||
| + | At this point the Unjoined Aspect debuffs fall off, as 45 seconds have passed. |
||
====Words of Night==== |
====Words of Night==== |
||
| + | The boss casts Unjoined Aspect. This time, the healers and tanks will all have the same color, while the DPS will all have the opposite color. |
||
| + | |||
| + | The boss then casts '''Words of Night''', spawning four clouds of sin eaters at the north end of the platform, two of each color, so that the clouds in columns B and C are of opposite colors. Words of Night also spawns a red and a blue inwards portal at B4 and C4. The sin eaters then dash south across the platform, killing anyone they hit of the same color, so the player should be hit by the cloud of sin eaters of the opposite color to their debuff. This will swap the color of their debuff. The player should note which color debuff went into which color portal. |
||
| + | |||
| + | A pattern of outwards and inwards red and blue portals will spawn similar to in the early parts of the fight. To survive this, the party should execute the following maneuver: |
||
| + | #Split into light parties: west party will go to A1 and A2, while east party goes to D1 and D2. |
||
| + | #Note the color of the east (outwards) portals. They will shoot the same color sin eaters as the sin eaters that went into the portals at the beginning of the phase. |
||
| + | #Stand in the tile that will be hit by sin eaters opposite the player's color (Example: if the blue portal is going to shoot black sin eaters, the blue portal is at D2, and the player has the black debuff and is in the west party, the player should stand at A1). Being hit by sin eaters will swap the player's debuff. |
||
| + | #Note the color of the west (inwards) portals, and which color sin eaters will go into which color portals. |
||
| + | #Be hit by sin eaters. |
||
| + | #Note the color of the east (outwards) portals. They will shoot the same color sin eaters as the sin eaters that went into the portals at Step 4. |
||
| + | #Stand in the tile that will be hit by sin eaters opposite the player's color, as in Step 4. |
||
| + | #Note the color of the west (inwards portals). |
||
| + | #Be hit by sin eaters. |
||
| + | #Stack in the center of the platform, as the boss will target everyone with an circular telegraphed spell, '''False Dawn''', that must be dodged, and should be baited away from the action. |
||
| + | #Split back into light parties, as in Step 1. |
||
| + | #Note the color of the east (outwards) portals. They will shoot the same color sin eaters as the sin eaters that went into the portals at Step 8. |
||
| + | #Stand in the tile that will be hit by sin eaters of the opposite color as the player, and spread to avoid anyone else in this tile. |
||
| + | #The boss will cast '''Silver Spear''', targeting the player with splash damage that is the same color as they are. |
||
| + | #Note the color of the west (inwards) portals, and which color sin eaters are going into them. |
||
| + | #Be hit by sin eaters; this will change the player's color, so they are the opposite color as Silver Spear. |
||
| + | #Be hit by Silver Spear. This will change the player's color back. |
||
| + | #Note the color of the east (outwards) portals. They will shoot the same color sin eaters as the sin eaters that went into the portals at Step 15. |
||
| + | #Stand in the tile that will be hit by sin eaters of the opposite color as the player. |
||
| + | #Be hit by sin eaters. |
||
| + | When the portals resolve, Unjoined Aspect debuffs fall off, and the boss casts Empty Wave and Unshadowed Stake before going untargetable. |
||
====Words of Fervor==== |
====Words of Fervor==== |
||
| + | [[File:Iconoclasm from FFXIV Crusade screenshot.png|thumb|The party positions to survive Crusade.]] |
||
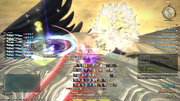
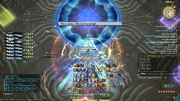
| + | {{q|The sin eaters... What are they doing?|Ryne, signaling the beginning of the final phase}} |
||
| + | A blue marker appears in the center of the platform. Anyone standing in this marker when it resolves, during which time the boss casts '''Crusade''', will be instantly killed; everyone else will be knocked back. Knock back immunities do not work, so players need to position themselves to be knocked into the corners of the platform to avoid being knocked off the platform. |
||
| + | |||
| + | The boss then reforms as a tornado of sin eaters swirling in the center of the platform, and casts Unjoined Aspect. Again, this will assign one healer, one tank, and two DPS with one color and the others with the opposite color. |
||
| + | |||
| + | [[File:Iconoclasm from FFXIV Crusade orbs screenshot.png|thumb|left|The Idol of Darkness casts Words of Fervor, spawning orbs around the platform.]] |
||
| + | The Idol of Darkness then casts '''Words of Fervor'''. Three lines of telegraphed area-of-effect spells, which spiral out from the boss and rotate in the direction indicated by the direction that the boss is spinning, will begin to fire, and they must be avoided. This divides the platform into three segments, and the player must move as their segment does, or they will be hit by a spiral spell and die. |
||
| + | |||
| + | [[File:Iconoclasm from FFXIV Crusade orbs Explosion screenshot.png|thumb|The astral paladin and the umbral monk move to detonate an umbral and an astral orb respectively. Notice that the Words of Fervor spirals split the platform in three, and that the gunbreaker positions himself to avoid the paladin's Explosion.]] |
||
| + | In each segment, white and black orbs, '''Chiaro''' and '''Scuro''' respectively, will periodically spawn. These must be touched by a player of the opposite color; otherwise they will explode, instantly killing everyone. Touching an orb changes the player's color, and the color of any player close to the orb; so the other players in that segment must be far away from the orb when the intercepting player touches it. |
||
| + | |||
| + | One possible way to divide up the platform is to have tanks take the south segment, white healers and DPS take the northwest segment, and black healers and DPS take the northeast segment. This approach will guarantee that there are sufficient players in each segment to touch the appropriate orbs, and is canonical to Party Finder on the Aether data center. |
||
| + | |||
| + | [[File:Iconoclasm from FFXIV Threefold Grace screenshot.png|thumb|left|The Idol of Darkness casts Threefold Grace, and the players move to match their colors.]] |
||
| + | After the boss has completed a full rotation, it will cast '''Threefold Grace''', covering the entire platform in either white or black rings. The player must stand in a ring of the opposite color as the player, which will also swap the player's debuff. This will repeat three times. |
||
| + | |||
| + | The boss will then cast Empty Wave twice, and then Unjoined Aspect will fall off. The boss will cast Unjoined Aspect and Words of Fervor again, and it behaves identically as in the previous cycle of mechanics. |
||
| + | |||
| + | [[File:Iconoclasm from FFXIV defeated screenshot.png|thumb|The Idol of Darkness is defeated.]] |
||
| + | After the Words of Fervor resolves, the boss casts Threefold Grace and then Empty Wave three times, before casting Empty Flood, which is an enrage cast that will instantly kill the party. Empty Flood always casts at 11:37 after the beginning of the fight, regardless of how long it took to kill Idolatry and Blasphemy, so the boss may skip some casts of Empty Wave depending on the speed of the party. |
||
====Timeline==== |
====Timeline==== |
||
| Line 114: | Line 227: | ||
|- |
|- |
||
!class="b"|0:25 |
!class="b"|0:25 |
||
| − | |Unshadowed |
+ | |Unshadowed Stake |
|— |
|— |
||
|- |
|- |
||
| Line 138: | Line 251: | ||
|- |
|- |
||
!class="b"|2:23 |
!class="b"|2:23 |
||
| − | |Unshadowed |
+ | |Unshadowed Stake |
|— |
|— |
||
|- |
|- |
||
| Line 235: | Line 348: | ||
!class="b"|0:47 |
!class="b"|0:47 |
||
|White Smoke |
|White Smoke |
||
| + | |Towers explode here. |
||
| − | |— |
||
| − | |- |
||
| − | !class="b"|0:54 |
||
| − | |Boundless Light |
||
| − | |— |
||
|- |
|- |
||
!class="b"|1:08 |
!class="b"|1:08 |
||
| Line 262: | Line 371: | ||
|- |
|- |
||
!class="b"|2:13 |
!class="b"|2:13 |
||
| − | |Unshadowed |
+ | |Unshadowed Stake |
|— |
|— |
||
|- |
|- |
||
| Line 319: | Line 428: | ||
==Musical themes== |
==Musical themes== |
||
| + | {{Audio|title="Force Your Way"|filename=FFXIV Force Your Way.ogg}} |
||
A orchestration of [[Force Your Way]], the same that plays during [[Eden's Gate: Resurrection]] and [[Eden's Gate: Descent]], plays during the fight against the Idol of Darkness. |
A orchestration of [[Force Your Way]], the same that plays during [[Eden's Gate: Resurrection]] and [[Eden's Gate: Descent]], plays during the fight against the Idol of Darkness. |
||
| Line 325: | Line 435: | ||
{{navbox activities FFXIV}} |
{{navbox activities FFXIV}} |
||
| − | [[Category:Duties in Final Fantasy XIV]] |
||
Revision as of 18:50, 22 September 2020
Template:Sideicon

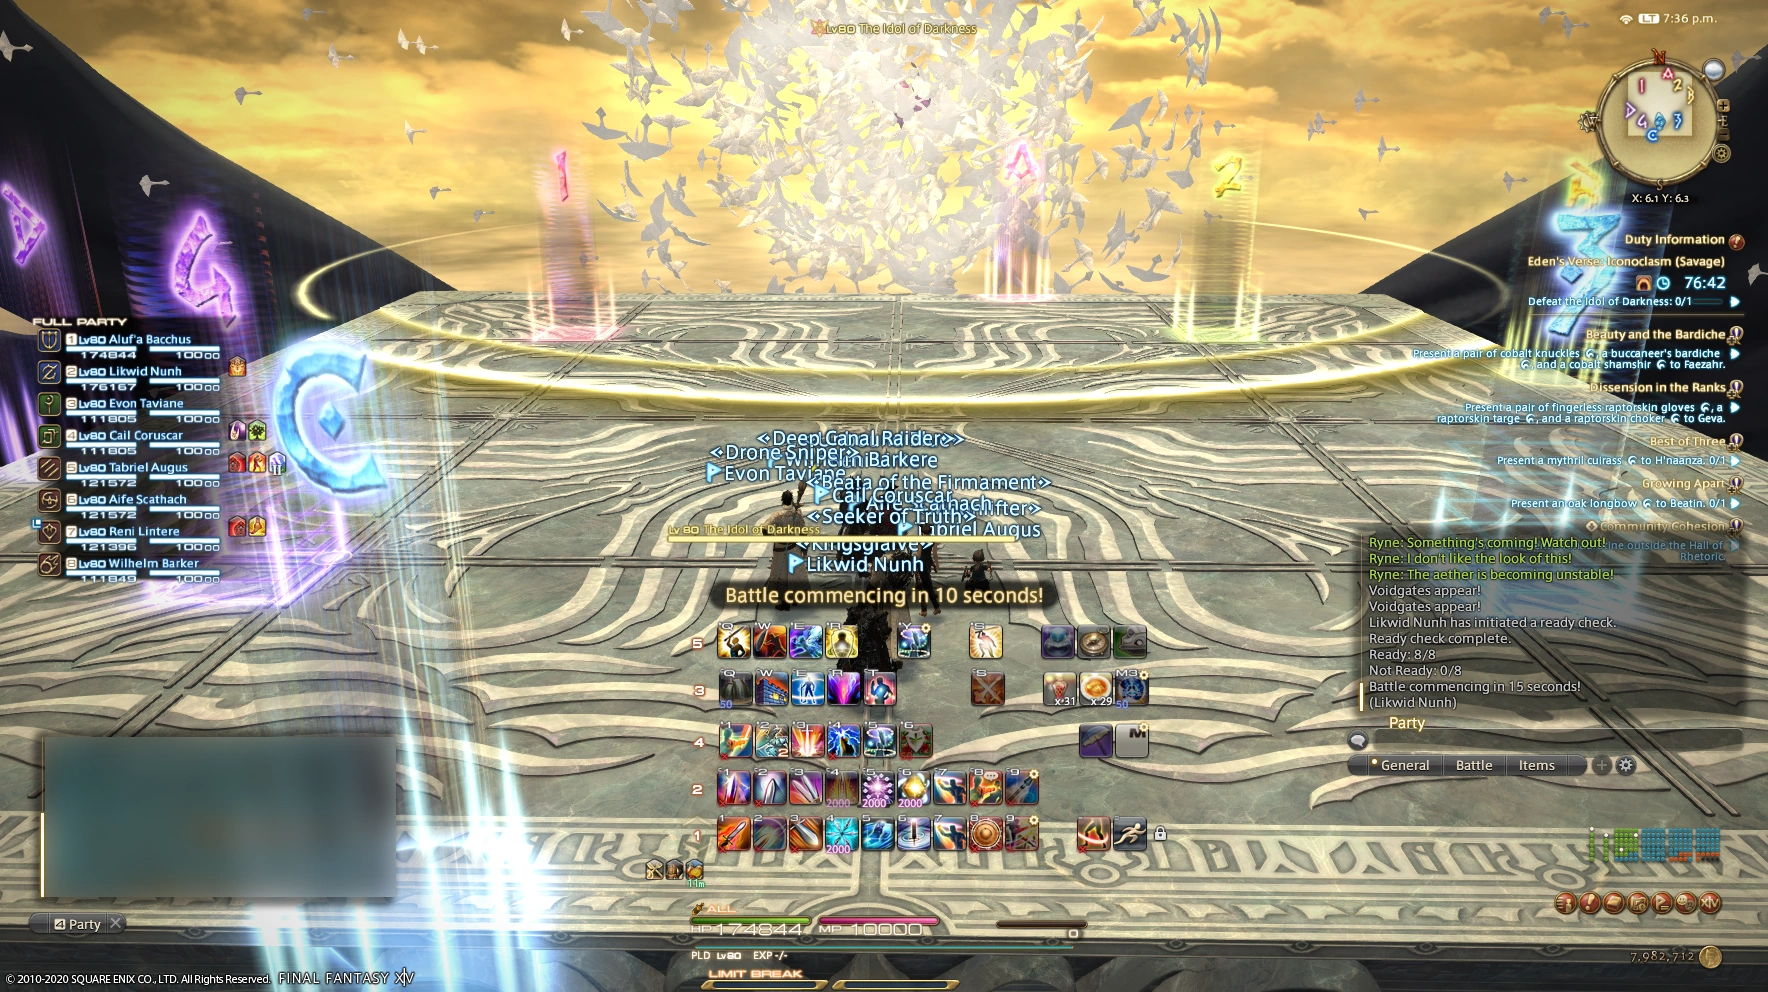
Oh, shut up and help me remodel the Eden's Verse: Iconoclasm page!
Eden's Verse: Iconoclasm is the third fight of the Eden's Verse raid in Final Fantasy XIV: Shadowbringers.
Story
As you and your comrades prepare to restore the last of the six elements, Gaia's mind is suddenly seized in the grip of an unknown and malevolent force. Dark aether swirls around her, and slowly coalesces into an ominous glyph, hovering high above Eden. From nowhere, a vast swarm of sin eaters circles around it, as moths to a flame, and a voice that emanates from within the core claims to hold dominion over these creatures of Light. While its true purpose remains unknown, one thing is abundantly clear: it must be vanquished before it is allowed to place your mission in jeopardy.
In-game description
Progression
Normal
Savage
The battle against the Idol of Darkness takes place on a square platform, which it is possible to fall off of. At the start of the fight, the Idol of Darkness is a cloud of sin eaters at the north end of the platform, which is omnidirectional in the sense that positionals automatically succeed. The platform is divided into four rows and four columns, forming 16 tiles in total. In what follows, we will always refer to the tiles with the following scheme:
- The area where the Idol of Darkness is will always be referred to as "north".
- The columns will be indexed, west to east, as A, B, C, and D.
- The rows will be indexed, north to south, as 1, 2, 3, and 4.
- The tiles will be referred to by their column index and then their row index. For example, the northwest-most tile will be referred to as A1.
Throughout the fight, it will be useful to assume that the group has been divided up into two light parties, "west" and "east". Each light party should have one tank, one healer, and two DPS.
A mechanic which is used throughout the fight, and is worth mentioning right at the beginning of the discussion, is Away with Thee. Away with Thee inflicts each party member with one randomly selected debuff: Forward with Thee, Back with Thee, Left with Thee, or Right with Thee. This debuff places a portal under the party member's feet and another in front of, behind, to the left of, or to the right of, the party member respectively. As the party member moves, their portals will move to preserve this relation. When the debuff expires, they will be teleported through the portal. To avoid being teleported off the platform, or into certain death, the party member must be positioned correctly and facing a certain direction whenever Away with Thee is about to expire. A good practice is to stop moving and attacking one or two GCDs (2.5-5 seconds) before Away with Thee expires. Another trick is to use the setting which causes the player character to face their target when using a GCD ability and use this to turn in the desired direction, though as the boss always remains at the north end of the platform, this will not always be helpful.
Introduction
The Idol of Darkness before battle. Notice the waymark positions: the numerical waymarks are used for Idolatry, and the alphabetical waymarks are used for Words of Entrapment.
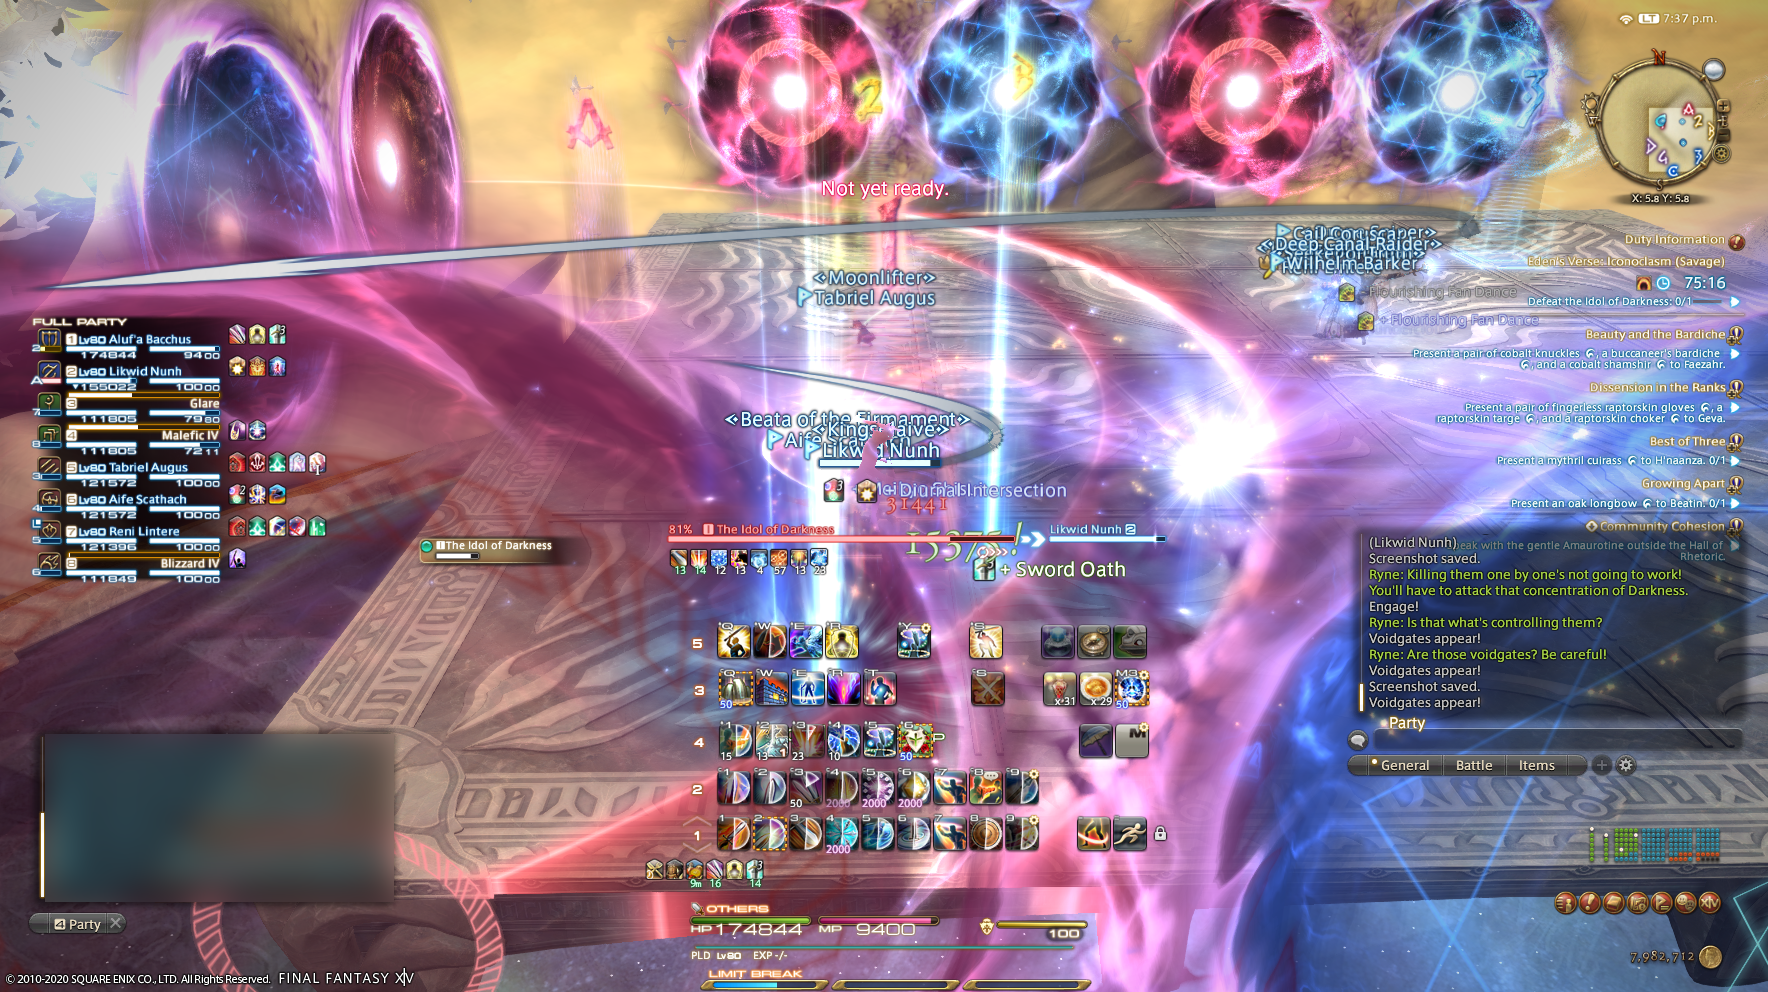
The boss begins by casting Empty Wave, dealing heavy raid-wide damage. It follows by Unshadowed Stake, a tank buster which targets a random tank, regardless of who is top enmity. The first hit of Unshadowed Stake is a linear area-of-effect which inflicts Magic Vulnerability Up; the second hit, known as Silver Stake, will instantly kill anyone with Magic Vulnerability Up, but can be shared with the other tank or the party; the person in the stack closest to the boss will take the most damage.
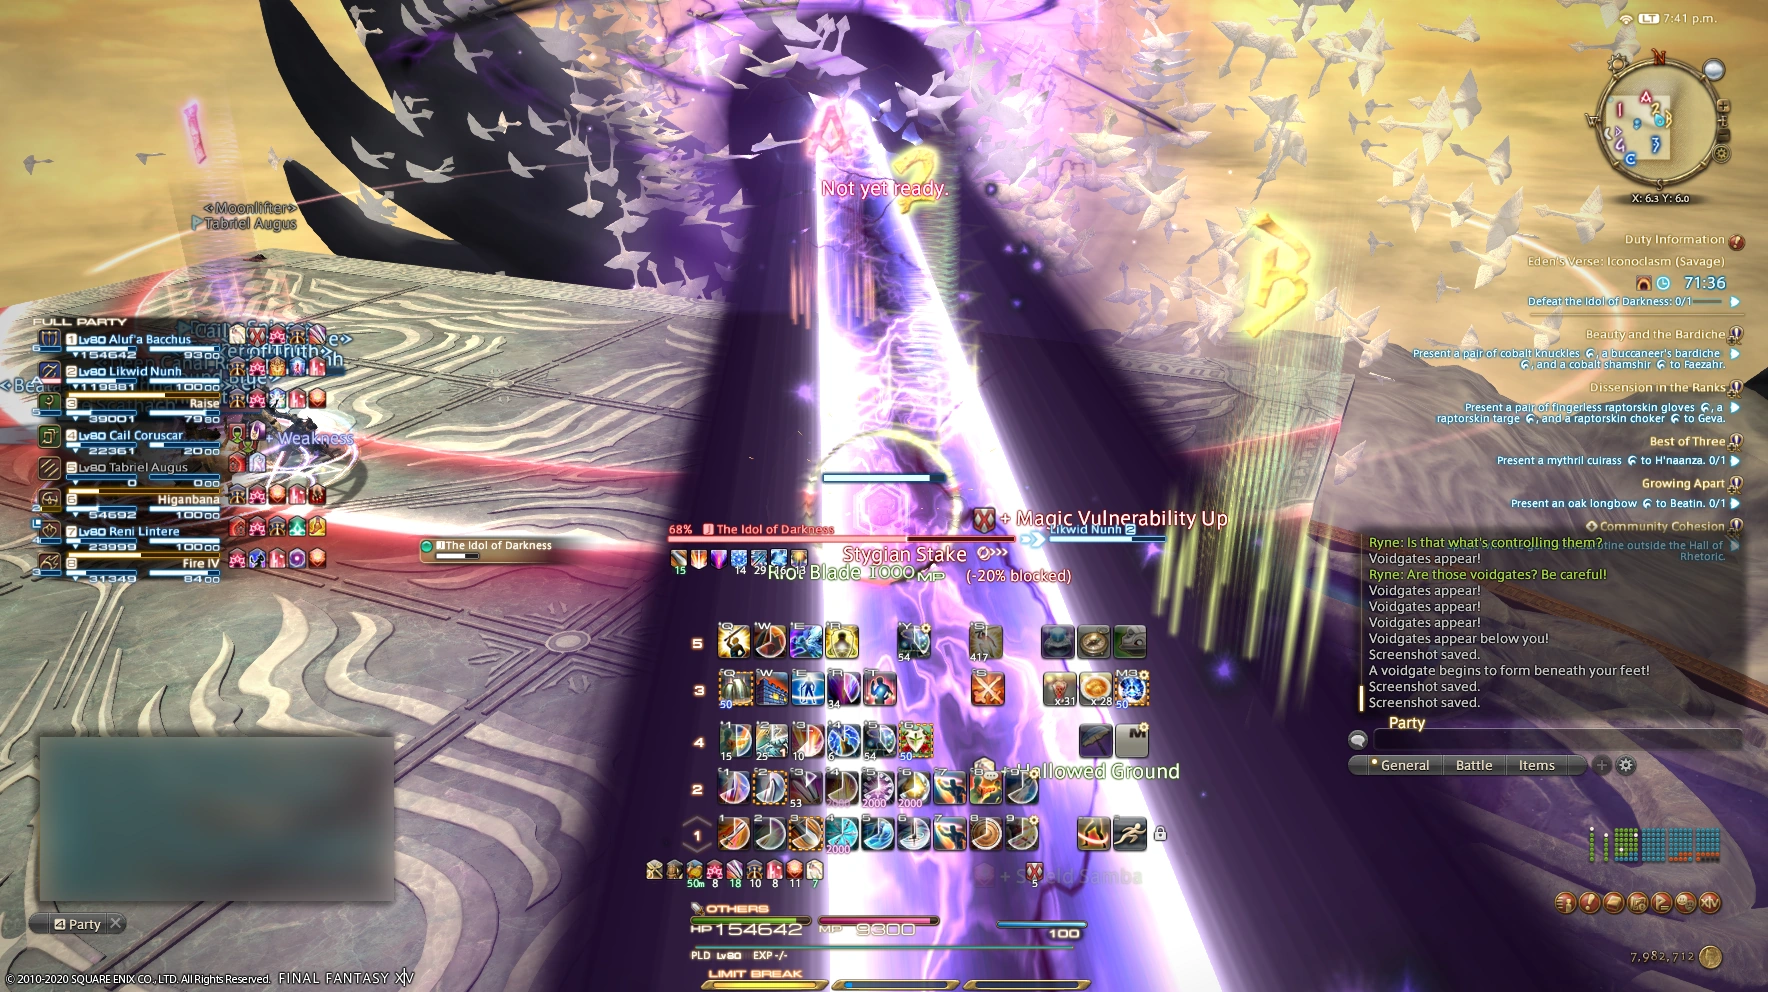
The paladin uses Hallowed Ground to survive Unshadowed Stake.
Therefore, the tank who gets a marker for Unshadowed Stake must get away from the party, and then either go invulnerable to avoid both hits, or, if invulnerabilities are not available, the untargeted tank must stand in front of the targeted tank for the second hit. If the latter strategy is used, then either the tanks need to use heavy mitigation abilities or stack with the party for the second hit. However, Unshadowed Stake is only used three times throughout the fight, so it may be possible to use invulnerabilities on all three uses, depending on luck.
Words of Motion
Is that what's controlling them?
Ryne, referring to the Idol of Darkness, signaling the start of the first mechanic
The first more involved mechanic of the fight begins when the boss casts Words of Motion, spawning red and blue portals in tiles B4 and C4, and two untargetable clouds of sin eaters at the north edge of platform, either in columns A and C, B and D, A and B, or C and D. In particular, exactly two of columns B and C and will have sin eaters. Clouds of sin eaters then spawn in the other two columns, before the first two clouds dash through their columns, and the last two clouds dash through their columns. Being hit with a dashing cloud of sin eaters deals heavy damage and inflicts a stack of Vulnerability Up, and must be avoided. So the party must move to the columns where the last two clouds spawn, and then to the columns where the first two spawned as soon as the first two are done dashing. The player should whether the first clouds ended up in the red portal or in the blue portal. We will refer to these portals as "initial" portals.

The party positions to survive Words of Motion. They know that the blue portals are about to unleash sin eaters, so they stand in front of only red portals.

The red portal unleashes sin eaters.
For example, if sin eaters spawned first in A and C, and the red portal was at B4, then the blue portal will be at C4, and the player should start in either B or D, and then move to A or C as soon as the first clouds are done dashing. The player should note that the first cloud went into the blue portal (so the second cloud went into the red portal).
Portals now spawn along the edge of the platform. The behavior of the portals on the north and south edges of the platform an always be ignored, as long as the player always stays in columns A or D, as such portals will only ever spawn in columns B and C. The portals on the west and east edges cannot be ignored, however, and follow the following rules:
- "Inward" portals spawn at A1, A2, A3, and A4. "Outward" portals spawn at D1, D2, D3, and D4.
- Portals on one side always alternate between red and blue. For example, if there is a red portal at A1, then there will be a red portal at A3 and blue portals at A2 and A4.
- Clouds of sin eaters dash across the rows from the outward portals towards the inward portals, in the order that they went into the initial portal.
- The clouds of sin eaters dash three times. Each time, the order of the portals changes.
This all sounds quite complicated, but in reality the following strategy works:
- Note the color of the initial portal that the first wave of sin eaters went into. We will call this the "first color."
- Look at the outward portals at D1 and D2. If the first color is at D1, go to A2; otherwise, go to A1.
- Look at the inward portals at A1 and A2. If their colors match the colors of the outward portals at D1 and D2, call "swap"; otherwise, do nothing.
- After the first wave of sin eaters dashes, swap: i.e., if the player is at A2, go to A1; otherwise, go to A2.
- After the second wave of sin eaters dashes, if the raid leader called "swap", swap. Otherwise, do nothing.
- Repeat from Step 3 until the portals are gone.
Note that the decision to stand at A1 and A2 can be replaced with standing at D1 and D2 without consequence in the above strategy. In particular, no 90-second or 120-second raid buffs should occur during this phase, so the party does not need to be stacked.
After the third round of portals, the party should move to the center of the platform in preparation for the next mechanic.
Betwixt Worlds

The Idol of Darkness casts Betwixt Worlds, splitting the platform in three.
The Idol of Darkness casts Betwixt Worlds, targeting the lines between columns A and B, and between columns C and D, for an area-of-effect spell that is fatal and must be avoided. The spell also places walls on those lines that can only be crossed using Away with Thee, and causes a knockback that randomly moves players left or right, cannot be mitigated, and will possibly kill anyone not in between the two walls. So the player must be in the center area of the platform, so they are knocked into one of the walls. (If someone is teleported into a wall by Away with Thee, they will immediately die.)
The boss then casts Words of Spite, spawning clouds of sin eaters at the north (A1, B1, C1, and D1). Each tethers to a random DPS, and after some time will dash in a line through that DPS, dealing heavy damage and inflicting Magic Vulnerability Up. In particular, if a player is hit by two clouds, they will die.
Before Words of Spite resolves, the boss casts Away with Thee, and then targets both healers for Silver Sledge, a stack marker that inflicts Magic Vulnerability Up and must be shared with a player that does not have Magic Vulnerability Up. Silver Sledge and Words of Spite resolve at the same time, immediately after Away with Thee.
The following strategy always works for this mechanic:
- The DPS tethered to the clouds at A1 and D1 should use Away with Thee to teleport to their respective square, and then run to the corner of that square, so that their cloud just barely clips the platform as it dashes.
- The DPS tethered to the clouds at B1 and C1 should use Away with Thee to teleport to a tile in their respective column, so that their clouds dash in a straight line along that column.
- The tank and healer in the west light party should teleport to A3.
- The tank and healer in the east light party should teleport to D3.
This way, the tank is still in melee range of the boss, the healer has a partner for Silver Sledge, and they are both far away from the clouds.
Care must be taken to avoid being teleported off the platform or into the wall. If a healer or DPS dies during teleportation, their marker will be transferred to a random party member, which will very likely wipe the group.
The boss casts Empty Wave and Unshadowed Stake. At this point the party should again stack in the center of the platform in preparation for the next mechanic.
False Moonlight
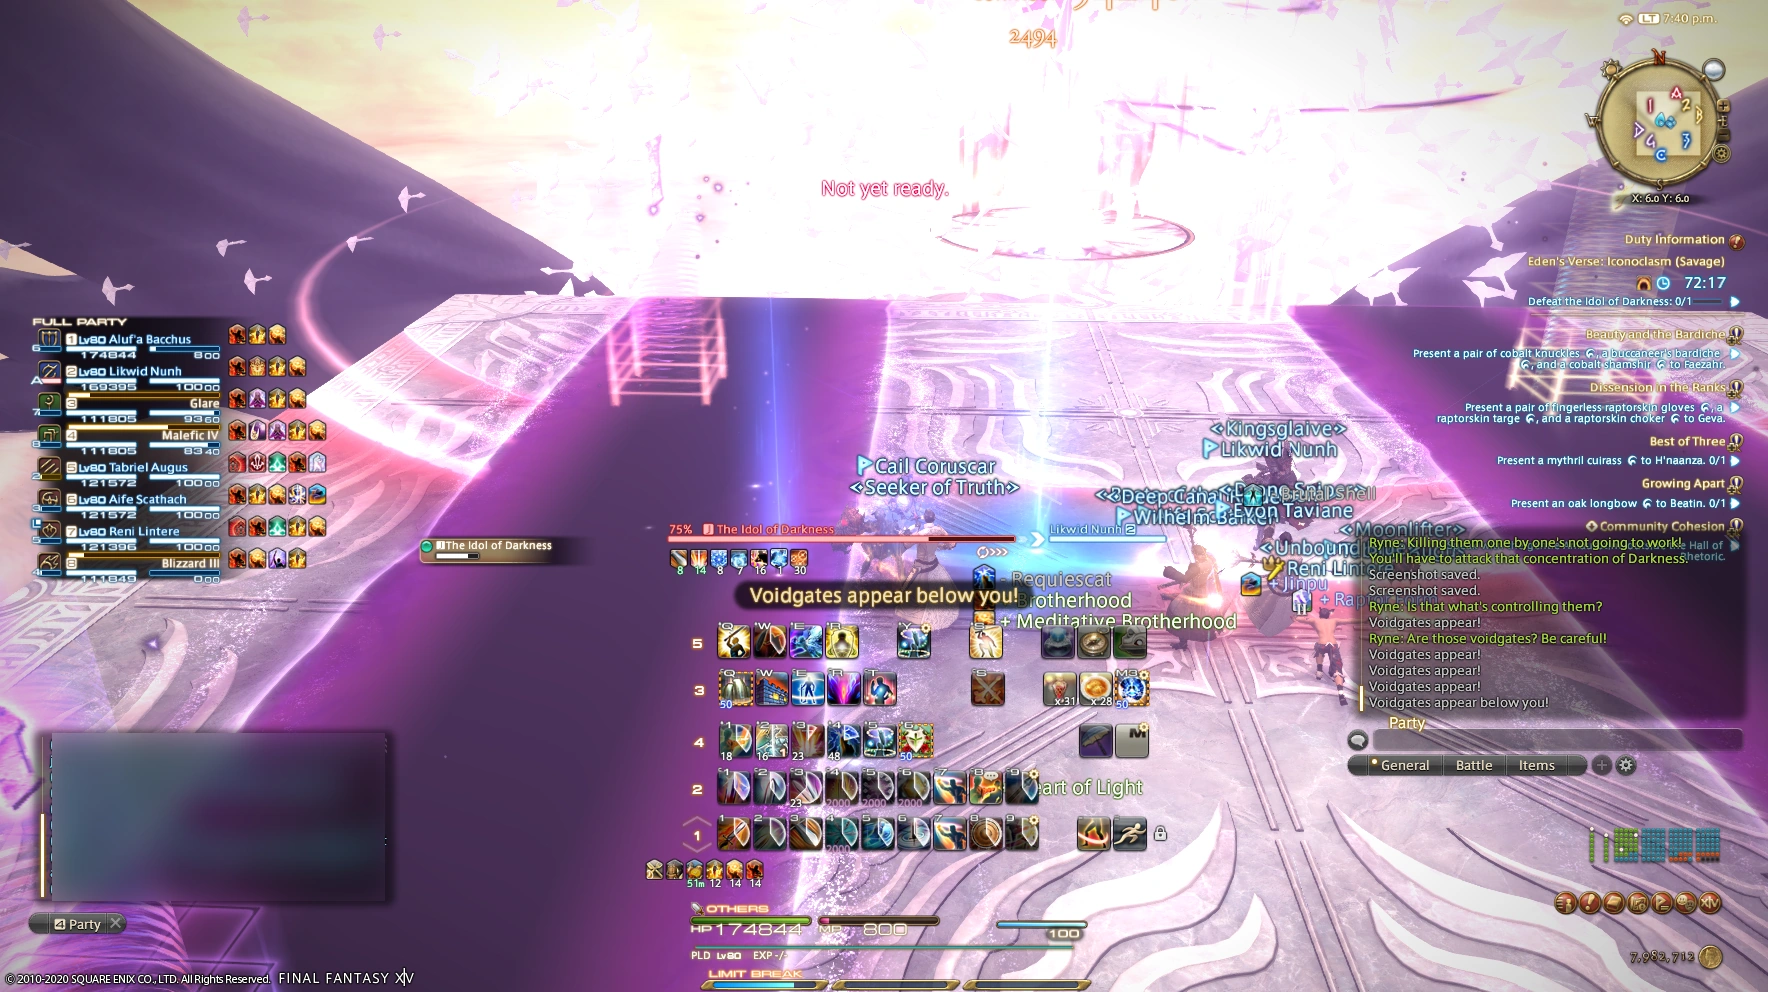
The Idol of Darkness then casts False Moonlight, targeting each party member for a telegraphed area-of-effect spell and spawning sin eaters at the north edge (A1, B1, C1, and D1). The sin eaters dash through columns A and D first, and then through columns B and C. At the same time, the boss casts Silver Scourge, targeting each party member for splash damage that also leaves behind a circular white puddle which inflicts Vulnerability Up to anyone who stands in it. The Silver Scourges go out right before the first wave of sin eaters dash. The boss then casts Away with Thee, which takes effect before the second waves of sin eaters dash. Just before Away with Thee resolves, the boss casts False Midnight, which targets each of the healers and tanks for Silver Scourge and one of the DPS for a Silver Sledge that must be shared with three other players.
To survive this, the party should stack up to bait the False Moonlights all in the same place, and then spread into their light parties (so the west party moves to column B, and the east party to column C) and spread throughout their column, then move to the edge (so the west party moves to column A, and the east to column D) to avoid the first wave of sin eaters. Then the players should all teleport into columns B or C to avoid the second wave using Away with Thee, so that the DPS end up in the same place and the tanks and healers are all spread out. One standard way to deal with this mechanic is to have the DPS all end up in the center of the platform, the tanks in the north of B/C, and the healers in the south of B/C.
After False Midnight resolves, the party should again split into their west/east light parties in preparation for the add phase. The boss goes untargetable at this point.
Idolatry and Blasphemy

The paladin pulls the Idolatry away from the Blasphemy by taking it from D2 to D4.
The Darkness is growing!
Ryne, signaling the start of this phase
At the beginning of this page, three clouds of sin eaters, which are targetable, spawn: a Blasphemy spawns between B1 and C1, and Idolatries spawn at A2 and D2. The Blasphemy ignores hatred, does not autoattack, and randomly either moves clockwise (i.e. to D1, then to D4, then to A4, then to A1, then back to D1) or counterclockwise. The Idolatries do respond to hatred and autoattack, so each should be picked up by the west or east tank. If two adds come within a tile of each other, they will tether and both gain Vulnerability Up. The DPS check in this phase is very tight, so even though this buff can be removed by separating the adds, this must be avoided even if only for a few GCDs. So, the party must identify the direction that the Blasphemy is rotating, and then the tanks must pull their Idolatries in that direction as well.
The light parties each stack for Overwhelming Light. Notice the use of waymarks to help them plan for the stack, and the distance of two tiles separating the two Idolatries.
After some time rotating, the Blasphemy will cast Overwhelming Light, targeting four random party members for linear area-of-effect telegraphs that must be dodged. At the same time, each Idolatry will target a healer for Insatiable Light, a stack marker that must be shared with at least two other party members. So each light party must move in unison, so that they they dodge the Overwhelming Lights in the same direction and end up stacked for Insatiable Light.
The Blasphemy again casts Overwhelming Light, and the Idolatries cast Advent of Light, a spell which does massive raid-wide damage, but which can and must be Interrupted. The adds then repeat their Overwhelming and Insatiable Light combination.
The Idol of Darkness then casts Away with Thee, while the Idolatries cast Strength in Numbers. When this happens, the sin eaters in the Idolatry will make a wheel shape, either rotating vertically or spinning in a circle on the ground. In fact, in this first cast, the Idolatry will always rotate vertically. If the Idolatry rotates vertically, then it will deal heavy damage and inflict a Vulnerability Up stack on anyone who is standing in a doughnut-shaped region around the Idolatry, but leave people standing far away or inside the hitbox untouched. If it rotates horizontally, then it will instead attack players close to its hitbox.
After dodging Strength in Numbers, the healers will again be targeted for Insatiable Light, so each light party must choose a spot that the Away with Thee cast will all teleport them to.
Some time after this, the adds will do their Overwhelming and Insatiable Light combination, but cast Strength in Numbers at the same time, so this must also be dodged. At this point, the Idolatries will begin to cast Explode, which will instantly kill the party if they are not destroyed before this.
The Idolatries also cast Explode if one is destroyed before the other, so they must be killed at the same time. In particular, the ranged DPS should be prepared to attack the other light party's Idolatry if necessary.
As the Idolatries are destroyed, the Blasphemy casts Unearned Envy, heavy raid-wide damage that hits six times and so must be healed through heavily. After the sixth hit, the Blasphemy will Explode; this must be avoided.
The boss will the cast Empty Flood, which does massive raid-wide damage. After some time, the boss becomes targetable, beginning the next phase.
Words of Unity
I don't like the look of this!
Ryne, signaling the start of the phase

The astral light party moves to avoid Boundless Light, with the astral paladin moving to the front to soak the brunt of the umbral attack.
As soon as the Idol of Darkness becomes targetable, it casts Unjoined Aspect, giving each party member either Astral Effect or Umbral Effect debuffs. In this case, one tank, one healer, and two DPS will get each debuff. Astral Effect reduces the damage taken by Dark-elemental attacks, increases damage taken from Light-elemental attacks, and will be replaced by Umbral Effect if the player is hit with certain Light-elemental attacks. However, the change in Effect does not reset the countdown until the debuff wears off, which is 45 seconds. Umbral Effect has the opposite effect.
The boss will then cast Words of Unity, spawning clouds of sin eaters at the north row (A1, B1, C1, and D1). Two of the clouds will be black instead of white, however, and the clouds at A1 and D1 will always have opposite colors. The clouds at A1 and D1 will tether to the tank of the opposite color for an attack called Boundless Light. This attack must be shared with the three other players of the same Effect, but the player standing closest to the clouds will take the most damage, so the tank must take this hit with a cooldown, with the other players standing to the south of the tank. This will swap the Effects of all players as well.
If this mechanic is executed correctly, the players will end the phase with one tank, one healer, and two DPS assigned each to each debuff.
Words of Entrapment
The party moves to survive Words of Entrapment. The umbral paladin takes the astral sin eaters at D2 while the astral samurai takes the umbral tower at D1. Just offscreen, the astral gunbreaker takes the umbral sin eaters at C1.
The Idol of Darkness then casts Words of Entrapment. This spawns four "towers", at the corner tiles (A1, A4, D1, and D4); two will be white and two will be black. It also spawns four clouds of sin eaters, two white and two black, at each of the cardinal points (between A2 and A3, between D2 and D3, between B1 and C1, and between B4 and C4). A cloud of sin eaters will always be the same color as the one directly opposite it (so, for example, if a white cloud of sin eaters is at north, then a white cloud will be at south, and black clouds will be at east and west).
The towers will explode if nobody stands in them, but will instantly kill a player standing in them of the same color; so one player, of the opposite color of the tower, must stand in the tower before it explodes.
The clouds of sin eaters will tether to the closest player and then dash in a straight line through that player, instantly killing anyone of the opposite color. So a player of the opposite color must be closest to the cloud and drag it into a column or row with no other players before it dashes.
To survive Words of Entrapment, the players should take the following actions depending on their role:
- The melee should stand in the north tower opposite their color.
- The ranged should stand in the south tower opposite their color.
- The tanks should stand closest to the north or east cloud opposite their color, and then rotate counterclockwise (so the east tank drags their cloud to D2, and the north tank to B1).
- The healers should stand closest to the south or west cloud opposite their color, and then rotate counterclockwise (so the west healer drags their cloud to A3, and the south healer to C4).
If all this is executed correctly, the following will happen:
- Each DPS will soak the tower opposite their color, so no towers explode.
- Clouds of sin eaters will dash through columns B and C, and rows 2 and 3, where there are no towers and only one player, of the opposite color.
We assume that two DPS are melee, but in reality one just needs to designate two DPS, ideally those with the least mobility, to be "melee", and the other two DPS to be "ranged". One can swap the roles of the DPS and non-DPS in the above discussion, if necessary. (In doing so, one would have to replace the tanks with the melee and the healers with the ranged.) One could also replace "counterclockwise" with "clockwise" if desired. However, the strategy proposed is essentially canonical to Party Finder on the Aether data center.
At this point the Unjoined Aspect debuffs fall off, as 45 seconds have passed.
Words of Night
The boss casts Unjoined Aspect. This time, the healers and tanks will all have the same color, while the DPS will all have the opposite color.
The boss then casts Words of Night, spawning four clouds of sin eaters at the north end of the platform, two of each color, so that the clouds in columns B and C are of opposite colors. Words of Night also spawns a red and a blue inwards portal at B4 and C4. The sin eaters then dash south across the platform, killing anyone they hit of the same color, so the player should be hit by the cloud of sin eaters of the opposite color to their debuff. This will swap the color of their debuff. The player should note which color debuff went into which color portal.
A pattern of outwards and inwards red and blue portals will spawn similar to in the early parts of the fight. To survive this, the party should execute the following maneuver:
- Split into light parties: west party will go to A1 and A2, while east party goes to D1 and D2.
- Note the color of the east (outwards) portals. They will shoot the same color sin eaters as the sin eaters that went into the portals at the beginning of the phase.
- Stand in the tile that will be hit by sin eaters opposite the player's color (Example: if the blue portal is going to shoot black sin eaters, the blue portal is at D2, and the player has the black debuff and is in the west party, the player should stand at A1). Being hit by sin eaters will swap the player's debuff.
- Note the color of the west (inwards) portals, and which color sin eaters will go into which color portals.
- Be hit by sin eaters.
- Note the color of the east (outwards) portals. They will shoot the same color sin eaters as the sin eaters that went into the portals at Step 4.
- Stand in the tile that will be hit by sin eaters opposite the player's color, as in Step 4.
- Note the color of the west (inwards portals).
- Be hit by sin eaters.
- Stack in the center of the platform, as the boss will target everyone with an circular telegraphed spell, False Dawn, that must be dodged, and should be baited away from the action.
- Split back into light parties, as in Step 1.
- Note the color of the east (outwards) portals. They will shoot the same color sin eaters as the sin eaters that went into the portals at Step 8.
- Stand in the tile that will be hit by sin eaters of the opposite color as the player, and spread to avoid anyone else in this tile.
- The boss will cast Silver Spear, targeting the player with splash damage that is the same color as they are.
- Note the color of the west (inwards) portals, and which color sin eaters are going into them.
- Be hit by sin eaters; this will change the player's color, so they are the opposite color as Silver Spear.
- Be hit by Silver Spear. This will change the player's color back.
- Note the color of the east (outwards) portals. They will shoot the same color sin eaters as the sin eaters that went into the portals at Step 15.
- Stand in the tile that will be hit by sin eaters of the opposite color as the player.
- Be hit by sin eaters.
When the portals resolve, Unjoined Aspect debuffs fall off, and the boss casts Empty Wave and Unshadowed Stake before going untargetable.
Words of Fervor
The party positions to survive Crusade.
The sin eaters... What are they doing?
Ryne, signaling the beginning of the final phase
A blue marker appears in the center of the platform. Anyone standing in this marker when it resolves, during which time the boss casts Crusade, will be instantly killed; everyone else will be knocked back. Knock back immunities do not work, so players need to position themselves to be knocked into the corners of the platform to avoid being knocked off the platform.
The boss then reforms as a tornado of sin eaters swirling in the center of the platform, and casts Unjoined Aspect. Again, this will assign one healer, one tank, and two DPS with one color and the others with the opposite color.

The Idol of Darkness casts Words of Fervor, spawning orbs around the platform.
The Idol of Darkness then casts Words of Fervor. Three lines of telegraphed area-of-effect spells, which spiral out from the boss and rotate in the direction indicated by the direction that the boss is spinning, will begin to fire, and they must be avoided. This divides the platform into three segments, and the player must move as their segment does, or they will be hit by a spiral spell and die.

The astral paladin and the umbral monk move to detonate an umbral and an astral orb respectively. Notice that the Words of Fervor spirals split the platform in three, and that the gunbreaker positions himself to avoid the paladin's Explosion.
In each segment, white and black orbs, Chiaro and Scuro respectively, will periodically spawn. These must be touched by a player of the opposite color; otherwise they will explode, instantly killing everyone. Touching an orb changes the player's color, and the color of any player close to the orb; so the other players in that segment must be far away from the orb when the intercepting player touches it.
One possible way to divide up the platform is to have tanks take the south segment, white healers and DPS take the northwest segment, and black healers and DPS take the northeast segment. This approach will guarantee that there are sufficient players in each segment to touch the appropriate orbs, and is canonical to Party Finder on the Aether data center.

The Idol of Darkness casts Threefold Grace, and the players move to match their colors.
After the boss has completed a full rotation, it will cast Threefold Grace, covering the entire platform in either white or black rings. The player must stand in a ring of the opposite color as the player, which will also swap the player's debuff. This will repeat three times.
The boss will then cast Empty Wave twice, and then Unjoined Aspect will fall off. The boss will cast Unjoined Aspect and Words of Fervor again, and it behaves identically as in the previous cycle of mechanics.
The Idol of Darkness is defeated.
After the Words of Fervor resolves, the boss casts Threefold Grace and then Empty Wave three times, before casting Empty Flood, which is an enrage cast that will instantly kill the party. Empty Flood always casts at 11:37 after the beginning of the fight, regardless of how long it took to kill Idolatry and Blasphemy, so the boss may skip some casts of Empty Wave depending on the speed of the party.
Timeline
| Time | Ability | Notes |
|---|---|---|
| 0:09 | Empty Wave | — |
| 0:25 | Unshadowed Stake | — |
| 0:40 | Words of Motion | The next minute is the blue/red portal phase. |
| 1:42 | Betwixt Worlds | — |
| 1:48 | Words of Spite | — |
| 1:53 | Away with Thee | — |
| 2:16 | Empty Wave | — |
| 2:23 | Unshadowed Stake | — |
| 2:36 | Words of Motion | — |
| 2:40 | False Moonlight | — |
| 2:45 | Silver Scourge | — |
| 2:55 | Away with Thee | — |
| 3:00 | False Midnight | — |
| 3:25 | Idolatry and Blasphemy spawn | — |
| 3:42 | Overwhelming Light | — |
| 3:44 | Insatiable Light | — |
| 3:59 | Advent of Light | — |
| 4:07 | Insatiable Light | — |
| 4:11 | Overwhelming Light | — |
| 4:21 | Away with Thee | — |
| 4:22 | Strength in Numbers | — |
| 4:30 | Insatiable Light | — |
| 4:48 | Overwhelming Light | — |
| 4:48 | Strength in Numbers | — |
| 4:54 | Insatiable Light | — |
| 5:25 | Unearned Envy | Casts six times before enraging. |
| 0:00 | Empty Flood | Casts some seconds after Blasphemy is destroyed, which depends on group DPS. |
| 0:16 | Unjoined Aspect | Boss becomes targetable here. |
| 0:23 | Words of Unity | — |
| 0:30 | Boundless Light | — |
| 0:38 | Words of Entrapment | — |
| 0:47 | White Smoke | Towers explode here. |
| 1:08 | Unjoined Aspect | — |
| 1:17 | Words of Night | — |
| 1:23 | False Dawn | — |
| 1:46 | Silver Spear | — |
| 2:06 | Empty Wave | — |
| 2:13 | Unshadowed Stake | — |
| 2:38 | Crusade | Boss untargetable shortly before this cast. |
| 2:47 | Unjoined Aspect | — |
| 2:53 | Words of Fervor | — |
| 3:26 | Threefold Grace | Casts three times. |
| 3:46 | Empty Wave | — |
| 3:56 | Empty Wave | — |
| 4:05 | Unjoined Aspect | — |
| 4:11 | Words of Fervor | — |
| 4:44 | Threefold Grace | Casts three times. |
| 5:14 | Empty Wave | Possibly skipped, depending on how long add phase took. |
| 5:24 | Empty Wave | Possibly skipped, depending on how long add phase took. |
| 5:34 | Empty Wave | Possibly skipped, depending on how long add phase took. |
| 11:37 | Empty Flood | Enrage cast. Cast time determined by time since the start of the fight, not since the end of the add phase. |
Musical themes
A orchestration of Force Your Way, the same that plays during Eden's Gate: Resurrection and Eden's Gate: Descent, plays during the fight against the Idol of Darkness.
Etymology
Iconoclasm is the destruction of certain "heretical" or "unholy" images for religious reasons; metaphorically, it can also refer to attacks on widely revered beliefs.