Template:Sideicon

Oh, shut up and help me remodel the EX Dungeon B page!
"EX Dungeon B" (named as such in the World of Final Fantasy Strategy Guide), also known as ??? on the map and the Mirage Manual, is an optional post-game dungeon located in the The Girl's Tearoom in World of Final Fantasy. It is one of three dungeons that becomes available after clearing every Intervention quest, then defeating the final boss. Three Gates that were not there before appear inside the Girl's Tearoom—the Gate that takes the player to EX Dungeon B is the second from the right.
Profile
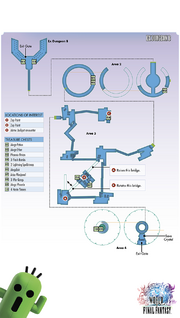
The layout of EX Dungeon B consists of portions of other dungeons in Grymoire, connected with one another. The player traverses through these areas in the opposite direction than what is done in the original dungeons. Pulling up the map, however, shows nothing.
The enemies encountered in each area are those normally found in the original dungeons, but there are also very rare encounters with enemies that served as bosses from The Crystal Tower (Asterius, Tiamat, Buer, and Kraken) that are accompanied by several regular ones that correspond to the "element" of the "boss enemy". These particular enemies can be imprismed.
At the end of this dungeon the player finds Rairamuh, and approaching him engages a boss fight with he, Voultr and Joult in a stack.
Locations
- Area 1
This area resembles Mako Reactor 0 - Sector 5. Contains an Exit Gate at the entrance.
- Area 2
This area resembles the Underground Prison - Ophion 4. As there are no Searchers to encounter on the field, the trash bins in this area cannot be interacted with.
- Area 3
This area resembles The Train Graveyard - Necropolis 3.
- Area 4
This area resembles The Crystal Tower - First Floor. Has the only Save Crystal in the dungeon, and is where the Rairamuh Stack is fought. Defeating all three bosses creates an Exit Gate back to Nine Wood Hills.
Maps

Treasures
| Name | Location | Image |
|---|---|---|
| Mega-Potion | Area 1 | |
| Mega-Ether | Area 1 | |
| Phoenix Pinion | Area 2 | |
| Flash Bomb x3 | Area 2 | |
| Lightning Spellstone x2 | Area 2 | |
| Megalixir | Area 3 | |
| Arise Mirajewel | Area 3 | |
| War Gong x3 | Area 3 | |
| Mega Phoenix | Area 4 | |
| Haste Stone x4 | Area 4 |
- Joult Memento (defeat Rairamuh Stack)
- Voultr Memento (defeat Rairamuh Stack)
- Rairamuh Memento (defeat Rairamuh Stack)
- Girl's Diary, Entry 12 (defeat Rairamuh Stack)
Enemies
- Area 1
- Bihydra StackBombino, Bihydra x2
- Werebat x3
- Bombino x6
- Buer, Bomb, Blood Eye, Cocadrille, Black Nakk
- Area 2
- Magitek Armor x3
- Searcher x3, Magitek Armor
- Magitek Armor StackSearcher, Magitek Armor x2, Magitek Armor, Searcher
- Asterius, Memecoleous, Sandicore, Copper Gnome, Mordskull
- Area 3
- Mimic Jackpot (Monster-in-a-box)
- Mordskull x3, Imp
- Skull Eater x2, Imp x3
- Chrome Giant, Vampire, Werebat
- Tiamat, Sylph, Trihyde, Moogle
- Area 4
- Kuza Beast StackWater Golem, Sistertaur, Kuza Beast, Sistertaur x2
- Kuza Beast StackWater Golem, Sistertaur, Kuza Beast, Ghidra StackMindflayer, Ghidra, Wind Toad
- Unicorn StackWater Golem, Unicorn, Paleberry StackWater Golem, Paleberry x2
- Ghidra StackWind Toad, Mindflayer, Ghidra, Unicorn
- Rairamuh StackJoult, Voultr, Rairamuh (Boss stack)
Formations
| Area | Enemies | Notes |
|---|---|---|
| Area 1 | Bihydra StackBombino, Bihydra | — |
| Werebat x3 | — | |
| Bombino x6 | — | |
| Buer, Bomb, Blood Eye, Cocadrille, Black Nakk | — | |
| Area 2 | Magitek Armor x3 | — |
| Searcher x3, Magitek Armor | — | |
| Magitek Armor StackSearcher, Magitek Armor x2, Magitek Armor, Searcher | — | |
| Asterius, Memecoleous, Sandicore, Copper Gnome, Mordskull | — | |
| Area 3 | Mimic Jackpot | Monster-in-a-box encounter. |
| Mordskull x3, Imp | — | |
| Skull Eater x2, Imp x3 | — | |
| Chrome Giant, Vampire, Werebat | — | |
| Tiamat, Sylph, Trihyde, Moogle | — | |
| Area 4 | Kuza Beast StackWater Golem, Sistertaur, Kuza Beast, Sistertaur x2 | — |
| Kuza Beast StackWater Golem, Sistertaur, Kuza Beast, Ghidra StackMindflayer, Ghidra, Wind Toad | — | |
| Unicorn StackWater Golem, Unicorn, Paleberry StackWater Golem, Paleberry x2 | — | |
| Ghidra StackWind Toad, Mindflayer, Ghidra, Unicorn | — | |
| Rairamuh StackJoult, Voultr, Rairamuh (Boss stack) | — |
