Template:Sideicon
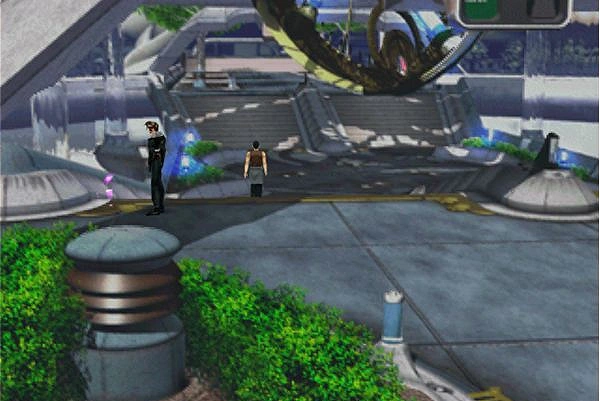
A full draw point on the left indicated by pink swirls.
By examining the draw points in the field and on the world map, you can draw magic. The draw points on the world map are completely hidden. Examine odd-looking areas carefully.
FFVIII Info Corner
Draw point is a gameplay element in Final Fantasy VIII where players can draw magic spells to be cast using the Magic command or junctioned to a player character's stats.
Development-wise, Square designed the draw points as a replacement for treasure chests, which are mainly absent in Final Fantasy VIII.[1]
Template:See Also
Mechanics
Draw point has been used up indicated by the blue swirls.
Draw points are scattered throughout the field map, while others are found on the overworld map. Draw points can be recognized by two or three glowing purple-pink lines rising from the ground in a swirl pattern. Most draw points refill over time, but there are a few draw points that do not (recognizable by the pale blue swirl lines appearing once the magic has been drawn, as opposed to the white swirl lines denoting refillable draw points).
Each draw point has 4 possible states, Each is recorded in 2 bits in the game data and there are 64 bytes reserved for this.
| State ID | Description |
|---|---|
| 0 | Fully stocked |
| 1 | Partially stocked |
| 2 | Empty but refills |
| 3 | Empty and doesn't refill |
Draw points start off at state 0 and move to state 2 or 3 when drawn from. There are two flags for each draw point, one which defines if the draw point is rich, and one which defines if it refills. The visibility of draw points is controlled by the field scripts.
The draw amount is given by the following formulas:
- for fields:
![{\displaystyle DrawAmount=(([0..255]+128)*DrawMod)/512+1}](https://services.fandom.com/mathoid-facade/v1/media/math/render/svg/f65567bef81750f17aec9c6c624bffa3cfb43905)
DrawMod is 20 if the draw point is rich, 10 if not, and this is halved if the draw point is partially stocked. This gives the following ranges:
- 6-15 if rich and fully stocked
- 3-8 if rich and partially stocked<
- 3-8 if not rich and fully stocked
- 2-4 if not rich and partially stocked
- for the world map:
DrawMod is 6 if the draw point is rich and 2 if not. This gives the following ranges:
- 2-5 if rich
- 1-2 if not rich
Draw points' refill-speed is determined by the number of steps the player takes, recorded in the game data (other features that are dictated by the number of steps taken are Rinoa's Angelo skills and the SeeD salary payment frequency). There's a hidden counter in the game data that resets every 10,240 steps. When reset, the draw points are checked and have a 50% chance of being partially restocked.
Some draw points are hidden and only revealed when the player junctions the support ability Move-Find. All draw points are free to draw from, with the exception of an Ultima draw point inside Shumi Village in the area beside the elevator. This draw point is guarded by three Shumi and costs 5,000 gil to access. Additionally, this is the only place, excluding the world map, to have a refillable draw point that contains Ultima.
Drawing magic from draw points 100 times in the Steam version earns the achievement Magic Miner.
World map draw points
Draw Points around the world.
World map draw points are invisible and give at maximum five spells, which is fewer than field draw points, but world map draw points will always refill. World map draw points can usually be found in any "unusual" area, such as tips of peninsulas, opening of railway tunnels, on railway bridges, on beaches and near landmarks, such as behind towns.
The Island Closest to Heaven and the Island Closest to Hell are known for their numerous draw points, all of which contain powerful spells.
Field draw points
Most field draw points are visible and recharge. The invisible ones can be revealed with the Move-Find ability. Even if most draw points are refillable, some exist in unrevisitable locations, meaning the player would have to run around in circles for a long time to be able to draw from them more than once.
List of field draw points
| Location | Spell | Refill | Visible | Accessible |
|---|---|---|---|---|
| Balamb Garden library next to the book shelf | Esuna | No | Yes | Until Time Compression |
| Balamb Garden training center | Blizzard | Yes | Yes | Until Time Compression |
| Balamb Garden courtyard | Cure | Yes | Yes | Until Time Compression |
| Fire Cavern | Fire | Yes | Yes | Always |
| Balamb outside junk shop | Thunder | Yes | Yes | Until Time Compression |
| Balamb harbor | Cure*after liberating the town in disc 2 this draw point also gives gil | Yes | Yes | Until Time Compression |
| Dollet Communications Tower | Blind | Yes | Yes | Only once |
| Timber forests in a Laguna dream | Cure | Yes | Yes | Only once |
| Timber forests in a Laguna dream | Water | Yes | Yes | Only once |
| Timber Maniacs Building left room | Blizzaga | No | No | Until Time Compression |
| Timber outside the pub | Cure | Yes | Yes | Until Time Compression |
| Timber Pub Aurora back alley | Scan | Yes | Yes | Until Time Compression |
| Centra Excavation Site | Sleep | Yes | Yes | Only once |
| Centra Excavation Site | Confuse | Yes | Yes | Only once |
| Centra Excavation Site | Cure | Yes | Yes | Only once |
| Dollet town square | Silence | Yes | Yes | Until Time Compression |
| Galbadia Garden lobby | Haste | Yes | No | Twice (Late Disc 1, Battle of the Gardens) |
| Galbadia Garden courtyard | Shell | Yes | Yes | Twice (Late Disc 1, Battle of the Gardens) |
| Galbadia Garden changing rooms | Life | Yes | Yes | Twice (Late Disc 1, Battle of the Gardens) |
| Galbadia Garden auditorium | Double | No | No | Twice (Late Disc 1, Battle of the Gardens) |
| Deling City park | Thundara | Yes | Yes | Until Time Compression |
| Tomb of the Unknown King - outside | Protect | Yes | Yes | Always |
| Tomb of the Unknown King - north room | Float | Yes | Yes | Always |
| Tomb of the Unknown King - east room | Cura | Yes | No | Always |
| Deling City Sewers | Esuna | Yes | Yes | Only once |
| Deling City Sewers | Zombie | Yes | Yes | Only once |
| Deling City Sewers | Bio | Yes | No | Only once |
| Winhill Laguna's room in the dream | Curaga | No | No | Until Time Compression |
| Winhill town square | Dispel | Yes | Yes | Until Time Compression |
| Winhill road south from town square | Drain | Yes | Yes | Until Time Compression |
| Winhill east road | Reflect | No | No | Until Time Compression |
| D-District Prison Floor 9 - right cell | Berserk | Yes | Yes | Only once |
| D-District Prison Floor 11 - right cell | Thundaga | No | No | Only once |
| Outside D-District Prison | Aero | Yes | Yes | Only once |
| Missile Base room with G-Soldiers who ask to deliver a message | Blind | Yes | Yes | Only once |
| Missile Base - silo room | Full-Life | Yes | No | Only once |
| Missile Base - control room | Blizzara | Yes | Yes | Only once |
| Balamb Garden cafeteria (only during Garden Riot) | Demi | No | No | Only once |
| Balamb Garden MD level | Full-Life | No | Yes | Only once |
| Balamb Garden B2 floor | Bio | Yes | No | Only once |
| Fishermans Horizon overlooking the sun panel | Regen | Yes | Yes | Until Time Compression |
| Fishermans Horizon Master Fisherman's fishing spot | Full-Life | No | No | Until Time Compression |
| Fishermans Horizon junk shop | Shell | Yes | Yes | Until Time Compression |
| Fishermans Horizon abandoned train station | Haste | Yes | No | Until Time Compression |
| Fishermans Horizon mayor's house | Ultima | No | No | Until Time Compression |
| Shumi Village - above ground | Ultima | Yes | Yes | Until Time Compression |
| Shumi Village - outside elder's house | Blizzaga | Yes | Yes | Until Time Compression |
| Shumi Village workshop | Firaga | Yes | Yes | Until Time Compression |
| Trabia Garden in front of the statue | Thundaga | Yes | Yes | Until Time Compression |
| Trabia Garden cemetery | Zombie | No | No | Until Time Compression |
| Trabia Garden stage | Aura | No | No | Until Time Compression |
| Centra Ruins platform after the first staircase | Drain | No | No | Always |
| Centra Ruins right ladder after the lift | Aero | Yes | Yes | Always |
| Centra Ruins next to the dome | Pain | No | No | Always |
| Outside Galbadia Garden during Garden war | Aura | No | No | Only once |
| Galbadia Garden ice rink | Protect | Yes | Yes | Only once |
| Edea's Orphanage | Curaga | Yes | Yes | Always |
| White SeeD Ship | Holy | Yes | Yes | Until Time Compression |
| Great Salt Lake dinosaur skeleton | Meteor | No | No | Until Time Compression |
| Great Salt Lake past the dinosaur skeleton | Thundaga | Yes | Yes | Until Time Compression |
| Lunatic Pandora Laboratory in a Laguna dream | Death | Yes | Yes | Only once |
| Esthar Odine's Lab in a Laguna dream | Double | Yes | Yes | Until Time Compression |
| Esthar Odine's Lab in a Laguna dream | Flare | No | No | Until Time Compression |
| Esthar outside palace | Blizzard | Yes | Yes | Until Time Compression |
| Esthar outside Odine's Lab | Quake | Yes | Yes | Until Time Compression |
| Esthar city streets near city entrance | Curaga | Yes | Yes | Until Time Compression |
| Esthar shopping mall | Tornado | Yes | Yes | Until Time Compression |
| Tears' Point entrance | Life | Yes | Yes | Always |
| Tears' Point middle | Reflect | No | Yes | Always |
| Lunar Base Ellone's room | Meteor | No | No | Only once |
| Lunar Base room before the escape pods | Meltdown | Yes | No | Only once |
| Ragnarok hangar upstairs | Life | Yes | No | Always |
| Ragnarok room with a red Propagator | Cura | Yes | No | Always |
| Ragnarok room with save point | Full-Life | No | No | Always |
| Sorceress Memorial | Stop | Yes | Yes | Until Time Compression |
| Deep Sea Research Center second level | Dispel | Yes | Yes | Always |
| Deep Sea Research Center secret room | Esuna | Yes | Yes | Always |
| Deep Sea Research Center third screen on the way to Ultima Weapon's lair | Triple | No | No | Always |
| Deep Sea Research Center fifth screen on the way to Ultima Weapon's lair | Ultima | No | No | Always |
| Lunatic Pandora entrance | Meteor | Yes | Yes | Until Time Compression |
| Lunatic Pandora elevator room | Curaga | Yes | Yes | Until Time Compression |
| Lunatic Pandora hallways | Confuse | Yes | Yes | Until Time Compression |
| Lunatic Pandora near Elevator #1 | Holy | No | Yes | Until Time Compression |
| Lunatic Pandora | Ultima*only appears if the Laguna scenario earlier was completed successfully | No | Yes | Until Time Compression |
| Lunatic Pandora | Silence*only appears if the Laguna scenario earlier was completed successfully | Yes | Yes | Until Time Compression |
| Lunatic Pandora on the way to fight Adel | Break | Yes | Yes | Until Time Compression |
| Edea's Orphanage in the future | Triple | No | Yes | Always |
| Ultimecia Castle outside | Flare | No | No | Always |
| Ultimecia Castle wine cellar | Aura | No | No | Always |
| Ultimecia Castle treasure room | Holy | No | No | Always |
| Ultimecia Castle terrace | Meteor | No | No | Always |
| Ultimecia Castle art gallery | Meltdown | No | No | Always |
| Ultimecia Castle armory | Ultima | No | No | Always |
| Ultimecia Castle passageway | Cura | Yes | Yes | Always |
| Ultimecia Castle storage room | Curaga | Yes | No | Always |
| Ultimecia Castle prison | Full-Life | No | No | Always |
| Ultimecia Castle courtyard | Slow | Yes | Yes | Always |
| Ultimecia Castle chapel | Dispel | Yes | Yes | Always |
| Ultimecia Castle the balcony where Tiamat is fought | Triple | No | No | Always |
| Ultimecia Castle clock tower | Stop | Yes | Yes | Always |
Gallery
")
")
")
")
References
Template:FFVIII