(j) |
Whirl Roller (talk | contribs) mNo edit summary |
||
| (40 intermediate revisions by 14 users not shown) | |||
| Line 1: | Line 1: | ||
| + | {{sideicon|prime=FFIII|PFF|FFAB|FFRK|FFBE}} |
||
| ⚫ | |||
| + | {{infobox location |
||
| − | [[File:Doga's Grotto - Entrance.jpg|thumb|right|The entrance to Doga's Grotto via Doga's Manor.]] |
||
| + | |name=Doga's Grotto |
||
| ⚫ | '''Doga's Grotto''' |
||
| + | |release=FFIII |
||
| + | |japanese=ドーガの洞窟 |
||
| + | |romaji=Dooga no Doukutsu |
||
| + | |lit= |
||
| + | |image=<gallery> |
||
| + | Doga's Grotto.jpg|Grotto |
||
| + | Doga's Grotto - Entrance.jpg|Entrance |
||
| + | </gallery> |
||
| + | |type=Grotto |
||
| + | |region=Accessed through [[Doga's Manor]], [[Final Fantasy III locations#Surface World|Surface World]] |
||
| + | |residents=[[Doga]], [[Unei]] |
||
| + | |items={{collapsible text|header=Famicon|content= |
||
| + | *40000 gil (total) |
||
| + | *[[Final Fantasy III items#Light Curtain|Barrier]] x4 |
||
| ⚫ | |||
| + | {{collapsible text|header=3D|content= |
||
| + | *20000 gil (total) |
||
| + | *[[Final Fantasy III weapons#Rising Sun|Rising Sun]] |
||
| + | *[[Final Fantasy III weapons#Lust Dagger|Lust Dagger]] |
||
| + | *[[Final Fantasy III items#White Musk|White Musk]] |
||
| + | *[[Final Fantasy III items#Chocobo's Wrath|Chocobo's Wrath]] |
||
| + | *[[Final Fantasy III items#Phoenix Down|Phoenix Down]] x2 |
||
| + | }} |
||
| ⚫ | |||
| ⚫ | |||
| + | *[[Nemesis (Final Fantasy III)|Nemesis]] |
||
| + | *[[Ogre (Final Fantasy III)|Ogre]] |
||
| + | *[[Peryton (Final Fantasy III)|Peryton]] |
||
| ⚫ | |||
| ⚫ | |||
| + | |quests=*Unsealing the Eureka key |
||
| + | }} |
||
| ⚫ | '''Doga's Grotto''' is a location in ''[[Final Fantasy III]]'', and is only visitable until the boss that lies within is defeated. When the party returns to [[Doga's Manor]] after defeating [[Hecatoncheir (Final Fantasy III)|Hecatoncheir]] at the [[Cave of Shadows]], [[Doga]] creates a teleport circle to the grotto. Doga and [[Unei]] await at the end to repair the [[Final Fantasy III items#Eureka Key|Eureka Key]]. Once both Doga and Unei surrender the key and expire after the battle with them, the Warriors of the Light can [[Unrevisitable locations|never return to this grotto again]]. |
||
| − | ==Story== |
+ | == Story == |
| − | {{ |
+ | {{spoiler}} |
| − | After obtaining the Fang of Earth at the [[Cave of Shadows]], [[Doga]] and [[Unei]] telepathically call the [[ |
+ | After obtaining the Fang of Earth at the [[Cave of Shadows]], [[Doga]] and [[Unei]] telepathically call the [[Warriors of Light|Warriors of the Light]] to Doga's Manor. Upon entering Doga's home, the wizard creates a warp circle to the Grotto, and asks the Warriors to meet him and Unei at the bottom. |
| − | Upon meeting with the two students of [[Noah (Final Fantasy III)|Noah |
+ | Upon meeting with the two students of [[Noah (Final Fantasy III)|Noah's]], the Warriors of the Light are faced with a great challenge: defeat them in battle so as to release energy to unseal the Eureka key. Felling Doga and Unei heavily shakes the morale of the Warriors of the Light, but their incorporeal and eternal souls cheer them with support, giving them the Eureka and Syrcus key as well. |
| − | After this ordeal, the Warriors of Light head to the [[Crystal Tower]], to face [[Xande]]. |
+ | After this ordeal, the Warriors of the Light head to the [[Crystal Tower]], to face [[Xande]]. |
| − | {{ |
+ | {{Endspoiler}} |
| − | == |
+ | == Items == |
| − | {|class="half-width table" style="text-align:center" |
+ | {|class="half-width FFIII article-table" style="text-align:center" |
| − | |-class=" |
+ | |-class="a" |
| − | !width="15%"| |
+ | !width="15%"|Famicom |
| − | !width="15%"| |
+ | !width="15%"|3D |
!width="20%"|Location |
!width="20%"|Location |
||
|- |
|- |
||
| − | !class=" |
+ | !class="b"|20000 Gil |
| − | !class=" |
+ | !class="b"|10000 Gil |
|Second Floor |
|Second Floor |
||
|- |
|- |
||
| − | !class=" |
+ | !class="b"|20000 Gil |
| − | !class=" |
+ | !class="b"|10000 Gil |
|Second Floor |
|Second Floor |
||
|- |
|- |
||
| − | !class=" |
+ | !class="b"|[[Final Fantasy III items#Light Curtain|Barrier]] |
| − | !class=" |
+ | !class="b"|[[Final Fantasy III weapons#Rising Sun|Rising Sun]] |
|Left room at Third Floor |
|Left room at Third Floor |
||
|- |
|- |
||
| − | !class=" |
+ | !class="b"|[[Final Fantasy III items#Light Curtain|Barrier]] |
| − | !class=" |
+ | !class="b"|[[Final Fantasy III weapons#Lust Dagger|Lust Dagger]] |
|Left room at Third Floor |
|Left room at Third Floor |
||
|- |
|- |
||
| − | !class=" |
+ | !class="b"|[[Final Fantasy III items#Light Curtain|Barrier]] |
| − | !class=" |
+ | !class="b"|[[Final Fantasy III items#White Musk|White Musk]] |
|Left room at Third Floor |
|Left room at Third Floor |
||
|- |
|- |
||
| − | !class=" |
+ | !class="b"|[[Final Fantasy III items#Light Curtain|Barrier]] |
| − | !class=" |
+ | !class="b"|[[Final Fantasy III items#Chocobo's Wrath|Chocobo's Wrath]] |
|Right room at Third Floor |
|Right room at Third Floor |
||
|- |
|- |
||
| − | !class=" |
+ | !class="b"| |
| − | !class=" |
+ | !class="b"|[[Final Fantasy III items#Phoenix Down|Phoenix Down]] |
|Fourth Floor |
|Fourth Floor |
||
|- |
|- |
||
| − | !class=" |
+ | !class="b"| |
| − | !class=" |
+ | !class="b"|[[Final Fantasy III items#Phoenix Down|Phoenix Down]] |
|Fourth Floor |
|Fourth Floor |
||
|} |
|} |
||
| − | == |
+ | == Enemies == |
| + | ;First area |
||
| ⚫ | |||
| − | *[[ |
+ | * [[Nemesis (Final Fantasy III)|Nemesis]] x2 |
| − | *[[Cyclops (Final Fantasy III)|Cyclops]] |
+ | * [[Cyclops (Final Fantasy III)|Cyclops]] x2 |
| − | *[[ |
+ | * [[Peryton (Final Fantasy III)|Peryton]] |
| + | ;Second area |
||
| ⚫ | |||
| + | * [[Peryton (Final Fantasy III)|Peryton]] |
||
| ⚫ | |||
| + | * [[Nemesis (Final Fantasy III)|Nemesis]] x2 |
||
| ⚫ | |||
| + | * [[Ogre (Final Fantasy III)|Ogre]], [[Humbaba (Final Fantasy III)|Humbaba]] |
||
| + | * [[Ogre (Final Fantasy III)|Ogre]], [[Humbaba (Final Fantasy III)|Humbaba]] x2 |
||
| + | * [[Cyclops (Final Fantasy III)|Cyclops]] x2 |
||
| + | ;Third area |
||
| + | * [[Cyclops (Final Fantasy III)|Cyclops]] x2 |
||
| + | * [[Peryton (Final Fantasy III)|Peryton]] |
||
| + | * [[Nemesis (Final Fantasy III)|Nemesis]] x2 |
||
| + | ;Third area, upper left room |
||
| + | * [[Cyclops (Final Fantasy III)|Cyclops]] x2 |
||
| + | * [[Peryton (Final Fantasy III)|Peryton]] |
||
| + | * [[Ogre (Final Fantasy III)|Ogre]], [[Humbaba (Final Fantasy III)|Humbaba]] x2 |
||
| + | * [[Nemesis (Final Fantasy III)|Nemesis]] x2 |
||
| + | ;Third area, lower left room |
||
| + | * [[Ogre (Final Fantasy III)|Ogre]], [[Humbaba (Final Fantasy III)|Humbaba]] x2 |
||
| + | * [[Cyclops (Final Fantasy III)|Cyclops]] x2 |
||
| + | * [[Peryton (Final Fantasy III)|Peryton]] |
||
| + | * [[Nemesis (Final Fantasy III)|Nemesis]] x2 |
||
| + | * [[Ogre (Final Fantasy III)|Ogre]], [[Humbaba (Final Fantasy III)|Humbaba]] |
||
| + | ;Third area, right room |
||
| + | * [[Cyclops (Final Fantasy III)|Cyclops]] x2 |
||
| + | * [[Nemesis (Final Fantasy III)|Nemesis]] x2 |
||
| + | * [[Ogre (Final Fantasy III)|Ogre]], [[Humbaba (Final Fantasy III)|Humbaba]] x2 |
||
| + | * [[Ogre (Final Fantasy III)|Ogre]], [[Humbaba (Final Fantasy III)|Humbaba]] |
||
| + | * [[Peryton (Final Fantasy III)|Peryton]] |
||
| + | ;Fourth area |
||
| + | * [[Cyclops (Final Fantasy III)|Cyclops]] x2 |
||
| + | * [[Ogre (Final Fantasy III)|Ogre]], [[Humbaba (Final Fantasy III)|Humbaba]] |
||
| + | * [[Peryton (Final Fantasy III)|Peryton]] |
||
| + | * [[Nemesis (Final Fantasy III)|Nemesis]] x2 |
||
| + | * [[Ogre (Final Fantasy III)|Ogre]], [[Humbaba (Final Fantasy III)|Humbaba]] x2 |
||
| + | ;Fifth area |
||
| + | * [[Doga (boss)|Doga]] (boss) |
||
| + | * [[Unei (boss)|Unei]] (boss) |
||
| − | ==Battle Background== |
+ | == Battle Background == |
[[File:AncientRuins.PNG]] |
[[File:AncientRuins.PNG]] |
||
| + | == Musical themes == |
||
| − | ==Music== |
||
| − | {{ |
+ | {{audio|filename=FFIII - Pavillion of Doga and Unei.ogg|title="Pavilion of Dorga and Une" from ''Final Fantasy III'' (DS)}} |
Doga's Grotto shares the background theme with that of Doga's Manor: "Pavilion of Dorga and Une". |
Doga's Grotto shares the background theme with that of Doga's Manor: "Pavilion of Dorga and Une". |
||
| − | {{ |
+ | {{clear}} |
| + | == Other appearances == |
||
| ⚫ | |||
| + | ===''[[Pictlogica Final Fantasy]]''=== |
||
| − | {{Gallery |
||
| + | |||
| ⚫ | |||
| + | {{Equipment section|Pictlogica Final Fantasy}} |
||
| ⚫ | |||
| + | |||
| ⚫ | |||
| + | === ''[[Final Fantasy Airborne Brigade]]'' === |
||
| ⚫ | |||
| + | |||
| ⚫ | |||
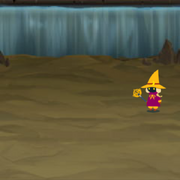
| + | [[File:Doga's Grotto Battle Brigade.png|right|thumb]] |
||
| ⚫ | |||
| + | {{Section|Final Fantasy Airborne Brigade}} |
||
| + | {{clear}} |
||
| + | |||
| + | === ''[[Final Fantasy Record Keeper]]'' === |
||
| + | |||
| ⚫ | |||
| + | {{Location section|Final Fantasy Record Keeper}} |
||
| + | {{clear}} |
||
| + | |||
| + | ===''[[Final Fantasy Brave Exvius]]''=== |
||
| + | <gallery> |
||
| + | FFBE Doga's Grotto.png| |
||
| + | FFBE Doga's Grotto 2.png| |
||
| + | FFBE Doga's Grotto 3.png| |
||
| + | FFBE Doga's Grotto BG.png|Battle background. |
||
| + | </gallery> |
||
| + | {{Location section|Final Fantasy Brave Exvius}} |
||
| + | |||
| ⚫ | |||
| + | <gallery> |
||
| ⚫ | |||
| ⚫ | |||
| ⚫ | |||
| ⚫ | |||
| ⚫ | |||
| + | FFRK Doga's Grotto JP FFIII.png|The Japanese dungeon image for ''Doga's Grotto'' in ''Final Fantasy Record Keeper''. |
||
| + | </gallery> |
||
| − | {{FFIII}} |
+ | {{navbox setting FFIII}} |
| − | [[Category:Final Fantasy III |
+ | [[Category:Locations in Final Fantasy III]] |
Revision as of 16:59, 29 January 2020
Template:Sideicon Doga's Grotto is a location in Final Fantasy III, and is only visitable until the boss that lies within is defeated. When the party returns to Doga's Manor after defeating Hecatoncheir at the Cave of Shadows, Doga creates a teleport circle to the grotto. Doga and Unei await at the end to repair the Eureka Key. Once both Doga and Unei surrender the key and expire after the battle with them, the Warriors of the Light can never return to this grotto again.
Story
After obtaining the Fang of Earth at the Cave of Shadows, Doga and Unei telepathically call the Warriors of the Light to Doga's Manor. Upon entering Doga's home, the wizard creates a warp circle to the Grotto, and asks the Warriors to meet him and Unei at the bottom.
Upon meeting with the two students of Noah's, the Warriors of the Light are faced with a great challenge: defeat them in battle so as to release energy to unseal the Eureka key. Felling Doga and Unei heavily shakes the morale of the Warriors of the Light, but their incorporeal and eternal souls cheer them with support, giving them the Eureka and Syrcus key as well.
After this ordeal, the Warriors of the Light head to the Crystal Tower, to face Xande.
Items
| Famicom | 3D | Location |
|---|---|---|
| 20000 Gil | 10000 Gil | Second Floor |
| 20000 Gil | 10000 Gil | Second Floor |
| Barrier | Rising Sun | Left room at Third Floor |
| Barrier | Lust Dagger | Left room at Third Floor |
| Barrier | White Musk | Left room at Third Floor |
| Barrier | Chocobo's Wrath | Right room at Third Floor |
| Phoenix Down | Fourth Floor | |
| Phoenix Down | Fourth Floor |
Enemies
- First area
- Second area
- Third area
- Third area, upper left room
- Third area, lower left room
- Third area, right room
- Fourth area
- Fifth area
Battle Background

Musical themes
Doga's Grotto shares the background theme with that of Doga's Manor: "Pavilion of Dorga and Une".
Other appearances
Pictlogica Final Fantasy
Final Fantasy Airborne Brigade

Final Fantasy Record Keeper
Final Fantasy Brave Exvius
")
")
")
")
Gallery
")
")
")
")
")
")