mNo edit summary |
Intangir Bot (talk | contribs) m (Renaming categories in accordance with Forum:Category overhaul and categories for redirects) |
||
| (39 intermediate revisions by 14 users not shown) | |||
| Line 1: | Line 1: | ||
| − | {{sideicon|FFXIII}} |
+ | {{sideicon|prime=FFXIII}} |
{{incompletetable|"Requiem of the Goddess" fight}} |
{{incompletetable|"Requiem of the Goddess" fight}} |
||
| + | {{infobox enemy |
||
| − | {{FFXIII-2 multi Enemies |
||
| + | | release = XIII2 |
||
| name = Chaos Bahamut |
| name = Chaos Bahamut |
||
| + | | image = Chaos Bahamut render.png |
||
| − | | Enemy = Boss |
||
| + | | japanese = バハムート・カオス |
||
| − | | Other Names = |
||
| + | | romaji = Bahamūto Kaosu |
||
| − | | Japanese = バハムート・カオス |
||
| + | | type = Boss |
||
| − | | Romaji = Bahamūto Kaosu |
||
| + | | location = [[Valhalla (Fabula Nova Crystallis)|Valhalla]] -??? AF-<br>[[Academia]] -500 AF- |
||
| − | | tab 1 = Valhalla |
||
| + | | character = [[Chaos Bahamut (Final Fantasy XIII)|Chaos Bahamut]] |
||
| − | | tab 2 = Academia |
||
| − | | image = [[File:Chaos Bahamut render.png]] |
||
| − | | Level = |
||
| − | | HP = 24,000 |
||
| − | | Strength = 2,000 |
||
| − | | Magic = 2,000 |
||
| − | | Stagger = None |
||
| − | | Chain Res = 99 |
||
| − | | Keep = 100 |
||
| − | | Launch = Immune |
||
| − | | Libra = 0 |
||
| − | | CP = 0 |
||
| − | | Gil = 0 |
||
| − | | Fire = - |
||
| − | | Ice = - |
||
| − | | Lightning = - |
||
| − | | Wind = - |
||
| − | | Physical = - |
||
| − | | Magical = - |
||
| − | | Deprotect = 30% |
||
| − | | Deshell = 30% |
||
| − | | Imperil = 30% |
||
| − | | Poison = 30% |
||
| − | | Slow = 30% |
||
| − | | Pain = 30% |
||
| − | | Fog = 30% |
||
| − | | Debrave = 30% |
||
| − | | Defaith = 30% |
||
| − | | Curse = 30% |
||
| − | | Daze = 30% |
||
| − | | Provoke = 30% |
||
| − | | Wound = 0% |
||
| − | | Death = 30% |
||
| − | | Dispel = 0% |
||
| − | | Other names = |
||
| − | | Location = [[Valhalla (Fabula Nova Crystallis)|Valhalla]] -??? AF- |
||
| − | | Type = Special |
||
| − | | Subtype = [[Eidolon]]s |
||
| − | | Recruit Chance = Untameable |
||
| − | | Common Drop = None |
||
| − | | Rare Drop = None |
||
| − | | Abilities = Umbral Vise, [[Inferno (Ability)|Inferno]], Ignis, [[Megaflare]] |
||
| − | | Notes = - |
||
| − | | 2 image = [[File:Chaos Bahamut render.png]] |
||
| − | | 2 Level = |
||
| − | | 2 HP = 79,930 |
||
| − | | 2 Strength = 485 |
||
| − | | 2 Magic = 420 |
||
| − | | 2 Stagger = None |
||
| − | | 2 Chain Res = 60 |
||
| − | | 2 Keep = 100 |
||
| − | | 2 Launch = Immune |
||
| − | | 2 Libra = 51 |
||
| − | | 2 CP = 300 |
||
| − | | 2 Gil = 450 |
||
| − | | 2 Fire = Halved |
||
| − | | 2 Ice = Halved |
||
| − | | 2 Lightning = Halved |
||
| − | | 2 Wind = Halved |
||
| − | | 2 Physical = Halved |
||
| − | | 2 Magical = Halved |
||
| − | | 2 Deprotect = 70% |
||
| − | | 2 Deshell = 70% |
||
| − | | 2 Imperil = 70% |
||
| − | | 2 Poison = Immune |
||
| − | | 2 Slow = 90% |
||
| − | | 2 Pain = Immune |
||
| − | | 2 Fog = Immune |
||
| − | | 2 Debrave = 70% |
||
| − | | 2 Defaith = 70% |
||
| − | | 2 Curse = Immune |
||
| − | | 2 Daze = Immune |
||
| − | | 2 Provoke = Immune |
||
| − | | 2 Wound = Immune |
||
| − | | 2 Death = Immune |
||
| − | | 2 Dispel = Immune |
||
| − | | 2 Other names = |
||
| − | | 2 Location = [[Academia]] -500 AF- |
||
| − | | 2 Type = Special |
||
| − | | 2 Subtype = [[Eidolon (Final Fantasy XIII)|Eidolons]] |
||
| − | | 2 Recruit Chance = Untameable |
||
| − | | 2 Common Drop = [[Phoenix Down]] (50%) |
||
| − | | 2 Rare Drop = Phoenix Blood (10%) |
||
| − | | 2 Abilities = Metamorphosis, [[Whirlwind (Ability)|Whirlwind]], Umbral Vise, [[Inferno (Ability)|Inferno]], [[Megaflare]] |
||
| − | | 2 Notes = Can alter own form.<br/>Cannot be provoked.<br/>Immune to wounding attacks that reduce maximum HP. |
||
| − | | tab 3 = RotG DLC |
||
| − | | 3 image = [[File:Chaos Bahamut render.png]] |
||
| − | | 3 HP = 3,285,000 |
||
| − | | 3 Strength = |
||
| − | | 3 Magic = |
||
| − | | 3 Stagger = 400.0% |
||
| − | | 3 Chain Res = 40 |
||
| − | | 3 Keep = |
||
| − | | 3 Launch = Immune |
||
| − | | 3 Libra = |
||
| − | | 3 CP = 10,000 |
||
| − | | 3 Gil = |
||
| − | | 3 Fire = Halved |
||
| − | | 3 Ice = Halved |
||
| − | | 3 Lightning = Halved |
||
| − | | 3 Wind = Halved |
||
| − | | 3 Physical = Halved |
||
| − | | 3 Magical = Halved |
||
| − | | 3 Deprotect = |
||
| − | | 3 Deshell = |
||
| − | | 3 Imperil = |
||
| − | | 3 Poison = |
||
| − | | 3 Slow = |
||
| − | | 3 Pain = |
||
| − | | 3 Fog = |
||
| − | | 3 Debrave = |
||
| − | | 3 Defaith = |
||
| − | | 3 Curse = Immune |
||
| − | | 3 Daze = Immune |
||
| − | | 3 Provoke = |
||
| − | | 3 Wound = |
||
| − | | 3 Death = |
||
| − | | 3 Dispel = |
||
| − | | 3 Other names = |
||
| − | | 3 Location = [[Valhalla (Fabula Nova Crystallis)|Valhalla]] -??? AF- |
||
| − | | 3 Type = Special |
||
| − | | 3 Subtype = [[Eidolon (Final Fantasy XIII)|Eidolons]] |
||
| − | | 3 Recruit Chance = Untameable |
||
| − | | 3 Common Drop = None |
||
| − | | 3 Rare Drop = None |
||
| − | | 3 Abilities = [[Inferno (Ability)|Inferno]], Metamorphosis, Obliterating Breath, Resist Lightning, Resist Wind, Umbral Vise, [[Whirlwind (Ability)|Whirlwind]], [[Megaflare]] |
||
| − | | 3 Notes = |
||
}} |
}} |
||
{{Q|Cast your shadow over all, wings of night!|Caius when he transforms into Chaos Bahamut}} |
{{Q|Cast your shadow over all, wings of night!|Caius when he transforms into Chaos Bahamut}} |
||
| − | '''Chaos Bahamut''' |
+ | '''Chaos Bahamut''' is a [[boss]] in ''[[Final Fantasy XIII-2]]''. It is an [[Eidolon (Final Fantasy XIII)|Eidolon]] incarnated by [[Caius Ballad]]. It first appears in the pregame tutorial, and later as a boss. Chaos Bahamut is weaker than the three other [[Bahamut]]s: [[Amber Bahamut]], [[Garnet Bahamut]], and [[Jet Bahamut]]. |
| − | Chaos Bahamut's main appearance |
+ | Chaos Bahamut's main appearance is at the end of [[Academia]] 500 AF. |
| − | Chaos Bahamut is also fought in the DLC episode |
+ | Chaos Bahamut is also fought in the DLC episode [[Lightning's Story: Requiem of the Goddess|Requiem of the Goddess]]. |
| + | |||
| + | {{See Also|Chaos Bahamut (Final Fantasy XIII)}} |
||
| + | |||
| + | ==Stats== |
||
| + | {{infobox enemy stats XIII2 |
||
| + | | sec 1 = Valhalla -??? AF- |
||
| + | | location = [[Valhalla (Fabula Nova Crystallis)|Valhalla]] -??? AF- |
||
| + | | type = Special |
||
| + | | subtype = Eidolon |
||
| + | | hp = 24,000 |
||
| + | | strength = 2,000 |
||
| + | | magic = 2,000 |
||
| + | | stagger = None |
||
| + | | chain resistance = 99 |
||
| + | | cp = |
||
| + | | gil = |
||
| + | | keep = 100 |
||
| + | | launch = Immune |
||
| + | | libra = |
||
| + | | recruit name = |
||
| + | | recruit chance = |
||
| + | | fire = |
||
| + | | ice = |
||
| + | | lightning = |
||
| + | | wind = |
||
| + | | physical = |
||
| + | | magical = |
||
| + | | deprotect = 30 |
||
| + | | deshell = 30 |
||
| + | | slow = 30 |
||
| + | | poison = 30 |
||
| + | | imperil = 30 |
||
| + | | curse = 30 |
||
| + | | pain = 30 |
||
| + | | fog = 30 |
||
| + | | daze = 30 |
||
| + | | debrave = 30 |
||
| + | | defaith = 30 |
||
| + | | death = 30 |
||
| + | | dispel = 0 |
||
| + | | wound = 0 |
||
| + | | provoke = 30 |
||
| + | | common drop = |
||
| + | | rare drop = |
||
| + | | common drop rate = |
||
| + | | rare drop rate = |
||
| + | | abilities = [[Final Fantasy XIII-2 enemy abilities#Umbral Vise|Umbral Vise]], [[Final Fantasy XIII-2 enemy abilities#Inferno|Inferno]], [[Final Fantasy XIII-2 enemy abilities#Ignis|Ignis]], [[Final Fantasy XIII-2 enemy abilities#Megaflare|Megaflare]] |
||
| + | | notes = |
||
| + | | sec 2 = Academia -500 AF- |
||
| + | | 2 location = [[Academia]] -500 AF- |
||
| + | | 2 hp = 79,930 |
||
| + | | 2 strength = 485 |
||
| + | | 2 magic = 420 |
||
| + | | 2 chain resistance = 60 |
||
| + | | 2 cp = 300 |
||
| + | | 2 gil = 450 |
||
| + | | 2 fire = Halves |
||
| + | | 2 ice = Halves |
||
| + | | 2 lightning = Halves |
||
| + | | 2 wind = Halves |
||
| + | | 2 physical = Halves |
||
| + | | 2 magical = Halves |
||
| + | | 2 deprotect = 70 |
||
| + | | 2 deshell = 70 |
||
| + | | 2 imperil = 70 |
||
| + | | 2 poison = Immune |
||
| + | | 2 slow = 90 |
||
| + | | 2 pain = Immune |
||
| + | | 2 fog = Immune |
||
| + | | 2 debrave = 70 |
||
| + | | 2 defaith = 70 |
||
| + | | 2 curse = Immune |
||
| + | | 2 daze = Immune |
||
| + | | 2 provoke = Immune |
||
| + | | 2 wound = Immune |
||
| + | | 2 death = Immune |
||
| + | | 2 dispel = Immune |
||
| + | | 2 common drop = [[Final Fantasy XIII-2 enemy abilities#Phoenix Down|Phoenix Down]] |
||
| + | | 2 rare drop = [[Final Fantasy XIII-2 enemy abilities#Phoenix Blood|Phoenix Blood]] |
||
| + | | 2 common drop rate = 50 |
||
| + | | 2 rare drop rate = 10 |
||
| + | | 2 abilities = [[Final Fantasy XIII-2 enemy abilities#Metamorphosis|Metamorphosis]], [[Final Fantasy XIII-2 enemy abilities#Whirlwind|Whirlwind]], [[Final Fantasy XIII-2 enemy abilities#Umbral Vise|Umbral Vise]], [[Final Fantasy XIII-2 enemy abilities#Inferno|Inferno]], [[Final Fantasy XIII-2 enemy abilities#Megaflare|Megaflare]] |
||
| + | | 2 notes = - Can alter own form.<br/>- Cannot be provoked.<br/>- Immune to wounding attacks that reduce maximum HP. |
||
| + | | sec 3 = Requiem of the Goddess |
||
| + | | 3 hp = 3,285,000 |
||
| + | | 3 strength = |
||
| + | | 3 magic = |
||
| + | | 3 stagger = 400.0% |
||
| + | | 3 chain resistance = 40 |
||
| + | | 3 keep = |
||
| + | | 3 libra = |
||
| + | | 3 cp = 10,000 |
||
| + | | 3 gil = |
||
| + | | 3 fire = Halves |
||
| + | | 3 ice = Halves |
||
| + | | 3 lightning = Halves |
||
| + | | 3 wind = Halves |
||
| + | | 3 physical = Halves |
||
| + | | 3 magical = Halves |
||
| + | | 3 deprotect = |
||
| + | | 3 deshell = |
||
| + | | 3 imperil = |
||
| + | | 3 poison = |
||
| + | | 3 slow = |
||
| + | | 3 pain = |
||
| + | | 3 fog = |
||
| + | | 3 debrave = |
||
| + | | 3 defaith = |
||
| + | | 3 curse = Immune |
||
| + | | 3 daze = Immune |
||
| + | | 3 provoke = |
||
| + | | 3 wound = |
||
| + | | 3 death = |
||
| + | | 3 dispel = |
||
| + | | 3 abilities = [[Final Fantasy XIII-2 enemy abilities#Inferno|Inferno]], [[Final Fantasy XIII-2 enemy abilities#Metamorphosis|Metamorphosis]], [[Final Fantasy XIII-2 enemy abilities#Obliterating Breath|Obliterating Breath]], [[Final Fantasy XIII-2 enemy abilities#Resist Lightning|Resist Lightning]], [[Final Fantasy XIII-2 enemy abilities#Resist Wind|Resist Wind]], [[Final Fantasy XIII-2 enemy abilities#Umbral Vise|Umbral Vise]], [[Final Fantasy XIII-2 enemy abilities#Whirlwind|Whirlwind]], [[Final Fantasy XIII-2 enemy abilities#Megaflare|Megaflare]] |
||
| + | | 3 notes = |
||
| + | }} |
||
==Battle== |
==Battle== |
||
| − | ===Valhalla -??? AF- ( |
+ | ===Valhalla -??? AF- (prologue)=== |
| − | When Chaos Bahamut's HP has dropped to 50%, a cutscene will occur. The player must continue to fight until another cinematic action occurs. |
+ | When Chaos Bahamut's HP has dropped to 50%, a cutscene will occur. The player must continue to fight until another [[Command Synergy Battle#Cinematic Action|cinematic action]] occurs. |
| − | The second battle is still simple but Chaos Bahamut's moves have changed since the first battle. War's Benediction can be used to heal and it also grants the [[Haste ( |
+ | The second battle is still simple, but Chaos Bahamut's moves have changed since the first battle. War's Benediction can be used to heal and it also grants the [[Haste (status)|Haste status]]. |
| − | [[Megaflare]] can do major damage and Chaos Bahamut's moves that prevent the player from attacking it. During the [[Battle ( |
+ | [[Megaflare]] can do major damage and Chaos Bahamut's moves that prevent the player from attacking it. During the [[Battle (term)|battle]], a cutscene will play but the player must continue fighting until his HP has dropped to zero. |
====Strategy==== |
====Strategy==== |
||
| − | It is recommended to use Lightning Strike to fill up the [[Command Synergy Battle|ATB gauge]], as well as watching out for Chaos Bahamut's attacks. Ullr's Shield can be used to heal and gain two status boosts: [[Protect ( |
+ | It is recommended to use Lightning Strike to fill up the [[Command Synergy Battle|ATB gauge]], as well as watching out for Chaos Bahamut's attacks. Ullr's Shield can be used to heal and gain two status boosts: [[Protect (status)|Protect]] and [[Shell (status)|Shell]]. |
Using Graviton Cores will allow the player to fill up the ATB bar and attack. |
Using Graviton Cores will allow the player to fill up the ATB bar and attack. |
||
===Academia -500 AF-=== |
===Academia -500 AF-=== |
||
| − | Chaos Bahamut has two forms. At first he simply hovers before using Metamorphosis, upon which he becomes a flying mechanical wyvern. In its normal form, it will |
+ | Chaos Bahamut has two forms. At first he simply hovers before using Metamorphosis, upon which he becomes a flying mechanical wyvern. In its normal form, it will use potentially crippling physical attacks to beat down the party in sets of two. Soon he will change between forms and begin to use powerful magic instead, such as Megaflare, which deals a large amount of [[non-elemental]] damage with a side effect of [[Wound (term)|wounding]] the party. |
| − | Chaos Bahamut is immune to the Sentinel's [[Provoke ( |
+ | Chaos Bahamut is immune to the [[Sentinel (Final Fantasy XIII-2)|Sentinel's]] [[Provoke (status)|Provoke]] ability, but is susceptible to three debuffs: [[Deprotect (status)|Deprotect]], [[Deshell (status)|Deshell]], and [[Imperil (status)|Imperil]]. |
| + | |||
| + | Much like the [[Havoc Skytank]] from ''[[Final Fantasy XIII]]'', Chaos Bahamut is out of range of melee attacks; [[Serah Farron/Gameplay|Serah]] will use her bowsword in bow form, [[Noel Kreiss/Gameplay|Noel]] will throw his dual swords as a javelin, and [[Lightning (Final Fantasy XIII)/Gameplay#Final Fantasy XIII-2|both iterations of Lightning]] will use the gun mechanisms of their [[Gunblade (weapon type)|gunblades]]. |
||
====Strategy==== |
====Strategy==== |
||
| − | The best way to counter Chaos Bahamut's onslaught |
+ | The best way to counter Chaos Bahamut's onslaught is to use the all-Sentinel [[paradigm]], Tortoise, to minimize Megaflare's effect. As Chaos Bahamut is immune to the Sentinel's Provoke, the player will have to heal more often. Unless the party is fairly strong, it will be a good idea to have a Sentinel in all paradigms to minimize damage over a wide area. |
| − | It is recommended a good [[Medic (Final Fantasy XIII-2)|Medic]] is in at least one paradigm. Since Chaos Bahamut is susceptible to some debuffs a good [[Saboteur (Final Fantasy XIII-2)|Saboteur]] can |
+ | It is recommended a good [[Medic (Final Fantasy XIII-2)|Medic]] is in at least one paradigm. Since Chaos Bahamut is susceptible to some debuffs, a good [[Saboteur (Final Fantasy XIII-2)|Saboteur]] can exploit this weakness. Once the party boosts its [[Stagger|chain bonus]], Chaos Bahamut shouldn't take long to defeat. |
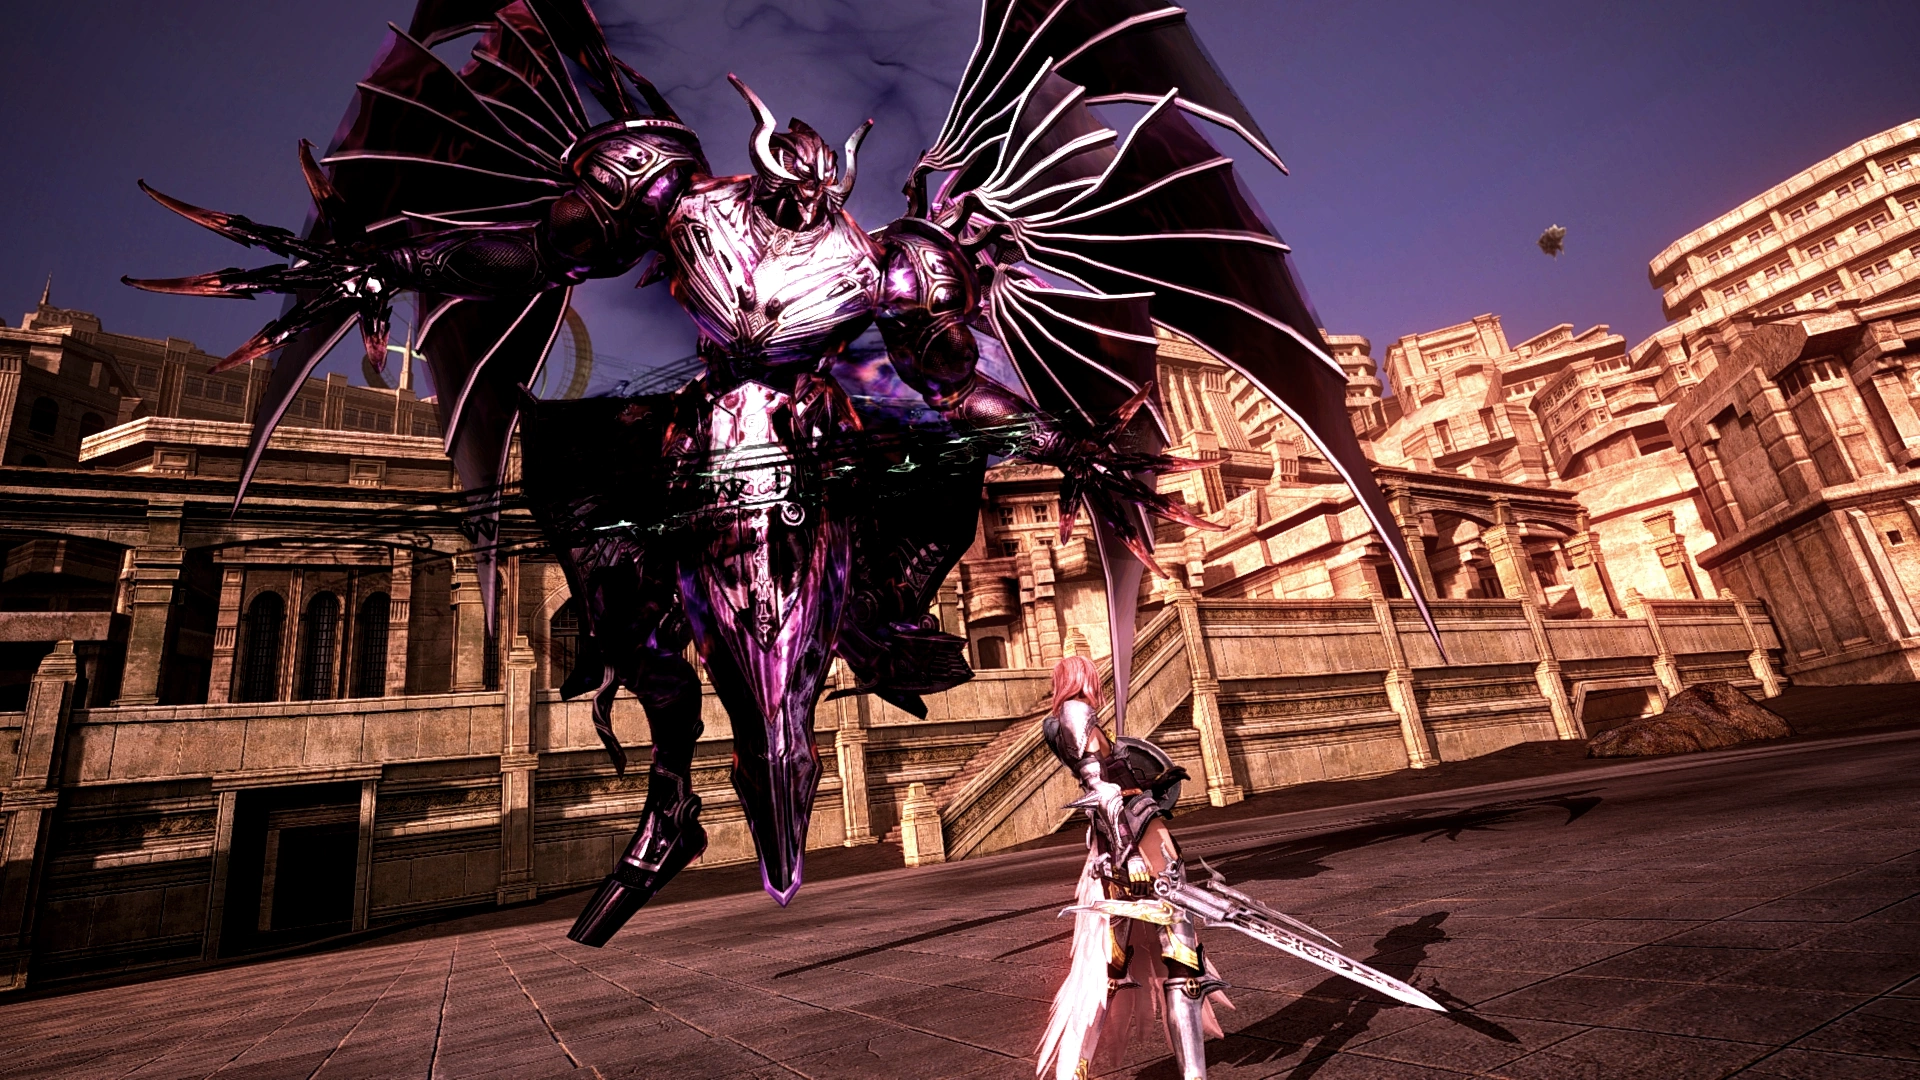
===Valhalla -??? AF- ("Requiem of the Goddess")=== |
===Valhalla -??? AF- ("Requiem of the Goddess")=== |
||
| + | [[File:Lightning Chaos Bahamut RotG.png|thumb|left|Caius transformed into Chaos Bahamut.]] |
||
| − | If player defeats Caius fast enough in "Requiem of the Goddess", Caius transforms into Chaos Bahamut and is fought in that form. |
||
| + | If the player defeats Caius fast enough he transforms into Chaos Bahamut who has the same abilities he has in his other battles, but in addition can use Resist Wind and Resist Lightning to change his vulnerabilities. Resist Wind makes him invulnerable to [[Wind (element)|Wind]] and physical attacks, and Resist Lightning immunizes him to [[Lightning (element)|Lightning]] and magic attacks. |
||
| + | The battle starts with Chaos Bahamut being in his normal form where he uses physical attacks and [[Whirlwind (ability)|Whirlwind]], Ignis, and Umbral Vise. After a while he transforms into his aerial form where his abilities vary depending on which resist is currently on. If under Resist Wind, he attacks with Pulsar Burst, and if under Resist Lightning, he attacks with Obliterating Breath. After being in aerial mode for a while he will use Megaflare and switch back to normal form and the cycle will begin anew. |
||
| − | Chaos Bahamut has the same abilities he has in his other battles, but in addition can use Resist Wind and Resist Lightning to change his vulnerabilities. When using Resist Wind, he will become invulnerable to [[Wind (Element)|Wind]] and physical attacks, and with Resist Lightning, will become immune to [[Lightning (Element)|Lightning]] and magic attacks. |
||
| + | Defeating the DLC's Chaos Bahamut with a [[Battle Results#Final Fantasy XIII-2|five star rank]] with Lightning's level at 9 or lower, nets Lightning in her [[Knight of Etro]] armor as a [[Paradigm Pack]] ally. |
||
| − | The battle starts with Chaos Bahamut being in his normal form where he uses physical attacks and [[Whirlwind (Ability)|Whirlwind]], Ignis, and Umbral Vise. After a while he transforms into his aerial form where his abilities vary depending on which resist is currently on. If he is under Resist Wind, he attacks only with Pulsar Burst, and if under Resist Lightning, he will only attack with Obliterating Breath. After being in aerial mode for a while he will use Megaflare and switch back to normal form and cycle will begin anew. |
||
====Strategy==== |
====Strategy==== |
||
| − | Chaos Bahamut changing his properties forces the player to use Mage and Shaman roles accordingly, because Mage uses Lightning-based magic attacks |
+ | Chaos Bahamut changing his properties forces the player to use Mage and Shaman roles accordingly, because Mage uses Lightning-based magic attacks and Shaman uses Wind-based physical attacks. |
| − | The key to victory is to pay close attention on his Resist-ability and use the correct role to drive up |
+ | The key to victory is to pay close attention on his Resist-ability and use the correct role to drive up the chain gauge. Same applies when using Paladin. [[Ruin (ability)|Ruin]] should be used when under Resist Wind and Attack when under Resist Lightning. When he switches to aerial form, it's important to keep an eye out for Megaflare, and when he is about to launch it, the player must quickly switch to Knight and use Immortality to survive. |
| − | |||
| − | ==Other Appearances== |
||
| − | [[File:FFB Chaos Bahamut.jpg|thumb|150px|Chaos Bahamut as it appears in ''Final Fantasy Airborne Brigade''.]] |
||
| − | ===''[[Final Fantasy Airborne Brigade]]''=== |
||
| − | Chaos Bahamut appeared in ''Final Fantasy Airborne Brigade'' for "a special event".<ref>http://www.siliconera.com/2012/03/03/chaos-bahamut-soars-into-final-fantasy-brigade/</ref> |
||
| − | {{-}} |
||
==Gallery== |
==Gallery== |
||
| + | <gallery> |
||
| − | {{Gallery |
||
| − | + | Bahamut Gestalt Mode Artwork FFXIII-2.jpg|Artwork. |
|
| − | + | XIII-2 Lightning on Odin.jpg|Chaos Bahamut fought in the game's prologue. |
|
| − | + | XIII-2 OdinBahamut2.jpg|Chaos Bahamut fought in the game's prologue. |
|
| − | + | XIII-2 OdinBahamut3.jpg|Chaos Bahamut fought in the game's prologue. |
|
| − | + | XIII-2 OdinBahamut4.jpg|Chaos Bahamut fought in the game's prologue. |
|
| − | + | Chaos-bahamut-cinematic-action.jpg|Performing Cinematic action against Chaos Bahamut. |
|
| + | FFXIII-2 Chaos Bahamut Final Battle.png|Chaos Bahamut before the final battle. |
||
| − | |File:RoTG umbral vise.PNG|Umbral Vise. |
||
| + | FFXIII-2_Chaos_Bahamut_RotG_DLC.png|Chaos Bahamut in the ''Requiem of the Goddess'' DLC. |
||
| − | |File:RoTG whirlwind.PNG|Whirlwind. |
||
| − | + | RoTG umbral vise.PNG|Umbral Vise. |
|
| − | + | RoTG whirlwind.PNG|Whirlwind. |
|
| + | 13-2 RoTG ignis.PNG|Ignis. |
||
| − | |File:FFXIII-2 Obliterating Breath.png|Obliterating Breath. |
||
| − | + | 13-2 RoTG pulsar burst2.PNG|Pulsar Burst. |
|
| − | + | FFXIII-2 Obliterating Breath.png|Obliterating Breath. |
|
| − | + | 13-2 RoTG resist lightning.PNG|Resist Lightning. |
|
| + | FFXIII-2 Inferno.png|Inferno. |
||
| − | }} |
||
| + | 13-2 RoTG megaflare.PNG|Megaflare. |
||
| + | </gallery> |
||
| + | |||
| + | ==Etymology== |
||
| + | {{Etym|Chaos}} |
||
| + | |||
| + | {{Etym|Bahamut}} |
||
==Trivia== |
==Trivia== |
||
*In the aerial fight between Lightning and Caius at the beginning of the game, sound designer Tomohiro Yajima overlapped the sounds made in the sky and automatically calculated the weight of the sound as objects pass to bring out the scene's presence and flashiness.<ref>http://www.destructoid.com/exclusive-meet-final-fantasy-xiii-2-s-sound-team-220375.phtml</ref> |
*In the aerial fight between Lightning and Caius at the beginning of the game, sound designer Tomohiro Yajima overlapped the sounds made in the sky and automatically calculated the weight of the sound as objects pass to bring out the scene's presence and flashiness.<ref>http://www.destructoid.com/exclusive-meet-final-fantasy-xiii-2-s-sound-team-220375.phtml</ref> |
||
| − | ==Related |
+ | ==Related enemies== |
*[[Twilight Odin]] |
*[[Twilight Odin]] |
||
| − | ==='' |
+ | ===''Final Fantasy XIII''=== |
| − | *[[Bahamut (Final Fantasy XIII)|Bahamut]] |
+ | *[[Bahamut (Final Fantasy XIII boss)|Bahamut]] |
| − | *[[Stiria ( |
+ | *[[Stiria (boss)|Stiria]] |
*[[Nix (Final Fantasy XIII)|Nix]] |
*[[Nix (Final Fantasy XIII)|Nix]] |
||
| − | *[[Odin (Final Fantasy XIII)|Odin]] |
+ | *[[Odin (Final Fantasy XIII boss)|Odin]] |
| − | *[[Brynhildr ( |
+ | *[[Brynhildr (boss)|Brynhildr]] |
| − | *[[Alexander (Final Fantasy XIII)|Alexander]] |
+ | *[[Alexander (Final Fantasy XIII boss)|Alexander]] |
| − | *[[Hecatoncheir (Final Fantasy XIII)|Hecatoncheir]] |
+ | *[[Hecatoncheir (Final Fantasy XIII boss)|Hecatoncheir]] |
==References== |
==References== |
||
{{Reflist}} |
{{Reflist}} |
||
| + | |||
| + | [[Category:Bosses in Final Fantasy XIII-2]] |
||
[[de:Bahamut Chaos]] |
[[de:Bahamut Chaos]] |
||
| − | [[Category:Final Fantasy XIII-2 Bosses]] |
||
Revision as of 22:52, 13 January 2019
Template:Sideicon

I couldn't finish 'em. Looks like this's gonna get complicated.
Cast your shadow over all, wings of night!
Caius when he transforms into Chaos Bahamut
Chaos Bahamut is a boss in Final Fantasy XIII-2. It is an Eidolon incarnated by Caius Ballad. It first appears in the pregame tutorial, and later as a boss. Chaos Bahamut is weaker than the three other Bahamuts: Amber Bahamut, Garnet Bahamut, and Jet Bahamut.
Chaos Bahamut's main appearance is at the end of Academia 500 AF.
Chaos Bahamut is also fought in the DLC episode Requiem of the Goddess.
Template:See Also
Stats
Valhalla -??? AF-
Academia -500 AF-
Requiem of the Goddess
Battle
Valhalla -??? AF- (prologue)
When Chaos Bahamut's HP has dropped to 50%, a cutscene will occur. The player must continue to fight until another cinematic action occurs.
The second battle is still simple, but Chaos Bahamut's moves have changed since the first battle. War's Benediction can be used to heal and it also grants the Haste status.
Megaflare can do major damage and Chaos Bahamut's moves that prevent the player from attacking it. During the battle, a cutscene will play but the player must continue fighting until his HP has dropped to zero.
Strategy
It is recommended to use Lightning Strike to fill up the ATB gauge, as well as watching out for Chaos Bahamut's attacks. Ullr's Shield can be used to heal and gain two status boosts: Protect and Shell.
Using Graviton Cores will allow the player to fill up the ATB bar and attack.
Academia -500 AF-
Chaos Bahamut has two forms. At first he simply hovers before using Metamorphosis, upon which he becomes a flying mechanical wyvern. In its normal form, it will use potentially crippling physical attacks to beat down the party in sets of two. Soon he will change between forms and begin to use powerful magic instead, such as Megaflare, which deals a large amount of non-elemental damage with a side effect of wounding the party.
Chaos Bahamut is immune to the Sentinel's Provoke ability, but is susceptible to three debuffs: Deprotect, Deshell, and Imperil.
Much like the Havoc Skytank from Final Fantasy XIII, Chaos Bahamut is out of range of melee attacks; Serah will use her bowsword in bow form, Noel will throw his dual swords as a javelin, and both iterations of Lightning will use the gun mechanisms of their gunblades.
Strategy
The best way to counter Chaos Bahamut's onslaught is to use the all-Sentinel paradigm, Tortoise, to minimize Megaflare's effect. As Chaos Bahamut is immune to the Sentinel's Provoke, the player will have to heal more often. Unless the party is fairly strong, it will be a good idea to have a Sentinel in all paradigms to minimize damage over a wide area.
It is recommended a good Medic is in at least one paradigm. Since Chaos Bahamut is susceptible to some debuffs, a good Saboteur can exploit this weakness. Once the party boosts its chain bonus, Chaos Bahamut shouldn't take long to defeat.
Valhalla -??? AF- ("Requiem of the Goddess")
Caius transformed into Chaos Bahamut.
If the player defeats Caius fast enough he transforms into Chaos Bahamut who has the same abilities he has in his other battles, but in addition can use Resist Wind and Resist Lightning to change his vulnerabilities. Resist Wind makes him invulnerable to Wind and physical attacks, and Resist Lightning immunizes him to Lightning and magic attacks.
The battle starts with Chaos Bahamut being in his normal form where he uses physical attacks and Whirlwind, Ignis, and Umbral Vise. After a while he transforms into his aerial form where his abilities vary depending on which resist is currently on. If under Resist Wind, he attacks with Pulsar Burst, and if under Resist Lightning, he attacks with Obliterating Breath. After being in aerial mode for a while he will use Megaflare and switch back to normal form and the cycle will begin anew.
Defeating the DLC's Chaos Bahamut with a five star rank with Lightning's level at 9 or lower, nets Lightning in her Knight of Etro armor as a Paradigm Pack ally.
Strategy
Chaos Bahamut changing his properties forces the player to use Mage and Shaman roles accordingly, because Mage uses Lightning-based magic attacks and Shaman uses Wind-based physical attacks.
The key to victory is to pay close attention on his Resist-ability and use the correct role to drive up the chain gauge. Same applies when using Paladin. Ruin should be used when under Resist Wind and Attack when under Resist Lightning. When he switches to aerial form, it's important to keep an eye out for Megaflare, and when he is about to launch it, the player must quickly switch to Knight and use Immortality to survive.
Gallery
")
")
")
")
")
")
")
")
")
")
")
")
")
")
")
")
Etymology
Chaos refers to the void state preceding the creation of the universe in Greek creation myths, or to the initial "gap" created by the original separation of heaven and earth. Chaos also refers to a state of disorder, disharmony, dissonance, lawlessness, and unpredictability.
Bahamut (Arabic بهموت Bahamūt) originated as an enormous whale in ancient pre-Islamic Arabian mythology. Upon Bahamut's back stands a bull with four thousand eyes, ears, noses, mouths, tongues and feet called Kujuta (also spelled "Kuyutha") (compared with the pair of Behemoth and Leviathan). Between each of these is a distance of a 500-year journey. On the back of Kujuta is a mountain of ruby. Atop this mountain is an angel who carries six hells, earth, and seven heavens on its shoulders.
Another version of the Arabic story is that Bahamut is indeed a dragon and he stands on a whale called Liwash.
In modern times, the game Dungeons & Dragons is responsible for reimagining Bahamut as the king of dragons, a benevolent Platinum Dragon; the opposite of the malevolent Tiamat, the five-headed Chromatic Queen of Dragons.
Trivia
- In the aerial fight between Lightning and Caius at the beginning of the game, sound designer Tomohiro Yajima overlapped the sounds made in the sky and automatically calculated the weight of the sound as objects pass to bring out the scene's presence and flashiness.[1]