RaptorCore7 (talk | contribs) |
m (Fix image option typo) |
||
| (27 intermediate revisions by 11 users not shown) | |||
| Line 1: | Line 1: | ||
| − | [[File:Battlegen.JPG |
+ | [[File:Battlegen.JPG|right|250px|thumb|Sephiroth lands an HP attack against Kuja, fulfilling Battlegen and receiving an Accessory.]] |
| − | '''Battlegen''' is a feature in ''[[Dissidia Final Fantasy]]'' and ''[[Dissidia 012 Final Fantasy]]''. It is a system that allows [[Accessory|accessories]] to be generated during battle, which are rewarded to the player if they win. To Battlegen an accessory, the player must either destroy part of the stage, or execute a certain type of attack on the opponent. When they do so, the words "Accessory created" will appear in the upper-left corner of the screen, along with an icon showing the level of the created accessory. Many rare items and equipment pieces can be traded for in the shop using Battlegen-exclusive accessories. |
+ | '''Battlegen''' is a feature in ''[[Dissidia Final Fantasy (2008)|Dissidia Final Fantasy]]'' and ''[[Dissidia 012 Final Fantasy]]''. It is a system that allows [[Accessory|accessories]] to be generated during battle, which are rewarded to the player if they win. To Battlegen an accessory, the player must either destroy part of the stage, or execute a certain type of attack on the opponent. When they do so, the words "Accessory created" will appear in the upper-left corner of the screen, along with an icon showing the level of the created accessory. Many rare items and equipment pieces can be traded for in the shop using Battlegen-exclusive accessories. |
==Performing Battlegen== |
==Performing Battlegen== |
||
| − | In ''Dissidia'', each character has four accessories that can only be acquired as a Battlegen when fighting them, with the exceptions of [[Gabranth/Dissidia|Gabranth]], [[Shantotto/Dissidia|Shantotto]], and [[Chaos (Final Fantasy)/Dissidia|Chaos]], who have three. In ''Dissidia 012'', each character only has three accessories that can be acquired from them. Each stage has an accessory that can be acquired through Battlegen, with the exception of [[Ultimecia Castle|Ultimecia's Castle]] which has two |
+ | In ''Dissidia'', each character has four accessories that can only be acquired as a Battlegen when fighting them, with the exceptions of [[Gabranth/Dissidia (PSP)|Gabranth]], [[Shantotto/Dissidia (PSP)|Shantotto]], and [[Chaos (Final Fantasy)/Dissidia|Chaos]], who have three. In ''Dissidia 012'', each character only has three accessories that can be acquired from them. Each stage has an accessory that can be acquired through Battlegen, with the exception of [[Ultimecia Castle|Ultimecia's Castle]] which has two. |
| ⚫ | |||
| ⚫ | Battlegen's success rate depends heavily on the opponent's level. Unless the opponent is at a specific level, the Battlegen success rate will be 0.1%, giving the player roughly a one in a thousand chance to win the item. The percentage rate increases when the opponent is at a set level or higher. For example, if the opponent faces a [[Warrior |
||
| + | Online and [[Friend Card]] ghost battles allow the player to Battlegen gems and equipped accessories after the option is purchased in the [[PP Catalog (Dissidia)|PP Catalog]], in addition to the items they could normally Battlegen against the opponent's character. Winning an item through Battlegen allows the player to win the next item, in order of Powder, Shard, Crystal and Orb. Generating the Powder accessory from a Cosmos character also allows the player to Battlegen against their Chaos counterpart, and generating from them allows Stage Destruction Battlegen. |
||
| ⚫ | Battlegen-exclusive accessories can be traded for a variety of other items in the [[Shop (Dissidia)|Shop]]. Most importantly, Battlegen accessories are needed to trade for the characters' exclusive weapons, such as five Time Orbs needed for Gabranth's Chaos Blade, three Recovery Crystals for [[Onion Knight ( |
||
| + | In ''Dissidia 012'', this was simplified; all characters can be generated immediately, with items received in order of Desire, Dream, and Hope. The names of the Battlegen items obtained from characters were renamed to reflect the name of the character's Manikin - for example, Warrior of Light, whose Manikin is named "False Hero", has his Battlegen items named Hero's Desire, Hero's Dream, and Hero's Hope. |
||
| ⚫ | Battlegen's success rate can be increased by a number of factors. The higher the level above the minimum required level, the easier it is to Battlegen the item. The Sunrise and Moonrise accessories raise the chance of Battlegen occurring by 1.2 times and 1.5 times respectively, and can be further strengthened through the use of Boosters. The Superslick also raises the Battlegen rate by 1.5 times, but has a chance to break. Equipping the "[[Combinations#Allure of Honey (4/4)|Allure of Honey]]" equipment raises the Battlegen rate by 1.5 times. Raising the player character's [[Luck ( |
||
| + | |||
| ⚫ | |||
| ⚫ | Battlegen's success rate depends heavily on the opponent's level. Unless the opponent is at a specific level, the Battlegen success rate will be 0.1%, giving the player roughly a one in a thousand chance to win the item. The percentage rate increases when the opponent is at a set level or higher. For example, if the opponent faces a [[Warrior of Light (Dissidia)|Warrior of Light]] who is Level 22 or below, there is only the aforementioned 0.1% chance of getting a Protect Shard. If the Warrior of Light is Level 23 or higher, the chance to win a Protect Shard greatly increases. The higher the level above the recommended level, the easier it is to Battlegen. For this reason, orb-type accessories, which have a recommended level of 100, are usually very difficult to win. The player may only Battlegen the same accessory once during a battle, even if they fulfill the requirements multiple times. |
||
| + | |||
| ⚫ | Battlegen-exclusive accessories can be traded for a variety of other items in the [[Shop (Dissidia)|Shop]]. Most importantly, Battlegen accessories are needed to trade for the characters' exclusive weapons, such as five Time Orbs needed for Gabranth's Chaos Blade, three Recovery Crystals for [[Onion Knight (Dissidia)|Onion Knight]]'s Royal Sword, and so forth. |
||
| + | |||
| ⚫ | Battlegen's success rate can be increased by a number of factors. The higher the level above the minimum required level, the easier it is to Battlegen the item. The Sunrise and Moonrise accessories raise the chance of Battlegen occurring by 1.2 times and 1.5 times respectively, and can be further strengthened through the use of Boosters. The Superslick also raises the Battlegen rate by 1.5 times, but has a chance to break. Equipping the "[[Combinations#Allure of Honey (4/4)|Allure of Honey]]" equipment raises the Battlegen rate by 1.5 times. Raising the player character's [[Luck (stat)|luck]] also helps. In the PP Catalog, the player can choose to purchase a temporary boost to their Battlegen rate for a certain number of battles. |
||
Note that Battlegen is not related to drop rate, which is an entirely separate occurrence. |
Note that Battlegen is not related to drop rate, which is an entirely separate occurrence. |
||
| − | ==Battlegen |
+ | ==Battlegen accessory list== |
===''Dissidia Final Fantasy''=== |
===''Dissidia Final Fantasy''=== |
||
| ⚫ | |||
| − | {|width="100%" |
||
| + | {|class="full-width DFF2008 article-table" style="text-align:center" |
||
| − | |width="50%" valign="top"| |
||
| + | |-class="a" |
||
| ⚫ | |||
| − | {|border=1 cellspacing=0 cellpadding=1 width=100% |
||
| − | |-bgcolor=#4682B4 style="color:white;" |
||
!width="20%"|Target |
!width="20%"|Target |
||
!width="30%"|Condition |
!width="30%"|Condition |
||
| Line 25: | Line 28: | ||
!width="35%"|Reward |
!width="35%"|Reward |
||
|- |
|- |
||
| − | !class=" |
+ | !class="b" rowspan=4|Warrior of Light |
|Inflict Break [[File:BattlegenIcon-Break.png|right]] |
|Inflict Break [[File:BattlegenIcon-Break.png|right]] |
||
|Level 2 |
|Level 2 |
||
| Line 42: | Line 45: | ||
|Protect Orb |
|Protect Orb |
||
|- |
|- |
||
| − | !class=" |
+ | !class="b" rowspan=4|Firion |
|Inflict Break [[File:BattlegenIcon-Break.png|right]] |
|Inflict Break [[File:BattlegenIcon-Break.png|right]] |
||
|Level 9 |
|Level 9 |
||
| Line 59: | Line 62: | ||
|Magnet Orb |
|Magnet Orb |
||
|- |
|- |
||
| − | !class=" |
+ | !class="b" rowspan=4|Onion Knight |
|Inflict Break [[File:BattlegenIcon-Break.png|right]] |
|Inflict Break [[File:BattlegenIcon-Break.png|right]] |
||
|Level 16 |
|Level 16 |
||
| Line 76: | Line 79: | ||
|Recovery Orb |
|Recovery Orb |
||
|- |
|- |
||
| − | !class=" |
+ | !class="b" rowspan=4|Cecil |
|Inflict Break [[File:BattlegenIcon-Break.png|right]] |
|Inflict Break [[File:BattlegenIcon-Break.png|right]] |
||
|Level 2 |
|Level 2 |
||
| Line 93: | Line 96: | ||
|Titan Orb |
|Titan Orb |
||
|- |
|- |
||
| − | !class=" |
+ | !class="b" rowspan=4|Bartz |
|Inflict Break [[File:BattlegenIcon-Break.png|right]] |
|Inflict Break [[File:BattlegenIcon-Break.png|right]] |
||
|Level 9 |
|Level 9 |
||
| Line 110: | Line 113: | ||
|Luck Orb |
|Luck Orb |
||
|- |
|- |
||
| − | !class=" |
+ | !class="b" rowspan=4|Terra |
|Inflict Break [[File:BattlegenIcon-Break.png|right]] |
|Inflict Break [[File:BattlegenIcon-Break.png|right]] |
||
|Level 16 |
|Level 16 |
||
| Line 127: | Line 130: | ||
|Amplification Orb |
|Amplification Orb |
||
|- |
|- |
||
| − | !class=" |
+ | !class="b" rowspan=4|Cloud |
|Inflict Break [[File:BattlegenIcon-Break.png|right]] |
|Inflict Break [[File:BattlegenIcon-Break.png|right]] |
||
|Level 2 |
|Level 2 |
||
| Line 144: | Line 147: | ||
|Gale Orb |
|Gale Orb |
||
|- |
|- |
||
| − | !class=" |
+ | !class="b" rowspan=4|Squall |
|Inflict Break [[File:BattlegenIcon-Break.png|right]] |
|Inflict Break [[File:BattlegenIcon-Break.png|right]] |
||
|Level 9 |
|Level 9 |
||
| Line 161: | Line 164: | ||
|Bless Orb |
|Bless Orb |
||
|- |
|- |
||
| − | !class=" |
+ | !class="b" rowspan=4|Zidane |
|Inflict Break [[File:BattlegenIcon-Break.png|right]] |
|Inflict Break [[File:BattlegenIcon-Break.png|right]] |
||
|Level 16 |
|Level 16 |
||
| Line 178: | Line 181: | ||
|Power Orb |
|Power Orb |
||
|- |
|- |
||
| − | !class=" |
+ | !class="b" rowspan=4|Tidus |
|Inflict Break [[File:BattlegenIcon-Break.png|right]] |
|Inflict Break [[File:BattlegenIcon-Break.png|right]] |
||
|Level 2 |
|Level 2 |
||
| Line 195: | Line 198: | ||
|Guts Orb |
|Guts Orb |
||
|- |
|- |
||
| − | !class=" |
+ | !class="b" rowspan=3|Shantotto |
|Land an HP Attack [[File:BattlegenIcon-HPAtk.png|right]] |
|Land an HP Attack [[File:BattlegenIcon-HPAtk.png|right]] |
||
|Level 58 |
|Level 58 |
||
| Line 207: | Line 210: | ||
|Level 100 |
|Level 100 |
||
|Quickstrike Orb |
|Quickstrike Orb |
||
| ⚫ | |||
| − | |width="50%" valign="top"| |
||
| − | ====Villains==== |
||
| − | {|border=1 cellspacing=0 cellpadding=1 width=100% |
||
| − | |-bgcolor=#4682B4 style="color:white;" |
||
| − | !width="20%"|Target |
||
| − | !width="30%"|Condition |
||
| − | !width="15%"|Level |
||
| − | !width="35%"|Reward |
||
|- |
|- |
||
| − | !class=" |
+ | !class="b" rowspan=4|Garland |
|Inflict Break [[File:BattlegenIcon-Break.png|right]] |
|Inflict Break [[File:BattlegenIcon-Break.png|right]] |
||
|Level 16 |
|Level 16 |
||
| Line 234: | Line 228: | ||
|Strength Orb |
|Strength Orb |
||
|- |
|- |
||
| − | !class=" |
+ | !class="b" rowspan=4|The Emperor |
|Inflict Break [[File:BattlegenIcon-Break.png|right]] |
|Inflict Break [[File:BattlegenIcon-Break.png|right]] |
||
|Level 2 |
|Level 2 |
||
| Line 251: | Line 245: | ||
|Healing Orb |
|Healing Orb |
||
|- |
|- |
||
| − | !class=" |
+ | !class="b" rowspan=4|Cloud of Darkness |
|Inflict Break [[File:BattlegenIcon-Break.png|right]] |
|Inflict Break [[File:BattlegenIcon-Break.png|right]] |
||
|Level 9 |
|Level 9 |
||
| Line 268: | Line 262: | ||
|Mana Orb |
|Mana Orb |
||
|- |
|- |
||
| − | !class=" |
+ | !class="b" rowspan=4|Golbez |
|Inflict Break [[File:BattlegenIcon-Break.png|right]] |
|Inflict Break [[File:BattlegenIcon-Break.png|right]] |
||
|Level 16 |
|Level 16 |
||
| Line 285: | Line 279: | ||
|Destruction Orb |
|Destruction Orb |
||
|- |
|- |
||
| − | !class=" |
+ | !class="b" rowspan=4|Exdeath |
|Inflict Break [[File:BattlegenIcon-Break.png|right]] |
|Inflict Break [[File:BattlegenIcon-Break.png|right]] |
||
|Level 2 |
|Level 2 |
||
| Line 302: | Line 296: | ||
|Reflex Orb |
|Reflex Orb |
||
|- |
|- |
||
| − | !class=" |
+ | !class="b" rowspan=4|Kefka |
|Inflict Break [[File:BattlegenIcon-Break.png|right]] |
|Inflict Break [[File:BattlegenIcon-Break.png|right]] |
||
|Level 9 |
|Level 9 |
||
| Line 319: | Line 313: | ||
|Allure Orb |
|Allure Orb |
||
|- |
|- |
||
| − | !class=" |
+ | !class="b" rowspan=4|Sephiroth |
|Inflict Break [[File:BattlegenIcon-Break.png|right]] |
|Inflict Break [[File:BattlegenIcon-Break.png|right]] |
||
|Level 16 |
|Level 16 |
||
| Line 336: | Line 330: | ||
|Oath Orb |
|Oath Orb |
||
|- |
|- |
||
| − | !class=" |
+ | !class="b" rowspan=4|Ultimecia |
|Inflict Break [[File:BattlegenIcon-Break.png|right]] |
|Inflict Break [[File:BattlegenIcon-Break.png|right]] |
||
|Level 2 |
|Level 2 |
||
| Line 353: | Line 347: | ||
|Lithe Orb |
|Lithe Orb |
||
|- |
|- |
||
| − | !class=" |
+ | !class="b" rowspan=4|Kuja |
|Inflict Break [[File:BattlegenIcon-Break.png|right]] |
|Inflict Break [[File:BattlegenIcon-Break.png|right]] |
||
|Level 9 |
|Level 9 |
||
| Line 370: | Line 364: | ||
|Resilience Orb |
|Resilience Orb |
||
|- |
|- |
||
| − | !class=" |
+ | !class="b" rowspan=4|Jecht |
|Inflict Break [[File:BattlegenIcon-Break.png|right]] |
|Inflict Break [[File:BattlegenIcon-Break.png|right]] |
||
|Level 16 |
|Level 16 |
||
| Line 387: | Line 381: | ||
|Crimson Orb |
|Crimson Orb |
||
|- |
|- |
||
| − | !class=" |
+ | !class="b" rowspan=3|Gabranth |
|Inflict Break [[File:BattlegenIcon-Break.png|right]] |
|Inflict Break [[File:BattlegenIcon-Break.png|right]] |
||
|Level 58 |
|Level 58 |
||
| Line 400: | Line 394: | ||
|Time Orb |
|Time Orb |
||
|- |
|- |
||
| − | !class=" |
+ | !class="b" rowspan=3|Chaos |
|Use an EX Burst [[File:BattlegenIcon-EX.png|right]] |
|Use an EX Burst [[File:BattlegenIcon-EX.png|right]] |
||
|Level 51 |
|Level 51 |
||
| Line 412: | Line 406: | ||
|Level 100 |
|Level 100 |
||
|Chaos Orb |
|Chaos Orb |
||
| ⚫ | |||
| ⚫ | |||
|} |
|} |
||
====Stage Element Destruction==== |
====Stage Element Destruction==== |
||
| ⚫ | |||
| − | {|border=1 cellspacing=0 cellpadding=1 width=50% |
||
| + | {|class="half-width DFF2008 article-table" style="text-align:center" |
||
| − | |-bgcolor=#4682B4 style="color:white;" |
||
| + | |-class="a" |
||
!width="50%"|Stage |
!width="50%"|Stage |
||
!width="50%"|Reward |
!width="50%"|Reward |
||
|- |
|- |
||
| − | !class=" |
+ | !class="b"|Old Chaos Shrine |
|Blackcrystal Sliver |
|Blackcrystal Sliver |
||
|- |
|- |
||
| − | !class=" |
+ | !class="b"|Pandaemonium |
|Demon Soul |
|Demon Soul |
||
|- |
|- |
||
| − | !class=" |
+ | !class="b"|World of Darkness |
|Sealed Darkness |
|Sealed Darkness |
||
|- |
|- |
||
| − | !class=" |
+ | !class="b"|Lunar Subterrane |
|Moon Stone |
|Moon Stone |
||
|- |
|- |
||
| − | !class=" |
+ | !class="b"|The Rift |
|Voidshard |
|Voidshard |
||
|- |
|- |
||
| − | !class=" |
+ | !class="b"|Kefka's Tower |
|Magicite Shard |
|Magicite Shard |
||
|- |
|- |
||
| − | !class=" |
+ | !class="b"|Planet's Core |
|Materia |
|Materia |
||
|- |
|- |
||
| − | !class=" |
+ | !class="b" rowspan=2|Ultimecia's Castle |
|Time Warp |
|Time Warp |
||
|- |
|- |
||
| − | |Mallet{{Foot| |
+ | |Mallet{{Foot|Available after obtaining Mallet as the stage prize for Inward Chaos}} |
|- |
|- |
||
| − | !class=" |
+ | !class="b"|Crystal World |
|Star's Core |
|Star's Core |
||
|- |
|- |
||
| − | !class=" |
+ | !class="b"|Dream's End |
|Moonflow |
|Moonflow |
||
|- |
|- |
||
| − | !class=" |
+ | !class="b"|Order's Sanctuary |
|Order of Emptiness |
|Order of Emptiness |
||
|- |
|- |
||
| − | !class=" |
+ | !class="b"|Edge Of Madness |
|Entropy's Birth |
|Entropy's Birth |
||
|} |
|} |
||
===''Dissidia 012 Final Fantasy''=== |
===''Dissidia 012 Final Fantasy''=== |
||
| + | Note that numerous characters and arenas cannot have their associated Battlegen items won until the player completes certain tasks, such as getting to a certain point in Story Mode or viewing a certain [[Report (Dissidia 012)|Report]]. |
||
| − | {|width="100%" |
||
| + | |||
| − | |width="50%" valign="top"| |
||
| − | ==== |
+ | ====Battle==== |
| + | {|class="full-width D012 article-table" style="text-align:center" |
||
| − | {|border=1 cellspacing=0 cellpadding=1 width=100% |
||
| + | |-class="a" |
||
| − | |-bgcolor=#B0C4DE |
||
!width="17%"|Target |
!width="17%"|Target |
||
!width="41%"|Condition |
!width="41%"|Condition |
||
| Line 472: | Line 465: | ||
!width="30%"|Reward |
!width="30%"|Reward |
||
|- |
|- |
||
| − | !class=" |
+ | !class="b" rowspan=3|Warrior of Light |
|Land a Bravery Attack finish [[File:BattlegenIcon-BraveAtk.png|right]] |
|Land a Bravery Attack finish [[File:BattlegenIcon-BraveAtk.png|right]] |
||
|Level 2 |
|Level 2 |
||
| Line 485: | Line 478: | ||
|Hero's Hopes |
|Hero's Hopes |
||
|- |
|- |
||
| − | !class=" |
+ | !class="b" rowspan=3|Firion |
|Land a Bravery Attack finish [[File:BattlegenIcon-BraveAtk.png|right]] |
|Land a Bravery Attack finish [[File:BattlegenIcon-BraveAtk.png|right]] |
||
|Level 2 |
|Level 2 |
||
| Line 498: | Line 491: | ||
|Liegeman's Hopes |
|Liegeman's Hopes |
||
|- |
|- |
||
| − | !class=" |
+ | !class="b" rowspan=3|Onion Knight |
|Land a Bravery Attack finish [[File:BattlegenIcon-BraveAtk.png|right]] |
|Land a Bravery Attack finish [[File:BattlegenIcon-BraveAtk.png|right]] |
||
|Level 2 |
|Level 2 |
||
| Line 511: | Line 504: | ||
|Youth's Hopes |
|Youth's Hopes |
||
|- |
|- |
||
| − | !class=" |
+ | !class="b" rowspan=3|Cecil |
|Land a Bravery Attack finish [[File:BattlegenIcon-BraveAtk.png|right]] |
|Land a Bravery Attack finish [[File:BattlegenIcon-BraveAtk.png|right]] |
||
|Level 2 |
|Level 2 |
||
| Line 524: | Line 517: | ||
|Knight's Hopes |
|Knight's Hopes |
||
|- |
|- |
||
| − | !class=" |
+ | !class="b" rowspan=3|Kain |
|Land a Bravery Attack finish [[File:BattlegenIcon-BraveAtk.png|right]] |
|Land a Bravery Attack finish [[File:BattlegenIcon-BraveAtk.png|right]] |
||
|Level 2 |
|Level 2 |
||
| − | | |
+ | |Dragoon's Desire |
|- |
|- |
||
|Land a HP Attack [[File:BattlegenIcon-HPAtk.png|right]] |
|Land a HP Attack [[File:BattlegenIcon-HPAtk.png|right]] |
||
|Level 9 |
|Level 9 |
||
| − | | |
+ | |Dragoon's Dream |
|- |
|- |
||
|Inflict Break [[File:BattlegenIcon-Break.png|right]] |
|Inflict Break [[File:BattlegenIcon-Break.png|right]] |
||
|Level 23 |
|Level 23 |
||
| − | | |
+ | |Dragoon's Hopes |
|- |
|- |
||
| − | !class=" |
+ | !class="b" rowspan=3|Bartz |
|Land a Bravery Attack finish [[File:BattlegenIcon-BraveAtk.png|right]] |
|Land a Bravery Attack finish [[File:BattlegenIcon-BraveAtk.png|right]] |
||
|Level 2 |
|Level 2 |
||
| − | | |
+ | |Wanderer's Desire |
|- |
|- |
||
|Land a HP Attack [[File:BattlegenIcon-HPAtk.png|right]] |
|Land a HP Attack [[File:BattlegenIcon-HPAtk.png|right]] |
||
|Level 9 |
|Level 9 |
||
| − | | |
+ | |Wanderer's Dream |
|- |
|- |
||
|Inflict Break [[File:BattlegenIcon-Break.png|right]] |
|Inflict Break [[File:BattlegenIcon-Break.png|right]] |
||
|Level 23 |
|Level 23 |
||
| − | | |
+ | |Wanderer's Hopes |
|- |
|- |
||
| − | !class=" |
+ | !class="b" rowspan=3|Tifa |
|Land a Bravery Attack finish [[File:BattlegenIcon-BraveAtk.png|right]] |
|Land a Bravery Attack finish [[File:BattlegenIcon-BraveAtk.png|right]] |
||
|Level 2 |
|Level 2 |
||
| − | | |
+ | |Brawler's Desire |
|- |
|- |
||
|Land a HP Attack [[File:BattlegenIcon-HPAtk.png|right]] |
|Land a HP Attack [[File:BattlegenIcon-HPAtk.png|right]] |
||
|Level 9 |
|Level 9 |
||
| − | | |
+ | |Brawler's Dream |
|- |
|- |
||
|Inflict Break [[File:BattlegenIcon-Break.png|right]] |
|Inflict Break [[File:BattlegenIcon-Break.png|right]] |
||
|Level 23 |
|Level 23 |
||
| − | | |
+ | |Brawler's Hopes |
|- |
|- |
||
| − | !class=" |
+ | !class="b" rowspan=3|Squall |
|Land a Bravery Attack finish [[File:BattlegenIcon-BraveAtk.png|right]] |
|Land a Bravery Attack finish [[File:BattlegenIcon-BraveAtk.png|right]] |
||
|Level 2 |
|Level 2 |
||
| Line 576: | Line 569: | ||
|Lion's Hopes |
|Lion's Hopes |
||
|- |
|- |
||
| − | !class=" |
+ | !class="b" rowspan=3|Laguna |
|Land a Bravery Attack finish [[File:BattlegenIcon-BraveAtk.png|right]] |
|Land a Bravery Attack finish [[File:BattlegenIcon-BraveAtk.png|right]] |
||
|Level 2 |
|Level 2 |
||
| − | | |
+ | |Gunner's Desire |
|- |
|- |
||
|Land a HP Attack [[File:BattlegenIcon-HPAtk.png|right]] |
|Land a HP Attack [[File:BattlegenIcon-HPAtk.png|right]] |
||
|Level 9 |
|Level 9 |
||
| − | | |
+ | |Gunner's Dream |
|- |
|- |
||
|Inflict Break [[File:BattlegenIcon-Break.png|right]] |
|Inflict Break [[File:BattlegenIcon-Break.png|right]] |
||
|Level 23 |
|Level 23 |
||
| − | | |
+ | |Gunner's Hopes |
|- |
|- |
||
| − | !class=" |
+ | !class="b" rowspan=3|Zidane |
|Land a Bravery Attack finish [[File:BattlegenIcon-BraveAtk.png|right]] |
|Land a Bravery Attack finish [[File:BattlegenIcon-BraveAtk.png|right]] |
||
|Level 2 |
|Level 2 |
||
| − | | |
+ | |Thief's Desire |
|- |
|- |
||
|Land a HP Attack [[File:BattlegenIcon-HPAtk.png|right]] |
|Land a HP Attack [[File:BattlegenIcon-HPAtk.png|right]] |
||
|Level 9 |
|Level 9 |
||
| − | | |
+ | |Thief's Dream |
|- |
|- |
||
|Inflict Break [[File:BattlegenIcon-Break.png|right]] |
|Inflict Break [[File:BattlegenIcon-Break.png|right]] |
||
|Level 23 |
|Level 23 |
||
| − | | |
+ | |Thief's Hopes |
|- |
|- |
||
| − | !class=" |
+ | !class="b" rowspan=3|Jecht |
|Land a Bravery Attack finish [[File:BattlegenIcon-BraveAtk.png|right]] |
|Land a Bravery Attack finish [[File:BattlegenIcon-BraveAtk.png|right]] |
||
|Level 2 |
|Level 2 |
||
| − | | |
+ | |Phantom's Desire |
|- |
|- |
||
|Land a HP Attack [[File:BattlegenIcon-HPAtk.png|right]] |
|Land a HP Attack [[File:BattlegenIcon-HPAtk.png|right]] |
||
|Level 9 |
|Level 9 |
||
| − | | |
+ | |Phantom's Dream |
|- |
|- |
||
|Inflict Break [[File:BattlegenIcon-Break.png|right]] |
|Inflict Break [[File:BattlegenIcon-Break.png|right]] |
||
|Level 23 |
|Level 23 |
||
| − | | |
+ | |Phantom's Hopes |
|- |
|- |
||
| − | !class=" |
+ | !class="b" rowspan=3|Yuna |
|Land a Bravery Attack finish [[File:BattlegenIcon-BraveAtk.png|right]] |
|Land a Bravery Attack finish [[File:BattlegenIcon-BraveAtk.png|right]] |
||
|Level 2 |
|Level 2 |
||
| − | | |
+ | |Summoner's Desire |
|- |
|- |
||
|Land a HP Attack [[File:BattlegenIcon-HPAtk.png|right]] |
|Land a HP Attack [[File:BattlegenIcon-HPAtk.png|right]] |
||
|Level 9 |
|Level 9 |
||
| − | | |
+ | |Summoner's Dream |
|- |
|- |
||
|Inflict Break [[File:BattlegenIcon-Break.png|right]] |
|Inflict Break [[File:BattlegenIcon-Break.png|right]] |
||
|Level 23 |
|Level 23 |
||
| − | | |
+ | |Summoner's Hopes |
|- |
|- |
||
| − | !class=" |
+ | !class="b" rowspan=3|Shantotto |
|Land a Bravery Attack finish [[File:BattlegenIcon-BraveAtk.png|right]] |
|Land a Bravery Attack finish [[File:BattlegenIcon-BraveAtk.png|right]] |
||
|Level 2 |
|Level 2 |
||
| − | | |
+ | |Lady's Desire |
|- |
|- |
||
|Land a HP Attack [[File:BattlegenIcon-HPAtk.png|right]] |
|Land a HP Attack [[File:BattlegenIcon-HPAtk.png|right]] |
||
|Level 9 |
|Level 9 |
||
| − | | |
+ | |Lady's Dream |
|- |
|- |
||
|Inflict Break [[File:BattlegenIcon-Break.png|right]] |
|Inflict Break [[File:BattlegenIcon-Break.png|right]] |
||
|Level 23 |
|Level 23 |
||
| − | | |
+ | |Lady's Hopes |
| ⚫ | |||
| ⚫ | |||
| ⚫ | |||
| ⚫ | |||
| ⚫ | |||
| ⚫ | |||
| ⚫ | |||
| ⚫ | |||
| ⚫ | |||
| ⚫ | |||
| ⚫ | |||
| ⚫ | |||
| ⚫ | |||
| − | |- |
||
| ⚫ | |||
| ⚫ | |||
| ⚫ | |||
| ⚫ | |||
| − | |- |
||
| ⚫ | |||
| ⚫ | |||
| ⚫ | |||
| − | |- |
||
| ⚫ | |||
| ⚫ | |||
| ⚫ | |||
|- |
|- |
||
| − | !class=" |
+ | !class="b" rowspan=3|{{Foot|Prishe|Complete ''Side Story: The Maiden Bringer of Light -2-'' in Report 18}} |
|Land a Bravery Attack finish [[File:BattlegenIcon-BraveAtk.png|right]] |
|Land a Bravery Attack finish [[File:BattlegenIcon-BraveAtk.png|right]] |
||
|Level 2 |
|Level 2 |
||
| Line 680: | Line 647: | ||
|Horror's Hopes |
|Horror's Hopes |
||
|- |
|- |
||
| − | !class=" |
+ | !class="b" rowspan=3|Vaan |
|Land a Bravery Attack finish [[File:BattlegenIcon-BraveAtk.png|right]] |
|Land a Bravery Attack finish [[File:BattlegenIcon-BraveAtk.png|right]] |
||
|Level 2 |
|Level 2 |
||
| Line 693: | Line 660: | ||
|Sky Pirate's Hopes |
|Sky Pirate's Hopes |
||
|- |
|- |
||
| − | !class=" |
+ | !class="b" rowspan=3|Lightning |
|Land a Bravery Attack finish [[File:BattlegenIcon-BraveAtk.png|right]] |
|Land a Bravery Attack finish [[File:BattlegenIcon-BraveAtk.png|right]] |
||
|Level 2 |
|Level 2 |
||
| Line 706: | Line 673: | ||
|Flash's Hopes |
|Flash's Hopes |
||
|- |
|- |
||
| ⚫ | |||
| − | |} |
||
| − | |width="50%" valign="top"| |
||
| − | ====Villains==== |
||
| − | {|border=1 cellspacing=0 cellpadding=1 width=100% |
||
| − | |-bgcolor=#B0C4DE |
||
| − | !width="17%"|Target |
||
| − | !width="41%"|Condition |
||
| − | !width="12%"|Level |
||
| − | !width="30%"|Reward |
||
| − | |- |
||
| ⚫ | |||
|Land a Bravery Attack finish [[File:BattlegenIcon-BraveAtk.png|right]] |
|Land a Bravery Attack finish [[File:BattlegenIcon-BraveAtk.png|right]] |
||
|Level 2 |
|Level 2 |
||
| Line 729: | Line 686: | ||
|Stalwart's Hopes |
|Stalwart's Hopes |
||
|- |
|- |
||
| − | !class=" |
+ | !class="b" rowspan=3|The Emperor |
|Land a Bravery Attack finish [[File:BattlegenIcon-BraveAtk.png|right]] |
|Land a Bravery Attack finish [[File:BattlegenIcon-BraveAtk.png|right]] |
||
|Level 2 |
|Level 2 |
||
| Line 742: | Line 699: | ||
|Despot's Hopes |
|Despot's Hopes |
||
|- |
|- |
||
| − | !class=" |
+ | !class="b" rowspan=3|Cloud of Darkness |
|Land a Bravery Attack finish [[File:BattlegenIcon-BraveAtk.png|right]] |
|Land a Bravery Attack finish [[File:BattlegenIcon-BraveAtk.png|right]] |
||
|Level 2 |
|Level 2 |
||
| Line 755: | Line 712: | ||
|Wraith's Hopes |
|Wraith's Hopes |
||
|- |
|- |
||
| − | !class=" |
+ | !class="b" rowspan=3|Golbez |
|Land a Bravery Attack finish [[File:BattlegenIcon-BraveAtk.png|right]] |
|Land a Bravery Attack finish [[File:BattlegenIcon-BraveAtk.png|right]] |
||
|Level 2 |
|Level 2 |
||
| Line 768: | Line 725: | ||
|Warlock's Hopes |
|Warlock's Hopes |
||
|- |
|- |
||
| − | !class=" |
+ | !class="b" rowspan=3|Exdeath |
|Land a Bravery Attack finish [[File:BattlegenIcon-BraveAtk.png|right]] |
|Land a Bravery Attack finish [[File:BattlegenIcon-BraveAtk.png|right]] |
||
|Level 2 |
|Level 2 |
||
| Line 781: | Line 738: | ||
|Tree's Hopes |
|Tree's Hopes |
||
|- |
|- |
||
| + | !class="b" rowspan=3|{{Foot|Gilgamesh|Complete ''Side Story: The Duel of Dreams'' in Report 08}} |
||
| ⚫ | |||
| ⚫ | |||
| ⚫ | |||
| ⚫ | |||
| ⚫ | |||
| ⚫ | |||
| ⚫ | |||
| ⚫ | |||
| ⚫ | |||
| ⚫ | |||
| ⚫ | |||
| ⚫ | |||
| ⚫ | |||
| ⚫ | |||
|Land a Bravery Attack finish [[File:BattlegenIcon-BraveAtk.png|right]] |
|Land a Bravery Attack finish [[File:BattlegenIcon-BraveAtk.png|right]] |
||
|Level 2 |
|Level 2 |
||
| Line 794: | Line 764: | ||
|Harlequin's Hopes |
|Harlequin's Hopes |
||
|- |
|- |
||
| − | !class=" |
+ | !class="b" rowspan=3|Terra |
| ⚫ | |||
| ⚫ | |||
| ⚫ | |||
| ⚫ | |||
| ⚫ | |||
| ⚫ | |||
| ⚫ | |||
| ⚫ | |||
| + | |Inflict Break [[File:BattlegenIcon-Break.png|right]] |
||
| ⚫ | |||
| ⚫ | |||
| ⚫ | |||
| ⚫ | |||
|Land a Bravery Attack finish [[File:BattlegenIcon-BraveAtk.png|right]] |
|Land a Bravery Attack finish [[File:BattlegenIcon-BraveAtk.png|right]] |
||
|Level 2 |
|Level 2 |
||
| Line 807: | Line 790: | ||
|Champion's Hopes |
|Champion's Hopes |
||
|- |
|- |
||
| − | !class=" |
+ | !class="b" rowspan=3|Cloud |
|Land a Bravery Attack finish [[File:BattlegenIcon-BraveAtk.png|right]] |
|Land a Bravery Attack finish [[File:BattlegenIcon-BraveAtk.png|right]] |
||
|Level 2 |
|Level 2 |
||
| − | | |
+ | |Soldier's Desire |
|- |
|- |
||
|Land a HP Attack [[File:BattlegenIcon-HPAtk.png|right]] |
|Land a HP Attack [[File:BattlegenIcon-HPAtk.png|right]] |
||
|Level 9 |
|Level 9 |
||
| − | | |
+ | |Soldier's Dream |
|- |
|- |
||
|Inflict Break [[File:BattlegenIcon-Break.png|right]] |
|Inflict Break [[File:BattlegenIcon-Break.png|right]] |
||
|Level 23 |
|Level 23 |
||
| − | | |
+ | |Soldier's Hopes |
|- |
|- |
||
| − | !class=" |
+ | !class="b" rowspan=3|Ultimecia |
|Land a Bravery Attack finish [[File:BattlegenIcon-BraveAtk.png|right]] |
|Land a Bravery Attack finish [[File:BattlegenIcon-BraveAtk.png|right]] |
||
|Level 2 |
|Level 2 |
||
| − | | |
+ | |Witch's Desire |
|- |
|- |
||
|Land a HP Attack [[File:BattlegenIcon-HPAtk.png|right]] |
|Land a HP Attack [[File:BattlegenIcon-HPAtk.png|right]] |
||
|Level 9 |
|Level 9 |
||
| − | | |
+ | |Witch's Dream |
|- |
|- |
||
|Inflict Break [[File:BattlegenIcon-Break.png|right]] |
|Inflict Break [[File:BattlegenIcon-Break.png|right]] |
||
|Level 23 |
|Level 23 |
||
| − | | |
+ | |Witch's Hopes |
|- |
|- |
||
| − | !class=" |
+ | !class="b" rowspan=3|Kuja |
|Land a Bravery Attack finish [[File:BattlegenIcon-BraveAtk.png|right]] |
|Land a Bravery Attack finish [[File:BattlegenIcon-BraveAtk.png|right]] |
||
|Level 2 |
|Level 2 |
||
| − | | |
+ | |Reaper's Desire |
|- |
|- |
||
|Land a HP Attack [[File:BattlegenIcon-HPAtk.png|right]] |
|Land a HP Attack [[File:BattlegenIcon-HPAtk.png|right]] |
||
|Level 9 |
|Level 9 |
||
| − | | |
+ | |Reaper's Dream |
|- |
|- |
||
|Inflict Break [[File:BattlegenIcon-Break.png|right]] |
|Inflict Break [[File:BattlegenIcon-Break.png|right]] |
||
|Level 23 |
|Level 23 |
||
| − | | |
+ | |Reaper's Hopes |
|- |
|- |
||
| ⚫ | |||
| − | !class="D012b" rowspan=3|Chaos{{Foot|After reaching floor 3 of the Edge of Discord gateway in Main Scenario 013's epilogue}} |
||
|Land a Bravery Attack finish [[File:BattlegenIcon-BraveAtk.png|right]] |
|Land a Bravery Attack finish [[File:BattlegenIcon-BraveAtk.png|right]] |
||
|Level 2 |
|Level 2 |
||
| − | | |
+ | |Vision's Desire |
|- |
|- |
||
|Land a HP Attack [[File:BattlegenIcon-HPAtk.png|right]] |
|Land a HP Attack [[File:BattlegenIcon-HPAtk.png|right]] |
||
|Level 9 |
|Level 9 |
||
| − | | |
+ | |Vision's Dream |
|- |
|- |
||
|Inflict Break [[File:BattlegenIcon-Break.png|right]] |
|Inflict Break [[File:BattlegenIcon-Break.png|right]] |
||
|Level 23 |
|Level 23 |
||
| − | | |
+ | |Vision's Hopes |
|- |
|- |
||
| − | !class=" |
+ | !class="b" rowspan=3|Gabranth |
|Land a Bravery Attack finish [[File:BattlegenIcon-BraveAtk.png|right]] |
|Land a Bravery Attack finish [[File:BattlegenIcon-BraveAtk.png|right]] |
||
|Level 2 |
|Level 2 |
||
| Line 872: | Line 855: | ||
|Warrior's Hopes |
|Warrior's Hopes |
||
|- |
|- |
||
| − | !class=" |
+ | !class="b" rowspan=3|{{Foot|Chaos|Reach Edge of Discord (Floor 3) in Main Scenario 013's epilogue}} |
|Land a Bravery Attack finish [[File:BattlegenIcon-BraveAtk.png|right]] |
|Land a Bravery Attack finish [[File:BattlegenIcon-BraveAtk.png|right]] |
||
|Level 2 |
|Level 2 |
||
| − | | |
+ | |Discord's Desire |
|- |
|- |
||
|Land a HP Attack [[File:BattlegenIcon-HPAtk.png|right]] |
|Land a HP Attack [[File:BattlegenIcon-HPAtk.png|right]] |
||
|Level 9 |
|Level 9 |
||
| − | | |
+ | |Discord's Dream |
|- |
|- |
||
|Inflict Break [[File:BattlegenIcon-Break.png|right]] |
|Inflict Break [[File:BattlegenIcon-Break.png|right]] |
||
|Level 23 |
|Level 23 |
||
| − | | |
+ | |Discord's Hopes |
|- |
|- |
||
| − | !class=" |
+ | !class="b" rowspan=3|{{Foot|Feral Chaos|Clear Southern Lufenia Gateway in Main Scenario 000}} |
|Land a Bravery Attack finish [[File:BattlegenIcon-BraveAtk.png|right]] |
|Land a Bravery Attack finish [[File:BattlegenIcon-BraveAtk.png|right]] |
||
|Level 2 |
|Level 2 |
||
| Line 897: | Line 880: | ||
|Level 23 |
|Level 23 |
||
|Utter Chaos's Hopes |
|Utter Chaos's Hopes |
||
| − | |- |
||
| − | |} |
||
|} |
|} |
||
====Stage Element Destruction==== |
====Stage Element Destruction==== |
||
| + | [[File:BattlegenIcon-Stage.png|center]] |
||
| − | {|border=1 cellspacing=0 cellpadding=1 width=50% |
||
| + | {|class="half-width D012 article-table" style="text-align:center" |
||
| − | |-bgcolor=#B0C4DE |
||
| + | |-class="a" |
||
!width="50%"|Stage |
!width="50%"|Stage |
||
!width="50%"|Reward |
!width="50%"|Reward |
||
|- |
|- |
||
| − | !class=" |
+ | !class="b"|Old Chaos Shrine |
|Blackcrystal Sliver |
|Blackcrystal Sliver |
||
|- |
|- |
||
| − | !class=" |
+ | !class="b"|Pandaemonium |
|Demon Soul |
|Demon Soul |
||
|- |
|- |
||
| − | !class=" |
+ | !class="b"|World of Darkness |
|Sealed Darkness |
|Sealed Darkness |
||
|- |
|- |
||
| − | !class=" |
+ | !class="b"|Lunar Subterrane |
|Moon Stone |
|Moon Stone |
||
|- |
|- |
||
| − | !class=" |
+ | !class="b"|The Rift |
|Voidshard |
|Voidshard |
||
|- |
|- |
||
| − | !class=" |
+ | !class="b"|Kefka's Tower |
|Magicite Shard |
|Magicite Shard |
||
|- |
|- |
||
| − | !class=" |
+ | !class="b"|Planet's Core |
|Materia |
|Materia |
||
|- |
|- |
||
| − | !class=" |
+ | !class="b"|Ultimecia's Castle |
|Time Warp |
|Time Warp |
||
|- |
|- |
||
| − | !class=" |
+ | !class="b"|Crystal World |
|Star's Core |
|Star's Core |
||
|- |
|- |
||
| − | !class=" |
+ | !class="b"|Dream's End |
|Moonflow |
|Moonflow |
||
|- |
|- |
||
| − | !class=" |
+ | !class="b"|Order's Sanctuary |
|Order of Emptiness |
|Order of Emptiness |
||
|- |
|- |
||
| − | !class=" |
+ | !class="b"|Edge Of Madness |
|Entropy's Birth |
|Entropy's Birth |
||
|- |
|- |
||
| − | !class=" |
+ | !class="b"|{{Foot|Empyreal Paradox|Battlegen at least one item from Shantotto}} |
|Promyvion Shard |
|Promyvion Shard |
||
|- |
|- |
||
| − | !class=" |
+ | !class="b"|{{Foot|Sky Fortress Bahamut|Battlegen at least one item from Vaan}} |
|Sephira |
|Sephira |
||
|- |
|- |
||
| − | !class=" |
+ | !class="b"|{{Foot|Orphan's Cradle|Battlegen at least one item from Lightning}} |
|Fal'cie Husk |
|Fal'cie Husk |
||
|- |
|- |
||
| − | !class=" |
+ | !class="b"|{{Foot|Pandaemonium - Top Floor|Complete Main Scenario 013's epilogue}} |
|Palamecian Gem |
|Palamecian Gem |
||
|- |
|- |
||
| − | !class=" |
+ | !class="b"|{{Foot|Crystal Tower|Complete Main Scenario 013's epilogue}} |
|Xande's Hatred |
|Xande's Hatred |
||
|- |
|- |
||
| − | !class=" |
+ | !class="b"|{{Foot|Phantom Train|Complete Main Scenario 013's epilogue}} |
|Ghost |
|Ghost |
||
|- |
|- |
||
| − | !class=" |
+ | !class="b"|{{Foot|M.S. Prima Vista|Complete Main Scenario 013's epilogue}} |
|Mallet |
|Mallet |
||
|} |
|} |
||
{{-}} |
{{-}} |
||
| + | ==Trivia== |
||
| − | - In order to Battlegen the Palamecian Gem, Xande's Hatred, Ghost and Mallet, Main Scenario 013's epilogue must be completed. |
||
| + | *The naming patterns of Battlegen items in the original ''Dissidia'' is similar to the ''Kingdom Hearts'' naming patterns for synthesis materials. Aside from rarer materials, synthesis materials come in four varieties of potency, Shard, Stone, Gem, and then Crystal, with the same descriptive prefix, such as Blaze Shard through Blaze Crystal. |
||
| + | {{navbox DFF2008}} |
||
| − | - In order to Battlegen the Fal'Cie Husk, Sephira, Promyvion Shard, you must Battlegen atleast one item from Lightning, Vaan and Shantotto respectively. |
||
| − | {{ |
+ | {{navbox D012}} |
| ⚫ | |||
| − | {{Dissidia 012}} |
||
| − | [[Category:Dissidia Final Fantasy]] |
+ | [[Category:Gameplay in Dissidia 012 Final Fantasy]] |
| ⚫ | |||
Revision as of 18:54, 21 October 2019

Sephiroth lands an HP attack against Kuja, fulfilling Battlegen and receiving an Accessory.
Battlegen is a feature in Dissidia Final Fantasy and Dissidia 012 Final Fantasy. It is a system that allows accessories to be generated during battle, which are rewarded to the player if they win. To Battlegen an accessory, the player must either destroy part of the stage, or execute a certain type of attack on the opponent. When they do so, the words "Accessory created" will appear in the upper-left corner of the screen, along with an icon showing the level of the created accessory. Many rare items and equipment pieces can be traded for in the shop using Battlegen-exclusive accessories.
Performing Battlegen
In Dissidia, each character has four accessories that can only be acquired as a Battlegen when fighting them, with the exceptions of Gabranth, Shantotto, and Chaos, who have three. In Dissidia 012, each character only has three accessories that can be acquired from them. Each stage has an accessory that can be acquired through Battlegen, with the exception of Ultimecia's Castle which has two.
Online and Friend Card ghost battles allow the player to Battlegen gems and equipped accessories after the option is purchased in the PP Catalog, in addition to the items they could normally Battlegen against the opponent's character. Winning an item through Battlegen allows the player to win the next item, in order of Powder, Shard, Crystal and Orb. Generating the Powder accessory from a Cosmos character also allows the player to Battlegen against their Chaos counterpart, and generating from them allows Stage Destruction Battlegen.
In Dissidia 012, this was simplified; all characters can be generated immediately, with items received in order of Desire, Dream, and Hope. The names of the Battlegen items obtained from characters were renamed to reflect the name of the character's Manikin - for example, Warrior of Light, whose Manikin is named "False Hero", has his Battlegen items named Hero's Desire, Hero's Dream, and Hero's Hope.
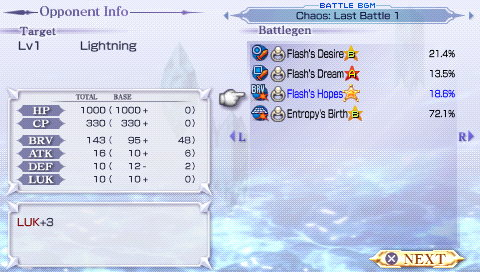
A list of Battlegen Accessories that can be won from the opponent is shown before every battle.
Battlegen's success rate depends heavily on the opponent's level. Unless the opponent is at a specific level, the Battlegen success rate will be 0.1%, giving the player roughly a one in a thousand chance to win the item. The percentage rate increases when the opponent is at a set level or higher. For example, if the opponent faces a Warrior of Light who is Level 22 or below, there is only the aforementioned 0.1% chance of getting a Protect Shard. If the Warrior of Light is Level 23 or higher, the chance to win a Protect Shard greatly increases. The higher the level above the recommended level, the easier it is to Battlegen. For this reason, orb-type accessories, which have a recommended level of 100, are usually very difficult to win. The player may only Battlegen the same accessory once during a battle, even if they fulfill the requirements multiple times.
Battlegen-exclusive accessories can be traded for a variety of other items in the Shop. Most importantly, Battlegen accessories are needed to trade for the characters' exclusive weapons, such as five Time Orbs needed for Gabranth's Chaos Blade, three Recovery Crystals for Onion Knight's Royal Sword, and so forth.
Battlegen's success rate can be increased by a number of factors. The higher the level above the minimum required level, the easier it is to Battlegen the item. The Sunrise and Moonrise accessories raise the chance of Battlegen occurring by 1.2 times and 1.5 times respectively, and can be further strengthened through the use of Boosters. The Superslick also raises the Battlegen rate by 1.5 times, but has a chance to break. Equipping the "Allure of Honey" equipment raises the Battlegen rate by 1.5 times. Raising the player character's luck also helps. In the PP Catalog, the player can choose to purchase a temporary boost to their Battlegen rate for a certain number of battles.
Note that Battlegen is not related to drop rate, which is an entirely separate occurrence.
Battlegen accessory list
Dissidia Final Fantasy
Battle
| Target | Condition | Level | Reward |
|---|---|---|---|
| Warrior of Light | Inflict Break |
Level 2 | Protect Powder |
| Land an HP Attack |
Level 23 | Protect Shard | |
| Land an HP Attack |
Level 44 | Protect Crystal | |
| Inflict Break |
Level 100 | Protect Orb | |
| Firion | Inflict Break |
Level 9 | Magnet Powder |
| Land an HP Attack |
Level 30 | Magnet Shard | |
| Use an EX Burst |
Level 51 | Magnet Crystal | |
| Inflict Break |
Level 100 | Magnet Orb | |
| Onion Knight | Inflict Break |
Level 16 | Recovery Powder |
| Land an HP Attack |
Level 37 | Recovery Shard | |
| Use an EX Burst |
Level 58 | Recovery Crystal | |
| Inflict Break |
Level 100 | Recovery Orb | |
| Cecil | Inflict Break |
Level 2 | Titan Powder |
| Land an HP Attack |
Level 23 | Titan Shard | |
| Land an HP Attack |
Level 44 | Titan Crystal | |
| Inflict Break |
Level 100 | Titan Orb | |
| Bartz | Inflict Break |
Level 9 | Luck Powder |
| Land an HP Attack |
Level 30 | Luck Shard | |
| Land an HP Attack |
Level 51 | Luck Crystal | |
| Inflict Break |
Level 100 | Luck Orb | |
| Terra | Inflict Break |
Level 16 | Amplification Powder |
| Land an HP Attack |
Level 37 | Amplification Shard | |
| Use an EX Burst |
Level 58 | Amplification Crystal | |
| Inflict Break |
Level 100 | Amplification Orb | |
| Cloud | Inflict Break |
Level 2 | Gale Powder |
| Land an HP Attack |
Level 23 | Gale Shard | |
| Land an HP Attack |
Level 44 | Gale Crystal | |
| Inflict Break |
Level 100 | Gale Orb | |
| Squall | Inflict Break |
Level 9 | Bless Powder |
| Land an HP Attack |
Level 30 | Bless Shard | |
| Use an EX Burst |
Level 51 | Bless Crystal | |
| Inflict Break |
Level 100 | Bless Orb | |
| Zidane | Inflict Break |
Level 16 | Power Powder |
| Land an HP Attack |
Level 37 | Power Shard | |
| Land an HP Attack |
Level 58 | Power Crystal | |
| Inflict Break |
Level 100 | Power Orb | |
| Tidus | Inflict Break |
Level 2 | Guts Powder |
| Land an HP Attack |
Level 23 | Guts Shard | |
| Land an HP Attack |
Level 44 | Guts Crystal | |
| Inflict Break |
Level 100 | Guts Orb | |
| Shantotto | Land an HP Attack |
Level 58 | Quickstrike Shard |
| Land an HP Attack |
Level 79 | Quickstrike Crystal | |
| Inflict Break |
Level 100 | Quickstrike Orb | |
| Garland | Inflict Break |
Level 16 | Strength Powder |
| Land an HP Attack |
Level 37 | Strength Shard | |
| Land an HP Attack |
Level 58 | Strength Crystal | |
| Inflict Break |
Level 100 | Strength Orb | |
| The Emperor | Inflict Break |
Level 2 | Healing Powder |
| Land an HP Attack |
Level 23 | Healing Shard | |
| Land an HP Attack |
Level 44 | Healing Crystal | |
| Inflict Break |
Level 100 | Healing Orb | |
| Cloud of Darkness | Inflict Break |
Level 9 | Mana Powder |
| Land an HP Attack |
Level 30 | Mana Shard | |
| Use an EX Burst |
Level 51 | Mana Crystal | |
| Land an HP Attack |
Level 100 | Mana Orb | |
| Golbez | Inflict Break |
Level 16 | Destruction Powder |
| Land an HP Attack |
Level 37 | Destruction Shard | |
| Use an EX Burst |
Level 58 | Destruction Crystal | |
| Inflict Break |
Level 100 | Destruction Orb | |
| Exdeath | Inflict Break |
Level 2 | Reflex Powder |
| Land an HP Attack |
Level 23 | Reflex Shard | |
| Land an HP Attack |
Level 44 | Reflex Crystal | |
| Inflict Break |
Level 100 | Reflex Orb | |
| Kefka | Inflict Break |
Level 9 | Allure Powder |
| Land an HP Attack |
Level 30 | Allure Shard | |
| Use an EX Burst |
Level 51 | Allure Crystal | |
| Inflict Break |
Level 100 | Allure Orb | |
| Sephiroth | Inflict Break |
Level 16 | Oath Powder |
| Land an HP Attack |
Level 37 | Oath Shard | |
| Use an EX Burst |
Level 58 | Oath Crystal | |
| Inflict Break |
Level 100 | Oath Orb | |
| Ultimecia | Inflict Break |
Level 2 | Lithe Powder |
| Land an HP Attack |
Level 23 | Lithe Shard | |
| Land an HP Attack |
Level 44 | Lithe Crystal | |
| Inflict Break |
Level 100 | Lithe Orb | |
| Kuja | Inflict Break |
Level 9 | Resilience Powder |
| Land an HP Attack |
Level 30 | Resilience Shard | |
| Land an HP Attack |
Level 51 | Resilience Crystal | |
| Inflict Break |
Level 100 | Resilience Orb | |
| Jecht | Inflict Break |
Level 16 | Crimson Powder |
| Land an HP Attack |
Level 37 | Crimson Shard | |
| Land an HP Attack |
Level 58 | Crimson Crystal | |
| Inflict Break |
Level 100 | Crimson Orb | |
| Gabranth | Inflict Break |
Level 58 | Time Shard |
| Land an HP Attack |
Level 79 | Time Crystal | |
| Use an EX Burst |
Level 100 | Time Orb | |
| Chaos | Use an EX Burst |
Level 51 | Chaos Shard |
| Land an HP Attack |
Level 72 | Chaos Crystal | |
| Inflict Break |
Level 100 | Chaos Orb |
Stage Element Destruction
| Stage | Reward |
|---|---|
| Old Chaos Shrine | Blackcrystal Sliver |
| Pandaemonium | Demon Soul |
| World of Darkness | Sealed Darkness |
| Lunar Subterrane | Moon Stone |
| The Rift | Voidshard |
| Kefka's Tower | Magicite Shard |
| Planet's Core | Materia |
| Ultimecia's Castle | Time Warp |
| Mallet*Available after obtaining Mallet as the stage prize for Inward Chaos | |
| Crystal World | Star's Core |
| Dream's End | Moonflow |
| Order's Sanctuary | Order of Emptiness |
| Edge Of Madness | Entropy's Birth |
Dissidia 012 Final Fantasy
Note that numerous characters and arenas cannot have their associated Battlegen items won until the player completes certain tasks, such as getting to a certain point in Story Mode or viewing a certain Report.
Battle
| Target | Condition | Level | Reward |
|---|---|---|---|
| Warrior of Light | Land a Bravery Attack finish |
Level 2 | Hero's Desire |
| Land a HP Attack |
Level 9 | Hero's Dream | |
| Inflict Break |
Level 23 | Hero's Hopes | |
| Firion | Land a Bravery Attack finish |
Level 2 | Liegeman's Desire |
| Land a HP Attack |
Level 9 | Liegeman's Dream | |
| Inflict Break |
Level 23 | Liegeman's Hopes | |
| Onion Knight | Land a Bravery Attack finish |
Level 2 | Youth's Desire |
| Land a HP Attack |
Level 9 | Youth's Dream | |
| Inflict Break |
Level 23 | Youth's Hopes | |
| Cecil | Land a Bravery Attack finish |
Level 2 | Knight's Desire |
| Land a HP Attack |
Level 9 | Knight's Dream | |
| Inflict Break |
Level 23 | Knight's Hopes | |
| Kain | Land a Bravery Attack finish |
Level 2 | Dragoon's Desire |
| Land a HP Attack |
Level 9 | Dragoon's Dream | |
| Inflict Break |
Level 23 | Dragoon's Hopes | |
| Bartz | Land a Bravery Attack finish |
Level 2 | Wanderer's Desire |
| Land a HP Attack |
Level 9 | Wanderer's Dream | |
| Inflict Break |
Level 23 | Wanderer's Hopes | |
| Tifa | Land a Bravery Attack finish |
Level 2 | Brawler's Desire |
| Land a HP Attack |
Level 9 | Brawler's Dream | |
| Inflict Break |
Level 23 | Brawler's Hopes | |
| Squall | Land a Bravery Attack finish |
Level 2 | Lion's Desire |
| Land a HP Attack |
Level 9 | Lion's Dream | |
| Inflict Break |
Level 23 | Lion's Hopes | |
| Laguna | Land a Bravery Attack finish |
Level 2 | Gunner's Desire |
| Land a HP Attack |
Level 9 | Gunner's Dream | |
| Inflict Break |
Level 23 | Gunner's Hopes | |
| Zidane | Land a Bravery Attack finish |
Level 2 | Thief's Desire |
| Land a HP Attack |
Level 9 | Thief's Dream | |
| Inflict Break |
Level 23 | Thief's Hopes | |
| Jecht | Land a Bravery Attack finish |
Level 2 | Phantom's Desire |
| Land a HP Attack |
Level 9 | Phantom's Dream | |
| Inflict Break |
Level 23 | Phantom's Hopes | |
| Yuna | Land a Bravery Attack finish |
Level 2 | Summoner's Desire |
| Land a HP Attack |
Level 9 | Summoner's Dream | |
| Inflict Break |
Level 23 | Summoner's Hopes | |
| Shantotto | Land a Bravery Attack finish |
Level 2 | Lady's Desire |
| Land a HP Attack |
Level 9 | Lady's Dream | |
| Inflict Break |
Level 23 | Lady's Hopes | |
| PrisheComplete Side Story: The Maiden Bringer of Light -2- in Report 18 | Land a Bravery Attack finish |
Level 2 | Horror's Desire |
| Land a HP Attack |
Level 9 | Horror's Dream | |
| Inflict Break |
Level 23 | Horror's Hopes | |
| Vaan | Land a Bravery Attack finish |
Level 2 | Sky Pirate's Desire |
| Land a HP Attack |
Level 9 | Sky Pirate's Dream | |
| Inflict Break |
Level 23 | Sky Pirate's Hopes | |
| Lightning | Land a Bravery Attack finish |
Level 2 | Flash's Desire |
| Land a HP Attack |
Level 9 | Flash's Dream | |
| Inflict Break |
Level 23 | Flash's Hopes | |
| Garland | Land a Bravery Attack finish |
Level 2 | Stalwart's Desire |
| Land a HP Attack |
Level 9 | Stalwart's Dream | |
| Inflict Break |
Level 23 | Stalwart's Hopes | |
| The Emperor | Land a Bravery Attack finish |
Level 2 | Despot's Desire |
| Land a HP Attack |
Level 9 | Despot's Dream | |
| Inflict Break |
Level 23 | Despot's Hopes | |
| Cloud of Darkness | Land a Bravery Attack finish |
Level 2 | Wraith's Desire |
| Land a HP Attack |
Level 9 | Wraith's Dream | |
| Inflict Break |
Level 23 | Wraith's Hopes | |
| Golbez | Land a Bravery Attack finish |
Level 2 | Warlock's Desire |
| Land a HP Attack |
Level 9 | Warlock's Dream | |
| Inflict Break |
Level 23 | Warlock's Hopes | |
| Exdeath | Land a Bravery Attack finish |
Level 2 | Tree's Desire |
| Land a HP Attack |
Level 9 | Tree's Dream | |
| Inflict Break |
Level 23 | Tree's Hopes | |
| GilgameshComplete Side Story: The Duel of Dreams in Report 08 | Land a Bravery Attack finish |
Level 2 | Giant's Desire |
| Land a HP Attack |
Level 9 | Giant's Dream | |
| Inflict Break |
Level 23 | Giant's Hopes | |
| Kefka | Land a Bravery Attack finish |
Level 2 | Harlequin's Desire |
| Land a HP Attack |
Level 9 | Harlequin's Dream | |
| Inflict Break |
Level 23 | Harlequin's Hopes | |
| Terra | Land a Bravery Attack finish |
Level 2 | Girl's Desire |
| Land a HP Attack |
Level 9 | Girl's Dream | |
| Inflict Break |
Level 23 | Girl's Hopes | |
| Sephiroth | Land a Bravery Attack finish |
Level 2 | Champion's Desire |
| Land a HP Attack |
Level 9 | Champion's Dream | |
| Inflict Break |
Level 23 | Champion's Hopes | |
| Cloud | Land a Bravery Attack finish |
Level 2 | Soldier's Desire |
| Land a HP Attack |
Level 9 | Soldier's Dream | |
| Inflict Break |
Level 23 | Soldier's Hopes | |
| Ultimecia | Land a Bravery Attack finish |
Level 2 | Witch's Desire |
| Land a HP Attack |
Level 9 | Witch's Dream | |
| Inflict Break |
Level 23 | Witch's Hopes | |
| Kuja | Land a Bravery Attack finish |
Level 2 | Reaper's Desire |
| Land a HP Attack |
Level 9 | Reaper's Dream | |
| Inflict Break |
Level 23 | Reaper's Hopes | |
| Tidus | Land a Bravery Attack finish |
Level 2 | Vision's Desire |
| Land a HP Attack |
Level 9 | Vision's Dream | |
| Inflict Break |
Level 23 | Vision's Hopes | |
| Gabranth | Land a Bravery Attack finish |
Level 2 | Warrior's Desire |
| Land a HP Attack |
Level 9 | Warrior's Dream | |
| Inflict Break |
Level 23 | Warrior's Hopes | |
| ChaosReach Edge of Discord (Floor 3) in Main Scenario 013's epilogue | Land a Bravery Attack finish |
Level 2 | Discord's Desire |
| Land a HP Attack |
Level 9 | Discord's Dream | |
| Inflict Break |
Level 23 | Discord's Hopes | |
| Feral ChaosClear Southern Lufenia Gateway in Main Scenario 000 | Land a Bravery Attack finish |
Level 2 | Utter Chaos's Desire |
| Land a HP Attack |
Level 9 | Utter Chaos's Dream | |
| Inflict Break |
Level 23 | Utter Chaos's Hopes |
Stage Element Destruction
| Stage | Reward |
|---|---|
| Old Chaos Shrine | Blackcrystal Sliver |
| Pandaemonium | Demon Soul |
| World of Darkness | Sealed Darkness |
| Lunar Subterrane | Moon Stone |
| The Rift | Voidshard |
| Kefka's Tower | Magicite Shard |
| Planet's Core | Materia |
| Ultimecia's Castle | Time Warp |
| Crystal World | Star's Core |
| Dream's End | Moonflow |
| Order's Sanctuary | Order of Emptiness |
| Edge Of Madness | Entropy's Birth |
| Empyreal ParadoxBattlegen at least one item from Shantotto | Promyvion Shard |
| Sky Fortress BahamutBattlegen at least one item from Vaan | Sephira |
| Orphan's CradleBattlegen at least one item from Lightning | Fal'cie Husk |
| Pandaemonium - Top FloorComplete Main Scenario 013's epilogue | Palamecian Gem |
| Crystal TowerComplete Main Scenario 013's epilogue | Xande's Hatred |
| Phantom TrainComplete Main Scenario 013's epilogue | Ghost |
| M.S. Prima VistaComplete Main Scenario 013's epilogue | Mallet |
Trivia
- The naming patterns of Battlegen items in the original Dissidia is similar to the Kingdom Hearts naming patterns for synthesis materials. Aside from rarer materials, synthesis materials come in four varieties of potency, Shard, Stone, Gem, and then Crystal, with the same descriptive prefix, such as Blaze Shard through Blaze Crystal.