Intangir Bot (talk | contribs) m (→Quayside Magickery: Relinking, replaced: Scourge (command) → Scourge (poison ability)) Tag: apiedit |
Tag: Visual edit |
||
| (41 intermediate revisions by 6 users not shown) | |||
| Line 1: | Line 1: | ||
| − | {{sideicon|FFXII}} |
+ | {{sideicon|prime=FFXII|FFAB}} |
| − | {{Expand|Adding a Locations section, with images and brief descriptions of the areas within the location}} |
+ | {{Expand|FFAB|FFXII|FFXII|Adding a Locations section, with images and brief descriptions of the areas within the location}} |
| + | {{infobox location |
||
| − | {{Location |
||
|name=Port at Balfonheim |
|name=Port at Balfonheim |
||
|release=FFXII |
|release=FFXII |
||
| Line 10: | Line 10: | ||
|region=[[Archadia]] |
|region=[[Archadia]] |
||
|affiliation=Archadia |
|affiliation=Archadia |
||
| − | |residents=[[Reddas]], [[Rikken]], [[Elza]], [[Raz]], [[Dyce]], Fishing Enthusiast, Viera Wayfarer |
+ | |residents=[[Reddas]], [[Rikken]], [[Elza (Final Fantasy XII)|Elza]], [[Raz]], [[Dyce]], Fishing Enthusiast, Viera Wayfarer |
|items=*[[#Treasures|Treasures]] |
|items=*[[#Treasures|Treasures]] |
||
*Many found in [[#Shops|shops]] |
*Many found in [[#Shops|shops]] |
||
| Line 18: | Line 18: | ||
*[[#Fishing rod|Fishing rod]] |
*[[#Fishing rod|Fishing rod]] |
||
}} |
}} |
||
| − | {{ |
+ | {{Quote|A city of men without countries. Pirates of the sea and of the sky.|Reddas}} |
The '''Port at Balfonheim''', commonly referred as '''Balfonheim''', is a location in the land of [[Ivalice (Final Fantasy XII)|Ivalice]] in ''[[Final Fantasy XII]]''. It is a [[town]] full of sailors and pirates, led by the infamous [[Reddas]]. |
The '''Port at Balfonheim''', commonly referred as '''Balfonheim''', is a location in the land of [[Ivalice (Final Fantasy XII)|Ivalice]] in ''[[Final Fantasy XII]]''. It is a [[town]] full of sailors and pirates, led by the infamous [[Reddas]]. |
||
Despite being located in [[Archadia]]n territory, Balfonheim stays out of the Empire's conflicts. Instead, it is a town willing to offer its services to whoever wants them, such as the [[Resistance (Final Fantasy XII)|Resistance]]. |
Despite being located in [[Archadia]]n territory, Balfonheim stays out of the Empire's conflicts. Instead, it is a town willing to offer its services to whoever wants them, such as the [[Resistance (Final Fantasy XII)|Resistance]]. |
||
| − | ==[[Sage Knowledge]]== |
+ | == [[Sage Knowledge]] == |
| − | {{See |
+ | {{See|Sage Knowledge}} |
| − | {{ |
+ | {{Quote|Prosperous port on the Naldoan Sea renowned for its rich fishing grounds. In addition to fishing, the port is known for its shipwrights and their numerous contributions to the advancement of seacraft. Though demand has dropped with the spread of airships, the wrights are still able to turn a profit on their craft. The power in Balfonheim rests with the sea captains and pirates of wealth. Though belonging in name to the Archadian Empire, well-placed regular bribes have ensured the city autonomous governance. The city itself is small, being a classic port town, with many stone-cobbled alleyways winding between buildings which hug the curve of the hills. Fresh seafood can be found in the market stalls daily, along with many other items brought by traders and pirates. Several waterways run through the city, some carrying drinking water, others used as canals for the transport of goods. The manse of Pirate King Reddas stands in the western quarter of Balfonheim.|Sage Knowledge 62, Port at Balfonheim}} |
| − | ==Story== |
+ | == Story == |
{{spoiler}} |
{{spoiler}} |
||
As [[Ashelia B'nargin Dalmasca|Ashe's]] party storms the [[Draklor Laboratory]] in [[Archades]], they find Reddas there after the same goal: to destroy the Empire's [[nethicite]]. [[Cidolfus Demen Bunansa|Dr. Cid]] escapes with the pieces of deifacted nethicite, telling the party he's off to [[Giruvegan]], and Reddas takes the party to Balfonheim on his [[Airship (term)|airship]]. |
As [[Ashelia B'nargin Dalmasca|Ashe's]] party storms the [[Draklor Laboratory]] in [[Archades]], they find Reddas there after the same goal: to destroy the Empire's [[nethicite]]. [[Cidolfus Demen Bunansa|Dr. Cid]] escapes with the pieces of deifacted nethicite, telling the party he's off to [[Giruvegan]], and Reddas takes the party to Balfonheim on his [[Airship (term)|airship]]. |
||
| − | Reddas tells the party [[Halim Ondore IV|Marquis Ondore]] has already been looking for the [[Sky |
+ | Reddas tells the party [[Halim Ondore IV|Marquis Ondore]] has already been looking for the [[Sky pirate (Final Fantasy XII)|sky pirates']] assistance to join the Resistance. The war seems closer than ever, but as long as it's Cid who holds the nethicite and not [[Vayne Carudas Solidor|Vayne]], there may be hope. The party decides to follow Cid to Giruvegan, but Reddas refuses to join them, saying he has other plans. |
After returning from Giruvegan the party ends up in Balfonheim and finds Reddas has sent a fleet to [[Ridorana Cataract]], but it caught trouble. After hearing Ashe's plan is to destroy the [[Sun-Cryst]], the motherlode of all nethicite in Ivalice, Reddas joins the party to aid them and gives the party a skystone he stole from the Draklor Laboratory so that [[Strahl|the party's airship]] may fly on the [[jagd]]. |
After returning from Giruvegan the party ends up in Balfonheim and finds Reddas has sent a fleet to [[Ridorana Cataract]], but it caught trouble. After hearing Ashe's plan is to destroy the [[Sun-Cryst]], the motherlode of all nethicite in Ivalice, Reddas joins the party to aid them and gives the party a skystone he stole from the Draklor Laboratory so that [[Strahl|the party's airship]] may fly on the [[jagd]]. |
||
| Line 38: | Line 38: | ||
{{endspoiler}} |
{{endspoiler}} |
||
| − | ==Locations== |
+ | == Locations == |
Balfonheim is located at the southern tip of the continent of Valendia, in the Archadia region, near the [[Cerobi Steppe]]. Balfonheim was a place full of troublemakers and cut-throats until Reddas came and got rid of the riffraff, making it a haven to pirates of both sea and air. |
Balfonheim is located at the southern tip of the continent of Valendia, in the Archadia region, near the [[Cerobi Steppe]]. Balfonheim was a place full of troublemakers and cut-throats until Reddas came and got rid of the riffraff, making it a haven to pirates of both sea and air. |
||
| − | *Sea Breeze Lane (to the Cerobi Steppe) |
+ | * Sea Breeze Lane (to the Cerobi Steppe) |
| − | *Gallerina Marketplace |
+ | * Gallerina Marketplace |
| − | *Chivany Breakwater |
+ | * Chivany Breakwater |
| − | *Quayside Court |
+ | * Quayside Court |
| − | *Canal Lane |
+ | * Canal Lane |
| − | *Saccio Lane |
+ | * Saccio Lane |
| + | * Aerodrome |
||
| − | {{Locat-stub|Final Fantasy XII}} |
||
| + | From the aerodrome one can fly to Archades, Bhujerba or Nalbina for 180 gil and dock their private airship for free. |
||
| − | ==Treasures== |
||
| − | {{ |
+ | {{Location section|Final Fantasy XII}} |
| − | Balfonheim is one of the few areas in the game that has treasures within a town area (where only [[Vaan]] is controllable). The treasure in the Sea Breeze Lane next to [[Dyce]] is always [[gil]], and will never respawn. Without the [[List of Final Fantasy XII accessories#Diamond Armlet|Diamond Armlet]] the treasure is 5040 gil, but with the Diamond Armlet equipped, the amount is reduced to mere 3 gil. |
||
| + | == Treasures == |
||
| − | North of the Canal Lane area, the player can enter a residence on the right that has a treasure that will never respawn, and without the Diamond Armlet is either an [[List of Final Fantasy XII items#Elixir|Elixir]] or a [[List of Final Fantasy XII items#Megalixir|Megalixir]]. With the Diamond Armlet equipped the treasure is 90% Megalixir, 10% [[List of Final Fantasy XII armor#Ensanguined Shield|Ensanguined Shield]]. |
||
| + | {{See|Treasure (Final Fantasy XII)}} |
||
| + | Balfonheim is one of the few areas in the game that has treasures within a town area (where only [[Vaan]] is controllable). The treasure in the Sea Breeze Lane next to [[Dyce]] is always [[gil]], and will never respawn. Without the [[Final Fantasy XII accessories#Diamond Armlet|Diamond Armlet]] the treasure is 5040 gil, but with the Diamond Armlet equipped, the amount is reduced to mere 3 gil. |
||
| + | North of the Canal Lane area, the player can enter a residence on the right that has a treasure that will never respawn, and without the Diamond Armlet is either an [[Final Fantasy XII items#Elixir|Elixir]] or a [[Final Fantasy XII items#Megalixir|Megalixir]]. With the Diamond Armlet equipped the treasure is 90% Megalixir, 10% [[Final Fantasy XII armor#Ensanguined Shield|Ensanguined Shield]]. |
||
| − | ===Quayside Court - The White Cap=== |
||
| + | |||
| + | === Quayside Court - The White Cap === |
||
This chest only appears in the ''Zodiac'' versions. |
This chest only appears in the ''Zodiac'' versions. |
||
| − | {|class="full-width FFXII table" style="text-align:center" |
+ | {|class="full-width FFXII article-table" style="text-align:center" |
|-class="a" |
|-class="a" |
||
!style="width:20%"|Chest |
!style="width:20%"|Chest |
||
| Line 77: | Line 80: | ||
|- |
|- |
||
|Bacchus's Wine |
|Bacchus's Wine |
||
| + | |Domaine Calvados |
||
| − | |''Shitamachi no Karubadosu'' |
||
|Knot of Rust |
|Knot of Rust |
||
|Dark Matter |
|Dark Matter |
||
|} |
|} |
||
| − | {{ |
+ | {{clear}} |
| + | |||
| − | ===Canal Lane - Port Villa, West Side=== |
||
| + | === Canal Lane - Port Villa, West Side === |
||
This chest only appears in the ''Zodiac'' versions. |
This chest only appears in the ''Zodiac'' versions. |
||
| − | {|class="full-width FFXII table" style="text-align:center" |
+ | {|class="full-width FFXII article-table" style="text-align:center" |
|-class="a" |
|-class="a" |
||
!style="width:20%"|Chest |
!style="width:20%"|Chest |
||
| Line 108: | Line 112: | ||
|Meteorite (D) |
|Meteorite (D) |
||
|} |
|} |
||
| − | {{ |
+ | {{clear}} |
| − | ===Canal Lane - Port Villa, East Side=== |
+ | === Canal Lane - Port Villa, East Side === |
;Zodiac |
;Zodiac |
||
| − | {|class="full-width FFXII table" style="text-align:center" |
+ | {|class="full-width FFXII article-table" style="text-align:center" |
|-class="a" |
|-class="a" |
||
!style="width:20%"|Chest |
!style="width:20%"|Chest |
||
| Line 129: | Line 133: | ||
|- |
|- |
||
|Knot of Rust |
|Knot of Rust |
||
| + | |Baltoro's Seed |
||
| − | |''Barutoro no Tane'' |
||
|} |
|} |
||
| + | ;Original |
||
| − | ;FFXII |
||
| − | {|class="full-width FFXII table" style="text-align:center" |
+ | {|class="full-width FFXII article-table" style="text-align:center" |
|-class="a" |
|-class="a" |
||
!style="width:20%"|Chest |
!style="width:20%"|Chest |
||
| Line 155: | Line 159: | ||
|N/A |
|N/A |
||
|Megalixir |
|Megalixir |
||
| − | |[[ |
+ | |[[Final Fantasy XII armor#Ensanguined Shield|Ensanguined Shield]] |
|} |
|} |
||
| − | *'''''{{A|1}}''''' - Chest does not respawn. |
+ | * '''''{{A|1}}''''' - Chest does not respawn. |
| − | {{ |
+ | {{clear}} |
| + | |||
| − | ===Sea Breeze Lane=== |
||
| + | === Sea Breeze Lane === |
||
;Zodiac |
;Zodiac |
||
| − | {|class="full-width FFXII table" style="text-align:center" |
+ | {|class="full-width FFXII article-table" style="text-align:center" |
|-class="a" |
|-class="a" |
||
!style="width:20%"|Chest |
!style="width:20%"|Chest |
||
| Line 191: | Line 196: | ||
|rowspan="2"|70% |
|rowspan="2"|70% |
||
|rowspan="2"|≤ 50 gil |
|rowspan="2"|≤ 50 gil |
||
| − | |rowspan="2" colspan="2"| |
+ | |rowspan="2" colspan="2"|Gysahl Greens |
!class="a" width="12.5%"|Common |
!class="a" width="12.5%"|Common |
||
!class="a" width="12.5%"|Rare |
!class="a" width="12.5%"|Rare |
||
| Line 198: | Line 203: | ||
|Scathe Mote |
|Scathe Mote |
||
|} |
|} |
||
| − | *'''''{{A|1}}''''' - Chest does not respawn. |
+ | * '''''{{A|1}}''''' - Chest does not respawn. |
| + | ;Original |
||
| − | ;FFXII |
||
| − | {|class="full-width FFXII table" style="text-align:center" |
+ | {|class="full-width FFXII article-table" style="text-align:center" |
|-class="a" |
|-class="a" |
||
!style="width:20%"|Chest |
!style="width:20%"|Chest |
||
| Line 213: | Line 218: | ||
|colspan="2"|5040 gil |
|colspan="2"|5040 gil |
||
|} |
|} |
||
| − | *'''''{{A|1}}''''' - Chest does not respawn. |
+ | * '''''{{A|1}}''''' - Chest does not respawn. |
| − | ==Notable citizens== |
+ | == Notable citizens == |
| − | *[[Reddas]], the leader of the port's pirates. |
+ | * [[Reddas]], the leader of the port's pirates. |
| − | *[[Rikken]], Reddas's comrade, holds a footrace minigame. |
+ | * [[Rikken]], Reddas's comrade, holds a footrace minigame. |
| − | *[[Elza]], Rikken's friend. |
+ | * [[Elza (Final Fantasy XII)|Elza]], Rikken's friend. |
| − | *[[Raz]], Rikken's friend. |
+ | * [[Raz]], Rikken's friend. |
| − | *[[Dyce]], merchant previously met at [[Jagd Yensa]]. |
+ | * [[Dyce]], merchant previously met at [[Jagd Yensa]]. |
| − | *'''Fishing Enthusiast''', helps the player with the [[Fishing (Final Fantasy XII)|Fishing]] minigame. |
+ | * '''Fishing Enthusiast''', helps the player with the [[Fishing (Final Fantasy XII)|Fishing]] minigame. |
| − | *'''Viera Wayfarer''', [[viera]] with [[Vyraal (Final Fantasy XII)|a hunt]] found in the Whitecap Tavern, who gives the party the Dragon Scales item. |
+ | * '''Viera Wayfarer''', [[viera]] with [[Vyraal (Final Fantasy XII)|a hunt]] found in the Whitecap Tavern, who gives the party the Dragon Scales item. |
| − | ==Quests== |
+ | == Quests == |
| − | ===Hunts=== |
+ | === Hunts === |
| − | {{See |
+ | {{See|Hunt (Final Fantasy XII)}} |
The [[Vyraal (Final Fantasy XII)|Vyraal]] is a Rank V Mark whose hunt can be undertaken after the events in [[Draklor Laboratory]] are complete. The Vyraal can be found in The Northsward area of the Cerobi Steppe, and enemies will be cleared out when the player enters it. The hunt is petitioned by the [[Viera Wayfarer]] in the Whitecap pub in Balfonheim. The player will also receive the Viera Rucksack after the battle, which the Viera Wayfarer will take back when the hunt is reported. She lets the player keep the Dragon Scale, item part of the [[Cerobi Steppe#Wyrm Philosopher|Wyrm Philosopher]] quest. |
The [[Vyraal (Final Fantasy XII)|Vyraal]] is a Rank V Mark whose hunt can be undertaken after the events in [[Draklor Laboratory]] are complete. The Vyraal can be found in The Northsward area of the Cerobi Steppe, and enemies will be cleared out when the player enters it. The hunt is petitioned by the [[Viera Wayfarer]] in the Whitecap pub in Balfonheim. The player will also receive the Viera Rucksack after the battle, which the Viera Wayfarer will take back when the hunt is reported. She lets the player keep the Dragon Scale, item part of the [[Cerobi Steppe#Wyrm Philosopher|Wyrm Philosopher]] quest. |
||
| Line 233: | Line 238: | ||
[[Ixion (Final Fantasy XII)|Ixion]] is an Elite Mark found in the Penumbra-Interior area of Subterra at [[Pharos (Final Fantasy XII)|Pharos]]. The hunt becomes available after the events in the Pharos. It is petitioned by Whitecap Wench at Quayside Court - The Whitecap. Ixion can be found at Pharos's Subterra, on any of the three floors. |
[[Ixion (Final Fantasy XII)|Ixion]] is an Elite Mark found in the Penumbra-Interior area of Subterra at [[Pharos (Final Fantasy XII)|Pharos]]. The hunt becomes available after the events in the Pharos. It is petitioned by Whitecap Wench at Quayside Court - The Whitecap. Ixion can be found at Pharos's Subterra, on any of the three floors. |
||
| − | ===Pirate Olympics=== |
+ | === Pirate Olympics === |
[[File:Balfonheim-footrace.jpg|thumb|Footrace.]] |
[[File:Balfonheim-footrace.jpg|thumb|Footrace.]] |
||
| − | When the party leaves Reddas Mansion after the first time they visit Balfonheim, Rikken and his gang will be outside and give Vaan information about the [[Feywood]]. If Vaan talks to him a couple of times, Rikken will invite him for a footrace [[minigame]]. The minigame consists of 100 levels that reward the party with treasures, including the [[ |
+ | When the party leaves Reddas Mansion after the first time they visit Balfonheim, Rikken and his gang will be outside and give Vaan information about the [[Feywood]]. If Vaan talks to him a couple of times, Rikken will invite him for a footrace [[minigame]]. The minigame consists of 100 levels that reward the party with treasures, including the [[Very rare items|rare loot]] [[Loot (Final Fantasy XII)#Slime Oil|Slime Oil]]. |
| + | Racing requires pressing two buttons alternately. There are 100 different races, and winning them yields various curative items and gil. |
||
| − | Racing requires pressing two buttons together. Beating the pirates gets the party potions and curative items. At tier 100 the reward is 10,000 gil, and any tier higher than tier 30 will give [[Loot (Final Fantasy XII)#Unpurified Ether|Unpurified Ether]] and/or [[List of Final Fantasy XII items#Elixir|Elixirs]]. |
||
| − | Rikken is normally in the lead, and travels at about the same speed as Vaan, making it difficult to pass him until near the final turn, where he slows down for a second. If the player did not [[Steal#Final Fantasy XII|steal]] Slime Oil from the mark [[Orthros (Final Fantasy XII)|Orthros]], the [[ |
+ | Rikken is normally in the lead, and travels at about the same speed as Vaan, making it difficult to pass him until near the final turn, where he slows down for a second. If the player did not [[Steal#Final Fantasy XII|steal]] Slime Oil from the mark [[Orthros (Final Fantasy XII)|Orthros]], the [[permanently missable content|only other way to obtain one]] is to win the tier 90 footrace. |
| + | |||
| + | Elza is not a threat on her own, but by progressing in the mini game, she may take the last turn of the race very tightly. If this outcome happens when the player must go out of his way to make Raz trip, she can steal the victory. |
||
| + | |||
| + | Raz is the fastest of the three, but he trips a lot, causing him to almost always lose the first races. Beyond the 40th level Raz no longer trips on his own (apart for one fall at the beginning) and Vaan has to prompt it by intercepting Raz's trajectory or approaching him from the side. If the player fails to stop him, Raz will win the race. |
||
;Rewards |
;Rewards |
||
| + | <div style="column-count:2;-moz-column-count:2;-webkit-column-count:2"> |
||
| − | #[[List of Final Fantasy XII items#Potion|Potion]] |
||
| − | #[[ |
+ | # [[Final Fantasy XII items#Potion|Potion]] |
| − | #[[ |
+ | # [[Final Fantasy XII items#Phoenix Down|Phoenix Down]] |
| − | #[[ |
+ | # [[Final Fantasy XII items#Eye Drops|Eye Drops]] |
| − | # |
+ | # [[Final Fantasy XII items#Antidote|Antidote]] |
| − | #[[ |
+ | # 10 [[gil]], [[Final Fantasy XII items#Echo Herbs|Echo Herbs]] |
| − | #[[ |
+ | # [[Final Fantasy XII items#Gold Needle|Gold Needle]] |
| − | #[[ |
+ | # [[Final Fantasy XII items#Alarm Clock|Alarm Clock]] (Prince's Kiss in ''Zodiac'' versions) |
| − | #[[ |
+ | # [[Final Fantasy XII items#Handkerchief|Handkerchief]] |
| + | # [[Final Fantasy XII items#Bacchus's Wine|Bacchus's Wine]] |
||
| − | #100 gil, Balance Mote x2 |
||
| + | # 100 gil, Balance Mote x2 |
||
| − | #Potion x2 |
||
| − | # |
+ | # Potion x2 |
| − | # |
+ | # Phoenix Down x2 |
| − | # |
+ | # Eye Drops x2 |
| − | # |
+ | # Antidote x2 |
| + | # 20 gil, Echo Herbs x2 |
||
| − | #Gold Needle x2 |
||
| + | # Gold Needle x2 |
||
| − | #Alarm Clock (Prince's Kiss in ''Zodiac'' versions) x2 |
||
| + | # Alarm Clock (Prince's Kiss in ''Zodiac'' versions) x2 |
||
| − | #Handkerchief x2 |
||
| + | # Handkerchief x2 |
||
| − | #Bacchus's Wine x2 |
||
| + | # Bacchus's Wine x2 |
||
| − | #300 gil, [[List of Final Fantasy XII items#Float Mote|Float Mote]] x2 |
||
| + | # 300 gil, [[Final Fantasy XII items#Float Mote|Float Mote]] x2 |
||
| − | #Potion x3 |
||
| − | # |
+ | # Potion x3 |
| − | # |
+ | # Phoenix Down x3 |
| − | # |
+ | # Eye Drops x3 |
| − | # |
+ | # Antidote x3 |
| + | # 30 gil, Echo Herbs x3 |
||
| − | #Gold Needle x3 |
||
| + | # Gold Needle x3 |
||
| − | #Alarm Clock (Prince's Kiss in ''Zodiac'' versions) x3 |
||
| + | # Alarm Clock (Prince's Kiss in ''Zodiac'' versions) x3 |
||
| − | #Handkerchief x3 |
||
| + | # Handkerchief x3 |
||
| − | #Bacchus's Wine x3 |
||
| + | # Bacchus's Wine x3 |
||
| − | #800 gil, [[List of Final Fantasy XII items#Teleport Stone|Teleport Stone]] x3 |
||
| + | # 800 gil, [[Final Fantasy XII items#Teleport Stone|Teleport Stone]] x3 |
||
| − | #Potion x4 |
||
| − | # |
+ | # Potion x4 |
| − | # |
+ | # Phoenix Down x4 |
| − | # |
+ | # Eye Drops x4 |
| − | # |
+ | # Antidote x4 |
| + | # 40 gil, Echo Herbs x4 |
||
| − | #Gold Needle x4 |
||
| + | # Gold Needle x4 |
||
| − | #Alarm Clock (Prince's Kiss in ''Zodiac'' versions) x4 |
||
| + | # Alarm Clock (Prince's Kiss in ''Zodiac'' versions) x4 |
||
| − | #Handkerchief x4 |
||
| + | # Handkerchief x4 |
||
| − | #Bacchus's Wine x4 |
||
| + | # Bacchus's Wine x4 |
||
| − | #1500 gil, [[List of Final Fantasy XII items#Vanishga Mote|Vanishga Mote]] x2 |
||
| + | # 1500 gil, [[Final Fantasy XII items#Vanishga Mote|Vanishga Mote]] x2 |
||
| − | #Potion x5 |
||
| − | # |
+ | # Potion x5 |
| − | # |
+ | # Phoenix Down x5 |
| − | # |
+ | # Eye Drops x5 |
| − | # |
+ | # Antidote x5 |
| + | # 50 gil, Echo Herbs x5 |
||
| − | #Gold Needle x5 |
||
| + | # Gold Needle x5 |
||
| − | #Alarm Clock (Prince's Kiss in ''Zodiac'' versions) x5 |
||
| + | # Alarm Clock (Prince's Kiss in ''Zodiac'' versions) x5 |
||
| − | #Handkerchief x5 |
||
| + | # Handkerchief x5 |
||
| − | #Bacchus's Wine x5 |
||
| + | # Bacchus's Wine x5 |
||
| − | #2500 gil, [[List of Final Fantasy XII items#Reflectga Mote|Reflectga Mote]] x2 |
||
| + | # 2500 gil, [[Final Fantasy XII items#Reflectga Mote|Reflectga Mote]] x2 |
||
| − | #Potion x6 |
||
| − | # |
+ | # Potion x6 |
| − | # |
+ | # Phoenix Down x6 |
| − | # |
+ | # Eye Drops x6 |
| − | # |
+ | # Antidote x6 |
| + | # 60 gil, Echo Herbs x6 |
||
| − | #Gold Needle x6 |
||
| + | # Gold Needle x6 |
||
| − | #Alarm Clock (Prince's Kiss in ''Zodiac'' versions) x6 |
||
| + | # Alarm Clock (Prince's Kiss in ''Zodiac'' versions) x6 |
||
| − | #Handkerchief x6 |
||
| + | # Handkerchief x6 |
||
| − | #Bacchus's Wine x6 |
||
| + | # Bacchus's Wine x6 |
||
| − | #3500 gil, [[List of Final Fantasy XII items#Hi-Ether|Hi-Ether]] x2 |
||
| + | # 3500 gil, [[Final Fantasy XII items#Hi-Ether|Hi-Ether]] x2 |
||
| − | #Potion x7 |
||
| − | # |
+ | # Potion x7 |
| − | # |
+ | # Phoenix Down x7 |
| − | # |
+ | # Eye Drop x7 |
| − | # |
+ | # Antidote x7 |
| + | # 70 gil, Echo Herb x7 |
||
| − | #Gold Needle x7 |
||
| + | # Gold Needle x7 |
||
| − | #Alarm Clock (Prince's Kiss in ''Zodiac'' versions) x7 |
||
| + | # Alarm Clock (Prince's Kiss in ''Zodiac'' versions) x7 |
||
| − | #Handkerchief x7 |
||
| + | # Handkerchief x7 |
||
| − | #Bacchus's Wine x7 |
||
| + | # Bacchus's Wine x7 |
||
| − | #4500 gil, [[List of Final Fantasy XII items#Holy Mote|Holy Mote]] x2 |
||
| + | # 4500 gil, [[Final Fantasy XII items#Holy Mote|Holy Mote]] x2 |
||
| − | #Potion x8 |
||
| − | # |
+ | # Potion x8 |
| − | # |
+ | # Phoenix Down x8 |
| − | # |
+ | # Eye Drops x8 |
| − | # |
+ | # Antidote x8 |
| + | # 80 gil,Echo Herbs x8 |
||
| − | #Gold Needle x8 |
||
| + | # Gold Needle x8 |
||
| − | #Alarm Clock (Prince's Kiss in ''Zodiac'' versions) x8 |
||
| + | # Alarm Clock (Prince's Kiss in ''Zodiac'' versions) x8 |
||
| − | #Handkerchief x8 |
||
| + | # Handkerchief x8 |
||
| − | #Bacchus's Wine x8 |
||
| + | # Bacchus's Wine x8 |
||
| − | #6000 gil, [[Hastega|Hastega Mote]] x2, Caramel |
||
| + | # 6000 gil, [[Hastega|Hastega Mote]] x2, [[Loot (Final Fantasy XII)#Caramel|Caramel]] |
||
| − | #Potion x9 |
||
| − | # |
+ | # Potion x9 |
| − | # |
+ | # Phoenix Down x9 |
| − | # |
+ | # Eyes Drops x9 |
| − | # |
+ | # Antidote x9 |
| + | # 90 gil, Echo Herbs x9 |
||
| − | #Gold Needle x9 |
||
| + | # Gold Needle x9 |
||
| − | #Alarm Clock (Prince's Kiss in ''Zodiac'' versions) x9 |
||
| + | # Alarm Clock (Prince's Kiss in ''Zodiac'' versions) x9 |
||
| − | #Handkerchief x9 |
||
| + | # Handkerchief x9 |
||
| − | #Bacchus's Wine x9 |
||
| + | # Bacchus's Wine x9 |
||
| − | #8000 gil, [[Scathe|Scathe Mote]] x2, Slime Oil |
||
| + | # 8000 gil, [[Scathe|Scathe Mote]] x2, [[Loot (Final Fantasy XII)#Slime Oil|Slime Oil]] |
||
| − | #Potion x10 |
||
| − | # |
+ | # Potion x10 |
| − | # |
+ | # Phoenix Down x10 |
| − | # |
+ | # Eye Drops x10 |
| − | # |
+ | # Antidote x10 |
| − | # |
+ | # 100 gil, Echo Herbs x10 |
| + | # Gold Needle x10 |
||
| − | #Alarm Clock (Prince's Kiss in ''Zodiac'' versions) x10 |
||
| + | # Alarm Clock (Prince's Kiss in ''Zodiac'' versions) x10 |
||
| − | #Handkerchief x10 |
||
| − | # |
+ | # Handkerchief x10 |
| + | # Bacchus's Wine x10 |
||
| − | #10000 gil, Elixir x2, Unpurified Ether |
||
| + | # 10000 gil, Elixir x2, [[Loot (Final Fantasy XII)#Unpurified Ether|Unpurified Ether]] |
||
| − | {{-}} |
||
| + | </div> |
||
| + | {{clear}} |
||
| − | ===Great cockatrice escape quest=== |
+ | === Great cockatrice escape quest === |
| − | [[File: |
+ | [[File:Moomer-FFXII-TZA.jpg|thumb|Moomer.]] |
{{Main|Great cockatrice escape}} |
{{Main|Great cockatrice escape}} |
||
| − | A [[cockatrice]] called Moomer is in the [[Chocobo (Final Fantasy XII)|chocobo]] pen at Sea Breeze Lane of Balfonheim. The player must talk to the Chocobo Wrangler by the chocobo pen and show her the Feather of the Flock, then talk to the Miffed Moogle, and then [[Gurdy (Final Fantasy XII)|Gurdy]], to receive the [[ |
+ | A [[cockatrice]] called Moomer is in the [[Chocobo (Final Fantasy XII)|chocobo]] pen at Sea Breeze Lane of Balfonheim. The player must talk to the Chocobo Wrangler by the chocobo pen and show her the Feather of the Flock, then talk to the Miffed Moogle, and then [[Gurdy (Final Fantasy XII)|Gurdy]], to receive the [[Defender (Final Fantasy XII)|Defender]]. The Feather of the Flock item, needed to talk to cockatrice, is found in an urn in the [[Giza Plains (Final Fantasy XII)|Giza Plains]] Tracks of the Beast area during the Rains. |
| − | {{ |
+ | {{clear}} |
| − | ===Fishing rod=== |
+ | === Fishing rod === |
| + | [[File:Fishing Enthusiast.png|thumb|Fishing Enthusiast.]] |
||
{{Main|Fishing (Final Fantasy XII)}} |
{{Main|Fishing (Final Fantasy XII)}} |
||
The fishing minigame is played in the South Bank Village of the [[Dalmasca Estersand]]. To begin the fishing sidequest, the player must have completed the Cactuar Family sidequest and the portion of the game's storyline at the Draklor Laboratory. After speaking with Ruksel at the South Bank village, the player must travel to the Port at Balfonheim and speak to the Fishing Enthusiast outside of the Aerodrome. |
The fishing minigame is played in the South Bank Village of the [[Dalmasca Estersand]]. To begin the fishing sidequest, the player must have completed the Cactuar Family sidequest and the portion of the game's storyline at the Draklor Laboratory. After speaking with Ruksel at the South Bank village, the player must travel to the Port at Balfonheim and speak to the Fishing Enthusiast outside of the Aerodrome. |
||
The player must talk to him twice and ask about the fishing rod, then run to the Aerodrome's entrance and back to the same spot without leaving the area. The Muramata fishing rod will be near the wall where she was sitting. The player can return to Ruksel at the Dalmasca Estersand to begin the minigame. |
The player must talk to him twice and ask about the fishing rod, then run to the Aerodrome's entrance and back to the same spot without leaving the area. The Muramata fishing rod will be near the wall where she was sitting. The player can return to Ruksel at the Dalmasca Estersand to begin the minigame. |
||
| + | {{clear}} |
||
| − | ==Shops== |
+ | == Shops == |
'''Note:''' The items available for purchase change throughout the game. These items may not all be available at the same time. |
'''Note:''' The items available for purchase change throughout the game. These items may not all be available at the same time. |
||
| − | ===Beruny's Armaments - Beruny=== |
+ | === Beruny's Armaments - Beruny === |
| + | {{multicol-begin}} |
||
| − | <div class="multicolumn"> |
||
| + | ;Original |
||
| − | <div> |
||
| + | {|class="half-width article-table FFXII" style="text-align:center" |
||
| − | ;FFXII |
||
| − | {|class="half-width table FFXII" style="text-align:center" |
||
|-class="a" |
|-class="a" |
||
!width="70%"|Name |
!width="70%"|Name |
||
!width="30%"|Cost |
!width="30%"|Cost |
||
|- |
|- |
||
| − | !class="b"|[[ |
+ | !class="b"|[[Diamond Sword (Final Fantasy XII)|Diamond Sword]] |
|12,500 gil |
|12,500 gil |
||
|- |
|- |
||
| − | !class="b"|[[ |
+ | !class="b"|[[Yoichi Bow (Final Fantasy XII)|Yoichi Bow]] |
|12,500 gil |
|12,500 gil |
||
|- |
|- |
||
| − | !class="b"|[[ |
+ | !class="b"|[[Trident (Final Fantasy XII)|Trident]] |
|12,500 gil |
|12,500 gil |
||
|- |
|- |
||
| − | !class="b"|[[ |
+ | !class="b"|[[Yakei (Final Fantasy XII)|Yakei]] |
|12,500 gil |
|12,500 gil |
||
|- |
|- |
||
| − | !class="b"|[[ |
+ | !class="b"|[[Zephyr Pole (Final Fantasy XII)|Zephyr Pole]] |
|11,200 gil |
|11,200 gil |
||
|- |
|- |
||
| − | !class="b"|[[ |
+ | !class="b"|[[Hunting Crossbow (Final Fantasy XII)|Hunting Crossbow]] |
|12,500 gil |
|12,500 gil |
||
|- |
|- |
||
| − | !class="b"|[[ |
+ | !class="b"|[[Empyrean Rod (Final Fantasy XII)|Empyrean Rod]] |
|6,200 gil |
|6,200 gil |
||
|- |
|- |
||
!class="a" colspan="2"|After obtaining Treaty-Blade |
!class="a" colspan="2"|After obtaining Treaty-Blade |
||
|- |
|- |
||
| − | !class="b"|[[ |
+ | !class="b"|[[Defender (Final Fantasy XII)|Defender]] |
|13,000 gil |
|13,000 gil |
||
|- |
|- |
||
| − | !class="b"|[[ |
+ | !class="b"|[[Spica (Final Fantasy XII)|Spica]] |
|13,000 gil |
|13,000 gil |
||
|- |
|- |
||
| − | !class="b"|[[ |
+ | !class="b"|[[Morning Star (Final Fantasy XII)|Morning Star]] |
|13,500 gil |
|13,500 gil |
||
|- |
|- |
||
| − | !class="b"|[[ |
+ | !class="b"|[[Doom Mace (Final Fantasy XII)|Doom Mace]] |
|11,800 gil |
|11,800 gil |
||
|- |
|- |
||
| − | !class="b"|[[ |
+ | !class="b"|[[Runeblade (Final Fantasy XII)|Runeblade]] |
|14,500 gil |
|14,500 gil |
||
|- |
|- |
||
| − | !class="b"|[[ |
+ | !class="b"|[[Perseus Bow (Final Fantasy XII)|Perseus Bow]] |
|14,500 gil |
|14,500 gil |
||
|- |
|- |
||
| − | !class="b"|[[ |
+ | !class="b"|[[Holy Lance (Final Fantasy XII)|Holy Lance]] |
|14,500 gil |
|14,500 gil |
||
|- |
|- |
||
| − | !class="b"|[[ |
+ | !class="b"|[[Caliper]] |
|14,000 gil |
|14,000 gil |
||
|- |
|- |
||
!class="a" colspan="2"|Once Sky Fortress Bahamut appears |
!class="a" colspan="2"|Once Sky Fortress Bahamut appears |
||
|- |
|- |
||
| − | !class="b"|[[ |
+ | !class="b"|[[Deathbringer (Final Fantasy XII)|Deathbringer]] |
|16,000 gil |
|16,000 gil |
||
|- |
|- |
||
| − | !class="b"|[[ |
+ | !class="b"|[[Greataxe (Final Fantasy XII)|Greataxe]] |
|15,500 gil |
|15,500 gil |
||
|- |
|- |
||
| − | !class="b"|[[ |
+ | !class="b"|[[Ame-no-Murakumo (Final Fantasy XII)|Ame-no-Murakumo]] |
|15,000 gil |
|15,000 gil |
||
|- |
|- |
||
| − | !class="b"|[[ |
+ | !class="b"|[[Save the Queen (Final Fantasy XII)|Save the Queen]] |
|15,500 gil |
|15,500 gil |
||
|- |
|- |
||
| − | !class="b"|[[ |
+ | !class="b"|[[Zwill Crossblade (Final Fantasy XII)|Zwill Crossblade]] |
|15,000 gil |
|15,000 gil |
||
|- |
|- |
||
| − | !class="b"|[[ |
+ | !class="b"|[[Antares (Final Fantasy XII weapon)|Antares]] |
|16,000 gil |
|16,000 gil |
||
|- |
|- |
||
| − | !class="b"|[[ |
+ | !class="b"|[[Ivory Pole (Final Fantasy XII)|Ivory Pole]] |
|13,500 gil |
|13,500 gil |
||
|- |
|- |
||
| − | !class="b"|[[ |
+ | !class="b"|[[Penetrator Crossbow (Final Fantasy XII)|Penetrator Crossbow]] |
|15,500 gil |
|15,500 gil |
||
|- |
|- |
||
| − | !class="b"|[[ |
+ | !class="b"|[[Caldera (Final Fantasy XII)|Caldera]] |
|16,000 gil |
|16,000 gil |
||
|- |
|- |
||
| − | !class="b"|[[ |
+ | !class="b"|[[Cloud Staff (Final Fantasy XII)|Cloud Staff]] |
|8,000 gil |
|8,000 gil |
||
|} |
|} |
||
| + | {{multicol-separator}} |
||
| − | </div> |
||
| − | <div> |
||
;''Zodiac'' |
;''Zodiac'' |
||
| − | {|class="half-width table FFXII" style="text-align:center" |
+ | {|class="half-width article-table FFXII" style="text-align:center" |
|-class="a" |
|-class="a" |
||
!width="70%"|Name |
!width="70%"|Name |
||
!width="30%"|Cost |
!width="30%"|Cost |
||
|- |
|- |
||
| − | !class="b"|[[ |
+ | !class="b"|[[Deathbringer (Final Fantasy XII)|Deathbringer]] |
|13,700 gil |
|13,700 gil |
||
|- |
|- |
||
| − | !class="b"|[[ |
+ | !class="b"|[[Trident (Final Fantasy XII)|Trident]] |
|13,500 gil |
|13,500 gil |
||
|- |
|- |
||
| − | !class="b"|[[ |
+ | !class="b"|[[Ivory Pole (Final Fantasy XII)|Ivory Pole]] |
|13,770 gil |
|13,770 gil |
||
|- |
|- |
||
| − | !class="b"|[[ |
+ | !class="b"|[[Traitor's Bow (Final Fantasy XII)|Traitor's Bow]] |
|13,500 gil |
|13,500 gil |
||
|- |
|- |
||
| − | !class="b"|[[ |
+ | !class="b"|[[Spica (Final Fantasy XII)|Spica]] |
|11,000 gil |
|11,000 gil |
||
|- |
|- |
||
| − | !class="b"|[[ |
+ | !class="b"|[[Morning Star (Final Fantasy XII)|Morning Star]] |
|10,000 gil |
|10,000 gil |
||
|- |
|- |
||
| − | !class="b"|[[ |
+ | !class="b"|[[Platinum Dagger (Final Fantasy XII)|Platinum Dagger]] |
|13,700 gil |
|13,700 gil |
||
|- |
|- |
||
| − | !class="b"|[[ |
+ | !class="b"|[[Runeblade (Final Fantasy XII)|Runeblade]] |
|12,100 gil |
|12,100 gil |
||
|- |
|- |
||
| − | !class="b"|[[ |
+ | !class="b"|[[Yakei (Final Fantasy XII)|Yakei]] |
|9,300 gil |
|9,300 gil |
||
|- |
|- |
||
| − | !class="b"|[[ |
+ | !class="b"|[[Zephyr Pole (Final Fantasy XII)|Zephyr Pole]] |
|11,850 gil |
|11,850 gil |
||
|- |
|- |
||
| − | !class="b"|[[ |
+ | !class="b"|[[Burning Bow]] |
|11,850 gil |
|11,850 gil |
||
|- |
|- |
||
| − | !class="b"|[[ |
+ | !class="b"|[[Orichalcum Dirk (Final Fantasy XII)|Orichalcum Dirk]] |
|11,700 gil |
|11,700 gil |
||
|- |
|- |
||
| − | !class="b"|[[ |
+ | !class="b"|[[Doom Mace (Final Fantasy XII)|Doom Mace]] |
|9,700 gil |
|9,700 gil |
||
|- |
|- |
||
| − | !class="b"|[[ |
+ | !class="b"|[[Penetrator Crossbow (Final Fantasy XII)|Penetrator Crossbow]] |
|12,600 gil |
|12,600 gil |
||
|- |
|- |
||
!class="a" colspan="2"|After obtaining Treaty-Blade |
!class="a" colspan="2"|After obtaining Treaty-Blade |
||
|- |
|- |
||
| − | !class="b"|[[ |
+ | !class="b"|[[Ame-no-Murakumo (Final Fantasy XII)|Ame-no-Murakumo]] |
|16,000 gil |
|16,000 gil |
||
|- |
|- |
||
| − | !class="b"|[[ |
+ | !class="b"|[[Save the Queen (Final Fantasy XII)|Save the Queen]] |
|11,600 gil |
|11,600 gil |
||
|- |
|- |
||
| − | !class="b"|[[ |
+ | !class="b"|[[Holy Lance (Final Fantasy XII)|Holy Lance]] |
|15,700 gil |
|15,700 gil |
||
|- |
|- |
||
| − | !class="b"|[[ |
+ | !class="b"|[[Yoichi Bow (Final Fantasy XII)|Yoichi Bow]] |
|15,800 gil |
|15,800 gil |
||
|- |
|- |
||
| − | !class="b"|[[ |
+ | !class="b"|[[Greataxe (Final Fantasy XII)|Greataxe]] |
|12,000 gil |
|12,000 gil |
||
|- |
|- |
||
|} |
|} |
||
| + | {{multicol-end}} |
||
| − | </div> |
||
| + | {{clear}} |
||
| − | </div> |
||
| + | === Beruny's Armaments - Emma === |
||
| − | {{-}} |
||
| + | {{multicol-begin}} |
||
| − | ===Beruny's Armaments - Emma=== |
||
| + | ;Original |
||
| − | <div class="multicolumn"> |
||
| + | {|class="half-width article-table FFXII" style="text-align:center" |
||
| − | <div> |
||
| − | ;FFXII |
||
| − | {|class="half-width table FFXII" style="text-align:center" |
||
|-class="a" |
|-class="a" |
||
!width="70%"|Name |
!width="70%"|Name |
||
!width="30%"|Cost |
!width="30%"|Cost |
||
|- |
|- |
||
| − | !class="b"|[[ |
+ | !class="b"|[[Final Fantasy XII armor/Original#Chakra Band|Chakra Band]] |
|8,100 gil |
|8,100 gil |
||
|- |
|- |
||
| − | !class="b"|[[ |
+ | !class="b"|[[Final Fantasy XII armor/Original#Power Vest|Power Vest]] |
|8,100 gil |
|8,100 gil |
||
|- |
|- |
||
| − | !class="b"|[[ |
+ | !class="b"|[[Final Fantasy XII armor/Original#Hypnocrown|Hypnocrown]] |
|8,100 gil |
|8,100 gil |
||
|- |
|- |
||
| − | !class="b"|[[ |
+ | !class="b"|[[Final Fantasy XII armor/Original#Jade Gown|Jade Gown]] |
|8,100 gil |
|8,100 gil |
||
|- |
|- |
||
| − | !class="b"|[[ |
+ | !class="b"|[[Final Fantasy XII armor/Original#Platinum Helm|Platinum Helm]] |
|9,300 gil |
|9,300 gil |
||
|- |
|- |
||
| − | !class="b"|[[ |
+ | !class="b"|[[Final Fantasy XII armor/Original#Platinum Armor|Platinum Armor]] |
|9,300 gil |
|9,300 gil |
||
|- |
|- |
||
| − | !class="b"|[[ |
+ | !class="b"|[[Final Fantasy XII armor/Original#Crystal Shield|Crystal Shield]] |
|7,200 gil |
|7,200 gil |
||
|- |
|- |
||
| − | !class="b"|[[ |
+ | !class="b"|[[Final Fantasy XII armor/Original#Thief's Cap|Thief's Cap]] |
|9,300 gil |
|9,300 gil |
||
|- |
|- |
||
| − | !class="b"|[[ |
+ | !class="b"|[[Final Fantasy XII armor/Original#Ninja Gear|Ninja Gear]] |
|9,300 gil |
|9,300 gil |
||
|- |
|- |
||
| − | !class="b"|[[ |
+ | !class="b"|[[Final Fantasy XII armor/Original#Gold Hairpin|Gold Hairpin]] |
|9,300 gil |
|9,300 gil |
||
|- |
|- |
||
| − | !class="b"|[[ |
+ | !class="b"|[[Final Fantasy XII armor/Original#Gaia Gear|Gaia Gear]] |
|9,300 gil |
|9,300 gil |
||
|- |
|- |
||
| − | !class="b"|[[ |
+ | !class="b"|[[Final Fantasy XII armor/Original#Giant's Helmet|Giant's Helmet]] |
|11,000 gil |
|11,000 gil |
||
|- |
|- |
||
| − | !class="b"|[[ |
+ | !class="b"|[[Final Fantasy XII armor/Original#Carabineer Mail|Carabineer Mail]] |
|11,000 gil |
|11,000 gil |
||
|- |
|- |
||
!class="a" colspan="2"|After obtaining Treaty-Blade |
!class="a" colspan="2"|After obtaining Treaty-Blade |
||
|- |
|- |
||
| − | !class="b"|[[ |
+ | !class="b"|[[Final Fantasy XII armor/Original#Gigas Hat|Gigas Hat]] |
|10,700 gil |
|10,700 gil |
||
|- |
|- |
||
| − | !class="b"|[[ |
+ | !class="b"|[[Final Fantasy XII armor/Original#Gigas Chestplate|Gigas Chestplate]] |
|10,700 gil |
|10,700 gil |
||
|- |
|- |
||
| − | !class="b"|[[ |
+ | !class="b"|[[Final Fantasy XII armor/Original#Celebrant's Miter|Celebrant's Miter]] |
|10,700 gil |
|10,700 gil |
||
|- |
|- |
||
| − | !class="b"|[[ |
+ | !class="b"|[[Final Fantasy XII armor/Original#Cleric's Robes|Cleric's Robes]] |
|10,700 gil |
|10,700 gil |
||
|- |
|- |
||
| − | !class="b"|[[ |
+ | !class="b"|[[Final Fantasy XII armor/Original#Dragon Helm|Dragon Helm]] |
|12,500 gil |
|12,500 gil |
||
|- |
|- |
||
| − | !class="b"|[[ |
+ | !class="b"|[[Final Fantasy XII armor/Original#Dragon Mail|Dragon Mail]] |
|12,500 gil |
|12,500 gil |
||
|- |
|- |
||
| − | !class="b"|[[ |
+ | !class="b"|[[Final Fantasy XII armor/Original#Kaiser Shield|Kaiser Shield]] |
|8,300 gil |
|8,300 gil |
||
|- |
|- |
||
!class="a" colspan="2"|Once Sky Fortress ''Bahamut'' appears |
!class="a" colspan="2"|Once Sky Fortress ''Bahamut'' appears |
||
|- |
|- |
||
| − | !class="b"|[[ |
+ | !class="b"|[[Final Fantasy XII armor/Original#Chaperon|Chaperon]] |
|12,400 gil |
|12,400 gil |
||
|- |
|- |
||
| − | !class="b"|[[ |
+ | !class="b"|[[Final Fantasy XII armor/Original#Minerva Bustier|Minerva Bustier]] |
|12,400 gil |
|12,400 gil |
||
|- |
|- |
||
| − | !class="b"|[[ |
+ | !class="b"|[[Final Fantasy XII armor/Original#Black Mask|Black Mask]] |
|12,400 gil |
|12,400 gil |
||
|- |
|- |
||
| − | !class="b"|[[ |
+ | !class="b"|[[Final Fantasy XII armor/Original#White Robes|White Robes]] |
|13,500 gil |
|13,500 gil |
||
|- |
|- |
||
| − | !class="b"|[[ |
+ | !class="b"|[[Final Fantasy XII armor/Original#Aegis Shield|Aegis Shield]] |
|9,600 gil |
|9,600 gil |
||
|- |
|- |
||
| − | !class="b"|[[ |
+ | !class="b"|[[Final Fantasy XII armor/Original#Crown of Laurels|Crown of Laurels]] |
|14,500 gil |
|14,500 gil |
||
|- |
|- |
||
| − | !class="b"|[[ |
+ | !class="b"|[[Final Fantasy XII armor/Original#Rubber Suit|Rubber Suit]] |
|14,500 gil |
|14,500 gil |
||
|- |
|- |
||
| − | !class="b"|[[ |
+ | !class="b"|[[Final Fantasy XII armor/Original#White Mask|White Mask]] |
|14,500 gil |
|14,500 gil |
||
|- |
|- |
||
| − | !class="b"|[[ |
+ | !class="b"|[[Final Fantasy XII armor/Original#Black Robes|Black Robes]] |
|13,500 gil |
|13,500 gil |
||
|} |
|} |
||
| + | {{multicol-separator}} |
||
| − | </div> |
||
| − | <div> |
||
;''Zodiac'' |
;''Zodiac'' |
||
| − | {|class="half-width table FFXII" style="text-align:center" |
+ | {|class="half-width article-table FFXII" style="text-align:center" |
|-class="a" |
|-class="a" |
||
!width="70%"|Name |
!width="70%"|Name |
||
!width="30%"|Cost |
!width="30%"|Cost |
||
|- |
|- |
||
| − | !class="b"|[[ |
+ | !class="b"|[[Final Fantasy XII armor#Chakra Band|Chakra Band]] |
|8,100 gil |
|8,100 gil |
||
|- |
|- |
||
| − | !class="b"|[[ |
+ | !class="b"|[[Final Fantasy XII armor#Power Vest|Power Vest]] |
|8,100 gil |
|8,100 gil |
||
|- |
|- |
||
| − | !class="b"|[[ |
+ | !class="b"|[[Final Fantasy XII armor#Hypnocrown|Hypnocrown]] |
|8,100 gil |
|8,100 gil |
||
|- |
|- |
||
| − | !class="b"|[[ |
+ | !class="b"|[[Final Fantasy XII armor#Jade Gown|Jade Gown]] |
|8,100 gil |
|8,100 gil |
||
|- |
|- |
||
| − | !class="b"|[[ |
+ | !class="b"|[[Final Fantasy XII armor#Giant's Helmet|Giant's Helmet]] |
|11,000 gil |
|11,000 gil |
||
|- |
|- |
||
| − | !class="b"|[[ |
+ | !class="b"|[[Final Fantasy XII armor#Carabineer Mail|Carabineer Mail]] |
|9,600 gil |
|9,600 gil |
||
|- |
|- |
||
| − | !class="b"|[[ |
+ | !class="b"|[[Final Fantasy XII armor#Officer's Hat|Officer's Hat]] |
|7,000 gil |
|7,000 gil |
||
|- |
|- |
||
| − | !class="b"|[[ |
+ | !class="b"|[[Final Fantasy XII armor#Barrel Coat|Barrel Coat]] |
|7,000 gil |
|7,000 gil |
||
|- |
|- |
||
| − | !class="b"|[[ |
+ | !class="b"|[[Final Fantasy XII armor#Gaia Hat|Gaia Hat]] |
|7,000 gil |
|7,000 gil |
||
|- |
|- |
||
| − | !class="b"|[[ |
+ | !class="b"|[[Final Fantasy XII armor#Maduin Gear|Maduin Gear]] |
|7,000 gil |
|7,000 gil |
||
|- |
|- |
||
| − | !class="b"|[[ |
+ | !class="b"|[[Final Fantasy XII armor#Platinum Helm|Platinum Helm]] |
|9,300 gil |
|9,300 gil |
||
|- |
|- |
||
| − | !class="b"|[[ |
+ | !class="b"|[[Final Fantasy XII armor#Platinum Armor|Platinum Armor]] |
|8,500 gil |
|8,500 gil |
||
|- |
|- |
||
!class="a" colspan="2"|After obtaining Treaty-Blade |
!class="a" colspan="2"|After obtaining Treaty-Blade |
||
|- |
|- |
||
| − | !class="b"|[[ |
+ | !class="b"|[[Final Fantasy XII armor#Gigas Hat|Gigas Hat]] |
|10,700 gil |
|10,700 gil |
||
|- |
|- |
||
| − | !class="b"|[[ |
+ | !class="b"|[[Final Fantasy XII armor#Gigas Chestplate|Gigas Chestplate]] |
|10,700 gil |
|10,700 gil |
||
|- |
|- |
||
| − | !class="b"|[[ |
+ | !class="b"|[[Final Fantasy XII armor#Celebrant's Miter|Celebrant's Miter]] |
|10,700 gil |
|10,700 gil |
||
|- |
|- |
||
| − | !class="b"|[[ |
+ | !class="b"|[[Final Fantasy XII armor#Cleric's Robes|Cleric's Robes]] |
|10,700 gil |
|10,700 gil |
||
|- |
|- |
||
|} |
|} |
||
| + | {{multicol-end}} |
||
| − | </div> |
||
| + | {{clear}} |
||
| − | </div> |
||
| + | === The Leapin' Bangaa === |
||
| − | {{-}} |
||
| + | {{multicol-begin}} |
||
| − | ===The Leapin' Bangaa=== |
||
| + | ;Original |
||
| − | <div class="multicolumn"> |
||
| + | {|class="half-width article-table FFXII" style="text-align:center" |
||
| − | <div> |
||
| − | ;FFXII |
||
| − | {|class="half-width table FFXII" style="text-align:center" |
||
|-class="a" |
|-class="a" |
||
!width="70%"|Name |
!width="70%"|Name |
||
!width="30%"|Cost |
!width="30%"|Cost |
||
|- |
|- |
||
| − | !class="b"|[[ |
+ | !class="b"|[[Final Fantasy XII accessories/Original#Cameo Belt|Cameo Belt]] |
|9,000 gil |
|9,000 gil |
||
|- |
|- |
||
| − | !class="b"|[[ |
+ | !class="b"|[[Final Fantasy XII accessories/Original#Power Armlet|Power Armlet]] |
|5,200 gil |
|5,200 gil |
||
|- |
|- |
||
| − | !class="b"|[[ |
+ | !class="b"|[[Final Fantasy XII accessories/Original#Opal Ring|Opal Ring]] |
|16,000 gil |
|16,000 gil |
||
|- |
|- |
||
| − | !class="b"|[[ |
+ | !class="b"|[[Final Fantasy XII items#Potion|Potion]] |
|70 gil |
|70 gil |
||
|- |
|- |
||
| − | !class="b"|[[ |
+ | !class="b"|[[Final Fantasy XII items#Antidote|Antidote]] |
|50 gil |
|50 gil |
||
|- |
|- |
||
| − | !class="b"|[[Eye Drops]] |
+ | !class="b"|[[Final Fantasy XII items#Eye Drops|Eye Drops]] |
|50 gil |
|50 gil |
||
|- |
|- |
||
| − | !class="b"|[[Phoenix Down]] |
+ | !class="b"|[[Final Fantasy XII items#Phoenix Down|Phoenix Down]] |
|250 gil |
|250 gil |
||
|- |
|- |
||
| − | !class="b"|[[Echo Herbs]] |
+ | !class="b"|[[Final Fantasy XII items#Echo Herbs|Echo Herbs]] |
|50 gil |
|50 gil |
||
|- |
|- |
||
| − | !class="b"|[[Gold Needle]] |
+ | !class="b"|[[Final Fantasy XII items#Gold Needle|Gold Needle]] |
|100 gil |
|100 gil |
||
|- |
|- |
||
| − | !class="b"|[[Alarm Clock]] |
+ | !class="b"|[[Final Fantasy XII items#Prince's Kiss|Alarm Clock]] |
|50 gil |
|50 gil |
||
|- |
|- |
||
| − | !class="b"|[[ |
+ | !class="b"|[[Final Fantasy XII items#Handkerchief|Handkerchief]] |
|50 gil |
|50 gil |
||
|- |
|- |
||
| − | !class="b"|[[Hi-Potion]] |
+ | !class="b"|[[Final Fantasy XII items#Hi-Potion|Hi-Potion]] |
|210 gil |
|210 gil |
||
|- |
|- |
||
| − | !class="b"|[[Bacchus's Wine]] |
+ | !class="b"|[[Final Fantasy XII items#Bacchus's Wine|Bacchus's Wine]] |
|120 gil |
|120 gil |
||
|- |
|- |
||
| − | !class="b"|[[ |
+ | !class="b"|[[Final Fantasy XII items#Nu Khai Sand|Smelling Salts]] |
|50 gil |
|50 gil |
||
|- |
|- |
||
| − | !class="b"|[[ |
+ | !class="b"|[[Final Fantasy XII items#Remedy|Remedy]] |
|400 gil |
|400 gil |
||
|- |
|- |
||
| − | !class="b"|[[ |
+ | !class="b"|[[Final Fantasy XII items#Chronos Tear|Chronos Tear]] |
|50 gil |
|50 gil |
||
|- |
|- |
||
| − | !class="b"|[[X-Potion]] |
+ | !class="b"|[[Final Fantasy XII items#X-Potion|X-Potion]] |
|630 gil |
|630 gil |
||
|- |
|- |
||
| − | !class="b"|[[Vaccine]] |
+ | !class="b"|[[Final Fantasy XII items#C9H8O4|Vaccine]] |
|200 gil |
|200 gil |
||
|} |
|} |
||
| + | {{multicol-separator}} |
||
| − | </div> |
||
| − | <div> |
||
;''Zodiac'' |
;''Zodiac'' |
||
| − | {|class="half-width table FFXII" style="text-align:center" |
+ | {|class="half-width article-table FFXII" style="text-align:center" |
|-class="a" |
|-class="a" |
||
!width="70%"|Name |
!width="70%"|Name |
||
!width="30%"|Cost |
!width="30%"|Cost |
||
|- |
|- |
||
| − | !class="b"|[[ |
+ | !class="b"|[[Final Fantasy XII accessories#Power Armlet|Power Armlet]] |
|5,200 gil |
|5,200 gil |
||
|- |
|- |
||
| − | !class="b"|[[ |
+ | !class="b"|[[Final Fantasy XII accessories#Fuzzy Miter|Fuzzy Miter]] |
|1,200 gil |
|1,200 gil |
||
|- |
|- |
||
| − | !class="b"|[[ |
+ | !class="b"|[[Final Fantasy XII accessories#Bowline Sash|Bowline Sash]] |
|1,000 gil |
|1,000 gil |
||
|- |
|- |
||
| − | !class="b"|[[ |
+ | !class="b"|[[Final Fantasy XII accessories#Agate Ring|Agate Ring]] |
|3,000 gil |
|3,000 gil |
||
|- |
|- |
||
| − | !class="b"|[[ |
+ | !class="b"|[[Final Fantasy XII accessories#Magick Gloves|Magick Gloves]] |
|3,000 gil |
|3,000 gil |
||
|- |
|- |
||
| − | !class="b"|[[ |
+ | !class="b"|[[Final Fantasy XII accessories#Blazer Gloves|Blazer Gloves]] |
|3,000 gil |
|3,000 gil |
||
|- |
|- |
||
| − | !class="b"|[[ |
+ | !class="b"|[[Final Fantasy XII accessories#Nishijin Belt|Nishijin Belt]] |
|800 gil |
|800 gil |
||
|- |
|- |
||
| − | !class="b"|[[ |
+ | !class="b"|[[Final Fantasy XII accessories#Black Belt|Black Belt]] |
|600 gil |
|600 gil |
||
|- |
|- |
||
| − | !class="b"|[[ |
+ | !class="b"|[[Final Fantasy XII accessories#Rose Corsage|Rose Corsage]] |
|800 gil |
|800 gil |
||
|- |
|- |
||
| − | !class="b"|[[ |
+ | !class="b"|[[Final Fantasy XII accessories#Leather Gorget|Leather Gorget]] |
|1,200 gil |
|1,200 gil |
||
|- |
|- |
||
| − | !class="b"|[[ |
+ | !class="b"|[[Final Fantasy XII accessories#Tourmaline Ring|Tourmaline Ring]] |
|300 gil |
|300 gil |
||
|- |
|- |
||
| − | !class="b"|[[ |
+ | !class="b"|[[Final Fantasy XII accessories#Steel Gorget|Steel Gorget]] |
|1,300 gil |
|1,300 gil |
||
|- |
|- |
||
| − | !class="b"|[[ |
+ | !class="b"|[[Final Fantasy XII accessories#Argyle Armlet|Argyle Armlet]] |
|600 gil |
|600 gil |
||
|- |
|- |
||
| − | !class="b"|[[ |
+ | !class="b"|[[Final Fantasy XII accessories#Bangle|Bangle]] |
|500 gil |
|500 gil |
||
|- |
|- |
||
| − | !class="b"|[[X-Potion]] |
+ | !class="b"|[[Final Fantasy XII items#X-Potion|X-Potion]] |
|520 gil |
|520 gil |
||
|- |
|- |
||
| − | !class="b"|[[Bacchus's Wine]] |
+ | !class="b"|[[Final Fantasy XII items#Bacchus's Wine|Bacchus's Wine]] |
|120 gil |
|120 gil |
||
|- |
|- |
||
| − | !class="b"|[[ |
+ | !class="b"|[[Final Fantasy XII items#Remedy|Remedy]] |
|400 gil |
|400 gil |
||
|- |
|- |
||
| − | !class="b"|[[Hi-Potion]] |
+ | !class="b"|[[Final Fantasy XII items#Hi-Potion|Hi-Potion]] |
|180 gil |
|180 gil |
||
|- |
|- |
||
| − | !class="b"|[[ |
+ | !class="b"|[[Final Fantasy XII items#Nu Khai Sand|Nu Khai Sand]] |
|50 gil |
|50 gil |
||
|- |
|- |
||
| − | !class="b"|[[ |
+ | !class="b"|[[Final Fantasy XII items#Chronos Tear|Chronos Tear]] |
|60 gil |
|60 gil |
||
|- |
|- |
||
| − | !class="b"|[[Gold Needle]] |
+ | !class="b"|[[Final Fantasy XII items#Gold Needle|Gold Needle]] |
|80 gil |
|80 gil |
||
|- |
|- |
||
| − | !class="b"|[[ |
+ | !class="b"|[[Final Fantasy XII items#Prince's Kiss|Prince's Kiss]] |
|50 gil |
|50 gil |
||
|- |
|- |
||
| − | !class="b"|[[ |
+ | !class="b"|[[Final Fantasy XII items#Handkerchief|Handkerchief]] |
|50 gil |
|50 gil |
||
|- |
|- |
||
| − | !class="b"|[[Phoenix Down]] |
+ | !class="b"|[[Final Fantasy XII items#Phoenix Down|Phoenix Down]] |
|200 gil |
|200 gil |
||
|- |
|- |
||
| − | !class="b"|[[Echo Herbs]] |
+ | !class="b"|[[Final Fantasy XII items#Echo Herbs|Echo Herbs]] |
|50 gil |
|50 gil |
||
|- |
|- |
||
| − | !class="b"|[[ |
+ | !class="b"|[[Final Fantasy XII items#Antidote|Antidote]] |
|50 gil |
|50 gil |
||
|- |
|- |
||
| − | !class="b"|[[Eye Drops]] |
+ | !class="b"|[[Final Fantasy XII items#Eye Drops|Eye Drops]] |
|50 gil |
|50 gil |
||
|- |
|- |
||
| − | !class="b"|[[ |
+ | !class="b"|[[Final Fantasy XII items#Potion|Potion]] |
|60 gil |
|60 gil |
||
|- |
|- |
||
|} |
|} |
||
| + | {{multicol-end}} |
||
| − | </div> |
||
| + | {{clear}} |
||
| − | </div> |
||
| − | {{-}} |
||
| − | ===Quayside Magickery=== |
+ | === Quayside Magickery === |
| + | {{multicol-begin}} |
||
| − | <div class="multicolumn"> |
||
| + | ;Original |
||
| − | <div> |
||
| + | {|class="half-width article-table FFXII" style="text-align:center" |
||
| − | ;FFXII |
||
| − | {|class="half-width table FFXII" style="text-align:center" |
||
|-class="a" |
|-class="a" |
||
!width="70%"|Name |
!width="70%"|Name |
||
| Line 902: | Line 905: | ||
|- |
|- |
||
|} |
|} |
||
| + | {{multicol-separator}} |
||
| − | </div> |
||
| − | <div> |
||
;''Zodiac'' |
;''Zodiac'' |
||
| − | {|class="half-width table FFXII" style="text-align:center" |
+ | {|class="half-width article-table FFXII" style="text-align:center" |
|-class="a" |
|-class="a" |
||
!width="70%"|Name |
!width="70%"|Name |
||
| Line 943: | Line 945: | ||
|- |
|- |
||
|} |
|} |
||
| + | {{multicol-end}} |
||
| − | </div> |
||
| + | {{clear}} |
||
| − | </div> |
||
| + | === Odo's Technicks === |
||
| − | {{-}} |
||
| + | {{multicol-begin}} |
||
| − | ===Odo's Technicks=== |
||
| + | ;Original |
||
| − | <div class="multicolumn"> |
||
| + | {|class="half-width article-table FFXII" style="text-align:center" |
||
| − | <div> |
||
| − | ;FFXII |
||
| − | {|class="half-width table FFXII" style="text-align:center" |
||
|-class="a" |
|-class="a" |
||
!width="70%"|Name |
!width="70%"|Name |
||
!width="30%"|Cost |
!width="30%"|Cost |
||
|- |
|- |
||
| − | !class="b"|[[ |
+ | !class="b"|[[Expose]] |
|3,800 gil |
|3,800 gil |
||
|- |
|- |
||
| − | !class="b"|[[ |
+ | !class="b"|[[Revive (ability)|Revive]] |
|10,000 gil |
|10,000 gil |
||
|- |
|- |
||
| Line 966: | Line 966: | ||
|3,500 gil |
|3,500 gil |
||
|} |
|} |
||
| + | {{multicol-separator}} |
||
| − | </div> |
||
| − | <div> |
||
;''Zodiac'' |
;''Zodiac'' |
||
| − | {|class="half-width table FFXII" style="text-align:center" |
+ | {|class="half-width article-table FFXII" style="text-align:center" |
|-class="a" |
|-class="a" |
||
!width="70%"|Name |
!width="70%"|Name |
||
| Line 977: | Line 976: | ||
|6,000 gil |
|6,000 gil |
||
|- |
|- |
||
| − | !class="b"|[[ |
+ | !class="b"|[[Traveler (ability)|Traveler]] |
|4,800 gil |
|4,800 gil |
||
|- |
|- |
||
| Line 983: | Line 982: | ||
|5,000 gil |
|5,000 gil |
||
|- |
|- |
||
| − | !class="b"|[[ |
+ | !class="b"|[[Horology]] |
|2,000 gil |
|2,000 gil |
||
|- |
|- |
||
| − | !class="b"|[[Charge |
+ | !class="b"|[[Technicks#Charge|Charge]] |
|1,500 gil |
|1,500 gil |
||
|- |
|- |
||
| Line 996: | Line 995: | ||
|- |
|- |
||
|} |
|} |
||
| + | {{multicol-end}} |
||
| − | </div> |
||
| − | </div> |
||
| − | ===[[Dyce]]=== |
+ | === [[Dyce]] === |
A treasure containing 5040 gil (without Diamond Armlet) can be opened near him. |
A treasure containing 5040 gil (without Diamond Armlet) can be opened near him. |
||
| − | ====[[ |
+ | ==== [[Final Fantasy XII weapons|Weapons]] ==== |
| + | {{multicol-begin}} |
||
| − | <div class="multicolumn"> |
||
| + | ;Original |
||
| − | <div> |
||
| + | {|class="half-width article-table FFXII" style="text-align:center" |
||
| − | ;FFXII |
||
| − | {|class="half-width table FFXII" style="text-align:center" |
||
|-class="a" |
|-class="a" |
||
!width="70%"|Name |
!width="70%"|Name |
||
| Line 1,015: | Line 1,012: | ||
|- |
|- |
||
|} |
|} |
||
| + | {{multicol-separator}} |
||
| − | </div> |
||
| − | <div> |
||
;''Zodiac'' |
;''Zodiac'' |
||
| − | {|class="half-width table FFXII" style="text-align:center" |
+ | {|class="half-width article-table FFXII" style="text-align:center" |
|-class="a" |
|-class="a" |
||
!width="70%"|Name |
!width="70%"|Name |
||
!width="30%"|Cost |
!width="30%"|Cost |
||
|- |
|- |
||
| − | !class="b"|[[ |
+ | !class="b"|[[Lohengrin (Final Fantasy XII)|Lohengrin]] |
|3,200 gil |
|3,200 gil |
||
|- |
|- |
||
| − | !class="b"|[[ |
+ | !class="b"|[[Heavy Lance (Final Fantasy XII)|Heavy Lance]] |
|3,500 gil |
|3,500 gil |
||
|- |
|- |
||
| − | !class="b"|[[ |
+ | !class="b"|[[Longbow (Final Fantasy XII)|Longbow]] |
|4,600 gil |
|4,600 gil |
||
|- |
|- |
||
| − | !class="b"|[[ |
+ | !class="b"|[[Sirius (Final Fantasy XII)|Sirius]] |
|2,600 gil |
|2,600 gil |
||
|- |
|- |
||
| − | !class="b"|[[ |
+ | !class="b"|[[Chopper (Final Fantasy XII)|Chopper]] |
|3,200 gil |
|3,200 gil |
||
|- |
|- |
||
| − | !class="b"|[[ |
+ | !class="b"|[[Paramina Crossbow (Final Fantasy XII)|Paramina Crossbow]] |
|3,300 gil |
|3,300 gil |
||
|- |
|- |
||
| − | !class="b"|[[ |
+ | !class="b"|[[Healing Rod (Final Fantasy XII)|Healing Rod]] |
|2,590 gil |
|2,590 gil |
||
|- |
|- |
||
| − | !class="b"|[[ |
+ | !class="b"|[[Ancient Sword (Final Fantasy XII)|Ancient Sword]] |
|2,450 gil |
|2,450 gil |
||
|- |
|- |
||
| − | !class="b"|[[ |
+ | !class="b"|[[Kogarasumaru (Final Fantasy XII)|Kogarasumaru]] |
|2,500 gil |
|2,500 gil |
||
|- |
|- |
||
| − | !class="b"|[[ |
+ | !class="b"|[[Musk Stick (Final Fantasy XII)|Musk Stick]] |
|3,040 gil |
|3,040 gil |
||
|- |
|- |
||
| − | !class="b"|[[ |
+ | !class="b"|[[Killer Bow (Final Fantasy XII)|Killer Bow]] |
|2,500 gil |
|2,500 gil |
||
|- |
|- |
||
| − | !class="b"|[[ |
+ | !class="b"|[[War Hammer (Final Fantasy XII)|War Hammer]] |
|2,500 gil |
|2,500 gil |
||
|- |
|- |
||
| − | !class="b"|[[ |
+ | !class="b"|[[Bhuj (Final Fantasy XII)|Bhuj]] |
|2,200 gil |
|2,200 gil |
||
|- |
|- |
||
| − | !class="b"|[[ |
+ | !class="b"|[[Wizard's Staff (Final Fantasy XII)|Wizard's Staff]] |
|1,350 gil |
|1,350 gil |
||
|- |
|- |
||
|} |
|} |
||
| + | {{multicol-end}} |
||
| − | </div> |
||
| + | {{clear}} |
||
| − | </div> |
||
| + | ==== [[Final Fantasy XII armor|Armor]] ==== |
||
| − | {{-}} |
||
| + | {{multicol-begin}} |
||
| − | ====[[List of Final Fantasy XII armor|Armor]]==== |
||
| + | ;Original |
||
| − | <div class="multicolumn"> |
||
| + | {|class="half-width article-table FFXII" style="text-align:center" |
||
| − | <div> |
||
| − | ;FFXII |
||
| − | {|class="half-width table FFXII" style="text-align:center" |
||
|-class="a" |
|-class="a" |
||
!width="70%"|Name |
!width="70%"|Name |
||
| Line 1,081: | Line 1,075: | ||
|― |
|― |
||
|} |
|} |
||
| + | {{multicol-separator}} |
||
| − | </div> |
||
| − | <div> |
||
;''Zodiac'' |
;''Zodiac'' |
||
| − | {|class="half-width table FFXII" style="text-align:center" |
+ | {|class="half-width article-table FFXII" style="text-align:center" |
|-class="a" |
|-class="a" |
||
!width="70%"|Name |
!width="70%"|Name |
||
!width="30%"|Cost |
!width="30%"|Cost |
||
|- |
|- |
||
| − | !class="b"|[[ |
+ | !class="b"|[[Final Fantasy XII armor#Soldier's Cap|Soldier's Cap]] |
|1,400 gil |
|1,400 gil |
||
|- |
|- |
||
| − | !class="b"|[[ |
+ | !class="b"|[[Final Fantasy XII armor#Heavy Coat|Heavy Coat]] |
|1,400 gil |
|1,400 gil |
||
|- |
|- |
||
| − | !class="b"|[[ |
+ | !class="b"|[[Final Fantasy XII armor#Lambent Hat|Lambent Hat]] |
|1,400 gil |
|1,400 gil |
||
|- |
|- |
||
| − | !class="b"|[[ |
+ | !class="b"|[[Final Fantasy XII armor#Chanter's Djellaba|Chanter's Djellaba]] |
|1,400 gil |
|1,400 gil |
||
|- |
|- |
||
| − | !class="b"|[[ |
+ | !class="b"|[[Final Fantasy XII armor#Winged Helm|Winged Helm]] |
|2,400 gil |
|2,400 gil |
||
|- |
|- |
||
| − | !class="b"|[[ |
+ | !class="b"|[[Final Fantasy XII armor#Chainmail|Chainmail]] |
|2,300 gil |
|2,300 gil |
||
|- |
|- |
||
| − | !class="b"|[[ |
+ | !class="b"|[[Final Fantasy XII armor#Golden Shield|Golden Shield]] |
|2,000 gil |
|2,000 gil |
||
|- |
|- |
||
| − | !class="b"|[[ |
+ | !class="b"|[[Final Fantasy XII armor#Balaclava|Balaclava]] |
|1,000 gil |
|1,000 gil |
||
|- |
|- |
||
| − | !class="b"|[[ |
+ | !class="b"|[[Final Fantasy XII armor#Windbreaker|Windbreaker]] |
|1,000 gil |
|1,000 gil |
||
|- |
|- |
||
| − | !class="b"|[[ |
+ | !class="b"|[[Final Fantasy XII armor#Wizard's Hat|Wizard's Hat]] |
|1,000 gil |
|1,000 gil |
||
|- |
|- |
||
| − | !class="b"|[[ |
+ | !class="b"|[[Final Fantasy XII armor#Wizard's Robes|Wizard's Robes]] |
|1,000 gil |
|1,000 gil |
||
|- |
|- |
||
| − | !class="b"|[[ |
+ | !class="b"|[[Final Fantasy XII armor#Barbut|Barbut]] |
|1,800 gil |
|1,800 gil |
||
|- |
|- |
||
| − | !class="b"|[[ |
+ | !class="b"|[[Final Fantasy XII armor#Linen Cuirass|Linen Cuirass]] |
|1,800 gil |
|1,800 gil |
||
|- |
|- |
||
| − | !class="b"|[[ |
+ | !class="b"|[[Final Fantasy XII armor#Round Shield|Round Shield]] |
|1,100 gil |
|1,100 gil |
||
|- |
|- |
||
|} |
|} |
||
| + | {{multicol-end}} |
||
| − | </div> |
||
| + | {{clear}} |
||
| − | </div> |
||
| + | ==== [[Final Fantasy XII accessories|Accessories]] ==== |
||
| − | {{-}} |
||
| + | {{multicol-begin}} |
||
| − | ====[[List of Final Fantasy XII accessories|Accessories]]==== |
||
| + | ;Original |
||
| − | <div class="multicolumn"> |
||
| + | {|class="half-width article-table FFXII" style="text-align:center" |
||
| − | <div> |
||
| − | ;FFXII |
||
| − | {|class="half-width table FFXII" style="text-align:center" |
||
|-class="a" |
|-class="a" |
||
!width="70%"|Name |
!width="70%"|Name |
||
| Line 1,148: | Line 1,139: | ||
|- |
|- |
||
|} |
|} |
||
| + | {{multicol-separator}} |
||
| − | </div> |
||
| − | <div> |
||
;''Zodiac'' |
;''Zodiac'' |
||
| − | {|class="half-width table FFXII" style="text-align:center" |
+ | {|class="half-width article-table FFXII" style="text-align:center" |
|-class="a" |
|-class="a" |
||
!width="70%"|Name |
!width="70%"|Name |
||
!width="30%"|Cost |
!width="30%"|Cost |
||
|- |
|- |
||
| − | !class="b"|[[ |
+ | !class="b"|[[Final Fantasy XII accessories#Nishijin Belt|Nishijin Belt]] |
|800 gil |
|800 gil |
||
|- |
|- |
||
| − | !class="b"|[[ |
+ | !class="b"|[[Final Fantasy XII accessories#Black Belt|Black Belt]] |
|600 gil |
|600 gil |
||
|- |
|- |
||
| − | !class="b"|[[ |
+ | !class="b"|[[Final Fantasy XII accessories#Rose Corsage|Rose Corsage]] |
|800 gil |
|800 gil |
||
|- |
|- |
||
| − | !class="b"|[[ |
+ | !class="b"|[[Final Fantasy XII accessories#Leather Gorget|Leather Gorget]] |
|1,200 gil |
|1,200 gil |
||
|- |
|- |
||
| − | !class="b"|[[ |
+ | !class="b"|[[Final Fantasy XII accessories#Tourmaline Ring|Tourmaline Ring]] |
|300 gil |
|300 gil |
||
|- |
|- |
||
| − | !class="b"|[[ |
+ | !class="b"|[[Final Fantasy XII accessories#Steel Gorget|Steel Gorget]] |
|1,300 gil |
|1,300 gil |
||
|- |
|- |
||
| − | !class="b"|[[ |
+ | !class="b"|[[Final Fantasy XII accessories#Argyle Armlet|Argyle Armlet]] |
|600 gil |
|600 gil |
||
|- |
|- |
||
| − | !class="b"|[[ |
+ | !class="b"|[[Final Fantasy XII accessories#Bangle|Bangle]] |
|500 gil |
|500 gil |
||
|- |
|- |
||
|} |
|} |
||
| + | {{multicol-end}} |
||
| − | </div> |
||
| + | {{clear}} |
||
| − | </div> |
||
| + | ==== [[Final Fantasy XII magicks|Magicks]] ==== |
||
| − | {{-}} |
||
| + | {{multicol-begin}} |
||
| − | ====[[List of Final Fantasy XII magicks|Magicks]]==== |
||
| + | ;Original |
||
| − | <div class="multicolumn"> |
||
| + | {|class="half-width article-table FFXII" style="text-align:center" |
||
| − | <div> |
||
| − | ;FFXII |
||
| − | {|class="half-width table FFXII" style="text-align:center" |
||
|-class="a" |
|-class="a" |
||
!width="70%"|Name |
!width="70%"|Name |
||
| Line 1,197: | Line 1,185: | ||
|- |
|- |
||
|} |
|} |
||
| + | {{multicol-separator}} |
||
| − | </div> |
||
| − | <div> |
||
;''Zodiac'' |
;''Zodiac'' |
||
| − | {|class="half-width table FFXII" style="text-align:center" |
+ | {|class="half-width article-table FFXII" style="text-align:center" |
|-class="a" |
|-class="a" |
||
!width="70%"|Name |
!width="70%"|Name |
||
| Line 1,220: | Line 1,207: | ||
|1,800 gil |
|1,800 gil |
||
|- |
|- |
||
| − | !class="b"|[[Water (ability)| |
+ | !class="b"|[[Water (ability)|Aqua]] |
|700 gil |
|700 gil |
||
|- |
|- |
||
| Line 1,236: | Line 1,223: | ||
|- |
|- |
||
|} |
|} |
||
| + | {{multicol-end}} |
||
| − | </div> |
||
| + | {{clear}} |
||
| − | </div> |
||
| + | |||
| − | {{-}} |
||
| − | ====[[ |
+ | ==== [[Final Fantasy XII ammunition|Ammunition]] ==== |
| + | {{multicol-begin}} |
||
| − | <div class="multicolumn"> |
||
| + | ;Original |
||
| − | <div> |
||
| + | {|class="half-width article-table FFXII" style="text-align:center" |
||
| − | ;FFXII |
||
| − | {|class="half-width table FFXII" style="text-align:center" |
||
|-class="a" |
|-class="a" |
||
!width="70%"|Name |
!width="70%"|Name |
||
| Line 1,251: | Line 1,237: | ||
|― |
|― |
||
|} |
|} |
||
| + | {{multicol-separator}} |
||
| − | </div> |
||
| − | <div> |
||
;''Zodiac'' |
;''Zodiac'' |
||
| − | {|class="half-width table FFXII" style="text-align:center" |
+ | {|class="half-width article-table FFXII" style="text-align:center" |
|-class="a" |
|-class="a" |
||
!width="70%"|Name |
!width="70%"|Name |
||
!width="30%"|Cost |
!width="30%"|Cost |
||
|- |
|- |
||
| − | !class="b"|[[ |
+ | !class="b"|[[Final Fantasy XII ammunition#Onion Arrows|Onion Arrows]] |
|100 gil |
|100 gil |
||
|- |
|- |
||
| − | !class="b"|[[ |
+ | !class="b"|[[Final Fantasy XII ammunition#Onion Bolts|Onion Bolts]] |
|100 gil |
|100 gil |
||
|- |
|- |
||
| − | !class="b"|[[ |
+ | !class="b"|[[Final Fantasy XII ammunition#Onion Shot|Onion Shot]] |
|100 gil |
|100 gil |
||
|- |
|- |
||
| − | !class="b"|[[ |
+ | !class="b"|[[Final Fantasy XII ammunition#Onion Bombs|Onion Bombs]] |
|100 gil |
|100 gil |
||
|} |
|} |
||
| + | {{multicol-end}} |
||
| − | </div> |
||
| + | {{clear}} |
||
| − | </div> |
||
| + | ==== [[Technicks]] ==== |
||
| − | {{-}} |
||
| + | {{multicol-begin}} |
||
| − | ====[[Technicks]]==== |
||
| + | ;Original |
||
| − | <div class="multicolumn"> |
||
| + | {|class="half-width article-table FFXII" style="text-align:center" |
||
| − | <div> |
||
| − | ;FFXII |
||
| − | {|class="half-width table FFXII" style="text-align:center" |
||
|-class="a" |
|-class="a" |
||
!width="70%"|Name |
!width="70%"|Name |
||
| Line 1,286: | Line 1,269: | ||
|― |
|― |
||
|} |
|} |
||
| + | {{multicol-separator}} |
||
| − | </div> |
||
| − | <div> |
||
;''Zodiac'' |
;''Zodiac'' |
||
| − | {|class="half-width table FFXII" style="text-align:center" |
+ | {|class="half-width article-table FFXII" style="text-align:center" |
|-class="a" |
|-class="a" |
||
!width="70%"|Name |
!width="70%"|Name |
||
| Line 1,297: | Line 1,279: | ||
|5,000 gil |
|5,000 gil |
||
|- |
|- |
||
| − | !class="b"|[[ |
+ | !class="b"|[[Horology]] |
|2,000 gil |
|2,000 gil |
||
|- |
|- |
||
| − | !class="b"|[[Charge |
+ | !class="b"|[[Technicks#Charge|Charge]] |
|1,500 gil |
|1,500 gil |
||
|- |
|- |
||
| Line 1,310: | Line 1,292: | ||
|- |
|- |
||
|} |
|} |
||
| + | {{multicol-end}} |
||
| − | </div> |
||
| + | {{clear}} |
||
| − | </div> |
||
| + | ==== [[Final Fantasy XII items|Items]] ==== |
||
| − | {{-}} |
||
| + | {{multicol-begin}} |
||
| − | ====[[List of Final Fantasy XII items|Items]]==== |
||
| + | ;Original |
||
| − | <div class="multicolumn"> |
||
| + | {|class="half-width article-table FFXII" style="text-align:center" |
||
| − | <div> |
||
| − | ;FFXII |
||
| − | {|class="half-width table FFXII" style="text-align:center" |
||
|-class="a" |
|-class="a" |
||
!width="70%"|Name |
!width="70%"|Name |
||
!width="30%"|Cost |
!width="30%"|Cost |
||
|- |
|- |
||
| + | !class="b"|― |
||
| − | !class="b"|[[Teleport Stone#Final Fantasy XII|Teleport Stone]] |
||
| + | |― |
||
| − | |200 gil |
||
| − | |- |
||
| − | !class="b"|[[Loot (Final Fantasy XII)#Gysahl Greens|Gysahl Greens]] |
||
| − | |108 gil |
||
|} |
|} |
||
| + | {{multicol-separator}} |
||
| − | </div> |
||
| − | <div> |
||
;''Zodiac'' |
;''Zodiac'' |
||
| − | {|class="half-width table FFXII" style="text-align:center" |
+ | {|class="half-width article-table FFXII" style="text-align:center" |
|-class="a" |
|-class="a" |
||
!width="70%"|Name |
!width="70%"|Name |
||
!width="30%"|Cost |
!width="30%"|Cost |
||
|- |
|- |
||
| − | !class="b"|[[Hi-Potion]] |
+ | !class="b"|[[Final Fantasy XII items#Hi-Potion|Hi-Potion]] |
|180 gil |
|180 gil |
||
|- |
|- |
||
| − | !class="b"|[[ |
+ | !class="b"|[[Final Fantasy XII items#Nu Khai Sand|Nu Khai Sand]] |
|50 gil |
|50 gil |
||
|- |
|- |
||
| − | !class="b"|[[ |
+ | !class="b"|[[Final Fantasy XII items#Chronos Tear|Chronos Tear]] |
|60 gil |
|60 gil |
||
|- |
|- |
||
| − | !class="b"|[[Gold Needle]] |
+ | !class="b"|[[Final Fantasy XII items#Gold Needle|Gold Needle]] |
|80 gil |
|80 gil |
||
|- |
|- |
||
| − | !class="b"|[[ |
+ | !class="b"|[[Final Fantasy XII items#Prince's Kiss|Prince's Kiss]] |
|50 gil |
|50 gil |
||
|- |
|- |
||
| − | !class="b"|[[ |
+ | !class="b"|[[Final Fantasy XII items#Handkerchief|Handkerchief]] |
|50 gil |
|50 gil |
||
|- |
|- |
||
| − | !class="b"|[[Phoenix Down]] |
+ | !class="b"|[[Final Fantasy XII items#Phoenix Down|Phoenix Down]] |
|200 gil |
|200 gil |
||
|- |
|- |
||
| − | !class="b"|[[Echo Herbs]] |
+ | !class="b"|[[Final Fantasy XII items#Echo Herbs|Echo Herbs]] |
|50 gil |
|50 gil |
||
|- |
|- |
||
| − | !class="b"|[[ |
+ | !class="b"|[[Final Fantasy XII items#Antidote|Antidote]] |
|50 gil |
|50 gil |
||
|- |
|- |
||
| − | !class="b"|[[Eye Drops]] |
+ | !class="b"|[[Final Fantasy XII items#Eye Drops|Eye Drops]] |
|50 gil |
|50 gil |
||
|- |
|- |
||
| − | !class="b"|[[ |
+ | !class="b"|[[Final Fantasy XII items#Potion|Potion]] |
|60 gil |
|60 gil |
||
|- |
|- |
||
|} |
|} |
||
| + | {{multicol-end}} |
||
| − | </div> |
||
| + | {{clear}} |
||
| − | </div> |
||
| + | ====Loot==== |
||
| − | {{-}} |
||
| + | {{multicol-begin}} |
||
| + | ;Original |
||
| + | {|class="half-width article-table FFXII" style="text-align:center" |
||
| + | |-class="a" |
||
| + | !width="70%"|Name |
||
| + | !width="30%"|Cost |
||
| + | |- |
||
| + | !class="b"|[[Teleport Stone#Final Fantasy XII|Teleport Stone]] |
||
| + | |200 gil |
||
| + | |- |
||
| + | !class="b"|[[Loot (Final Fantasy XII)#Gysahl Greens|Gysahl Greens]] |
||
| + | |108 gil |
||
| + | |} |
||
| + | {{multicol-separator}} |
||
| + | ;Zodiac |
||
| + | {|class="half-width article-table FFXII" style="text-align:center" |
||
| + | |-class="a" |
||
| + | !width="70%"|Name |
||
| + | !width="30%"|Cost |
||
| + | |- |
||
| + | !class="b"|[[Loot (Final Fantasy XII)#Gysahl Greens|Gysahl Greens]] |
||
| + | |108 gil |
||
| + | |- |
||
| + | !class="b"|[[Teleport Stone#Final Fantasy XII|Teleport Stone]] |
||
| + | |200 gil |
||
| + | |} |
||
| + | {{multicol-end}} |
||
| + | {{clear}} |
||
| − | ===Waterfront Gambits=== |
+ | === Waterfront Gambits === |
{{main|Gambits}} |
{{main|Gambits}} |
||
{|cellpadding="5" |
{|cellpadding="5" |
||
|valign="top"| |
|valign="top"| |
||
| − | {|class="half-width table FFXII" style="text-align:center" |
+ | {|class="half-width article-table FFXII" style="text-align:center" |
|-class="a" |
|-class="a" |
||
!width="70%"|Name |
!width="70%"|Name |
||
| Line 1,705: | Line 1,709: | ||
|} |
|} |
||
|valign="top"| |
|valign="top"| |
||
| − | {|class="half-width table FFXII" style="text-align:center" |
+ | {|class="half-width article-table FFXII" style="text-align:center" |
|-class="a" |
|-class="a" |
||
!Gambit |
!Gambit |
||
| Line 2,030: | Line 2,034: | ||
|} |
|} |
||
| − | ==Map== |
+ | == Map == |
| − | The map can be bought Sea Breeze Lane for 80 gil. |
+ | The map can be bought Sea Breeze Lane for 80 gil. The map below is for the original version; the ''Zodiac'' version has some differences in treasures (see above). |
| − | [[File: |
+ | [[File:Map_01_Balfonheim_Port.png|600px]] |
| − | {{ |
+ | {{clear}} |
| − | ==Musical themes== |
+ | == Musical themes == |
| − | {{ |
+ | {{audio|filename=The port of balfonheim.ogg|title="The Port of Balfonheim" from ''Final Fantasy XII''}} |
The theme of Balfonheim is called "The Port of Balfonheim" {{j|港町バーフォンハイム|Minatomachi Bāfonhaimu}}. |
The theme of Balfonheim is called "The Port of Balfonheim" {{j|港町バーフォンハイム|Minatomachi Bāfonhaimu}}. |
||
| − | {{ |
+ | {{clear}} |
| − | ==Other appearances== |
+ | == Other appearances == |
| − | ===''[[Final Fantasy Airborne Brigade]]''=== |
+ | === ''[[Final Fantasy Airborne Brigade]]'' === |
| − | {{sideicon|FFAB}} |
||
[[File:FFAB Balfonheim Port FFXII Special.png|right]] |
[[File:FFAB Balfonheim Port FFXII Special.png|right]] |
||
| − | {{ |
+ | {{Location section|Final Fantasy Airborne Brigade}} |
| − | ==Gallery== |
+ | == Gallery == |
<gallery> |
<gallery> |
||
| + | Balfonheim-FFXII-TZA.jpg|Beach. |
||
Sea breeze lane.png|Sea Breeze Lane. |
Sea breeze lane.png|Sea Breeze Lane. |
||
| + | Sea-Breeze-Lane-FFXII-TZA.jpg|Sea Breeze Lane. |
||
Quayside court.png|Quayside Court. |
Quayside court.png|Quayside Court. |
||
Gallerina marketplace.png|Gallerina Marketplace. |
Gallerina marketplace.png|Gallerina Marketplace. |
||
| Line 2,055: | Line 2,060: | ||
Aerodrome.png|Aerodrome. |
Aerodrome.png|Aerodrome. |
||
Balfomheim-port.png|Port. |
Balfomheim-port.png|Port. |
||
| + | Balfonheim-Manse-FFXII-TZA.png|Manse. |
||
| − | FFXII Amano 4.jpg|Promotional artwork of the party at Balfonheim by [[Yoshitaka Amano]]. |
||
| + | FFXII Amano 4.jpg|Promotional artwork of the party at Balfonheim by [[Yoshitaka Amano]]. |
||
</gallery> |
</gallery> |
||
| − | ==Etymology== |
+ | == Etymology == |
The name is a combination of three German words: ''Bald'' ("soon"), ''Von'', pronounced "Fon" ("of"), and ''Heim'' ("home"). Therefore, the city's name means "Soon of Home", a fitting name for port city. |
The name is a combination of three German words: ''Bald'' ("soon"), ''Von'', pronounced "Fon" ("of"), and ''Heim'' ("home"). Therefore, the city's name means "Soon of Home", a fitting name for port city. |
||
| − | ==Trivia== |
+ | == Trivia == |
[[File:Balfonheim-Early.jpg|thumb|Balfonheim before Draklor Laboratory.]] |
[[File:Balfonheim-Early.jpg|thumb|Balfonheim before Draklor Laboratory.]] |
||
| − | *It is possible to |
+ | * It is possible to visit Balfonheim before the events in Draklor Laboratory. If the player takes a chocobo from [[Phon Coast]] and rides it all the way across the [[Tchita Uplands]] to the east, they can enter the Cerobi Steppe that has a way into Balfonheim. If the player comes to Balfonheim at such an early time, only the Sea Breeze Lane area is explorable. |
| − | {{FFXII}} |
+ | {{navbox setting FFXII}} |
[[de:Balfonheim]] |
[[de:Balfonheim]] |
||
| − | [[Category:Final Fantasy XII |
+ | [[Category:Locations in Final Fantasy XII]] |
[[Category:Towns|Balfonheim]] |
[[Category:Towns|Balfonheim]] |
||
Revision as of 03:49, 29 April 2020
Template:Sideicon

Oh, shut up and help me remodel the Balfonheim Port page!
- Adding a Locations section, with images and brief descriptions of the areas within the location.
This request can be discussed on the associated discussion page. Remove this notice upon completion.
A city of men without countries. Pirates of the sea and of the sky.
Reddas
The Port at Balfonheim, commonly referred as Balfonheim, is a location in the land of Ivalice in Final Fantasy XII. It is a town full of sailors and pirates, led by the infamous Reddas.
Despite being located in Archadian territory, Balfonheim stays out of the Empire's conflicts. Instead, it is a town willing to offer its services to whoever wants them, such as the Resistance.
Sage Knowledge
Prosperous port on the Naldoan Sea renowned for its rich fishing grounds. In addition to fishing, the port is known for its shipwrights and their numerous contributions to the advancement of seacraft. Though demand has dropped with the spread of airships, the wrights are still able to turn a profit on their craft. The power in Balfonheim rests with the sea captains and pirates of wealth. Though belonging in name to the Archadian Empire, well-placed regular bribes have ensured the city autonomous governance. The city itself is small, being a classic port town, with many stone-cobbled alleyways winding between buildings which hug the curve of the hills. Fresh seafood can be found in the market stalls daily, along with many other items brought by traders and pirates. Several waterways run through the city, some carrying drinking water, others used as canals for the transport of goods. The manse of Pirate King Reddas stands in the western quarter of Balfonheim.
Sage Knowledge 62, Port at Balfonheim
Story
As Ashe's party storms the Draklor Laboratory in Archades, they find Reddas there after the same goal: to destroy the Empire's nethicite. Dr. Cid escapes with the pieces of deifacted nethicite, telling the party he's off to Giruvegan, and Reddas takes the party to Balfonheim on his airship.
Reddas tells the party Marquis Ondore has already been looking for the sky pirates' assistance to join the Resistance. The war seems closer than ever, but as long as it's Cid who holds the nethicite and not Vayne, there may be hope. The party decides to follow Cid to Giruvegan, but Reddas refuses to join them, saying he has other plans.
After returning from Giruvegan the party ends up in Balfonheim and finds Reddas has sent a fleet to Ridorana Cataract, but it caught trouble. After hearing Ashe's plan is to destroy the Sun-Cryst, the motherlode of all nethicite in Ivalice, Reddas joins the party to aid them and gives the party a skystone he stole from the Draklor Laboratory so that the party's airship may fly on the jagd.
Reddas sacrifices himself at Pharos, leaving Balfonheim without a governor, but its people honor Reddas's memory and stay true to the path Reddas had set before his death.
Locations
Balfonheim is located at the southern tip of the continent of Valendia, in the Archadia region, near the Cerobi Steppe. Balfonheim was a place full of troublemakers and cut-throats until Reddas came and got rid of the riffraff, making it a haven to pirates of both sea and air.
- Sea Breeze Lane (to the Cerobi Steppe)
- Gallerina Marketplace
- Chivany Breakwater
- Quayside Court
- Canal Lane
- Saccio Lane
- Aerodrome
From the aerodrome one can fly to Archades, Bhujerba or Nalbina for 180 gil and dock their private airship for free.
Treasures
Balfonheim is one of the few areas in the game that has treasures within a town area (where only Vaan is controllable). The treasure in the Sea Breeze Lane next to Dyce is always gil, and will never respawn. Without the Diamond Armlet the treasure is 5040 gil, but with the Diamond Armlet equipped, the amount is reduced to mere 3 gil.
North of the Canal Lane area, the player can enter a residence on the right that has a treasure that will never respawn, and without the Diamond Armlet is either an Elixir or a Megalixir. With the Diamond Armlet equipped the treasure is 90% Megalixir, 10% Ensanguined Shield.
Quayside Court - The White Cap
This chest only appears in the Zodiac versions.
| Chest | Spawns | Holds Gil% | Gil | Normal Treasure | Diamond Armlet Treasure | ||
|---|---|---|---|---|---|---|---|
| 1 | 20% | 0% | N/A | Item 1 | Item 2 | Common | Rare |
| Bacchus's Wine | Domaine Calvados | Knot of Rust | Dark Matter | ||||
Canal Lane - Port Villa, West Side
This chest only appears in the Zodiac versions.
| Chest | Spawns | Holds Gil% | Gil | Normal Treasure | Diamond Armlet Treasure | ||
|---|---|---|---|---|---|---|---|
| 2 | 5% | 70% | ≤ 300 gil | Item 1 | Item 2 | Common | Rare |
| Meteorite (B) | Meteorite (C) | Meteorite (A) | Meteorite (D) | ||||
Canal Lane - Port Villa, East Side
- Zodiac
| Chest | Spawns | Holds Gil% | Gil | Normal Treasure | Diamond Armlet Treasure | ||
|---|---|---|---|---|---|---|---|
| 3 | 5% | 95% | 5 gil | Knot of Rust | Common | Rare | |
| Knot of Rust | Baltoro's Seed | ||||||
- Original
| Chest | Spawns | Holds Gil% | Normal Treasure | Diamond Armlet Treasure | ||||
|---|---|---|---|---|---|---|---|---|
| 1[1] | 100% | 0% | Gil | Item 1 | Item 2 | Gil | Common | Rare |
| N/A | Elixir | Megalixir | N/A | Megalixir | Ensanguined Shield | |||
- 1 - Chest does not respawn.
Sea Breeze Lane
- Zodiac
| Chest | Spawns | Holds Gil% | Gil | Normal Treasure | Diamond Armlet Treasure | ||
|---|---|---|---|---|---|---|---|
| 4[1] | 100% | 100% | 5840 gil | N/A | |||
| 5 | 50% | 70% | ≤ 50 gil | Teleport Stone | Common | Rare | |
| Knot of Rust | Holy Mote | ||||||
| 6 | 50% | 70% | ≤ 50 gil | Gysahl Greens | Common | Rare | |
| Knot of Rust | Scathe Mote | ||||||
- 1 - Chest does not respawn.
- Original
| Chest | Spawns | Holds Gil% | Normal Treasure | Diamond Armlet Treasure |
|---|---|---|---|---|
| 2[1] | 100% | 100% | 5040 gil | |
- 1 - Chest does not respawn.
Notable citizens
- Reddas, the leader of the port's pirates.
- Rikken, Reddas's comrade, holds a footrace minigame.
- Elza, Rikken's friend.
- Raz, Rikken's friend.
- Dyce, merchant previously met at Jagd Yensa.
- Fishing Enthusiast, helps the player with the Fishing minigame.
- Viera Wayfarer, viera with a hunt found in the Whitecap Tavern, who gives the party the Dragon Scales item.
Quests
Hunts
The Vyraal is a Rank V Mark whose hunt can be undertaken after the events in Draklor Laboratory are complete. The Vyraal can be found in The Northsward area of the Cerobi Steppe, and enemies will be cleared out when the player enters it. The hunt is petitioned by the Viera Wayfarer in the Whitecap pub in Balfonheim. The player will also receive the Viera Rucksack after the battle, which the Viera Wayfarer will take back when the hunt is reported. She lets the player keep the Dragon Scale, item part of the Wyrm Philosopher quest.
Pylraster is a Mark whose hunt becomes available after the events in the Pharos. The hunt is petitioned by Rikken, but he is not sure where to find it. The player can find the Pylraster at the entrance to the Pharos in the section They Who Thirst Not. The player can use the Gate Crystal at the First Ascent, and go outside to find the Mark.
Ixion is an Elite Mark found in the Penumbra-Interior area of Subterra at Pharos. The hunt becomes available after the events in the Pharos. It is petitioned by Whitecap Wench at Quayside Court - The Whitecap. Ixion can be found at Pharos's Subterra, on any of the three floors.
Pirate Olympics
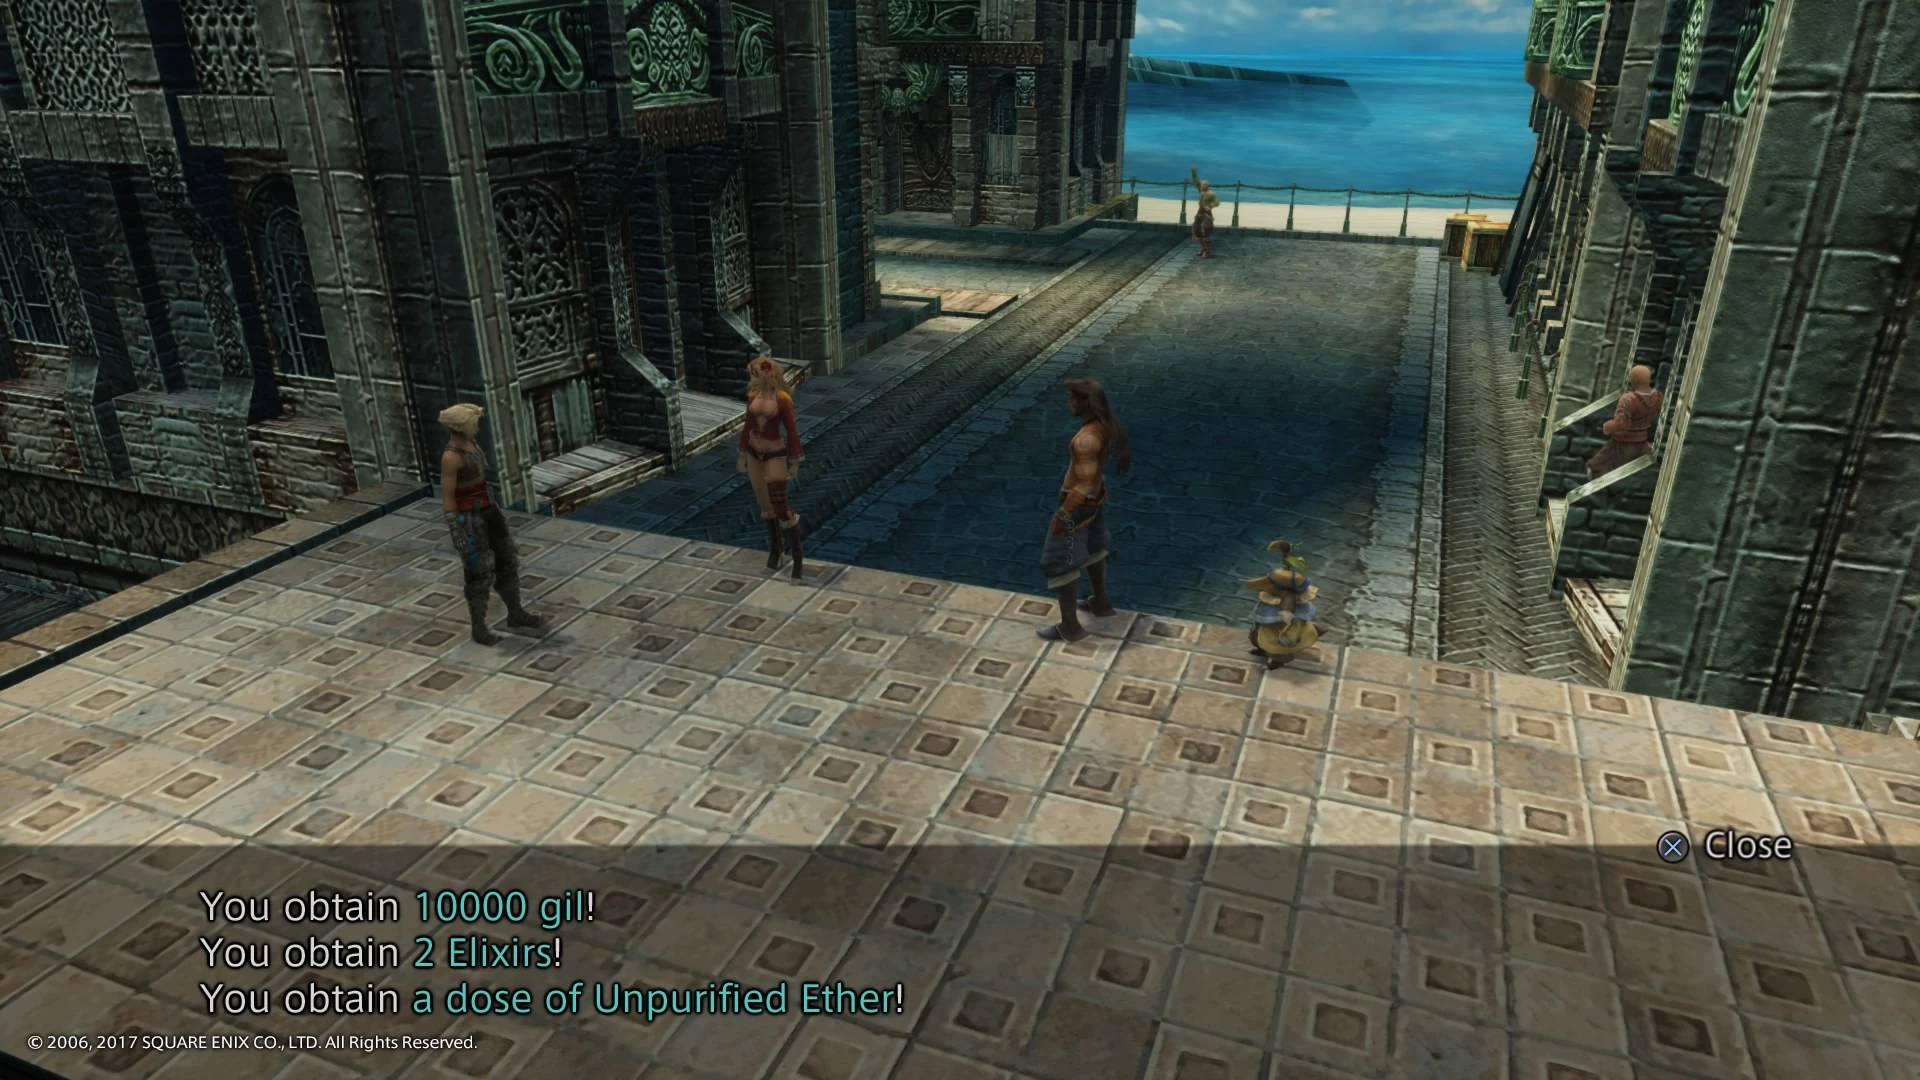

Footrace.
When the party leaves Reddas Mansion after the first time they visit Balfonheim, Rikken and his gang will be outside and give Vaan information about the Feywood. If Vaan talks to him a couple of times, Rikken will invite him for a footrace minigame. The minigame consists of 100 levels that reward the party with treasures, including the rare loot Slime Oil.
Racing requires pressing two buttons alternately. There are 100 different races, and winning them yields various curative items and gil.
Rikken is normally in the lead, and travels at about the same speed as Vaan, making it difficult to pass him until near the final turn, where he slows down for a second. If the player did not steal Slime Oil from the mark Orthros, the only other way to obtain one is to win the tier 90 footrace.
Elza is not a threat on her own, but by progressing in the mini game, she may take the last turn of the race very tightly. If this outcome happens when the player must go out of his way to make Raz trip, she can steal the victory.
Raz is the fastest of the three, but he trips a lot, causing him to almost always lose the first races. Beyond the 40th level Raz no longer trips on his own (apart for one fall at the beginning) and Vaan has to prompt it by intercepting Raz's trajectory or approaching him from the side. If the player fails to stop him, Raz will win the race.
- Rewards
- Potion
- Phoenix Down
- Eye Drops
- Antidote
- 10 gil, Echo Herbs
- Gold Needle
- Alarm Clock (Prince's Kiss in Zodiac versions)
- Handkerchief
- Bacchus's Wine
- 100 gil, Balance Mote x2
- Potion x2
- Phoenix Down x2
- Eye Drops x2
- Antidote x2
- 20 gil, Echo Herbs x2
- Gold Needle x2
- Alarm Clock (Prince's Kiss in Zodiac versions) x2
- Handkerchief x2
- Bacchus's Wine x2
- 300 gil, Float Mote x2
- Potion x3
- Phoenix Down x3
- Eye Drops x3
- Antidote x3
- 30 gil, Echo Herbs x3
- Gold Needle x3
- Alarm Clock (Prince's Kiss in Zodiac versions) x3
- Handkerchief x3
- Bacchus's Wine x3
- 800 gil, Teleport Stone x3
- Potion x4
- Phoenix Down x4
- Eye Drops x4
- Antidote x4
- 40 gil, Echo Herbs x4
- Gold Needle x4
- Alarm Clock (Prince's Kiss in Zodiac versions) x4
- Handkerchief x4
- Bacchus's Wine x4
- 1500 gil, Vanishga Mote x2
- Potion x5
- Phoenix Down x5
- Eye Drops x5
- Antidote x5
- 50 gil, Echo Herbs x5
- Gold Needle x5
- Alarm Clock (Prince's Kiss in Zodiac versions) x5
- Handkerchief x5
- Bacchus's Wine x5
- 2500 gil, Reflectga Mote x2
- Potion x6
- Phoenix Down x6
- Eye Drops x6
- Antidote x6
- 60 gil, Echo Herbs x6
- Gold Needle x6
- Alarm Clock (Prince's Kiss in Zodiac versions) x6
- Handkerchief x6
- Bacchus's Wine x6
- 3500 gil, Hi-Ether x2
- Potion x7
- Phoenix Down x7
- Eye Drop x7
- Antidote x7
- 70 gil, Echo Herb x7
- Gold Needle x7
- Alarm Clock (Prince's Kiss in Zodiac versions) x7
- Handkerchief x7
- Bacchus's Wine x7
- 4500 gil, Holy Mote x2
- Potion x8
- Phoenix Down x8
- Eye Drops x8
- Antidote x8
- 80 gil,Echo Herbs x8
- Gold Needle x8
- Alarm Clock (Prince's Kiss in Zodiac versions) x8
- Handkerchief x8
- Bacchus's Wine x8
- 6000 gil, Hastega Mote x2, Caramel
- Potion x9
- Phoenix Down x9
- Eyes Drops x9
- Antidote x9
- 90 gil, Echo Herbs x9
- Gold Needle x9
- Alarm Clock (Prince's Kiss in Zodiac versions) x9
- Handkerchief x9
- Bacchus's Wine x9
- 8000 gil, Scathe Mote x2, Slime Oil
- Potion x10
- Phoenix Down x10
- Eye Drops x10
- Antidote x10
- 100 gil, Echo Herbs x10
- Gold Needle x10
- Alarm Clock (Prince's Kiss in Zodiac versions) x10
- Handkerchief x10
- Bacchus's Wine x10
- 10000 gil, Elixir x2, Unpurified Ether
Great cockatrice escape quest
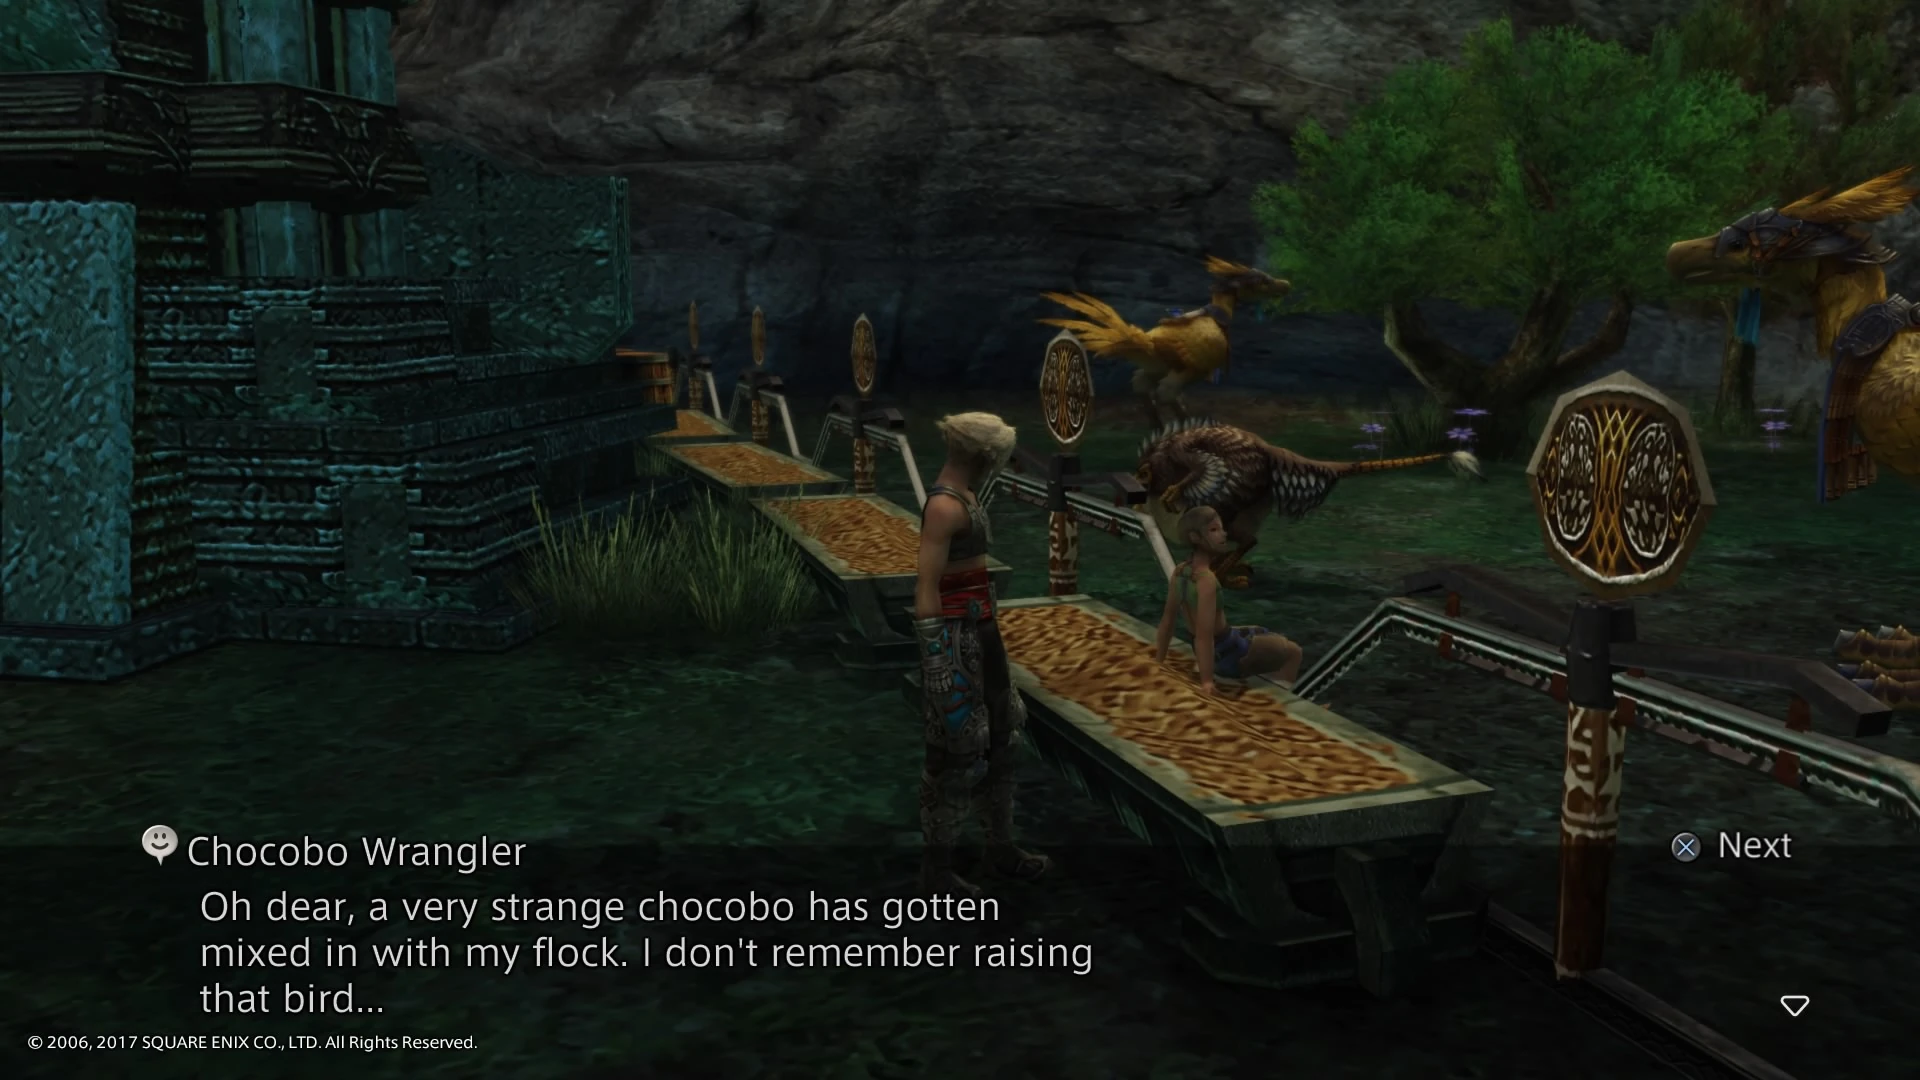

Moomer.
A cockatrice called Moomer is in the chocobo pen at Sea Breeze Lane of Balfonheim. The player must talk to the Chocobo Wrangler by the chocobo pen and show her the Feather of the Flock, then talk to the Miffed Moogle, and then Gurdy, to receive the Defender. The Feather of the Flock item, needed to talk to cockatrice, is found in an urn in the Giza Plains Tracks of the Beast area during the Rains.
Fishing rod


Fishing Enthusiast.
The fishing minigame is played in the South Bank Village of the Dalmasca Estersand. To begin the fishing sidequest, the player must have completed the Cactuar Family sidequest and the portion of the game's storyline at the Draklor Laboratory. After speaking with Ruksel at the South Bank village, the player must travel to the Port at Balfonheim and speak to the Fishing Enthusiast outside of the Aerodrome.
The player must talk to him twice and ask about the fishing rod, then run to the Aerodrome's entrance and back to the same spot without leaving the area. The Muramata fishing rod will be near the wall where she was sitting. The player can return to Ruksel at the Dalmasca Estersand to begin the minigame.
Shops
Note: The items available for purchase change throughout the game. These items may not all be available at the same time.
Beruny's Armaments - Beruny
- Original
| Name | Cost |
|---|---|
| Diamond Sword | 12,500 gil |
| Yoichi Bow | 12,500 gil |
| Trident | 12,500 gil |
| Yakei | 12,500 gil |
| Zephyr Pole | 11,200 gil |
| Hunting Crossbow | 12,500 gil |
| Empyrean Rod | 6,200 gil |
| After obtaining Treaty-Blade | |
| Defender | 13,000 gil |
| Spica | 13,000 gil |
| Morning Star | 13,500 gil |
| Doom Mace | 11,800 gil |
| Runeblade | 14,500 gil |
| Perseus Bow | 14,500 gil |
| Holy Lance | 14,500 gil |
| Caliper | 14,000 gil |
| Once Sky Fortress Bahamut appears | |
| Deathbringer | 16,000 gil |
| Greataxe | 15,500 gil |
| Ame-no-Murakumo | 15,000 gil |
| Save the Queen | 15,500 gil |
| Zwill Crossblade | 15,000 gil |
| Antares | 16,000 gil |
| Ivory Pole | 13,500 gil |
| Penetrator Crossbow | 15,500 gil |
| Caldera | 16,000 gil |
| Cloud Staff | 8,000 gil |
- Zodiac
| Name | Cost |
|---|---|
| Deathbringer | 13,700 gil |
| Trident | 13,500 gil |
| Ivory Pole | 13,770 gil |
| Traitor's Bow | 13,500 gil |
| Spica | 11,000 gil |
| Morning Star | 10,000 gil |
| Platinum Dagger | 13,700 gil |
| Runeblade | 12,100 gil |
| Yakei | 9,300 gil |
| Zephyr Pole | 11,850 gil |
| Burning Bow | 11,850 gil |
| Orichalcum Dirk | 11,700 gil |
| Doom Mace | 9,700 gil |
| Penetrator Crossbow | 12,600 gil |
| After obtaining Treaty-Blade | |
| Ame-no-Murakumo | 16,000 gil |
| Save the Queen | 11,600 gil |
| Holy Lance | 15,700 gil |
| Yoichi Bow | 15,800 gil |
| Greataxe | 12,000 gil |
Beruny's Armaments - Emma
- Original
| Name | Cost |
|---|---|
| Chakra Band | 8,100 gil |
| Power Vest | 8,100 gil |
| Hypnocrown | 8,100 gil |
| Jade Gown | 8,100 gil |
| Platinum Helm | 9,300 gil |
| Platinum Armor | 9,300 gil |
| Crystal Shield | 7,200 gil |
| Thief's Cap | 9,300 gil |
| Ninja Gear | 9,300 gil |
| Gold Hairpin | 9,300 gil |
| Gaia Gear | 9,300 gil |
| Giant's Helmet | 11,000 gil |
| Carabineer Mail | 11,000 gil |
| After obtaining Treaty-Blade | |
| Gigas Hat | 10,700 gil |
| Gigas Chestplate | 10,700 gil |
| Celebrant's Miter | 10,700 gil |
| Cleric's Robes | 10,700 gil |
| Dragon Helm | 12,500 gil |
| Dragon Mail | 12,500 gil |
| Kaiser Shield | 8,300 gil |
| Once Sky Fortress Bahamut appears | |
| Chaperon | 12,400 gil |
| Minerva Bustier | 12,400 gil |
| Black Mask | 12,400 gil |
| White Robes | 13,500 gil |
| Aegis Shield | 9,600 gil |
| Crown of Laurels | 14,500 gil |
| Rubber Suit | 14,500 gil |
| White Mask | 14,500 gil |
| Black Robes | 13,500 gil |
- Zodiac
| Name | Cost |
|---|---|
| Chakra Band | 8,100 gil |
| Power Vest | 8,100 gil |
| Hypnocrown | 8,100 gil |
| Jade Gown | 8,100 gil |
| Giant's Helmet | 11,000 gil |
| Carabineer Mail | 9,600 gil |
| Officer's Hat | 7,000 gil |
| Barrel Coat | 7,000 gil |
| Gaia Hat | 7,000 gil |
| Maduin Gear | 7,000 gil |
| Platinum Helm | 9,300 gil |
| Platinum Armor | 8,500 gil |
| After obtaining Treaty-Blade | |
| Gigas Hat | 10,700 gil |
| Gigas Chestplate | 10,700 gil |
| Celebrant's Miter | 10,700 gil |
| Cleric's Robes | 10,700 gil |
The Leapin' Bangaa
- Original
| Name | Cost |
|---|---|
| Cameo Belt | 9,000 gil |
| Power Armlet | 5,200 gil |
| Opal Ring | 16,000 gil |
| Potion | 70 gil |
| Antidote | 50 gil |
| Eye Drops | 50 gil |
| Phoenix Down | 250 gil |
| Echo Herbs | 50 gil |
| Gold Needle | 100 gil |
| Alarm Clock | 50 gil |
| Handkerchief | 50 gil |
| Hi-Potion | 210 gil |
| Bacchus's Wine | 120 gil |
| Smelling Salts | 50 gil |
| Remedy | 400 gil |
| Chronos Tear | 50 gil |
| X-Potion | 630 gil |
| Vaccine | 200 gil |
- Zodiac
| Name | Cost |
|---|---|
| Power Armlet | 5,200 gil |
| Fuzzy Miter | 1,200 gil |
| Bowline Sash | 1,000 gil |
| Agate Ring | 3,000 gil |
| Magick Gloves | 3,000 gil |
| Blazer Gloves | 3,000 gil |
| Nishijin Belt | 800 gil |
| Black Belt | 600 gil |
| Rose Corsage | 800 gil |
| Leather Gorget | 1,200 gil |
| Tourmaline Ring | 300 gil |
| Steel Gorget | 1,300 gil |
| Argyle Armlet | 600 gil |
| Bangle | 500 gil |
| X-Potion | 520 gil |
| Bacchus's Wine | 120 gil |
| Remedy | 400 gil |
| Hi-Potion | 180 gil |
| Nu Khai Sand | 50 gil |
| Chronos Tear | 60 gil |
| Gold Needle | 80 gil |
| Prince's Kiss | 50 gil |
| Handkerchief | 50 gil |
| Phoenix Down | 200 gil |
| Echo Herbs | 50 gil |
| Antidote | 50 gil |
| Eye Drops | 50 gil |
| Potion | 60 gil |
Quayside Magickery
- Original
| Name | Cost |
|---|---|
| Curaja | 11,700 gil |
| Dispelga | 8,200 gil |
| Firaga | 8,200 gil |
| Thundaga | 8,200 gil |
| Blizzaga | 8,200 gil |
| Sleepga | 7,900 gil |
| After obtaining Treaty-Blade | |
| Arise | 9,700 gil |
| Esunaga | 14,900 gil |
| Slowga | 10,400 gil |
| Shellga | 9,900 gil |
| Protectga | 9,400 gil |
| Darkga | 9,400 gil |
| Once Sky Fortress Bahamut appears | |
| Holy | 11,200 gil |
| Shock | 9,400 gil |
| Scourge | 11,200 gil |
| Flare | 11,200 gil |
Odo's Technicks
Dyce
A treasure containing 5040 gil (without Diamond Armlet) can be opened near him.
Weapons
- Original
| Name | Cost |
|---|---|
| ― | ― |
- Zodiac
| Name | Cost |
|---|---|
| Lohengrin | 3,200 gil |
| Heavy Lance | 3,500 gil |
| Longbow | 4,600 gil |
| Sirius | 2,600 gil |
| Chopper | 3,200 gil |
| Paramina Crossbow | 3,300 gil |
| Healing Rod | 2,590 gil |
| Ancient Sword | 2,450 gil |
| Kogarasumaru | 2,500 gil |
| Musk Stick | 3,040 gil |
| Killer Bow | 2,500 gil |
| War Hammer | 2,500 gil |
| Bhuj | 2,200 gil |
| Wizard's Staff | 1,350 gil |
Armor
- Original
| Name | Cost |
|---|---|
| ― | ― |
- Zodiac
| Name | Cost |
|---|---|
| Soldier's Cap | 1,400 gil |
| Heavy Coat | 1,400 gil |
| Lambent Hat | 1,400 gil |
| Chanter's Djellaba | 1,400 gil |
| Winged Helm | 2,400 gil |
| Chainmail | 2,300 gil |
| Golden Shield | 2,000 gil |
| Balaclava | 1,000 gil |
| Windbreaker | 1,000 gil |
| Wizard's Hat | 1,000 gil |
| Wizard's Robes | 1,000 gil |
| Barbut | 1,800 gil |
| Linen Cuirass | 1,800 gil |
| Round Shield | 1,100 gil |
Accessories
- Original
| Name | Cost |
|---|---|
| ― | ― |
- Zodiac
| Name | Cost |
|---|---|
| Nishijin Belt | 800 gil |
| Black Belt | 600 gil |
| Rose Corsage | 800 gil |
| Leather Gorget | 1,200 gil |
| Tourmaline Ring | 300 gil |
| Steel Gorget | 1,300 gil |
| Argyle Armlet | 600 gil |
| Bangle | 500 gil |
Magicks
- Original
| Name | Cost |
|---|---|
| ― | ― |
Ammunition
- Original
| Name | Cost |
|---|---|
| ― | ― |
- Zodiac
| Name | Cost |
|---|---|
| Onion Arrows | 100 gil |
| Onion Bolts | 100 gil |
| Onion Shot | 100 gil |
| Onion Bombs | 100 gil |
Technicks
- Original
| Name | Cost |
|---|---|
| ― | ― |
Items
- Original
| Name | Cost |
|---|---|
| ― | ― |
- Zodiac
| Name | Cost |
|---|---|
| Hi-Potion | 180 gil |
| Nu Khai Sand | 50 gil |
| Chronos Tear | 60 gil |
| Gold Needle | 80 gil |
| Prince's Kiss | 50 gil |
| Handkerchief | 50 gil |
| Phoenix Down | 200 gil |
| Echo Herbs | 50 gil |
| Antidote | 50 gil |
| Eye Drops | 50 gil |
| Potion | 60 gil |
Loot
- Original
| Name | Cost |
|---|---|
| Teleport Stone | 200 gil |
| Gysahl Greens | 108 gil |
- Zodiac
| Name | Cost |
|---|---|
| Gysahl Greens | 108 gil |
| Teleport Stone | 200 gil |
Waterfront Gambits
|
|
Map
The map can be bought Sea Breeze Lane for 80 gil. The map below is for the original version; the Zodiac version has some differences in treasures (see above).
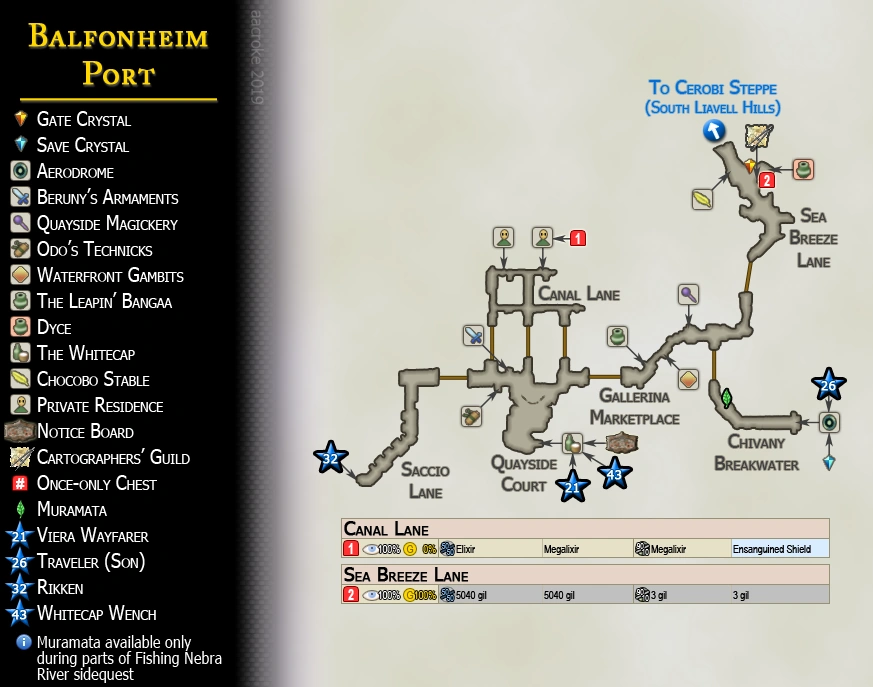
Musical themes
The theme of Balfonheim is called "The Port of Balfonheim" (港町バーフォンハイム, Minatomachi Bāfonhaimu?).
Other appearances
Final Fantasy Airborne Brigade
Gallery
")
")
")
")
")
")
")
")
")
")
Etymology
The name is a combination of three German words: Bald ("soon"), Von, pronounced "Fon" ("of"), and Heim ("home"). Therefore, the city's name means "Soon of Home", a fitting name for port city.
Trivia
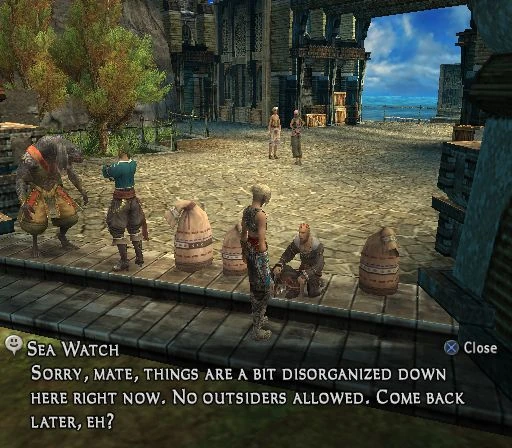
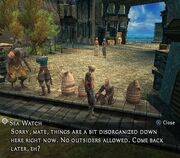
Balfonheim before Draklor Laboratory.
- It is possible to visit Balfonheim before the events in Draklor Laboratory. If the player takes a chocobo from Phon Coast and rides it all the way across the Tchita Uplands to the east, they can enter the Cerobi Steppe that has a way into Balfonheim. If the player comes to Balfonheim at such an early time, only the Sea Breeze Lane area is explorable.