Intangir Bot (talk | contribs) m (Reformatting {{sideicon}} with categoric ancestors) |
Intangir Bot (talk | contribs) m (Bot: Changing template: Locat-stub) |
||
| (18 intermediate revisions by 3 users not shown) | |||
| Line 1: | Line 1: | ||
{{sideicon|prime=FFIV|IVCCI|IVTAY|FFAB}} |
{{sideicon|prime=FFIV|IVCCI|IVTAY|FFAB}} |
||
| − | {{infobox location |
+ | {{infobox location |
|name=Agart |
|name=Agart |
||
| + | |release=FFIV |
||
|japanese=アガルトの村 |
|japanese=アガルトの村 |
||
|romaji=Agaruto no Mura |
|romaji=Agaruto no Mura |
||
| Line 12: | Line 13: | ||
|region=Island south of [[Baron (Final Fantasy IV)|Baron]], [[Earth (Final Fantasy IV)|Overworld]] |
|region=Island south of [[Baron (Final Fantasy IV)|Baron]], [[Earth (Final Fantasy IV)|Overworld]] |
||
|residents=[[Corio]] |
|residents=[[Corio]] |
||
| + | |ffiv items={{collapsible text|header=2D|content= |
||
| − | |ffiv items=*[[List of Final Fantasy IV items#Hi-Potion|Hi-Potion]] |
||
| − | *[[ |
+ | *[[Final Fantasy IV items#Hi-Potion|Hi-Potion]] |
| + | *[[Final Fantasy IV items#Antarctic Wind|Antarctic Wind]] (GBA only) |
||
| + | }} |
||
| + | {{collapsible text|header=3D|content= |
||
| + | *Antarctic Wind |
||
| + | *Cottage |
||
| + | *Gaia Drum |
||
| + | *Hi-Potion |
||
| + | *Phoenix Down |
||
| + | *Potion |
||
| + | }} |
||
*Many found in [[#Shops|shops]] |
*Many found in [[#Shops|shops]] |
||
|ffiv enemies= |
|ffiv enemies= |
||
| − | *[[Black Lizard (Final Fantasy IV)|Black Lizard]] |
+ | *[[Black Lizard (Final Fantasy IV 2D)|Black Lizard]] |
| − | *[[Flamehound (Final Fantasy IV)|Flamehound]] |
+ | *[[Flamehound (Final Fantasy IV 2D)|Flamehound]] |
| − | *[[Fledgling Rukh (Final Fantasy IV)|Fledgling Rukh]] |
+ | *[[Fledgling Rukh (Final Fantasy IV 2D)|Fledgling Rukh]] |
| − | *[[Ironback (Final Fantasy IV)|Ironback]] |
+ | *[[Ironback (Final Fantasy IV 2D)|Ironback]] |
| − | *[[Mors (Final Fantasy IV)|Mors]] |
+ | *[[Mors (Final Fantasy IV 2D)|Mors]] |
| − | *[[Rukh (Final Fantasy IV)|Rukh]] |
+ | *[[Rukh (Final Fantasy IV 2D)|Rukh]] |
|ffiv quests=*Reach the [[Earth (Final Fantasy IV)#Underworld|Underworld]] |
|ffiv quests=*Reach the [[Earth (Final Fantasy IV)#Underworld|Underworld]] |
||
| − | |ivtay items=Various, depends on |
+ | |ivtay items=Various, depends on tale, see [[#Final Fantasy IV: The After Years 2|below]] |
| − | |ivtay enemies=Various, depends on |
+ | |ivtay enemies=Various, depends on tale, see [[#Final Fantasy IV: The After Years 4|below]] |
|ivtay quests= |
|ivtay quests= |
||
}} |
}} |
||
| − | '''Agart''' is a town in ''[[Final Fantasy IV]]''. It is located on an island south of [[Baron (Final Fantasy IV)|Baron]], and it is the home of the |
+ | '''Agart''' is a town in ''[[Final Fantasy IV]]''. It is located on an island south of [[Baron (Final Fantasy IV)|Baron]], and it is the home of the descendants of [[Dwarf|Dwarves]] from the [[Earth (Final Fantasy IV)#Underworld|Underworld]]. The town contains a well and an observatory in which [[Corio]] studies the [[Red Moon|Moon]]. |
== Story == |
== Story == |
||
{{spoiler}} |
{{spoiler}} |
||
=== ''[[Final Fantasy IV]]'' === |
=== ''[[Final Fantasy IV]]'' === |
||
| ⚫ | [[Cecil Harvey|Cecil]], [[Kain Highwind|Kain]], [[Rosa Joanna Farrell|Rosa]], [[Yang Fang Leiden|Yang]], and [[Cid Pollendina|Cid]] visit the well in the center of the town and throw in the Magma Rock (Key of Magma on the SNES) to open the way to the [[Earth (Final Fantasy IV)#Underworld|Underworld]]. |
||
| − | |||
| ⚫ | [[Cecil Harvey|Cecil]], [[Kain Highwind|Kain]], [[Rosa Joanna Farrell|Rosa]], [[Yang Fang Leiden|Yang]], and [[Cid Pollendina|Cid]] visit the well in the center of the town and throw in the Magma Rock (Key of Magma |
||
| − | {{-}} |
||
=== ''[[Final Fantasy IV -Interlude-]]'' === |
=== ''[[Final Fantasy IV -Interlude-]]'' === |
||
| − | |||
Agart as well as the [[Agart Mine]] is seen on the overworld map when the ''[[Falcon (Final Fantasy IV)|Falcon]]'' dives into the hole to reach the underworld. Unfortunately, the party cannot explore both of these locations. |
Agart as well as the [[Agart Mine]] is seen on the overworld map when the ''[[Falcon (Final Fantasy IV)|Falcon]]'' dives into the hole to reach the underworld. Unfortunately, the party cannot explore both of these locations. |
||
=== ''[[Final Fantasy IV: The After Years]]'' === |
=== ''[[Final Fantasy IV: The After Years]]'' === |
||
| − | |||
[[Rydia]] and [[Luca (Final Fantasy IV)|Luca]] land near Agart when their airship malfunctions, and must travel into the Agart Mines to obtain an Agartite, as well as Mythril Springs, Bolts, and Nuts to repair the airship. |
[[Rydia]] and [[Luca (Final Fantasy IV)|Luca]] land near Agart when their airship malfunctions, and must travel into the Agart Mines to obtain an Agartite, as well as Mythril Springs, Bolts, and Nuts to repair the airship. |
||
| − | Later |
+ | Later, the town is overrun with monsters, and Rydia and Luca return to Agart with [[Edge Geraldine|Edge]] and the [[Golbez|Man in Black]]. They find the [[Maenad|Mysterious Girl]]. who summons [[Titan (The After Years boss)|Titan]] to attack them. Initially, Titan uses Gaia's Wrath, dumping the party in an underground cavern under Agart. Once the party has rescued [[Porom]] in Mysidia, she will appear during the fight to cast Float on the party and stop Titan's quakes from harming them, allowing them to return Titan to his senses and regain his power for Rydia. |
{{endspoiler}} |
{{endspoiler}} |
||
| Line 51: | Line 58: | ||
[[File:Agart_Observatory.PNG|thumb|right|The observatory.]] |
[[File:Agart_Observatory.PNG|thumb|right|The observatory.]] |
||
The observatory is the first building to the left. It houses the giant telescope in which [[Corio]] studies the Twin Moons. The player can look into it as well. |
The observatory is the first building to the left. It houses the giant telescope in which [[Corio]] studies the Twin Moons. The player can look into it as well. |
||
| − | {{ |
+ | {{clear}} |
=== Well === |
=== Well === |
||
[[File:FFIV iOS Agart.png|thumb|right|The village well.]] |
[[File:FFIV iOS Agart.png|thumb|right|The village well.]] |
||
It is the first structure found if the player goes straight from the entrance. During the first visit, the player must select the Magma Key from the inventory to open the way to the Underworld. |
It is the first structure found if the player goes straight from the entrance. During the first visit, the player must select the Magma Key from the inventory to open the way to the Underworld. |
||
| − | {{ |
+ | {{clear}} |
=== Empty House === |
=== Empty House === |
||
[[File:Agart empty house ios.PNG|thumb|right|The empty house.]] |
[[File:Agart empty house ios.PNG|thumb|right|The empty house.]] |
||
An empty house is found north of the village well. [[Namingway]] can be found inside it if the player has obtained the music box in Troia. He demands the very rare [[Rainbow Pudding]]. |
An empty house is found north of the village well. [[Namingway]] can be found inside it if the player has obtained the music box in Troia. He demands the very rare [[Rainbow Pudding]]. |
||
| − | {{ |
+ | {{clear}} |
== Items == |
== Items == |
||
=== ''Final Fantasy IV'' === |
=== ''Final Fantasy IV'' === |
||
| + | ;2D versions |
||
| − | * [[List of Final Fantasy IV items#Hi-Potion|Hi-Potion]] |
||
| − | * [[ |
+ | * [[Final Fantasy IV items#Hi-Potion|Hi-Potion]] |
| + | * [[Final Fantasy IV items#Antarctic Wind|Antarctic Wind]] (GBA only) |
||
| + | |||
| + | ;3D versions |
||
| + | *Antarctic Wind |
||
| + | *Cottage |
||
| + | *Gaia Drum |
||
| + | *Hi-Potion |
||
| + | *Phoenix Down |
||
| + | *Potion |
||
| + | |||
=== ''Final Fantasy IV: The After Years'' === |
=== ''Final Fantasy IV: The After Years'' === |
||
{{multicol-begin}} |
{{multicol-begin}} |
||
| Line 87: | Line 104: | ||
== Shops == |
== Shops == |
||
=== ''Final Fantasy IV'' === |
=== ''Final Fantasy IV'' === |
||
| − | {|class="table" style="text-align:center" |
+ | {|class="article-table" style="text-align:center" |
|+'''[[Inn]]''' |
|+'''[[Inn]]''' |
||
| 50 gil/night |
| 50 gil/night |
||
| Line 93: | Line 110: | ||
{{multicol-begin|1}} |
{{multicol-begin|1}} |
||
| − | {|class="FFIV table" style="text-align:center" |
+ | {|class="FFIV article-table" style="text-align:center" |
|+'''[[Item]]s''' |
|+'''[[Item]]s''' |
||
|-class="a" |
|-class="a" |
||
| Line 101: | Line 118: | ||
!width="20%"|SNES |
!width="20%"|SNES |
||
!width="20%"|GBA |
!width="20%"|GBA |
||
| − | !width="20%"| |
+ | !width="20%"|3D |
|- |
|- |
||
| − | !class="b"|[[ |
+ | !class="b"|[[Final Fantasy IV items#Potion|Potion]] |
|30 GP |
|30 GP |
||
|30 gil |
|30 gil |
||
|N/A |
|N/A |
||
|- |
|- |
||
| − | !class="b"|[[ |
+ | !class="b"|[[Final Fantasy IV items#Phoenix Down|Phoenix Down]] |
|150 GP |
|150 GP |
||
|100 gil |
|100 gil |
||
|N/A |
|N/A |
||
|- |
|- |
||
| − | !class="b"|[[ |
+ | !class="b"|[[Final Fantasy IV items#Tent|Tent]] |
|200 GP |
|200 GP |
||
|100 gil |
|100 gil |
||
|N/A |
|N/A |
||
|- |
|- |
||
| − | !class="b"|[[ |
+ | !class="b"|[[Final Fantasy IV items#Gysahl Greens|Gysahl Greens]] |
|50 GP |
|50 GP |
||
|50 gil |
|50 gil |
||
|N/A |
|N/A |
||
|- |
|- |
||
| − | !class="b"|[[ |
+ | !class="b"|[[Final Fantasy IV items#Remedy|Remedy]] |
|100 GP |
|100 GP |
||
|N/A |
|N/A |
||
|N/A |
|N/A |
||
|- |
|- |
||
| − | !class="b"|[[ |
+ | !class="b"|[[Final Fantasy IV items#Ether|Ether]] |
|10000 GP |
|10000 GP |
||
|N/A |
|N/A |
||
|N/A |
|N/A |
||
|- |
|- |
||
| − | !class="b"|[[ |
+ | !class="b"|[[Final Fantasy IV items#Antidote|Antidote]] |
|N/A |
|N/A |
||
|40 gil |
|40 gil |
||
|N/A |
|N/A |
||
|- |
|- |
||
| − | !class="b"|[[ |
+ | !class="b"|[[Final Fantasy IV items#Eye Drops|Eye Drops]] |
|N/A |
|N/A |
||
|30 gil |
|30 gil |
||
|N/A |
|N/A |
||
|- |
|- |
||
| − | !class="b"|[[ |
+ | !class="b"|[[Final Fantasy IV items#Gold Needle|Gold Needle]] |
|N/A |
|N/A |
||
|400 gil |
|400 gil |
||
|N/A |
|N/A |
||
|- |
|- |
||
| − | !class="b"|[[ |
+ | !class="b"|[[Final Fantasy IV items#Maiden's Kiss|Maiden's Kiss]] |
|N/A |
|N/A |
||
|60 gil |
|60 gil |
||
|N/A |
|N/A |
||
|- |
|- |
||
| − | !class="b"|[[ |
+ | !class="b"|[[Final Fantasy IV items#Bomb Fragment|Bomb Fragment]] |
|N/A |
|N/A |
||
|N/A |
|N/A |
||
|200 gil |
|200 gil |
||
|- |
|- |
||
| − | !class="b"|[[ |
+ | !class="b"|[[Final Fantasy IV items#Zeus's Wrath|Zeus's Wrath]] |
|N/A |
|N/A |
||
|N/A |
|N/A |
||
|200 gil |
|200 gil |
||
|- |
|- |
||
| − | !class="b"|[[ |
+ | !class="b"|[[Final Fantasy IV items#Antarctic Wind|Antarctic Wind]] |
|N/A |
|N/A |
||
|N/A |
|N/A |
||
|200 gil |
|200 gil |
||
|- |
|- |
||
| − | !class="b"|[[ |
+ | !class="b"|[[Final Fantasy IV items#Bestiary|Bestiary]] |
|N/A |
|N/A |
||
|N/A |
|N/A |
||
|50 gil |
|50 gil |
||
|} |
|} |
||
| − | {|class="FFIV table" style="text-align:center" |
+ | {|class="FFIV article-table" style="text-align:center" |
| − | |+'''[[ |
+ | |+'''[[Final Fantasy IV weapons|Weapons]]''' |
|-class="a" |
|-class="a" |
||
!width="40%" rowspan=2|Weapon |
!width="40%" rowspan=2|Weapon |
||
| Line 181: | Line 198: | ||
!width="20%"|SNES |
!width="20%"|SNES |
||
!width="20%"|GBA |
!width="20%"|GBA |
||
| − | !width="20%"| |
+ | !width="20%"|3D |
|- |
|- |
||
| − | !class="b"|[[ |
+ | !class="b"|[[Final Fantasy IV weapons#Spear|Spear]] |
|60 GP |
|60 GP |
||
|60 gil |
|60 gil |
||
|60 gil |
|60 gil |
||
|- |
|- |
||
| − | !class="b"|[[ |
+ | !class="b"|[[Final Fantasy IV weapons#Rod|Rod]] |
|100 GP |
|100 GP |
||
|100 gil |
|100 gil |
||
|100 gil |
|100 gil |
||
|- |
|- |
||
| − | !class="b"|[[ |
+ | !class="b"|[[Final Fantasy IV weapons#Staff|Staff]] |
|160 GP |
|160 GP |
||
|160 gil |
|160 gil |
||
|160 gil |
|160 gil |
||
|- |
|- |
||
| − | !class="b"|[[ |
+ | !class="b"|[[Final Fantasy IV weapons#Bow|Bow]] |
|220 GP |
|220 GP |
||
|220 gil |
|220 gil |
||
|220 gil |
|220 gil |
||
|- |
|- |
||
| − | !class="b"|[[ |
+ | !class="b"|[[Final Fantasy IV weapons#Power Bow|Power Bow]] |
|700 GP |
|700 GP |
||
|700 gil |
|700 gil |
||
|700 gil |
|700 gil |
||
|- |
|- |
||
| − | !class="b"|[[ |
+ | !class="b"|[[Final Fantasy IV weapons#Iron Arrows|Iron Arrows]] |
|10 GP |
|10 GP |
||
|10 gil |
|10 gil |
||
|50 gil |
|50 gil |
||
|- |
|- |
||
| − | !class="b"|[[ |
+ | !class="b"|[[Final Fantasy IV weapons#Holy Arrows|Holy Arrows]] |
|20 GP |
|20 GP |
||
|20 gil |
|20 gil |
||
|500 gil |
|500 gil |
||
|- |
|- |
||
| − | !class="b"|[[ |
+ | !class="b"|[[Final Fantasy IV weapons#Boomerang|Boomerang]] |
|3000 GP |
|3000 GP |
||
|3000 gil |
|3000 gil |
||
|3000 gil |
|3000 gil |
||
|} |
|} |
||
| − | {|class="FFIV table" style="text-align:center" |
+ | {|class="FFIV article-table" style="text-align:center" |
| − | |+'''[[ |
+ | |+'''[[Final Fantasy IV armor|Armor]]''' |
|-class="a" |
|-class="a" |
||
!width="40%" rowspan=2|Armor |
!width="40%" rowspan=2|Armor |
||
| Line 231: | Line 248: | ||
!width="20%"|SNES |
!width="20%"|SNES |
||
!width="20%"|GBA |
!width="20%"|GBA |
||
| − | !width="20%"| |
+ | !width="20%"|3D |
|- |
|- |
||
| − | !class="b"|[[ |
+ | !class="b"|[[Final Fantasy IV armor#Iron Shield|Iron Shield]] |
|100 GP |
|100 GP |
||
|100 gil |
|100 gil |
||
|100 gil |
|100 gil |
||
|- |
|- |
||
| − | !class="b"|[[ |
+ | !class="b"|[[Final Fantasy IV armor#Iron Helm|Iron Helm]] |
|150 GP |
|150 GP |
||
|150 gil |
|150 gil |
||
|150 gil |
|150 gil |
||
|- |
|- |
||
| − | !class="b"|[[ |
+ | !class="b"|[[Final Fantasy IV armor#Iron Armor|Iron Armor]] |
|600 GP |
|600 GP |
||
|600 gil |
|600 gil |
||
|600 gil |
|600 gil |
||
|- |
|- |
||
| − | !class="b"|[[ |
+ | !class="b"|[[Final Fantasy IV armor#Iron Gloves|Iron Gloves]] |
|130 GP |
|130 GP |
||
|130 gil |
|130 gil |
||
|130 gil |
|130 gil |
||
|- |
|- |
||
| − | !class="b"|[[ |
+ | !class="b"|[[Final Fantasy IV armor#Iron Armlet|Iron Armlet]] |
|100 GP |
|100 GP |
||
|100 gil |
|100 gil |
||
| Line 262: | Line 279: | ||
=== ''Final Fantasy IV: The After Years'' === |
=== ''Final Fantasy IV: The After Years'' === |
||
{{multicol-begin|1}} |
{{multicol-begin|1}} |
||
| − | {|class="IVTAY table" style="text-align:center" |
+ | {|class="IVTAY article-table" style="text-align:center" |
| − | |+'''[[ |
+ | |+'''[[Final Fantasy IV: The After Years items|Items]]''' |
|-class="a" |
|-class="a" |
||
!width="60%"|Item |
!width="60%"|Item |
||
| Line 292: | Line 309: | ||
|500 gil |
|500 gil |
||
|} |
|} |
||
| − | {|class="IVTAY table" style="text-align:center" |
+ | {|class="IVTAY article-table" style="text-align:center" |
| − | |+'''[[ |
+ | |+'''[[Final Fantasy IV: The After Years weapons|Weapons]]''' |
|-class="a" |
|-class="a" |
||
!width="60%"|Item |
!width="60%"|Item |
||
| Line 322: | Line 339: | ||
|2,000 gil |
|2,000 gil |
||
|} |
|} |
||
| − | {|class="IVTAY table" style="text-align:center" |
+ | {|class="IVTAY article-table" style="text-align:center" |
| − | |+'''[[ |
+ | |+'''[[Final Fantasy IV: The After Years armor|Armor]]''' |
|-class="a" |
|-class="a" |
||
!width="60%"|Item |
!width="60%"|Item |
||
| Line 353: | Line 370: | ||
|} |
|} |
||
{{multicol-end|1}} |
{{multicol-end|1}} |
||
| − | {{ |
+ | {{clear}} |
== Enemies == |
== Enemies == |
||
=== ''[[Final Fantasy IV]]'' === |
=== ''[[Final Fantasy IV]]'' === |
||
==== Outside ==== |
==== Outside ==== |
||
| − | * [[Rukh (Final Fantasy IV)|Rukh]], [[Fledgling Rukh (Final Fantasy IV)|Fledgling Rukh]] x3 |
+ | * [[Rukh (Final Fantasy IV 2D)|Rukh]], [[Fledgling Rukh (Final Fantasy IV 2D)|Fledgling Rukh]] x3 |
| − | * [[Rukh (Final Fantasy IV)|Rukh]], [[Fledgling Rukh (Final Fantasy IV)|Fledgling Rukh]] x2 |
+ | * [[Rukh (Final Fantasy IV 2D)|Rukh]], [[Fledgling Rukh (Final Fantasy IV 2D)|Fledgling Rukh]] x2 |
| − | * [[Ironback (Final Fantasy IV)|Ironback]] x2, [[Black Lizard (Final Fantasy IV)|Black Lizard]] x2 |
+ | * [[Ironback (Final Fantasy IV 2D)|Ironback]] x2, [[Black Lizard (Final Fantasy IV 2D)|Black Lizard]] x2 |
| − | * [[Black Lizard (Final Fantasy IV)|Black Lizard]] x2, [[Flamehound (Final Fantasy IV)|Flamehound]] x2 |
+ | * [[Black Lizard (Final Fantasy IV 2D)|Black Lizard]] x2, [[Flamehound (Final Fantasy IV 2D)|Flamehound]] x2 |
| − | * [[Mors (Final Fantasy IV)|Mors]] x3 |
+ | * [[Mors (Final Fantasy IV 2D)|Mors]] x3 |
| − | * [[Mors (Final Fantasy IV)|Mors]] x4 |
+ | * [[Mors (Final Fantasy IV 2D)|Mors]] x4 |
=== ''[[Final Fantasy IV: The After Years]]'' === |
=== ''[[Final Fantasy IV: The After Years]]'' === |
||
==== Rydia's Tale ==== |
==== Rydia's Tale ==== |
||
| − | * [[Basilisk (The After Years)|Basilisk]], [[Goblin (The After Years)|Goblin]] x3 |
+ | * [[Basilisk (The After Years)|Basilisk]], [[Goblin (The After Years enemy)|Goblin]] x3 |
| − | * [[Bomb (The After Years)|Bomb]] x2, [[Gray Bomb (The After Years)|Gray Bomb]] x2 |
+ | * [[Bomb (The After Years enemy)|Bomb]] x2, [[Gray Bomb (The After Years)|Gray Bomb]] x2 |
| − | * [[Bomb (The After Years)|Bomb]] x3 |
+ | * [[Bomb (The After Years enemy)|Bomb]] x3 |
* [[Domovoi (The After Years)|Domovoi]] x3, [[Gatlinghog (The After Years)|Gatlinghog]] x3 |
* [[Domovoi (The After Years)|Domovoi]] x3, [[Gatlinghog (The After Years)|Gatlinghog]] x3 |
||
* [[Gargoyle (The After Years)|Gargoyle]] x2 |
* [[Gargoyle (The After Years)|Gargoyle]] x2 |
||
| Line 396: | Line 413: | ||
* [[Mad Ogre (The After Years)|Mad Ogre]] x3 |
* [[Mad Ogre (The After Years)|Mad Ogre]] x3 |
||
* [[Balloon (The After Years)|Balloon]] x3 |
* [[Balloon (The After Years)|Balloon]] x3 |
||
| − | * [[Titan (The After Years)|Titan]] (Boss) |
+ | * [[Titan (The After Years boss)|Titan]] (Boss) |
{{multicol-separator}} |
{{multicol-separator}} |
||
;Underground |
;Underground |
||
| Line 415: | Line 432: | ||
== Other appearances == |
== Other appearances == |
||
=== ''[[Final Fantasy Airborne Brigade]]'' === |
=== ''[[Final Fantasy Airborne Brigade]]'' === |
||
| − | |||
[[File:FFAB Agart Well FFIV Special.png|right]] |
[[File:FFAB Agart Well FFIV Special.png|right]] |
||
| − | {{ |
+ | {{Location section|Final Fantasy Airborne Brigade}} |
| − | {{ |
+ | {{clear}} |
== Gallery == |
== Gallery == |
||
| Line 447: | Line 463: | ||
{{navbox setting FFIV}} |
{{navbox setting FFIV}} |
||
{{navbox setting IVTAY}} |
{{navbox setting IVTAY}} |
||
| + | |||
[[de:Agart]] |
[[de:Agart]] |
||
[[Category:Towns]] |
[[Category:Towns]] |
||
| − | [[Category:Final Fantasy IV |
+ | [[Category:Locations in Final Fantasy IV]] |
| − | [[Category:Final Fantasy IV: The After Years |
+ | [[Category:Locations in Final Fantasy IV: The After Years]] |
Revision as of 18:43, 13 January 2020
Template:Sideicon Agart is a town in Final Fantasy IV. It is located on an island south of Baron, and it is the home of the descendants of Dwarves from the Underworld. The town contains a well and an observatory in which Corio studies the Moon.
Story
Final Fantasy IV
Cecil, Kain, Rosa, Yang, and Cid visit the well in the center of the town and throw in the Magma Rock (Key of Magma on the SNES) to open the way to the Underworld.
Final Fantasy IV -Interlude-
Agart as well as the Agart Mine is seen on the overworld map when the Falcon dives into the hole to reach the underworld. Unfortunately, the party cannot explore both of these locations.
Final Fantasy IV: The After Years
Rydia and Luca land near Agart when their airship malfunctions, and must travel into the Agart Mines to obtain an Agartite, as well as Mythril Springs, Bolts, and Nuts to repair the airship.
Later, the town is overrun with monsters, and Rydia and Luca return to Agart with Edge and the Man in Black. They find the Mysterious Girl. who summons Titan to attack them. Initially, Titan uses Gaia's Wrath, dumping the party in an underground cavern under Agart. Once the party has rescued Porom in Mysidia, she will appear during the fight to cast Float on the party and stop Titan's quakes from harming them, allowing them to return Titan to his senses and regain his power for Rydia.
Locations
Observatory
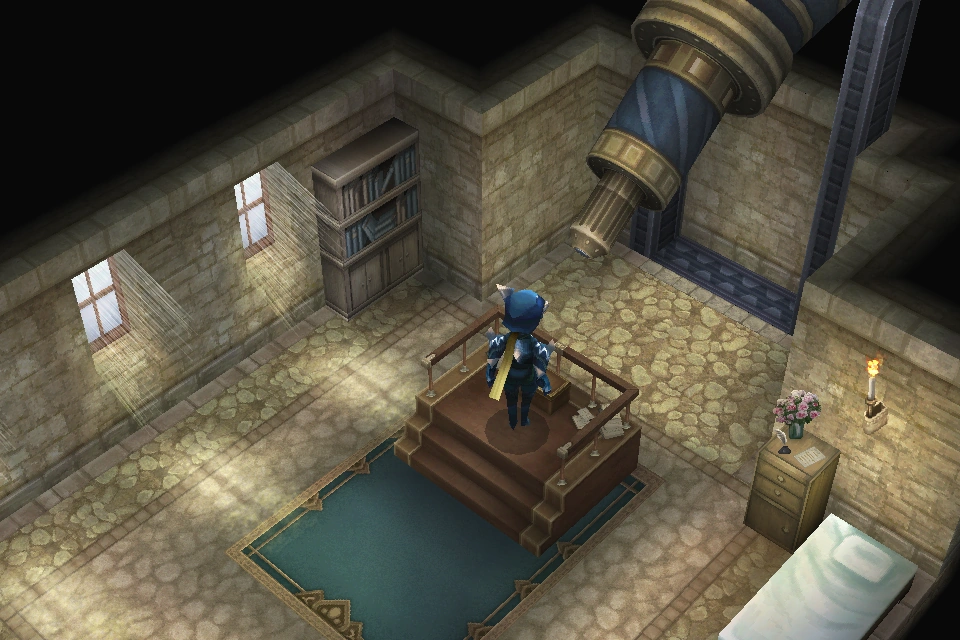

The observatory.
The observatory is the first building to the left. It houses the giant telescope in which Corio studies the Twin Moons. The player can look into it as well.
Well
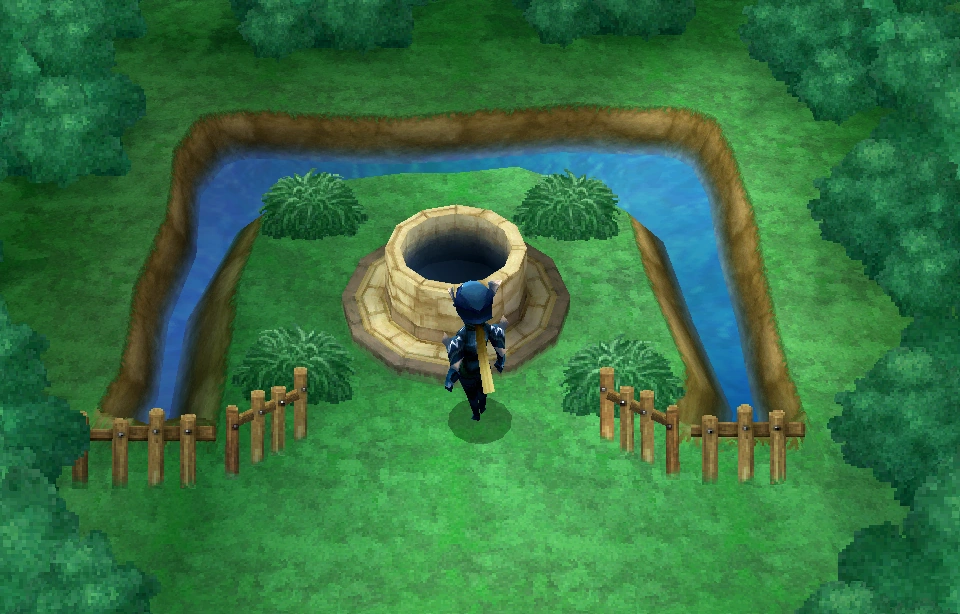

The village well.
It is the first structure found if the player goes straight from the entrance. During the first visit, the player must select the Magma Key from the inventory to open the way to the Underworld.
Empty House
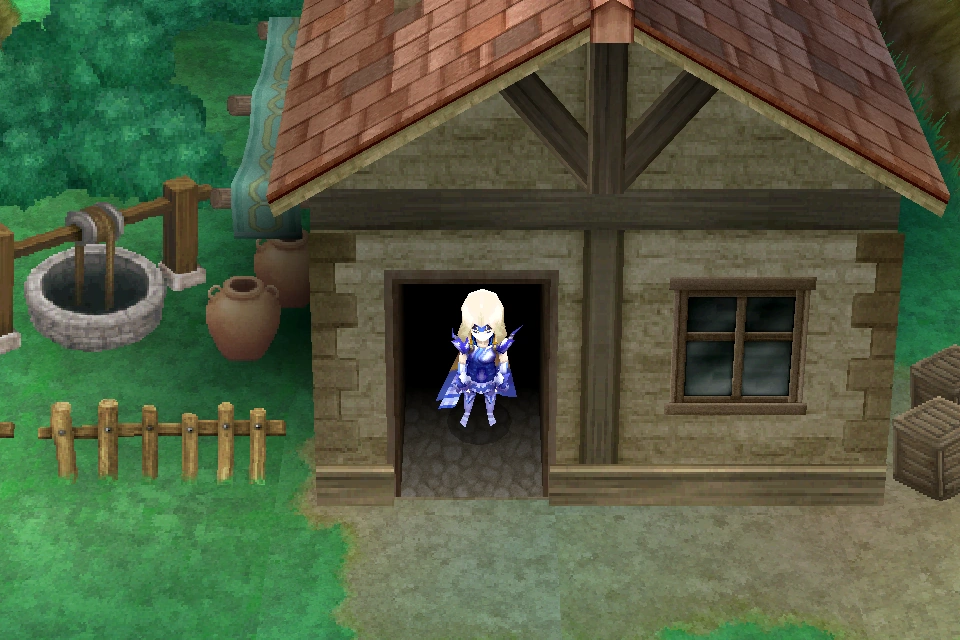

The empty house.
An empty house is found north of the village well. Namingway can be found inside it if the player has obtained the music box in Troia. He demands the very rare Rainbow Pudding.
Items
Final Fantasy IV
- 2D versions
- Hi-Potion
- Antarctic Wind (GBA only)
- 3D versions
- Antarctic Wind
- Cottage
- Gaia Drum
- Hi-Potion
- Phoenix Down
- Potion
Final Fantasy IV: The After Years
- Rydia's Tale
- Potion
- The Crystals
- In Town
- Gaia Drum
- Small Tail
- Underground
- Decoy
- Diamond Armlet
- Ogrekiller
- Golden Apple

Shops
Final Fantasy IV
| 50 gil/night |
| Item | Price | ||
|---|---|---|---|
| SNES | GBA | 3D | |
| Potion | 30 GP | 30 gil | N/A |
| Phoenix Down | 150 GP | 100 gil | N/A |
| Tent | 200 GP | 100 gil | N/A |
| Gysahl Greens | 50 GP | 50 gil | N/A |
| Remedy | 100 GP | N/A | N/A |
| Ether | 10000 GP | N/A | N/A |
| Antidote | N/A | 40 gil | N/A |
| Eye Drops | N/A | 30 gil | N/A |
| Gold Needle | N/A | 400 gil | N/A |
| Maiden's Kiss | N/A | 60 gil | N/A |
| Bomb Fragment | N/A | N/A | 200 gil |
| Zeus's Wrath | N/A | N/A | 200 gil |
| Antarctic Wind | N/A | N/A | 200 gil |
| Bestiary | N/A | N/A | 50 gil |
| Weapon | Price | ||
|---|---|---|---|
| SNES | GBA | 3D | |
| Spear | 60 GP | 60 gil | 60 gil |
| Rod | 100 GP | 100 gil | 100 gil |
| Staff | 160 GP | 160 gil | 160 gil |
| Bow | 220 GP | 220 gil | 220 gil |
| Power Bow | 700 GP | 700 gil | 700 gil |
| Iron Arrows | 10 GP | 10 gil | 50 gil |
| Holy Arrows | 20 GP | 20 gil | 500 gil |
| Boomerang | 3000 GP | 3000 gil | 3000 gil |
| Armor | Price | ||
|---|---|---|---|
| SNES | GBA | 3D | |
| Iron Shield | 100 GP | 100 gil | 100 gil |
| Iron Helm | 150 GP | 150 gil | 150 gil |
| Iron Armor | 600 GP | 600 gil | 600 gil |
| Iron Gloves | 130 GP | 130 gil | 130 gil |
| Iron Armlet | 100 GP | 100 gil | 100 gil |
Final Fantasy IV: The After Years
| Item | Price |
|---|---|
| Potion | 30 gil |
| Hi-Potion | 150 gil |
| Phoenix Down | 100 gil |
| Gold Needle | 400 gil |
| Maiden's Kiss | 60 gil |
| Eye Drops | 30 gil |
| Tent | 100 gil |
| Cottage | 500 gil |
| Item | Price |
|---|---|
| Thunder Rod | 700 gil |
| Dagger | 300 gil |
| Thorn Whip | 3,000 gil |
| Battle Axe | 2,500 gil |
| Fire Arrows | 500 gil |
| Ice Arrows | 500 gil |
| Lightning Arrows | 500 gil |
| Great Bow | 2,000 gil |
| Item | Price |
|---|---|
| Wizard's Hat | 700 gil |
| Sage's Miter | 2,000 gil |
| Sage's Surplice | 1,200 gil |
| Steel Helm | 2,000 gil |
| Chainmail | 2,200 gil |
| Ruby Ring | 1,000 gil |
| Silver Armlet | 650 gil |
| Rune Armlet | 2,000 gil |
Enemies
Final Fantasy IV
Outside
- Rukh, Fledgling Rukh x3
- Rukh, Fledgling Rukh x2
- Ironback x2, Black Lizard x2
- Black Lizard x2, Flamehound x2
- Mors x3
- Mors x4
Final Fantasy IV: The After Years
Rydia's Tale
- Basilisk, Goblin x3
- Bomb x2, Gray Bomb x2
- Bomb x3
- Domovoi x3, Gatlinghog x3
- Gargoyle x2
- Leshy x2
- Tiny Mage x4
- Yellow Jelly x4
The Crystals
- Outside
- Coeurl x2
- Ironback x2
- Black Lizard x3
- Ironback x2, Black Lizard x2
- White Mousse x4
- Ironback, Armadillo, Black Lizard
- Flamehound x2
- Rukh, Fledgling Rukh
- In Town
- Underground
Musical themes
The background music that plays in Agart is the Final Fantasy IV "Town Theme".
In The After Years, when the blue planet invaded in chaos by the True Moon in The Crystals chapter, the track "Castle Damcyan" is played instead.
Other appearances
Final Fantasy Airborne Brigade

Gallery
")
")
")
")
")
")
")
")
")
")
")
")
")
")
")
")
")
")
Etymology
Agartha is a legendary city that is said to reside in the earth's core. It is related to the belief in a hollow earth and is a popular subject in esotericism.